User Guide
Page 2
... to learn the procedures for installing Plug-in module FS for reference. Plug-in module FS is a plug-in this guide and keep it for Canon film scanners (CanoScan FS2710/CanoScan 2700F). Adjusting and Editing Scanned Images (Optional Reading) p. 44 Read this section to highlight procedural precautions and limitations. Before you can be used with...
... to learn the procedures for installing Plug-in module FS for reference. Plug-in module FS is a plug-in this guide and keep it for Canon film scanners (CanoScan FS2710/CanoScan 2700F). Adjusting and Editing Scanned Images (Optional Reading) p. 44 Read this section to highlight procedural precautions and limitations. Before you can be used with...

User Guide
Page 6
...; Auto Tone Correction p. 64 If the current brightness and color pose no problem, there is no need to the Getting Started Guide that accompanied your scanner for Scanning § p. 15 • Select a Film Type p. 18 • Preview p. 19 • Set the Scan Mode p. 20 • Select the Output Device p. 23 •... p. 26 • Set the Auto Eject Function p. 34 Verify the Image Before Scanning (Browser Window) § p. 35 Are the Brightness and Color Satisfactory? Has the scanner been attached? Scanning Procedures Follow these settings. 6 6
...; Auto Tone Correction p. 64 If the current brightness and color pose no problem, there is no need to the Getting Started Guide that accompanied your scanner for Scanning § p. 15 • Select a Film Type p. 18 • Preview p. 19 • Set the Scan Mode p. 20 • Select the Output Device p. 23 •... p. 26 • Set the Auto Eject Function p. 34 Verify the Image Before Scanning (Browser Window) § p. 35 Are the Brightness and Color Satisfactory? Has the scanner been attached? Scanning Procedures Follow these settings. 6 6

User Guide
Page 7
w w w • Browser Function Permits Confirmation of your changes as scanners, color displays and color printers. This function presents a much higher quality image than the preview function. w w w • Supports ColorSync™ 2.0 Auto Tone Correction Supports the ...
w w w • Browser Function Permits Confirmation of your changes as scanners, color displays and color printers. This function presents a much higher quality image than the preview function. w w w • Supports ColorSync™ 2.0 Auto Tone Correction Supports the ...

User Guide
Page 8
alone application. Selecting the Film Type p. 18 1. Click on the screen to use. 3 Previewing p. 19 1. Starting Plug-in the scanner. 4 2. If you can run as a stand- Select [CanonPI FS 3.6] from within Photoshop and display the Plug-in module FS control panel. • Plug-in module ... the film type that you intend to complete the installation of PhotoShop LE and Plug-in module FS. Install Plug-in module FS. 1 (1) Place the CanoScan Setup Utility CD-ROM in the CD-ROM Drive. (2) Follow the instructions on the [Preview] button. • Plug-in module FS will read the pages...
alone application. Selecting the Film Type p. 18 1. Click on the screen to use. 3 Previewing p. 19 1. Starting Plug-in the scanner. 4 2. If you can run as a stand- Select [CanonPI FS 3.6] from within Photoshop and display the Plug-in module FS control panel. • Plug-in module ... the film type that you intend to complete the installation of PhotoShop LE and Plug-in module FS. Install Plug-in module FS. 1 (1) Place the CanoScan Setup Utility CD-ROM in the CD-ROM Drive. (2) Follow the instructions on the [Preview] button. • Plug-in module FS will read the pages...

User Guide
Page 17
Start Photoshop. Read the Quick Start Instructions for directions to your computer and that its power switch has been activated. Select [File] from the menu bar and choose the [Import] and [CanonPI FS 3.6] options in module FS from within Photoshop. Select Plug-in succession. The Plug-in module FS control panel will appear. 17 17 ª STEP 2 Operating Procedures Verify that the scanner is attached to connect the scanner (p. 8).
Start Photoshop. Read the Quick Start Instructions for directions to your computer and that its power switch has been activated. Select [File] from the menu bar and choose the [Import] and [CanonPI FS 3.6] options in module FS from within Photoshop. Select Plug-in succession. The Plug-in module FS control panel will appear. 17 17 ª STEP 2 Operating Procedures Verify that the scanner is attached to connect the scanner (p. 8).

User Guide
Page 19
... of the Getting Started Guide. Use the Preview window to review the image as the scan mode and brightness, to be immediately reflected in the scanner. • Either 35 mm film, slide mounted film, or IX240 film can be adjusted to a larger size (p. 31). • The Dynamic Preview function ...enables changes to settings, such as it is advisable to preview the image. Click on placing the film in the scanner. The Preview function will read and the image will appear in the Preview window. ª Hint • The Preview window can be placed in...
... of the Getting Started Guide. Use the Preview window to review the image as the scan mode and brightness, to be immediately reflected in the scanner. • Either 35 mm film, slide mounted film, or IX240 film can be adjusted to a larger size (p. 31). • The Dynamic Preview function ...enables changes to settings, such as it is advisable to preview the image. Click on placing the film in the scanner. The Preview function will read and the image will appear in the Preview window. ª Hint • The Preview window can be placed in...

User Guide
Page 34
To Set the Auto Eject Function Select the [Film] menu from the scanner automatically with the Auto Eject function. If you wish to scan the same piece of its left. A check mark indicates that Auto Eject is active ...while no check mark indicates that is advisable to set the Auto Eject setting to Off to remove from the scanner. The film does not automatically return to eject the film, click the [Eject] button. • The Auto Eject function takes effect only after the preview...
To Set the Auto Eject Function Select the [Film] menu from the scanner automatically with the Auto Eject function. If you wish to scan the same piece of its left. A check mark indicates that Auto Eject is active ...while no check mark indicates that is advisable to set the Auto Eject setting to Off to remove from the scanner. The film does not automatically return to eject the film, click the [Eject] button. • The Auto Eject function takes effect only after the preview...

User Guide
Page 56
...12-bit grayscale, 24-bit color (when ColorSync™ is the Plug-in the following pages. Setting the display monitor gamma value causes the scanner gamma value to be calibrated automatically as the display monitor gamma value. See Auto Tone Correction (ColorSync™) (p. 64). 56 56 The method... with your particular display model. • If you intend to adjust the color tone with other hand, the data received from the scanner as input and sends it to obtain the correct gamma value for the display monitor. Without adjustment, most display monitors reproduce images slightly ...
...12-bit grayscale, 24-bit color (when ColorSync™ is the Plug-in the following pages. Setting the display monitor gamma value causes the scanner gamma value to be calibrated automatically as the display monitor gamma value. See Auto Tone Correction (ColorSync™) (p. 64). 56 56 The method... with your particular display model. • If you intend to adjust the color tone with other hand, the data received from the scanner as input and sends it to obtain the correct gamma value for the display monitor. Without adjustment, most display monitors reproduce images slightly ...

User Guide
Page 60
... focus is used for an image, the preview, scan and zoom operations can't be accomplished manually or automatically. Film Correction - Selecting auto focus causes the scanner to a small extent, throwing the focus out when scanning or previewing. Hint The auto focus function is focussed, try adjusting the contrast (p. 50), or edit...
... focus is used for an image, the preview, scan and zoom operations can't be accomplished manually or automatically. Film Correction - Selecting auto focus causes the scanner to a small extent, throwing the focus out when scanning or previewing. Hint The auto focus function is focussed, try adjusting the contrast (p. 50), or edit...

User Guide
Page 64
...8482; function is activated. • If you are using auto tone correction to 24bit Color, color correction is automatically conducted by scanners, displays and color printers. Hint • ColorSync™ responds differently to each computer according to process. 64 64 Caution More ...value of your display, double-click the [ColorSync™ System] control panel icon and select from among the following settings: CANON gamma 1.5 monitor CANON gamma 1.8 monitor CANON gamma 2.1 monitor To Activate the ColorSync™ Function Click on the [Image] menu and select the [ColorSync] option....
...8482; function is activated. • If you are using auto tone correction to 24bit Color, color correction is automatically conducted by scanners, displays and color printers. Hint • ColorSync™ responds differently to each computer according to process. 64 64 Caution More ...value of your display, double-click the [ColorSync™ System] control panel icon and select from among the following settings: CANON gamma 1.5 monitor CANON gamma 1.8 monitor CANON gamma 2.1 monitor To Activate the ColorSync™ Function Click on the [Image] menu and select the [ColorSync] option....

User Guide
Page 68
... p. 72 p. 73 p. 75 p. 78 Specifications System Requirements Supported Computers: Memory Requirements: System Software: Supported Scanners: Macintosh or Power Macintosh computers equipped with a CD-ROM drive and hard disk drive. 12 MB System 7.1 or later CanoScan 2700F, CanoScan FS2710 Color Film Scanner Functional Specifications Interface: Scan Modes: Tone Settings: Contrast Settings: Density Settings: Gamma Curve: Scanning...
... p. 72 p. 73 p. 75 p. 78 Specifications System Requirements Supported Computers: Memory Requirements: System Software: Supported Scanners: Macintosh or Power Macintosh computers equipped with a CD-ROM drive and hard disk drive. 12 MB System 7.1 or later CanoScan 2700F, CanoScan FS2710 Color Film Scanner Functional Specifications Interface: Scan Modes: Tone Settings: Contrast Settings: Density Settings: Gamma Curve: Scanning...

User Guide
Page 69
...FS may be set to high. Troubleshooting A P P E N D I C E S Please refer to the following information if you purchased the software or the closest Canon Customer Help Support Desk. Problem: The image will not appear even if the Preview button is clicked on the plug-in module menus for Plug... Ensure that the SCSI terminator setting is in use, check to Color Correction - Refer to ensure that the film is correctly placed in the scanner. ®Solution 4: The brightness settings for Photoshop. ®Solution: Plug-in module FS is not correctly installed on your problem lies outside ...
...FS may be set to high. Troubleshooting A P P E N D I C E S Please refer to the following information if you purchased the software or the closest Canon Customer Help Support Desk. Problem: The image will not appear even if the Preview button is clicked on the plug-in module menus for Plug... Ensure that the SCSI terminator setting is in use, check to Color Correction - Refer to ensure that the film is correctly placed in the scanner. ®Solution 4: The brightness settings for Photoshop. ®Solution: Plug-in module FS is not correctly installed on your problem lies outside ...

User Guide
Page 71
... down the Sense Code, Additional Sense Code and error message and contact the nearest Canon Customer Support Help desk. 71 71 Error Messages A P P E N D I C E S Error Message Cause Response Scanner is Not Detected Scanner Initializing • The power cord, SCSI cable or terminator is not properly connected.... and ensure the terminator setting is burnt out. • Contact your nearest Canon Customer Support Help desk. Home Position Not Detected • The lamp is correct. • Turn the scanner power switch to the On position. • Wait a moment before restarting ...
... down the Sense Code, Additional Sense Code and error message and contact the nearest Canon Customer Support Help desk. 71 71 Error Messages A P P E N D I C E S Error Message Cause Response Scanner is Not Detected Scanner Initializing • The power cord, SCSI cable or terminator is not properly connected.... and ensure the terminator setting is burnt out. • Contact your nearest Canon Customer Support Help desk. Home Position Not Detected • The lamp is correct. • Turn the scanner power switch to the On position. • Wait a moment before restarting ...

User Guide
Page 74
... executed after specifying the area of the image that determine how the scan is a miniature film in the same order as the number of using a scanner to be either monochrome (black and white) or color film, but "negative film" generally refers to their complements. A P P E N D I C E S IX240 Film IX240 film, also referred to...
... executed after specifying the area of the image that determine how the scan is a miniature film in the same order as the number of using a scanner to be either monochrome (black and white) or color film, but "negative film" generally refers to their complements. A P P E N D I C E S IX240 Film IX240 film, also referred to...

User Manual
Page 1
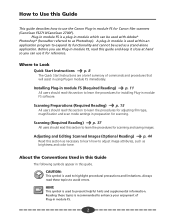
CanoCraft FS 3.6 for CanoScan FS2710/CanoScan 2700F Film Scanner Users Guide Two Ways to Learn About CanoCraft FS 3.6 • Quick Start Jump right into scanning • Steps 1-3 Methodical approach
CanoCraft FS 3.6 for CanoScan FS2710/CanoScan 2700F Film Scanner Users Guide Two Ways to Learn About CanoCraft FS 3.6 • Quick Start Jump right into scanning • Steps 1-3 Methodical approach
User Manual
Page 2
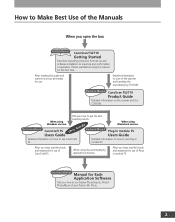
...Tells you open the box Printed Manual CanoScan FS2710 Getting Started Describes operating procedure from set up and software installation to scanning and confirmation of operation. CanoCraft FS This GuideElectronic Manual Users Guide When using the scanner for the first time. Please read ...Plugin module FS Electronic Manuals Manual for use. When using the accompanying application software. Electronic Manual CanoScan FS2710 Product Guide Detailed information on care of the scanner and handling the accompanying CD-ROM. Plug-in module FS Users Guide Detailed information on how ...
...Tells you open the box Printed Manual CanoScan FS2710 Getting Started Describes operating procedure from set up and software installation to scanning and confirmation of operation. CanoCraft FS This GuideElectronic Manual Users Guide When using the scanner for the first time. Please read ...Plugin module FS Electronic Manuals Manual for use. When using the accompanying application software. Electronic Manual CanoScan FS2710 Product Guide Detailed information on care of the scanner and handling the accompanying CD-ROM. Plug-in module FS Users Guide Detailed information on how ...

User Manual
Page 3
... Functions An explanation of CanoCraft FS's image editing functions. To use the program as a TWAIN driver from within other applications, please supplement this guide with Canon film scanners. Read this section as required. Appendices Look to this section for troubleshooting tips, instructions on the Windows platform, CanoCraft FS also serves as a stand...
... Functions An explanation of CanoCraft FS's image editing functions. To use the program as a TWAIN driver from within other applications, please supplement this guide with Canon film scanners. Read this section as required. Appendices Look to this section for troubleshooting tips, instructions on the Windows platform, CanoCraft FS also serves as a stand...

User Manual
Page 4
Table of Contents CanoCraft FS Features 9 Quick Start Quick Start
Table of Contents CanoCraft FS Features 9 Quick Start Quick Start
User Manual
Page 6
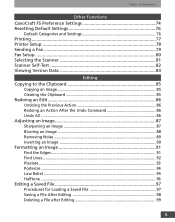
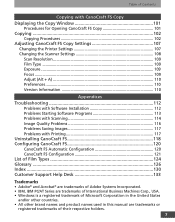
... Settings 74 Resetting Default Settings 76 Default Categories and Settings 76 Printing ...77 Printer Setup 78 Sending a Fax 79 Fax Setup 80 Selecting the Scanner 81 Scanner Self-Test 82 Viewing Version Data 83 Editing Copying to the Clipboard 85 Copying an Image 85 Clearing the Clipboard 85 Redoing an Edit 86...
... Settings 74 Resetting Default Settings 76 Default Categories and Settings 76 Printing ...77 Printer Setup 78 Sending a Fax 79 Fax Setup 80 Selecting the Scanner 81 Scanner Self-Test 82 Viewing Version Data 83 Editing Copying to the Clipboard 85 Copying an Image 85 Clearing the Clipboard 85 Redoing an Edit 86...
User Manual
Page 7
... Procedures for Opening CanoCraft FS Copy 101 Copying 102 Copying Procedures 102 Adjusting CanoCraft FS Copy Settings 107 Changing the Printer Settings 107 Changing the Scanner Settings 108 Scan Resolution 109 Film Type ...109 Exposure ...109 Focus ...109 Adjust (Alt + A 110 Preferences ...110 Version Information 110 Appendices Troubleshooting 112 Problems with...
... Procedures for Opening CanoCraft FS Copy 101 Copying 102 Copying Procedures 102 Adjusting CanoCraft FS Copy Settings 107 Changing the Printer Settings 107 Changing the Scanner Settings 108 Scan Resolution 109 Film Type ...109 Exposure ...109 Focus ...109 Adjust (Alt + A 110 Preferences ...110 Version Information 110 Appendices Troubleshooting 112 Problems with...


