
User Guide
Page 6
... Getting Started Guide that accompanied your scanner for Scanning § p. 15 • Select a Film Type p. 18 • Preview p. 19 • Set the Scan Mode p. 20 • Select the Output Device p. 23 • Set the Magnification p. 24 • Set Preferences p. 26 • Set the Auto Eject Function p. 34 Verify the Image Before Scanning (Browser Window) § p. 35 Are the Brightness and Color Satisfactory? STEP 1 Install the Plug-in module FS Software...
... Getting Started Guide that accompanied your scanner for Scanning § p. 15 • Select a Film Type p. 18 • Preview p. 19 • Set the Scan Mode p. 20 • Select the Output Device p. 23 • Set the Magnification p. 24 • Set Preferences p. 26 • Set the Auto Eject Function p. 34 Verify the Image Before Scanning (Browser Window) § p. 35 Are the Brightness and Color Satisfactory? STEP 1 Install the Plug-in module FS Software...

User Guide
Page 8
...-in module and cannot be previously installed before you intend to start scanning immediately should follow the procedures below. Selecting the Film Type p. 18 1. Quick Start Instructions Those who wish to use. 3 Previewing p. 19 1. Place the film in module FS p. 12 1. Photoshop Ver. 3.0 or later or Photoshop LE pro- Installing Plug-in the scanner. 4 2. alone application. If you require further information at...
...-in module and cannot be previously installed before you intend to start scanning immediately should follow the procedures below. Selecting the Film Type p. 18 1. Quick Start Instructions Those who wish to use. 3 Previewing p. 19 1. Place the film in module FS p. 12 1. Photoshop Ver. 3.0 or later or Photoshop LE pro- Installing Plug-in the scanner. 4 2. alone application. If you require further information at...

User Guide
Page 33
...: 0, Contrast: 0 Color Correction Color Balance 0 Color Correction Tone Curve Straight line Color Balance Threshold 128 ColorSync Off Auto Focus On Auto Eject On Film Type Setting 35 mm Color Neg. Click the [Yes] button to the factory default settings. Enabled Control Panel Position Center Click on the [Preferences] menu in the control panel and select [Resets Default Settings]. The Default Settings dialog box will appear. Unit Pixels Output Device File (2720 dpi) Preview Window Normal Driver after scanning Close Set Exposur Value...
...: 0, Contrast: 0 Color Correction Color Balance 0 Color Correction Tone Curve Straight line Color Balance Threshold 128 ColorSync Off Auto Focus On Auto Eject On Film Type Setting 35 mm Color Neg. Click the [Yes] button to the factory default settings. Enabled Control Panel Position Center Click on the [Preferences] menu in the control panel and select [Resets Default Settings]. The Default Settings dialog box will appear. Unit Pixels Output Device File (2720 dpi) Preview Window Normal Driver after scanning Close Set Exposur Value...

User Guide
Page 70
... not work. ®Solution: Color correction can't be utilized in the Black & White mode or when ColorSync™ is active in the Preview window, the scan button will be scanned. ®Solution 2: The selected area is selected in the color mode. A P P E N D I C E S Problem: The "Insufficient Memory" error message appears when scanning. ®Solution 1: Select the smallest possible area and rescan. ®Solution 2: Lower the resolution and magnification settings...
... not work. ®Solution: Color correction can't be utilized in the Black & White mode or when ColorSync™ is active in the Preview window, the scan button will be scanned. ®Solution 2: The selected area is selected in the color mode. A P P E N D I C E S Problem: The "Insufficient Memory" error message appears when scanning. ®Solution 1: Select the smallest possible area and rescan. ®Solution 2: Lower the resolution and magnification settings...

User Guide
Page 71
.... • Note down the Sense Code, Additional Sense Code and error message and contact the nearest Canon Customer Support Help desk. 71 71 Home Position Not Detected • The lamp is correct. • Turn the scanner power switch to Photoshop. Error Messages A P P E N D I C E S Error Message Cause Response Scanner is Not Detected Scanner Initializing • The power cord, SCSI cable or terminator is not properly connected. • The scanner power switch is set to a unique value not duplicated by...
.... • Note down the Sense Code, Additional Sense Code and error message and contact the nearest Canon Customer Support Help desk. 71 71 Home Position Not Detected • The lamp is correct. • Turn the scanner power switch to Photoshop. Error Messages A P P E N D I C E S Error Message Cause Response Scanner is Not Detected Scanner Initializing • The power cord, SCSI cable or terminator is not properly connected. • The scanner power switch is set to a unique value not duplicated by...
User Guide
Page 76
... L List of film types 72 M Magnification 24 Manipulation function 7 Manual focus 60 Memory 12 Menu bar 16 N Negative film 74 O Operating environment 12 Output device 23 Output device resolution 24 Output device settings dialog box 27 A P P E N D I C E S P PICT 43 Pointer 9 Positive film 74 Preferences 26 Aspect ratio 28 Output device 26 Preview window size 31 Return to default settings 33 Selecting the scan settings 32 Unit 30 Preview 74 Preview window 5, 16 Preview window settings dialog box...
... L List of film types 72 M Magnification 24 Manipulation function 7 Manual focus 60 Memory 12 Menu bar 16 N Negative film 74 O Operating environment 12 Output device 23 Output device resolution 24 Output device settings dialog box 27 A P P E N D I C E S P PICT 43 Pointer 9 Positive film 74 Preferences 26 Aspect ratio 28 Output device 26 Preview window size 31 Return to default settings 33 Selecting the scan settings 32 Unit 30 Preview 74 Preview window 5, 16 Preview window settings dialog box...

User Manual
Page 3
... program starting and file saving, the basic procedures for using CanoCraft FS as required. Read this section as a stand-alone program and TWAIN driver are virtually the same. Be sure to adjust CanoCraft FS settings, a glossary and an index. Step 3 Adjusting Images An explanation of how to adjust color balance and brightness. CanoCraft FS Copy An explanation of how to use with the Windows instruction manual...
... program starting and file saving, the basic procedures for using CanoCraft FS as required. Read this section as a stand-alone program and TWAIN driver are virtually the same. Be sure to adjust CanoCraft FS settings, a glossary and an index. Step 3 Adjusting Images An explanation of how to adjust color balance and brightness. CanoCraft FS Copy An explanation of how to use with the Windows instruction manual...
User Manual
Page 7
... FS Copy Displaying the Copy Window 101 Procedures for Opening CanoCraft FS Copy 101 Copying 102 Copying Procedures 102 Adjusting CanoCraft FS Copy Settings 107 Changing the Printer Settings 107 Changing the Scanner Settings 108 Scan Resolution 109 Film Type ...109 Exposure ...109 Focus ...109 Adjust (Alt + A 110 Preferences ...110 Version Information 110 Appendices Troubleshooting 112 Problems with Software Installation 112 Problems Starting Software Programs 113 Problems with Scanning 114 Image Quality Problems 116 Problems Saving Images 117 Problems with Printing 117...
... FS Copy Displaying the Copy Window 101 Procedures for Opening CanoCraft FS Copy 101 Copying 102 Copying Procedures 102 Adjusting CanoCraft FS Copy Settings 107 Changing the Printer Settings 107 Changing the Scanner Settings 108 Scan Resolution 109 Film Type ...109 Exposure ...109 Focus ...109 Adjust (Alt + A 110 Preferences ...110 Version Information 110 Appendices Troubleshooting 112 Problems with Software Installation 112 Problems Starting Software Programs 113 Problems with Scanning 114 Image Quality Problems 116 Problems Saving Images 117 Problems with Printing 117...

User Manual
Page 9
... need for time-consuming manual color correction. • Help with How to Use the Program is a scanning application that works with CanoScan FS2710 and CanoScan 2700F film scanners on the Windows 95/98 and Windows NT 4.0 platforms. Equipped with a broad array of film being scanned. • Canon ColorGear™ Color Management System The proprietary Canon ColorGear color management system produces consistent results from TWAIN-compliant applications. • Simple User Interface Set the parameters, preview the image, make...
... need for time-consuming manual color correction. • Help with How to Use the Program is a scanning application that works with CanoScan FS2710 and CanoScan 2700F film scanners on the Windows 95/98 and Windows NT 4.0 platforms. Equipped with a broad array of film being scanned. • Canon ColorGear™ Color Management System The proprietary Canon ColorGear color management system produces consistent results from TWAIN-compliant applications. • Simple User Interface Set the parameters, preview the image, make...

User Manual
Page 11
... than a TWAIN driver). • If you require more information about a procedure, consult the pages noted in succession. Insert the film. Electronic Manual 11 CD will display. 3. Click [Install/Uninstall Software] from your CanoScan FS2710/2700F package into the CD-ROM drive. Select a Scanning Method pp. 27-36 Click the [Settings] button, click the [Settings] menu or right-click the settings display area to get you started scanning. •...
... than a TWAIN driver). • If you require more information about a procedure, consult the pages noted in succession. Insert the film. Electronic Manual 11 CD will display. 3. Click [Install/Uninstall Software] from your CanoScan FS2710/2700F package into the CD-ROM drive. Select a Scanning Method pp. 27-36 Click the [Settings] button, click the [Settings] menu or right-click the settings display area to get you started scanning. •...
User Manual
Page 21
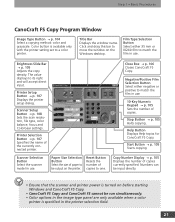
... currently connected printer. Printer Setup Button p. 107 Displays the printer setup dialog. Scanner Setup Button p. 108 Sets the scan resolution, file type, color balance, focus and ColorGear settings. Reset Button Resets the number of copies to a color printer. Stop Button p. 105 Halts copying. Click and drag this bar to its right and will accept direct input. Film Type Selection Button Select either negative or positive to be run simultaneously. • Color options in the image type panel are only available when a color printer is turned...
... currently connected printer. Printer Setup Button p. 107 Displays the printer setup dialog. Scanner Setup Button p. 108 Sets the scan resolution, file type, color balance, focus and ColorGear settings. Reset Button Resets the number of copies to a color printer. Stop Button p. 105 Halts copying. Click and drag this bar to its right and will accept direct input. Film Type Selection Button Select either negative or positive to be run simultaneously. • Color options in the image type panel are only available when a color printer is turned...

User Manual
Page 22
... set with the [Settings] button or the [Film Type] option on the Settings pull-down menu. Color Matching p. 75 The ColorGear color management system can be turned on or off . Adjusting the output magnification value in the display box at the top of the preview window.) Output Resolution p. 34 The output resolution settings can be selected from a TWAIN-compliant application, it is on, no check...
... set with the [Settings] button or the [Film Type] option on the Settings pull-down menu. Color Matching p. 75 The ColorGear color management system can be turned on or off . Adjusting the output magnification value in the display box at the top of the preview window.) Output Resolution p. 34 The output resolution settings can be selected from a TWAIN-compliant application, it is on, no check...
User Manual
Page 23
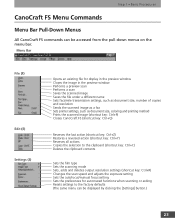
Menu Bar File (F) Edit (E) Settings (S) Opens an existing file for display in the preview window Closes the image in the preview window Performs a preview scan Performs a scan Saves the scanned image Saves the file under a different name Sets facsimile transmission settings, such as document size, number of copies and resolution Sends the scanned image as a fax Sets printer settings, such as document size, coloring and printing method Prints the scanned image (shortcut key: Ctrl+P) Closes CanoCraft FS (shortcut key: Ctrl+Q) Reverses the last action...
Menu Bar File (F) Edit (E) Settings (S) Opens an existing file for display in the preview window Closes the image in the preview window Performs a preview scan Performs a scan Saves the scanned image Saves the file under a different name Sets facsimile transmission settings, such as document size, number of copies and resolution Sends the scanned image as a fax Sets printer settings, such as document size, coloring and printing method Prints the scanned image (shortcut key: Ctrl+P) Closes CanoCraft FS (shortcut key: Ctrl+Q) Reverses the last action...

User Manual
Page 24
... scan area Sharpens the image Softens the image Deletes noise from the image Inverts the colors of the image Finds the edges of the image Finds the vertical and horizontal lines of the image Pixelates the image Posterizes the image Embosses the image Converts the image to halftones Sets the scanner model (in a multiple scanner configuration) Performs a self-test of the scanner Checks the scanner version and SCSI ID Displays an alphabetical list of Help...
... scan area Sharpens the image Softens the image Deletes noise from the image Inverts the colors of the image Finds the edges of the image Finds the vertical and horizontal lines of the image Pixelates the image Posterizes the image Embosses the image Converts the image to halftones Sets the scanner model (in a multiple scanner configuration) Performs a self-test of the scanner Checks the scanner version and SCSI ID Displays an alphabetical list of Help...

User Manual
Page 30
Step 2 • Scanning Selecting the Image Type The image type setting is used . Scans with the CanoScan 2700F model. 30 Scans at the 12-bit grayscale setting, 19.6 megabytes; Scans at the 36-bit color setting yields a file approximately 58 megabytes. Scans with 8-bit grayscale reproduction. A check mark will be selected when the film type is approximately 29 megabytes; at 8-bits per RGB channel when CanoCraft FS is started as a TWAIN driver from a TWAIN-compliant application...
Step 2 • Scanning Selecting the Image Type The image type setting is used . Scans with the CanoScan 2700F model. 30 Scans at the 12-bit grayscale setting, 19.6 megabytes; Scans at the 36-bit color setting yields a file approximately 58 megabytes. Scans with 8-bit grayscale reproduction. A check mark will be selected when the film type is approximately 29 megabytes; at 8-bits per RGB channel when CanoCraft FS is started as a TWAIN driver from a TWAIN-compliant application...

User Manual
Page 70
The default setting for the auto color adjustment function is 'on' so that the scanner can manually adjust the exposure setting (scan speed) for color positives cannot be adjusted with CanoScan 2700F. Exposure Adjustment Dialog Click the [Settings] menu and select [Exposure]. Cancels any adjustments and closes the dialog. Both the exposure and the film type settings need to be adjusted. Click here to adjust the...
The default setting for the auto color adjustment function is 'on' so that the scanner can manually adjust the exposure setting (scan speed) for color positives cannot be adjusted with CanoScan 2700F. Exposure Adjustment Dialog Click the [Settings] menu and select [Exposure]. Cancels any adjustments and closes the dialog. Both the exposure and the film type settings need to be adjusted. Click here to adjust the...

User Manual
Page 100
q q • Always turn on the scanner and printer power q before you start Windows and use CanoCraft FS q Copy with your CanoScan 2700F/FS 2710 film scanner to output scanned images directly to q your printer. q q Use the following procedures to operate the program. Copying with CanoCraft FS Copy q This section explains how to use CanoCraft q FS Copy. • CanoCraft FS Copy and CanoCraft FS cannot be q run simultaneously.
q q • Always turn on the scanner and printer power q before you start Windows and use CanoCraft FS q Copy with your CanoScan 2700F/FS 2710 film scanner to output scanned images directly to q your printer. q q Use the following procedures to operate the program. Copying with CanoCraft FS Copy q This section explains how to use CanoCraft q FS Copy. • CanoCraft FS Copy and CanoCraft FS cannot be q run simultaneously.

User Manual
Page 111
...tips for installing and operating CanoCraft FS and CanoCraft FS Copy. q Operating Environment q Hardware CD-ROM equipped IBM PC/AT compatible Operating System Windows 95, Windows 98, Windows NT 4.0 q Compatible Film Scanners q Performance Specifications Interface Auto Detection of SCSI scanners q Image Types Black and White, 8-bit grayscale, 12-bit grayscale (CanoScan FS2710), 24-bit color, 36-bit color (CanoScan FS2710) q Film Types 35 mm color negatives and positives, 35 mm monochrome, IX240 color negatives and positives, IX240 monochrome q Brightness Settings 256...
...tips for installing and operating CanoCraft FS and CanoCraft FS Copy. q Operating Environment q Hardware CD-ROM equipped IBM PC/AT compatible Operating System Windows 95, Windows 98, Windows NT 4.0 q Compatible Film Scanners q Performance Specifications Interface Auto Detection of SCSI scanners q Image Types Black and White, 8-bit grayscale, 12-bit grayscale (CanoScan FS2710), 24-bit color, 36-bit color (CanoScan FS2710) q Film Types 35 mm color negatives and positives, 35 mm monochrome, IX240 color negatives and positives, IX240 monochrome q Brightness Settings 256...
User Manual
Page 112
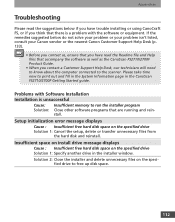
... Information page in the installer window. Setup initialization error message displays Cause : Insufficient free hard disk space on the specified drive Solution 1: Specify another drive in the CanoScan FS2710/2700F Getting Started guide. Solution 2: Close the installer and delete unnecessary files on the speci- Problems with Software Installation Installation is a problem with the software or equipment. If the remedies suggested below do not solve your problem or your problem isn't listed, consult your Canon...
... Information page in the installer window. Setup initialization error message displays Cause : Insufficient free hard disk space on the specified drive Solution 1: Specify another drive in the CanoScan FS2710/2700F Getting Started guide. Solution 2: Close the installer and delete unnecessary files on the speci- Problems with Software Installation Installation is a problem with the software or equipment. If the remedies suggested below do not solve your problem or your problem isn't listed, consult your Canon...

User Manual
Page 117
... 2: File size is not on-line Solution: Place printer on specified disk Solution 1: Specify another disk as the default printer and adjust its settings to handle Solution : Resave at a lower scan resolution. (p. 32) Problems with Printing Printing fails or printing errors Cause 1: Printer not receiving power Solution: Turn the printer power on. Solution 2: Resave after removing files from the disk. Cause 2: Printer is too large for printer different than the connected printer Solution: Select the connected printer as the save location. Appendices Problems Saving Images...
... 2: File size is not on-line Solution: Place printer on specified disk Solution 1: Specify another disk as the default printer and adjust its settings to handle Solution : Resave at a lower scan resolution. (p. 32) Problems with Printing Printing fails or printing errors Cause 1: Printer not receiving power Solution: Turn the printer power on. Solution 2: Resave after removing files from the disk. Cause 2: Printer is too large for printer different than the connected printer Solution: Select the connected printer as the save location. Appendices Problems Saving Images...


