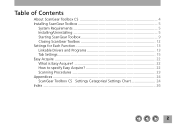
CanoScan D646U Toolbox2.2 for Win Guide
Page 2
Table of Contents About ScanGear Toolbox CS 4 Installing ScanGear Toolbox 5 System Requirements 5 Installing/Uninstalling 5 Starting ScanGear Toolbox 9 Closing ScanGear Toolbox 12 Settings for Each Function 13 Linkable Drivers and Programs 13 Tab Settings 15 Easy Acquire 22 What is Easy Acquire 22 How to specify Easy Acquire 22 Scanning Procedures 23 Appendices 24 ScanGear Toolbox CS Settings Categories/ Settings Chart 24 Index ...26 2
CanoScan D646U Toolbox2.2 for Win Guide
Page 5
When you log on as an Administrator to install/uninstall the software. Before installing ScanGear Toolbox, the scanner driver and the printer driver are those with using the CanoScan Setup Utility CD-ROM bundled with the service. With Windows 2000 Professional, ensure that you... obtain the ScanGear Toolbox through the download service, refer to install. 5 Installing ScanGear Toolbox System Requirements OS: Windows Millennium Edition ...
CanoScan D646U Toolbox2.2 for Win Guide
Page 6
... Toolbox CS will display. Click the [Install the Software] button in the drive. 2. Click the [Start Installation] button. Place the CanoScan Setup Utility CD-ROM in the CD-ROM's menu window. 3. The Install window will automatically be added to proceed with the scanner, if ScanGear Toolbox is already installed, the following procedures below are not...
CanoScan D646U Toolbox2.2 for Win Guide
Page 10
... the image and sends it to the printer. Using the ScanGear Toolbox Toolbar Click the button on the toolbar to use the function are installed using the CanoScan Setup Utility CD-ROM, the bundled application software will be registered. Settings Displays the seting tabs. (P. 15) The conditions to use the function. Copy...
CanoScan D646U Toolbox2.2 for Win Guide
Page 14
When you make installations using CanoScan Setup Utility CD-ROM, the application softwares installed simultaneously are connected to your computer, ScanGear Toolbox can switch between them. Both local and network printers can be scanned, the program started and the ...
CanoScan D646U Toolbox2.2 for Win Guide
Page 20
... can open more than two images. When registering an OCR program that does not support color data, set when a check is turned on from CanoScan Setup Utilitiy CD-ROM are registered in addition to sending it to the registered program. Custom (1, 2, 3) Settings Tab • Show this button... Place a check in this box to display the button for this function on the ScanGear Toolbox toolbar. • Button links The application software installed from the lists. See ScanGear Toolbox CS Settings Categories/Settings Chart (P.24) for a list of the options for the paper size. You can...
CanoScan D646U Toolbox2.2 for Win Guide
Page 26
Index Closing 12 Copy Setting Tab 18 Custom 1-3 Setting Tab 20 Easy Acquire 22 Fax Setting Tab 16 Installing 6 Linkable Drivers and Programs 13 Mail Setting Tab 17 MAPI 13 OCR program 20 Prefs Tab 21 Progress Dialog 23 Save Setting Tab 19 Settings Categories/Chart 24 Shortcut Icon 11 Starting 9 System Requirements 5 Tab Settings 15 Toolbar 10 Uninstalling 7 26
CanoScan D646U Toolbox1.3 for Mac Guide
Page 3
Table of Contents 1 Introduction ...4 About the CanoScan Toolbox ...4 Obtaining Customer Support ...4 2 Installing the CanoScan Toolbox 5 System Requirements...5 Installing the CanoScan Toolbox ...5 3 The CanoScan Toolbox Main Window 6 4 Using the Scanner Button 6 5 Selecting the Scanner ...6 6 Scanning ...7 7 Saving Scanned Images 7 8 Opening Files ...8 Opening a Stored File ...8 Opening a New Image Window ...8 ... an Image to a Catalog...20 Viewing an Image Catalog ...20 Opening a Scanned Image from the Catalog 21 14 Linking Applications to the CanoScan Toolbox 22 CanoScan Toolbox 3
CanoScan D646U Toolbox1.3 for Mac Guide
Page 5
... CD-ROM drive. Follow the on-screen instructions to store scanned images) Installing the CanoScan Toolbox Installing the CanoScan Toolbox is very simple. Inserting the Setup CD-ROM automatically displays the main menu. 2. 2. Installing the CanoScan Toolbox System Requirements The following indicates the minimum CanoScan Toolbox system requirements: Computers: System: Memory Requirements: Hard Disk Space: Power Macintosh...
CanoScan D646U Toolbox1.3 for Mac Guide
Page 7
...drive in Module CS opens so you are ready to save an image that has already been saved on the scanner as indicated in a new CanoScan Toolbox Image window. 6. When you choose JPEG or TIFF formats, an Options dialog box appears so you want to scan. To save the ...scanned image. 7. Saving Scanned Images You can save the image. 3. 6. Click the Scan button to preview the scanning area. 5. The scanning process is installed you can specify the compression level. 4. The Canon Plug-in which you can select your computer, choose the Save command from the File menu. 2.
CanoScan D646U Toolbox1.3 for Mac Guide
Page 17
... select tool. 2. Refer to cut, copy, paste, clear, select all, deselect, and set scanning preferences for its installation and functions. Choose the Clear command. Choose the Cut command. Using Plug-in You can utilize CanoScan Toolbox effectively by using the select tool. 2. Using the Editing Commands The commands on the Edit menu... To reverse the effects of the image: 1. Clear To delete a portion of a command you to the Plug-in the image, choose the Select All command. CanoScan Toolbox 17
CanoScan D646U ScanGear CS-U 6.0 for Win Guide
Page 3
... Glossary Contents Index Chapter 1 Before You Begin 5 Welcome to ScanGear CS-U 6 System Requirements 8 Hardware 8 Software 9 Getting Help in ScanGear CS-U 10 Chapter 2 Installing ScanGear CS-U 11 Installing ScanGear CS-U 12 Installing ScanGear CS-U 13 Uninstalling ScanGear CS-U 19 Chapter 3 Simple Mode and Advanced Mode . 20 What are the Simple Mode and Advanced Mode...
CanoScan D646U ScanGear CS-U 6.0 for Win Guide
Page 8
... Windows 2000 Professional can run • Memory (RAM) required is required to use following scanner with ScanGear CS-U: CanoScan D646U. • IBM PC or its compatible on the hard disk. • Minimum requirement for ScanGear installation • Free disk space, at higher resolution require more recommended) • 10 MB of free disk space...
CanoScan D646U ScanGear CS-U 6.0 for Win Guide
Page 11
2 chapter Top Page Glossary Contents Index Installing ScanGear CS-U Installing ScanGear CS-U Uninstalling ScanGear CS-U 11
CanoScan D646U ScanGear CS-U 6.0 for Win Guide
Page 12
... you log on the following tasks: • Make sure that the computer is equipped with the scanner, there is installed on your computer, uninstall it before you install ScanGear CS-U 6.0. • With Windows 2000 Professional, ensure that you have accomplished the following pages. 12 If you... is connected to a computer. • If a previous version of ScanGear CS is no need to perform the installation procedures described on as an Administrator to install/uninstall the software. For details about enabling the USB port with an enabled USB port. Some computers may require enabling...
CanoScan D646U ScanGear CS-U 6.0 for Win Guide
Page 13
...the [Next] button is selected. If you have attached the scanner to the computer, have the CanoScan Setup CD-ROM at hand and follow the procedures below to install the driver software (ScanGear CS-U). The driver will begin to locate the software for approximately 10 seconds..., then click the [Next] button. If the [Windows was unable to install. chapter 2 Installing ScanGear CS-U Top Page Glossary Contents Index Installing ScanGear CS-U • Windows Millennium Edition (Me) After you selected [Specify the location of the driver] in ...
CanoScan D646U ScanGear CS-U 6.0 for Win Guide
Page 14
When the [Windows has finished installing the new hardware device.] message appears, click the [Finish] button. After you use the multi language CanoScan Setup Utility CDROM. If you have attached the scanner to the computer, have been completely uninstalled and a portion of the driver (...advanced)] and click the [Next] button. 14 Turn the computer on the CanoScan Setup Utility to install the driver software (ScanGear CS-U). 1. Follow the instructions in Step 2 does not appear, ScanGear CS-U may not have the...
CanoScan D646U ScanGear CS-U 6.0 for Win Guide
Page 15
... From the [CANOSCAN] CD-ROM, select the [SCANGEAR] folder followed by the appropriate language folder, and click the [OK] button. 6. When the [Windows has finished installing the new hardware device.] message appears, click the [Finish] button. 15 The driver will begin to install. 8. Confirm ...that it is checked. chapter 2 Installing ScanGear CS-U Top Page Glossary Contents Index 3. Then click the [Browse...
CanoScan D646U ScanGear CS-U 6.0 for Win Guide
Page 16
A brief message will tell you need CanoScan Setup Utility CD-ROM. 1. Then turn on the computer. Click the [Next] button. 16 To perform this procedure to install ScanGear CS-U. Connect the scanner and computer with the USB cable. chapter 2 Installing ScanGear CS-U Top Page Glossary Contents Index • Windows 98 / Windows 2000 Professional Follow this procedure you that an unknown device has been detected, then the Add New Hardware Wizard dialog box opens. 2.
CanoScan D646U ScanGear CS-U 6.0 for Win Guide
Page 17
... Utility CD-ROM, select the "Specify a location:" and click the [Browse] button. Finally click the [Next] button. 17 Insert the CanoScan Setup Utility CD-ROM into the CD-ROM drive. 5. Confirm that the first button is selected (Search for the best driver for Folders dialog, navigate ... the Scangear folder and select the English folder then click the [OK] button. In the Browse for your device) and click the [Next] button. 4. chapter 2 Installing ScanGear CS-U Top Page Glossary Contents Index 3.