
User Manual
Page 2
... Up WordPerfect for Your Printer Setting Up Other Software Applications Software and Printer Compatibility Maintaining the Printer Printer Guidelines Cleaning the Printer Replacing the Ink Cartridge Transporting the Printer Troubleshooting Operational Problems Paper Loading Problems Print Quality Problems Printing Problems Windows Problems Customizing the Printer Factory Default Settings DIP Switch Setting...
... Up WordPerfect for Your Printer Setting Up Other Software Applications Software and Printer Compatibility Maintaining the Printer Printer Guidelines Cleaning the Printer Replacing the Ink Cartridge Transporting the Printer Troubleshooting Operational Problems Paper Loading Problems Print Quality Problems Printing Problems Windows Problems Customizing the Printer Factory Default Settings DIP Switch Setting...

User Manual
Page 4
...Reduction mode The printer offers two reduction modes for printing spreadsheets and other wide documents on regular paper. wide variety of applications: T BJ-10 mode emulates the IBM Proprinter X24E printer T Epson LQ mode emulates the Epson LQ-510 printer Two print modes/speeds The print... simply replace it. It provides detailed information on your computer screen. TrueType Fonts The Canon TrueType Font Pack enhances your font capability and improves your printer. Simple maintenance The replaceable ink cartridge contains both the ink and the print head; when it runs out of ink, ...
...Reduction mode The printer offers two reduction modes for printing spreadsheets and other wide documents on regular paper. wide variety of applications: T BJ-10 mode emulates the IBM Proprinter X24E printer T Epson LQ mode emulates the Epson LQ-510 printer Two print modes/speeds The print... simply replace it. It provides detailed information on your computer screen. TrueType Fonts The Canon TrueType Font Pack enhances your font capability and improves your printer. Simple maintenance The replaceable ink cartridge contains both the ink and the print head; when it runs out of ink, ...
User Manual
Page 5
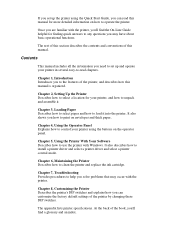
... Provides procedures to the features of the printer by changing these DIP switches. It also describes how to clean the printer and replace the ink cartridge. The rest of this section describes the contents and conventions of the book, you can customize the factory default settings of the printer, and describes...
... Provides procedures to the features of the printer by changing these DIP switches. It also describes how to clean the printer and replace the ink cartridge. The rest of this section describes the contents and conventions of the book, you can customize the factory default settings of the printer, and describes...

User Manual
Page 9
In addition to this chapter for the printer, explains how to install the ink cartridge, and describes how to unpack and set up your printer. Unpacking the Printer Carefully remove all items from the box. If you have already set up your printer using the Quick Start Guide, you may want to scan this User's Manual, you follow to connect the power cord and the interface cable. It offers guidelines for finding a suitable location for the additional information it supplies. Chapter 2 Setting Up the Printer This chapter describes the steps you will find these items in the box:
In addition to this chapter for the printer, explains how to install the ink cartridge, and describes how to unpack and set up your printer. Unpacking the Printer Carefully remove all items from the box. If you have already set up your printer using the Quick Start Guide, you may want to scan this User's Manual, you follow to connect the power cord and the interface cable. It offers guidelines for finding a suitable location for the additional information it supplies. Chapter 2 Setting Up the Printer This chapter describes the steps you will find these items in the box:
User Manual
Page 10
T Canon Bubble Jet Printer BJ-200e T BC-02 ink cartridge T AC power cord T Quick Start Guide T Windows Driver and On-Line Guide diskettes (in envelope) T WordPerfect™ drivers diskette (in shipping, or if any Styrofoam ... move or ship the printer in case you can purchase from your dealer. Open the front cover and remove the tape that secures the ink cartridge holder. As you unpack the printer, save the carton and packing materials in the future. NOTE: In addition to protect the printer during shipping. Remove...
T Canon Bubble Jet Printer BJ-200e T BC-02 ink cartridge T AC power cord T Quick Start Guide T Windows Driver and On-Line Guide diskettes (in envelope) T WordPerfect™ drivers diskette (in shipping, or if any Styrofoam ... move or ship the printer in case you can purchase from your dealer. Open the front cover and remove the tape that secures the ink cartridge holder. As you unpack the printer, save the carton and packing materials in the future. NOTE: In addition to protect the printer during shipping. Remove...

User Manual
Page 14
... of paper for complete information on the operator panel indicate the status of the printer, and identify the print mode you are installing the ink cartridge or adjusting the paper thickness lever. For information about changing the default settings, see Chapter 8, Customizing the Printer. Operator panel Controls the printer and defines...
... of paper for complete information on the operator panel indicate the status of the printer, and identify the print mode you are installing the ink cartridge or adjusting the paper thickness lever. For information about changing the default settings, see Chapter 8, Customizing the Printer. Operator panel Controls the printer and defines...

User Manual
Page 15
Parallel interface port Allows you choose adjusts the distance between the print head and the paper. The setting you to attach the printer's interface cable. AC power receptacle Allows you to install the ink cartridge (as described later in this chapter). There are two settings: left for thick paper or envelopes. Inside the Printer Paper thickness lever Identifies the thickness of your paper. Make sure the lever is set to attach the printer's power cord. Ink cartridge holder Allows you to the left for normal paper and right for printing on normal paper.
Parallel interface port Allows you choose adjusts the distance between the print head and the paper. The setting you to attach the printer's interface cable. AC power receptacle Allows you to install the ink cartridge (as described later in this chapter). There are two settings: left for thick paper or envelopes. Inside the Printer Paper thickness lever Identifies the thickness of your paper. Make sure the lever is set to attach the printer's power cord. Ink cartridge holder Allows you to the left for normal paper and right for printing on normal paper.

User Manual
Page 16
The first step is the only one you may need to change cartridges more often NOTE: Canon makes numerous ink cartridges; the BC-02 is designed specifically for the Bubble Jet Printer BJ-200e and is to your table, with this printer. To avoid spilling ink, follow these precautions: T Do not touch the... print head on your computer. The actual amount varies according to the print density of graphics, you should use the BC-02 ink cartridge with the ...
The first step is the only one you may need to change cartridges more often NOTE: Canon makes numerous ink cartridges; the BC-02 is designed specifically for the Bubble Jet Printer BJ-200e and is to your table, with this printer. To avoid spilling ink, follow these precautions: T Do not touch the... print head on your computer. The actual amount varies according to the print density of graphics, you should use the BC-02 ink cartridge with the ...

User Manual
Page 17
To install the ink cartridge, follow these steps: 1. NOTE: Install the ink cartridge immediately after removing it so you can access the cartridge holder. 2. Grasp the sides of the front cover and open it from the print head and remove the orange tape. Slide off the orange protective cap from its protective packaging. Take the ink cartridge out of children's reach; the ink contains isopropyl alcohol 67-63-0. CAUTION: Keep the ink cartridge out of its protective packaging. 3.
To install the ink cartridge, follow these steps: 1. NOTE: Install the ink cartridge immediately after removing it so you can access the cartridge holder. 2. Grasp the sides of the front cover and open it from the print head and remove the orange tape. Slide off the orange protective cap from its protective packaging. Take the ink cartridge out of children's reach; the ink contains isopropyl alcohol 67-63-0. CAUTION: Keep the ink cartridge out of its protective packaging. 3.

User Manual
Page 18
Locate the cartridge holder on the right side of the mounting base and the film cable that extends from the cartridge holder. 5. Lift the green lock lever on the side of the printer. CAUTION: Avoid touching the yellow mounting base on which you place the cartridge-especially the circuit board on the cartridge holder. 4.
Locate the cartridge holder on the right side of the mounting base and the film cable that extends from the cartridge holder. 5. Lift the green lock lever on the side of the printer. CAUTION: Avoid touching the yellow mounting base on which you place the cartridge-especially the circuit board on the cartridge holder. 4.

User Manual
Page 19
Make sure there is no gap exists between the ink cartridge and cartridge holder. Push the lock lever down .) 7. Fit the ink cartridge over the yellow mounting base with the print head facing down. (When installed correctly, the label on the lock lever, and be sure no resistance when you press on the cartridge will appear upside down until it snaps into place. 6.
Make sure there is no gap exists between the ink cartridge and cartridge holder. Push the lock lever down .) 7. Fit the ink cartridge over the yellow mounting base with the print head facing down. (When installed correctly, the label on the lock lever, and be sure no resistance when you press on the cartridge will appear upside down until it snaps into place. 6.
User Manual
Page 51
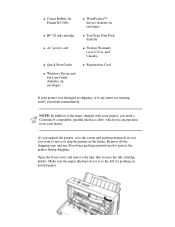
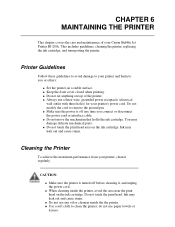
... off any oil or cleanser inside the printer, avoid the area near the print head on top of your printer and harm to your Canon Bubble Jet Printer BJ-200e. T Do not touch the print head area on a stable surface. T When cleaning inside the the printer. T Do not set anything on... wall outlet with three holes) for your printer, clean it , and unplug the power cord. T Do not move the mechanism that holds the ink cartridge. You may damage delicate mechanical parts. Do not modify the cord to clean the printer; This includes guidelines, cleaning the printer, replacing the ink...
... off any oil or cleanser inside the printer, avoid the area near the print head on top of your printer and harm to your Canon Bubble Jet Printer BJ-200e. T Do not touch the print head area on a stable surface. T When cleaning inside the the printer. T Do not set anything on... wall outlet with three holes) for your printer, clean it , and unplug the power cord. T Do not move the mechanism that holds the ink cartridge. You may damage delicate mechanical parts. Do not modify the cord to clean the printer; This includes guidelines, cleaning the printer, replacing the ink...

User Manual
Page 52
..., you may damage the surface of the printer with a soft cloth moistened with water. Clean especially well around the platen area. 2. Each ink cartridge can print about 200 to 500 letter-size pages (700,000 characters) in water. T Do not submerge the printer in HQ mode and 800 to change... cartridges more often. Replacing the Ink Cartridge You use the BC-02 ink cartridge with volatile liquids, such as thinners or benzine, or any other spray spray...
..., you may damage the surface of the printer with a soft cloth moistened with water. Clean especially well around the platen area. 2. Each ink cartridge can print about 200 to 500 letter-size pages (700,000 characters) in water. T Do not submerge the printer in HQ mode and 800 to change... cartridges more often. Replacing the Ink Cartridge You use the BC-02 ink cartridge with volatile liquids, such as thinners or benzine, or any other spray spray...

User Manual
Page 53
... sure to clean the print head before determining that are gaps in the printer. CAUTION: The Bubble Jet Printer BJ-200e was designed to replace the cartridge. (The print head cleaning procedure is described in Chapter 2, Setting Up the Printer, and later in this chapter.) NOTE: Print head... cleaning is not crisp and clear, or there are caused by using the cartridge for over one you should use. Using the BC-01 cartridge will be used exclusively with Canon ink cartridges. T Your printed output is not a routine maintenance procedure. Other inks may damage the print head...
... sure to clean the print head before determining that are gaps in the printer. CAUTION: The Bubble Jet Printer BJ-200e was designed to replace the cartridge. (The print head cleaning procedure is described in Chapter 2, Setting Up the Printer, and later in this chapter.) NOTE: Print head... cleaning is not crisp and clear, or there are caused by using the cartridge for over one you should use. Using the BC-01 cartridge will be used exclusively with Canon ink cartridges. T Your printed output is not a routine maintenance procedure. Other inks may damage the print head...
User Manual
Page 54
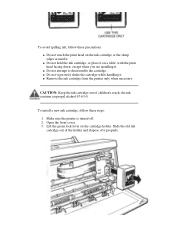
...the ink contains isopropyl alcohol 67-63-0. T Do not vigorously shake the cartridge while handling it properly. Open the front cover. 3. T Do not hold the ink cartridge, or place it on the cartridge holder. CAUTION: Keep the ink cartridge out of it . Lift the green lock lever on a table, ... except when you are installing it. Slide the old ink cartridge out of the holder and dispose of children's reach; T Do not attempt to disassemble the cartridge. Make sure the printer is turned off. 2. T Remove the ink cartridge from the printer only when necessary. To avoid spilling ink...
...the ink contains isopropyl alcohol 67-63-0. T Do not vigorously shake the cartridge while handling it properly. Open the front cover. 3. T Do not hold the ink cartridge, or place it on the cartridge holder. CAUTION: Keep the ink cartridge out of it . Lift the green lock lever on a table, ... except when you are installing it. Slide the old ink cartridge out of the holder and dispose of children's reach; T Do not attempt to disassemble the cartridge. Make sure the printer is turned off. 2. T Remove the ink cartridge from the printer only when necessary. To avoid spilling ink...

User Manual
Page 55
Slide off the orange protective cap from its protective packaging. Fit the ink cartridge over the yellow mounting base with the print head facing down. (When installed correctly, the label on the cartridge will be upside down.) 4. Take the new ink cartridge out of its protective packaging. 5. NOTE: Install the ink cartridge immediately after removing it from the print head and then remove the orange tape.
Slide off the orange protective cap from its protective packaging. Fit the ink cartridge over the yellow mounting base with the print head facing down. (When installed correctly, the label on the cartridge will be upside down.) 4. Take the new ink cartridge out of its protective packaging. 5. NOTE: Install the ink cartridge immediately after removing it from the print head and then remove the orange tape.

User Manual
Page 56
Push the lock lever down until it snaps into place. When secure, the ink cartridge makes contact with the circuit board inside the cartridge holder. Make sure there is no resistance when you place the cartridge--especially the circuit board on the lock lever, and be sure no gap exists between the ink cartridge and cartridge holder. CAUTION: Avoid touching the yellow mounting base on which you press on the side of the mounting base and the film cable that extends from the cartridge holder. 6.
Push the lock lever down until it snaps into place. When secure, the ink cartridge makes contact with the circuit board inside the cartridge holder. Make sure there is no resistance when you place the cartridge--especially the circuit board on the lock lever, and be sure no gap exists between the ink cartridge and cartridge holder. CAUTION: Avoid touching the yellow mounting base on which you press on the side of the mounting base and the film cable that extends from the cartridge holder. 6.

User Manual
Page 57
... the POWER button to turn off . The printer automatically cleans the print head when you are not using the printer, make sure the ink cartridge is in its home position, which is turned on and on the right side of the printer. When complete, the ON LINE indicator stops... blinking and goes off the printer. Make sure the printer is on -line. 2. NOTE: Cleaning the print head consumes a small amount of the cartridge. This ensures that the printer moves the print head to resume printing. Repeating this procedure unnecessarily reduces the life of ink. Press ON LINE to...
... the POWER button to turn off . The printer automatically cleans the print head when you are not using the printer, make sure the ink cartridge is in its home position, which is turned on and on the right side of the printer. When complete, the ON LINE indicator stops... blinking and goes off the printer. Make sure the printer is on -line. 2. NOTE: Cleaning the print head consumes a small amount of the cartridge. This ensures that the printer moves the print head to resume printing. Repeating this procedure unnecessarily reduces the life of ink. Press ON LINE to...

User Manual
Page 58
... take care when transporting it is not capped correctly. Detach the interface cable and the power cord. 4. Storing Ink Cartridges Follow these steps: 1. Transporting the Printer NOTE: While the Bubble Jet Printer BJ-200e is small and compact, it is not a portable printer and you want to store it, follow these guidelines...
... take care when transporting it is not capped correctly. Detach the interface cable and the power cord. 4. Storing Ink Cartridges Follow these steps: 1. Transporting the Printer NOTE: While the Bubble Jet Printer BJ-200e is small and compact, it is not a portable printer and you want to store it, follow these guidelines...
User Manual
Page 59
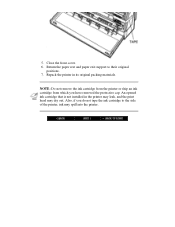
5. NOTE: Do not remove the ink cartridge from the printer or ship an ink cartridge from which you do not tape the ink cartridge to their original positions. 7. An opened ink cartridge that is not installed in its original packing materials. Close the front cover. 6. Repack the printer in the printer may leak, and the print head may spill into the printer. Also, if you have removed the protective cap. Return the paper rest and paper exit support to the side of the printer, ink may dry out.
5. NOTE: Do not remove the ink cartridge from the printer or ship an ink cartridge from which you do not tape the ink cartridge to their original positions. 7. An opened ink cartridge that is not installed in its original packing materials. Close the front cover. 6. Repack the printer in the printer may leak, and the print head may spill into the printer. Also, if you have removed the protective cap. Return the paper rest and paper exit support to the side of the printer, ink may dry out.


