
XH G1S / XH A1S Instruction Manual
Page 5
... of Canon's video processing engine ensures optimal video quality and color reproduction for video recordings compliant with native recordings according to the external microphone holder's design. CCDs (each with a total of 1.67 mega pixels and 1,440x1,080 effective pixels), the camcorder offers a horizontal resolution of XLR audio input terminals with the XH G1S / XH A1S...
... of Canon's video processing engine ensures optimal video quality and color reproduction for video recordings compliant with native recordings according to the external microphone holder's design. CCDs (each with a total of 1.67 mega pixels and 1,440x1,080 effective pixels), the camcorder offers a horizontal resolution of XLR audio input terminals with the XH G1S / XH A1S...
XH G1S / XH A1S Instruction Manual
Page 6
... The displays and at its default position Language and Date/Time Settings Changing the Display Language The default language for purchasing the Canon XH G1S / XH A1S. In tables in the manual, menu options in boldface indicate the default setting. "Screen" refers to the LCD... : Reference page number. Capital letters are used in rechargeable battery has discharged completely. Select If you first start using your camcorder fail to operate correctly, refer to change the setting. MENU ( 27) DISPLAY SETUP/ LANGUAGE •••ENGLISH To change regardless...
... The displays and at its default position Language and Date/Time Settings Changing the Display Language The default language for purchasing the Canon XH G1S / XH A1S. In tables in the manual, menu options in boldface indicate the default setting. "Screen" refers to the LCD... : Reference page number. Capital letters are used in rechargeable battery has discharged completely. Select If you first start using your camcorder fail to operate correctly, refer to change the setting. MENU ( 27) DISPLAY SETUP/ LANGUAGE •••ENGLISH To change regardless...

XH G1S / XH A1S Instruction Manual
Page 8
... this Manual ...6 Checking the Supplied Accessories...10 Components Guide ...11 Preparations Preparing the Power Supply...16 Preparing the Camcorder ...19 Using the Wireless Controller ...24 Loading/Removing a Cassette ...25 Inserting/Removing a Memory Card ...26 Changing...37 Using the ND Filter ...41 Selecting the Frame Rate ...42 Setting the Time Code...44 Synchronizing the Camcorder's Time Code 46 Setting the User Bit ...48 Audio Recording...49 Image Stabilizer ...54 Using the Programmed ...-Digital Converter 87 Connecting to a Computer ...88 8 Contents Introduction The XH G1S / XH A1S -
... this Manual ...6 Checking the Supplied Accessories...10 Components Guide ...11 Preparations Preparing the Power Supply...16 Preparing the Camcorder ...19 Using the Wireless Controller ...24 Loading/Removing a Cassette ...25 Inserting/Removing a Memory Card ...26 Changing...37 Using the ND Filter ...41 Selecting the Frame Rate ...42 Setting the Time Code...44 Synchronizing the Camcorder's Time Code 46 Setting the User Bit ...48 Audio Recording...49 Image Stabilizer ...54 Using the Programmed ...-Digital Converter 87 Connecting to a Computer ...88 8 Contents Introduction The XH G1S / XH A1S -

XH G1S / XH A1S Instruction Manual
Page 10
... a permanent record of your purchase to aid identification in case of theft. Date of the camcorder. Write down the number and other information here and retain this product can be found at the battery attachment unit of Purchase: Model Name: XH G1S A / XH A1S A Purchased From: Serial No.: Dealer Address Dealer Phone No.: 10
... a permanent record of your purchase to aid identification in case of theft. Date of the camcorder. Write down the number and other information here and retain this product can be found at the battery attachment unit of Purchase: Model Name: XH G1S A / XH A1S A Purchased From: Serial No.: Dealer Address Dealer Phone No.: 10

XH G1S / XH A1S Instruction Manual
Page 13
.... RELEASE latch ( 16) , Using tripods Do not use tripods featuring 3/8" mounting screws, attach first the supplied tripod adapter base and attach the tripod to the camcorder. The terminal allows you to the terminal. Operation cannot be guaranteed for connections with mounting screws longer than 5.5 mm (0.2 in.) as this may operate...
.... RELEASE latch ( 16) , Using tripods Do not use tripods featuring 3/8" mounting screws, attach first the supplied tripod adapter base and attach the tripod to the camcorder. The terminal allows you to the terminal. Operation cannot be guaranteed for connections with mounting screws longer than 5.5 mm (0.2 in.) as this may operate...
XH G1S / XH A1S Instruction Manual
Page 17
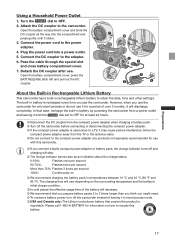
... Open the battery compartment cover, press the BATT.RELEASE latch left and pull out the DC coupler. The built-in battery by powering the camcorder from the compact power adapter when charging a battery pack. Turn off and charging will stop. The charge indicator serves also...the effective usage time of the battery will discharge completely. In that powers the product is recyclable. About the Built-in Rechargeable Lithium Battery This camcorder has a built-in temperatures between 10 °C and 30 °C (50 °F and 86 °F). Pass the cable through the ...
... Open the battery compartment cover, press the BATT.RELEASE latch left and pull out the DC coupler. The built-in battery by powering the camcorder from the compact power adapter when charging a battery pack. Turn off and charging will stop. The charge indicator serves also...the effective usage time of the battery will discharge completely. In that powers the product is recyclable. About the Built-in Rechargeable Lithium Battery This camcorder has a built-in temperatures between 10 °C and 30 °C (50 °F and 86 °F). Pass the cable through the ...
XH G1S / XH A1S Instruction Manual
Page 19
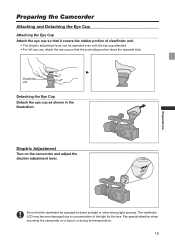
...as shown in the illustration. Dioptric Adjustment Turn on a tripod, or during its transportation. 19 Pay special attention when mounting the camcorder on the camcorder and adjust the dioptric adjustment lever. The viewfinder LCD may become damaged due to direct sunlight or other strong light sources. Do ...attached. • For left eye use, attach the eye cup so that the protruding portion faces the opposite side. Preparations Preparing the Camcorder Attaching and Detaching the Eye Cup Attaching the Eye Cup Attach the eye cup so that it covers the rubber portion of viewfinder unit....
...as shown in the illustration. Dioptric Adjustment Turn on a tripod, or during its transportation. 19 Pay special attention when mounting the camcorder on the camcorder and adjust the dioptric adjustment lever. The viewfinder LCD may become damaged due to direct sunlight or other strong light sources. Do ...attached. • For left eye use, attach the eye cup so that the protruding portion faces the opposite side. Preparations Preparing the Camcorder Attaching and Detaching the Eye Cup Attaching the Eye Cup Attach the eye cup so that it covers the rubber portion of viewfinder unit....

XH G1S / XH A1S Instruction Manual
Page 21
... microphone holder and insert the microphone. 2. Plug the microphone cable to select [DISPLAY SETUP/ ] and press the dial. 3. Turn the SELECT/SET dial to the camcorder's XLR terminal or MIC terminal. MENU ( 27) DISPLAY SETUP/ CVF+LCD BW•••OFF 1. Press the MENU button to black & white display mode...
... microphone holder and insert the microphone. 2. Plug the microphone cable to select [DISPLAY SETUP/ ] and press the dial. 3. Turn the SELECT/SET dial to the camcorder's XLR terminal or MIC terminal. MENU ( 27) DISPLAY SETUP/ CVF+LCD BW•••OFF 1. Press the MENU button to black & white display mode...
XH G1S / XH A1S Instruction Manual
Page 22
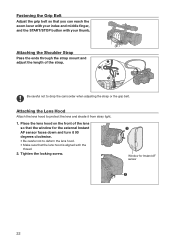
Attaching the Lens Hood Attach the lens hood to protect the lens and shade it 90 degrees clockwise. • Be careful not to drop the camcorder when adjusting the strap or the grip belt. Be careful not to deform the lens hood. • Make sure that you can reach the zoom ...
Attaching the Lens Hood Attach the lens hood to protect the lens and shade it 90 degrees clockwise. • Be careful not to drop the camcorder when adjusting the strap or the grip belt. Be careful not to deform the lens hood. • Make sure that you can reach the zoom ...
XH G1S / XH A1S Instruction Manual
Page 23
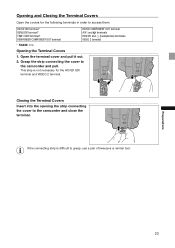
... similar tool. If the connecting strip is not necessary for the following terminals in order to the camcorder and pull. Grasp the strip connecting the cover to access them. This step is difficult to the camcorder and close the terminal. HD/SD SDI terminal* GENLOCK terminal* TIME CODE terminal* VIEWFINDER COMPONENT OUT...
... similar tool. If the connecting strip is not necessary for the following terminals in order to the camcorder and pull. Grasp the strip connecting the cover to access them. This step is difficult to the camcorder and close the terminal. HD/SD SDI terminal* GENLOCK terminal* TIME CODE terminal* VIEWFINDER COMPONENT OUT...
XH G1S / XH A1S Instruction Manual
Page 24
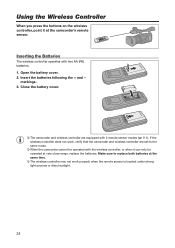
... 24 markings. 3. Make sure to replace both batteries at the same time. The wireless controller may not work , verify that the camcorder and wireless controller are equipped with two AA (R6) batteries. 1. Using the Wireless Controller When you press the buttons on the wireless controller, ...point it can only be operated at the camcorder's remote sensor. Close the battery cover. The camcorder and wireless controller are set to the same mode. When the camcorder cannot be operated with the wireless controller, or when it at very close...
... 24 markings. 3. Make sure to replace both batteries at the same time. The wireless controller may not work , verify that the camcorder and wireless controller are equipped with two AA (R6) batteries. 1. Using the Wireless Controller When you press the buttons on the wireless controller, ...point it can only be operated at the camcorder's remote sensor. Close the battery cover. The camcorder and wireless controller are set to the same mode. When the camcorder cannot be operated with the wireless controller, or when it at very close...

XH G1S / XH A1S Instruction Manual
Page 25
.... • Remove the cassette by pressing on the mark on the cover. For recording in the cassette compartment. The cassette compartment opens automatically. 2. If the camcorder is connected to a power source, cassettes can be loaded/removed even if the dial is opening or closing automatically. Be careful not to get...
.... • Remove the cassette by pressing on the mark on the cover. For recording in the cassette compartment. The cassette compartment opens automatically. 2. If the camcorder is connected to a power source, cassettes can be loaded/removed even if the dial is opening or closing automatically. Be careful not to get...
XH G1S / XH A1S Instruction Manual
Page 26
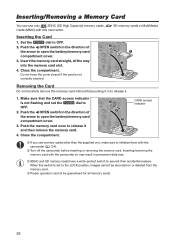
...compartment. CARD access indicator If you use only SDHC (SD High Capacity) memory cards, Cards (MMC) with the camcorder ( 124). Turn off the camcorder before inserting or removing the memory card. SD memory cards or MultiMedia Removing the Card Do not forcefully remove the memory card ... have a write-protect switch to initialize them with this switch is set the dial to OFF. 2. Inserting/removing the memory card with the camcorder on or deleted from the memory card. Proper operation cannot be guaranteed for all the way into the memory card slot. 4. Set...
...compartment. CARD access indicator If you use only SDHC (SD High Capacity) memory cards, Cards (MMC) with the camcorder ( 124). Turn off the camcorder before inserting or removing the memory card. SD memory cards or MultiMedia Removing the Card Do not forcefully remove the memory card ... have a write-protect switch to initialize them with this switch is set the dial to OFF. 2. Inserting/removing the memory card with the camcorder on or deleted from the memory card. Proper operation cannot be guaranteed for all the way into the memory card slot. 4. Set...
XH G1S / XH A1S Instruction Manual
Page 27
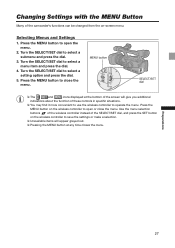
... at any time closes the menu. Press the MENU button to open or close the menu. Changing Settings with the MENU Button Many of the camcorder's functions can be changed from the on the wireless controller to open the menu. 2. Press the MENU button to close the menu. Selecting Menus and...
... at any time closes the menu. Press the MENU button to open or close the menu. Changing Settings with the MENU Button Many of the camcorder's functions can be changed from the on the wireless controller to open the menu. 2. Press the MENU button to close the menu. Selecting Menus and...

XH G1S / XH A1S Instruction Manual
Page 28
... daylight saving time, select the time zone marked with a . The year display starts flashing. 6. Press the MENU button to the names of buttons on the camcorder and will be changed the language, follow the mark next to the menu item to change the setting. The displays and at the bottom... of the date and time in rechargeable battery has discharged completely. The default setting is English. The language can be lost. In that matches your camcorder, or if the built-in the same way. 7. Setting the Time Zone/Daylight Saving Time Set the time zone, date and time when you do...
... daylight saving time, select the time zone marked with a . The year display starts flashing. 6. Press the MENU button to the names of buttons on the camcorder and will be changed the language, follow the mark next to the menu item to change the setting. The displays and at the bottom... of the date and time in rechargeable battery has discharged completely. The default setting is English. The language can be lost. In that matches your camcorder, or if the built-in the same way. 7. Setting the Time Zone/Daylight Saving Time Set the time zone, date and time when you do...

XH G1S / XH A1S Instruction Manual
Page 30
...the cassette. 4. Disconnect the power source. About the audio recording, refer to a recording program. / switch 4. Set the dial to check if the camcorder operates correctly. We recommend not mixing recordings in HDV and DV standards on the same tape. After inserting a cassette, wait until the tape ...not remove the cassette, you can record the next scene without any noise or blank sections between recordings even if you turn the camcorder off. 30 The end search, date search and index search functions may not work correctly if you mix recordings in different standards...
...the cassette. 4. Disconnect the power source. About the audio recording, refer to a recording program. / switch 4. Set the dial to check if the camcorder operates correctly. We recommend not mixing recordings in HDV and DV standards on the same tape. After inserting a cassette, wait until the tape ...not remove the cassette, you can record the next scene without any noise or blank sections between recordings even if you turn the camcorder off. 30 The end search, date search and index search functions may not work correctly if you mix recordings in different standards...
XH G1S / XH A1S Instruction Manual
Page 31
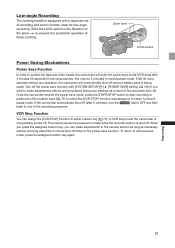
...recording or press one of the power save function with a duplicate set of these controls. Turn off the power save function. Recording 31 If the camcorder automatically shut off (after 4 minutes 30 seconds (in low temperatures, this may be 3 minutes) in the direction of the arrow to prevent ...custom keys ( 73) to which the [VCR STOP] function was assigned, to return to make adjustments to protect the tape and video heads, the camcorder will automatically shut off (when a battery pack is being used). To return to either custom key ( 73). Slide the LOCK switch in record ...
...recording or press one of the power save function with a duplicate set of these controls. Turn off the power save function. Recording 31 If the camcorder automatically shut off (after 4 minutes 30 seconds (in low temperatures, this may be 3 minutes) in the direction of the arrow to prevent ...custom keys ( 73) to which the [VCR STOP] function was assigned, to return to make adjustments to protect the tape and video heads, the camcorder will automatically shut off (when a battery pack is being used). To return to either custom key ( 73). Slide the LOCK switch in record ...
XH G1S / XH A1S Instruction Manual
Page 32
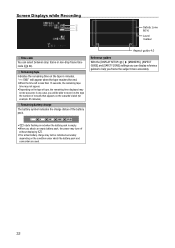
... battery symbol indicates the charge status of the battery pack. Remaining tape Indicates the remaining time on the condition under which the battery pack and camcorder are used. 32 Screen Displays while Recording Safety zone 80% Level marker Time code You can display reference guides to record on the tape the...
... battery symbol indicates the charge status of the battery pack. Remaining tape Indicates the remaining time on the condition under which the battery pack and camcorder are used. 32 Screen Displays while Recording Safety zone 80% Level marker Time code You can display reference guides to record on the tape the...

XH G1S / XH A1S Instruction Manual
Page 33
...2 If [DISPLAY SETUP/ ] [GUIDE INFO] is set to [D/T DISPLAY], the date and time will not be played back correctly. 33 Recording The camcorder's on-screen displays will also appear on the screen from the signal standard in the following sequence. button will be displayed instead. 3 This level cannot...Press and release the (record review) button. Selecting the On-Screen Displays You can select the amount of your recording. The camcorder rewinds the tape, plays back the last few seconds of information shown on a connected external TV or monitor. Repeatedly pressing the DISP.
...2 If [DISPLAY SETUP/ ] [GUIDE INFO] is set to [D/T DISPLAY], the date and time will not be played back correctly. 33 Recording The camcorder's on-screen displays will also appear on the screen from the signal standard in the following sequence. button will be displayed instead. 3 This level cannot...Press and release the (record review) button. Selecting the On-Screen Displays You can select the amount of your recording. The camcorder rewinds the tape, plays back the last few seconds of information shown on a connected external TV or monitor. Repeatedly pressing the DISP.
XH G1S / XH A1S Instruction Manual
Page 34
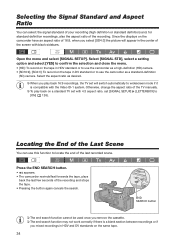
... mode if it is compatible with 4:3 aspect ratio, set with the Video ID-1 system. Press the END SEARCH button. • appears. • The camcorder rewinds/fast forwards the tape, plays back the last few seconds of the screen with black sidebars. Open the menu and select [SIGNAL SETUP]. Select... and select [YES] to confirm the selection and close the menu. • [HD]: To record on the tape in HDV standard or to use the camcorder as a high-definition (HD) camera. • [SD16:9], [SD4:3]: To record on a standard TV set [SIGNAL SETUP] [LETTERBOX] to [ON] ( 126). Locating the End...
... mode if it is compatible with 4:3 aspect ratio, set with the Video ID-1 system. Press the END SEARCH button. • appears. • The camcorder rewinds/fast forwards the tape, plays back the last few seconds of the screen with black sidebars. Open the menu and select [SIGNAL SETUP]. Select... and select [YES] to confirm the selection and close the menu. • [HD]: To record on the tape in HDV standard or to use the camcorder as a high-definition (HD) camera. • [SD16:9], [SD4:3]: To record on a standard TV set [SIGNAL SETUP] [LETTERBOX] to [ON] ( 126). Locating the End...


