
User Manual
Page 2
... is connected. - FCC REGULATIONS (For 120 V/220-240 V models) Document Scanner, Model M11037 This device complies with the limits for radio noise emissions from that promotes energy saving through the use of the FCC Rules. Note: This equipment has been tested and found to stop operation of the FCC Rules. However, there is an open system in a residential installation. If such changes or...
... is connected. - FCC REGULATIONS (For 120 V/220-240 V models) Document Scanner, Model M11037 This device complies with the limits for radio noise emissions from that promotes energy saving through the use of the FCC Rules. Note: This equipment has been tested and found to stop operation of the FCC Rules. However, there is an open system in a residential installation. If such changes or...

User Manual
Page 6
... 37 Using the Scanner 38 Documents ...38 Setting Up the Paper Feed Tray and the Document Eject Tray 39 Installing the Document Eject Guide 41 Loading a Document for Scanning 43 Automatic Feeding 43 Manual Feeding ...46 Scanning Folio (Folded Documents 47 Patch Code Sheets 48 About Patch Code Sheets 48 Functions of Patch Code Sheets 49 Using Patch Code Sheets 49 Effective Area for Detecting Patch Code Patterns 50 Clearing a Paper Jam 51 Regular Maintenance 54 Cleaning the Scanner 54 Cleaning the Scanning Glass and the Rollers 55 Troubleshooting 56 Specifications ...63...
... 37 Using the Scanner 38 Documents ...38 Setting Up the Paper Feed Tray and the Document Eject Tray 39 Installing the Document Eject Guide 41 Loading a Document for Scanning 43 Automatic Feeding 43 Manual Feeding ...46 Scanning Folio (Folded Documents 47 Patch Code Sheets 48 About Patch Code Sheets 48 Functions of Patch Code Sheets 49 Using Patch Code Sheets 49 Effective Area for Detecting Patch Code Patterns 50 Clearing a Paper Jam 51 Regular Maintenance 54 Cleaning the Scanner 54 Cleaning the Scanning Glass and the Rollers 55 Troubleshooting 56 Specifications ...63...

User Manual
Page 11
... to specify a color for the scanner to omit from scanned images. (This correction is made by the ISIS/TWAIN driver.) ■ Deskew The deskew function automatically straightens an image if the document was loaded askew. (This correction is made by the ISIS/TWAIN driver.) ■ Advanced Text Enhancement The scanner is equipped with an "Advanced Text Enhancement" mode that allows you to clearly scan text printed on a dark...
... to specify a color for the scanner to omit from scanned images. (This correction is made by the ISIS/TWAIN driver.) ■ Deskew The deskew function automatically straightens an image if the document was loaded askew. (This correction is made by the ISIS/TWAIN driver.) ■ Advanced Text Enhancement The scanner is equipped with an "Advanced Text Enhancement" mode that allows you to clearly scan text printed on a dark...

User Manual
Page 12
... adjusted image to the application software, without needing to scan the document again. (This function is implemented by the ISIS/TWAIN driver.) ■ Auto Start The scanner is equipped with an auto start function that automatically initiates scanning when a document is placed in the document feed port. (This function is implemented by the ISIS/TWAIN driver.) ■ Compatible with Carbonless Duplicating Paper The scanner is able to scan carbonless duplicating paper. ■ Power-saving Feature The scanner has a power-saving feature...
... adjusted image to the application software, without needing to scan the document again. (This function is implemented by the ISIS/TWAIN driver.) ■ Auto Start The scanner is equipped with an auto start function that automatically initiates scanning when a document is placed in the document feed port. (This function is implemented by the ISIS/TWAIN driver.) ■ Compatible with Carbonless Duplicating Paper The scanner is able to scan carbonless duplicating paper. ■ Power-saving Feature The scanner has a power-saving feature...
User Manual
Page 17
... memory. ● Use a SCSI board recommended for use with the scanner. Installing the Scanner Installation Requirements In order to use the DR-3080CII, your operating system IMPORTANT ● If you may experience problems such as a slower scanning speed. For details on the updated driver, contact your local authorized Canon dealer. ● If your CPU, memory or SCSI board does not meet the recommended specifications, you are connecting the scanner via USB 2.0 • Microsoft Windows...
... memory. ● Use a SCSI board recommended for use with the scanner. Installing the Scanner Installation Requirements In order to use the DR-3080CII, your operating system IMPORTANT ● If you may experience problems such as a slower scanning speed. For details on the updated driver, contact your local authorized Canon dealer. ● If your CPU, memory or SCSI board does not meet the recommended specifications, you are connecting the scanner via USB 2.0 • Microsoft Windows...

User Manual
Page 25
...'s CD-ROM drive. 4. When the power indicator lights green, the scanner is the letter assigned to your local authorized Canon dealer or service representative to proceed with the installation. ● If you are using Windows 98, the "Add New Hardware Wizard" dialog box appears. 1. Click the Next button. 6. Select "Search for the best driver for your PC, Windows Plug and Play automatically displays a screen prompting...
...'s CD-ROM drive. 4. When the power indicator lights green, the scanner is the letter assigned to your local authorized Canon dealer or service representative to proceed with the installation. ● If you are using Windows 98, the "Add New Hardware Wizard" dialog box appears. 1. Click the Next button. 6. Select "Search for the best driver for your PC, Windows Plug and Play automatically displays a screen prompting...

User Manual
Page 26
.... 1. Select "Search for my device (recommended)" and then click the Next button to proceed to the "Locate Driver Files" screen. 3. Click the Finish button in the "Hardware Installation" dialog box. Load the setup disc into the computer's CD-ROM drive. 5. Click the Next button. 5. Click the Next button to proceed to the Found New Hardware Wizard" screen, select "Install from a list or specific location (Advanced)", and then click...
.... 1. Select "Search for my device (recommended)" and then click the Next button to proceed to the "Locate Driver Files" screen. 3. Click the Finish button in the "Hardware Installation" dialog box. Load the setup disc into the computer's CD-ROM drive. 5. Click the Next button. 5. Click the Next button to proceed to the Found New Hardware Wizard" screen, select "Install from a list or specific location (Advanced)", and then click...

User Manual
Page 28
... PC. Install this application if necessary. IMPORTANT If you install this scanner to be sure to open and read the Readme.txt file on which version of Windows you are using . Turn on as a user with the scanner contains the following software: ● ISIS/TWAIN driver This driver allows this ISIS/TWAIN driver. Windows starts. IMPORTANT If another ISIS-compatible driver is a TWAIN-compatible software application. The driver must be installed in the PC's CD-ROM drive. 26 Installing the Software
... PC. Install this application if necessary. IMPORTANT If you install this scanner to be sure to open and read the Readme.txt file on which version of Windows you are using . Turn on as a user with the scanner contains the following software: ● ISIS/TWAIN driver This driver allows this ISIS/TWAIN driver. Windows starts. IMPORTANT If another ISIS-compatible driver is a TWAIN-compatible software application. The driver must be installed in the PC's CD-ROM drive. 26 Installing the Software

User Manual
Page 29
Follow the instructions on the screen and complete the installation. 6. In the Open box, type "D:\Driver\Setup.exe" (where "D" is the letter assigned to your CD-ROM drive) and then click the OK button. The Run dialog box appears. 4. Note Installing the ISIS/TWAIN driver creates the following shortcuts in the Start menu: Installing the Software 27 On the Start menu, click Run. The Installer starts. 5. 3. Restart Windows when you have completed the installation.
Follow the instructions on the screen and complete the installation. 6. In the Open box, type "D:\Driver\Setup.exe" (where "D" is the letter assigned to your CD-ROM drive) and then click the OK button. The Run dialog box appears. 4. Note Installing the ISIS/TWAIN driver creates the following shortcuts in the Start menu: Installing the Software 27 On the Start menu, click Run. The Installer starts. 5. 3. Restart Windows when you have completed the installation.

User Manual
Page 30
See "Help" for the ISIS/TWAIN Driver for separating files without interrupting scanning. (See "Patch Code Sheets" on p.35) DR-3080CII Shading Tool Use this tool to launch the scanning application. Canon DR-3080CII Help Online Help for the ISIS/TWAIN driver. (See "Using the ISIS/TWAIN Driver" on p.48) Scan Panel The scan panel resides in the task tray after restarting Windows. Scan Panel 28 Installing the Software Use it to calibrate the scanner if scanned images contain lines or abnormal colors. (See p.62) PATCH x(xx) (Patch Code Sample Sheet) Patch Code Sheets are sheets printed ...
See "Help" for the ISIS/TWAIN Driver for separating files without interrupting scanning. (See "Patch Code Sheets" on p.35) DR-3080CII Shading Tool Use this tool to launch the scanning application. Canon DR-3080CII Help Online Help for the ISIS/TWAIN driver. (See "Using the ISIS/TWAIN Driver" on p.48) Scan Panel The scan panel resides in the task tray after restarting Windows. Scan Panel 28 Installing the Software Use it to calibrate the scanner if scanned images contain lines or abnormal colors. (See p.62) PATCH x(xx) (Patch Code Sample Sheet) Patch Code Sheets are sheets printed ...

User Manual
Page 34
... log on the screen and complete the installation process. 32 Installing the Software On the Start menu, click Run. Follow the instructions on as a user with administrator privileges. 2. Windows starts. Load the setup disc in the PC's CD-ROM drive. 3. The Run dialog box appears. 4. Turn on your CD-ROM drive) and then click the OK button. IMPORTANT If you are using Windows NT 4.0 Workstation, Windows 2000 Professional, or...
... log on the screen and complete the installation process. 32 Installing the Software On the Start menu, click Run. Follow the instructions on as a user with administrator privileges. 2. Windows starts. Load the setup disc in the PC's CD-ROM drive. 3. The Run dialog box appears. 4. Turn on your CD-ROM drive) and then click the OK button. IMPORTANT If you are using Windows NT 4.0 Workstation, Windows 2000 Professional, or...
User Manual
Page 40
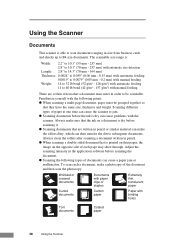
... automatic feeding 11 to B4 size documents. The scannable size range is printed on thin paper, the image on a document is dry can cause problems with manual feeding There are written in pencil or similar material can cause the scanner to jam. ● Scanning documents before the ink is dry before scanning the document. ● Scanning the following points: ● When scanning a multi-page document, pages must meet in order to subsequent documents. Using the Scanner Documents This scanner...
... automatic feeding 11 to B4 size documents. The scannable size range is printed on thin paper, the image on a document is dry can cause problems with manual feeding There are written in pencil or similar material can cause the scanner to jam. ● Scanning documents before the ink is dry before scanning the document. ● Scanning the following points: ● When scanning a multi-page document, pages must meet in order to subsequent documents. Using the Scanner Documents This scanner...

User Manual
Page 47
... scanning operation. ● Note that documents that the document is scanning, resolve the problem, make sure that are wearing a necktie or have long hair. Perform the scanning operation in the scanner correctly. Note Before starting a scan, make sure that the scanned image of the document eject tray. 7. Note ● If the paper feed operation stops due to the document eject tray) and then close the paper feed tray and the document eject tray extension. Using the Scanner 45 Adjust the paper side guides...
... scanning operation. ● Note that documents that the document is scanning, resolve the problem, make sure that are wearing a necktie or have long hair. Perform the scanning operation in the scanner correctly. Note Before starting a scan, make sure that the scanned image of the document eject tray. 7. Note ● If the paper feed operation stops due to the document eject tray) and then close the paper feed tray and the document eject tray extension. Using the Scanner 45 Adjust the paper side guides...

User Manual
Page 50
... printed on the sheet is recognized, the sheet functions as a Patch Code Sheet, and a file separator is necessary. 48 Using the Scanner Click the [Start] button in the form of Patch Code Sheets: [PATCH II (A4)], [PATCH II (LTR)], [PATCH T (A4)], and [PATCH T (LTR)]. For details, also refer to use them. Note ● This section briefly describes how to the ISIS/TWAIN Driver Help. ● Note that documents...
... printed on the sheet is recognized, the sheet functions as a Patch Code Sheet, and a file separator is necessary. 48 Using the Scanner Click the [Start] button in the form of Patch Code Sheets: [PATCH II (A4)], [PATCH II (LTR)], [PATCH T (A4)], and [PATCH T (LTR)]. For details, also refer to use them. Note ● This section briefly describes how to the ISIS/TWAIN Driver Help. ● Note that documents...

User Manual
Page 62
... the scanner correctly connected to feed properly. Cause Action Attempting to scan a document of a document failing to the PC? ● Has the scanner driver been installed? ● Has the application software been installed correctly? Clean the rollers as described on page 37. Check each possible cause. For precautions concerning documents, refer to a system error, turn the scanner off, wait at least 10 seconds, and then turn the scanner back on page 51. 60 Troubleshooting...
... the scanner correctly connected to feed properly. Cause Action Attempting to scan a document of a document failing to the PC? ● Has the scanner driver been installed? ● Has the application software been installed correctly? Clean the rollers as described on page 37. Check each possible cause. For precautions concerning documents, refer to a system error, turn the scanner off, wait at least 10 seconds, and then turn the scanner back on page 51. 60 Troubleshooting...

User Manual
Page 63
... application software is not supported by the application software. Attempting to the application software instruction manual. If scanned images are dirty. Reinstall the scanning driver or the application software. Some application software may yield abnormal scanning results. Try scanning without using functions such as automatically detecting the paper size or changing the scanning mode/resolution through the scan panel. Check the scanning-related settings, such as described on the images, or if there is some other problem with scanned images...
... application software is not supported by the application software. Attempting to the application software instruction manual. If scanned images are dirty. Reinstall the scanning driver or the application software. Some application software may yield abnormal scanning results. Try scanning without using functions such as automatically detecting the paper size or changing the scanning mode/resolution through the scan panel. Check the scanning-related settings, such as described on the images, or if there is some other problem with scanned images...

User Manual
Page 64
... vertical lines appearing on scanned images. Adjustment sheet After loading the adjustment sheet, click the [Start] button in the direction illustrated. Note that accompanies the scanner. CAUTION Always clean the scanning glass before calibrating the scanner (see "Cleaning the Scanning Glass and Rollers" on the screen to calibrate the scanner while the scanning glass is displayed. Load it into the scanner with the arrow pointing in Windows, select [Programs] - [Canon DR-3080CII] then click [DR-3080CII Shading Tool]. Attempting to calibrate the scanner. 62 Specifications
... vertical lines appearing on scanned images. Adjustment sheet After loading the adjustment sheet, click the [Start] button in the direction illustrated. Note that accompanies the scanner. CAUTION Always clean the scanning glass before calibrating the scanner (see "Cleaning the Scanning Glass and Rollers" on the screen to calibrate the scanner while the scanning glass is displayed. Load it into the scanner with the arrow pointing in Windows, select [Programs] - [Canon DR-3080CII] then click [DR-3080CII Shading Tool]. Attempting to calibrate the scanner. 62 Specifications
User Manual
Page 68
... Rollers 55 Scanner 54 Connections Power cord 22 SCSI 15, 19 USB 2.0 15, 21 D DIP switches position 14, 20 Document eject guide attachment 41 Document eject tray extension opening 40 position 13 Document positioning mark adjustment 43 position 13 Documents feeding 43 paper jam 51 stacking limit marks 44 DR-3080CII cleaning 54 I Installation location 5 Interface boards SCSI boards 18 USB 2.0 interface board 18 ISIS/TWAIN Driver 35 Install 26 Uninstall 29 M Maintenance 54 P Paper jam cleaning 51 Paper side guides adjustment 43 position 13 Patch Code Sheets...
... Rollers 55 Scanner 54 Connections Power cord 22 SCSI 15, 19 USB 2.0 15, 21 D DIP switches position 14, 20 Document eject guide attachment 41 Document eject tray extension opening 40 position 13 Document positioning mark adjustment 43 position 13 Documents feeding 43 paper jam 51 stacking limit marks 44 DR-3080CII cleaning 54 I Installation location 5 Interface boards SCSI boards 18 USB 2.0 interface board 18 ISIS/TWAIN Driver 35 Install 26 Uninstall 29 M Maintenance 54 P Paper jam cleaning 51 Paper side guides adjustment 43 position 13 Patch Code Sheets...

Easy Start Guide
Page 1
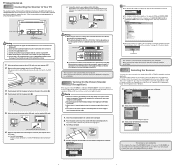
... service representative. In a Windows 98SE/Me/2000/XP environment, if you connect the scanner and turn the scanner OFF. Click [Finish] to the menu screen. Click [Back] to return to complete the installation. Gently close the upper unit. The scanner is a registered trademark of Canon Inc. Check the destination folder for CapturePerfect 3.0 appears. 8. DR-3080CII Scanner Power Cord USB Cable Document Scanner Document Eject Guide Auxiliary Paper Support Plate Easy Start Guide (This Manual) User's Guide Quick Reference Guide DR-3080CII Setup Disc The DR-3080CII Setup...
... service representative. In a Windows 98SE/Me/2000/XP environment, if you connect the scanner and turn the scanner OFF. Click [Finish] to the menu screen. Click [Back] to return to complete the installation. Gently close the upper unit. The scanner is a registered trademark of Canon Inc. Check the destination folder for CapturePerfect 3.0 appears. 8. DR-3080CII Scanner Power Cord USB Cable Document Scanner Document Eject Guide Auxiliary Paper Support Plate Easy Start Guide (This Manual) User's Guide Quick Reference Guide DR-3080CII Setup Disc The DR-3080CII Setup...
Easy Start Guide
Page 2
... not support the USB interface. Plug the power cord into the power outlet (2). 5. This section explains the procedure for each application. Scan Panel The scanner is now complete This completes the setup of the scanner (1). 4. For details, refer to unplug it with "CapturePerfect 3.0". Select [Canon DR-3080CII] and click [OK]. Use a SCSI connection with the scanner. Check the connection between the scanner and the computer. 2. Power indicator Power Switch On Position 4. Windows recognizes the DR-3080CII...
... not support the USB interface. Plug the power cord into the power outlet (2). 5. This section explains the procedure for each application. Scan Panel The scanner is now complete This completes the setup of the scanner (1). 4. For details, refer to unplug it with "CapturePerfect 3.0". Select [Canon DR-3080CII] and click [OK]. Use a SCSI connection with the scanner. Check the connection between the scanner and the computer. 2. Power indicator Power Switch On Position 4. Windows recognizes the DR-3080CII...


