
DC310/DC320 Instruction Manual
Page 3
... be hazardous. 7 Avoid magnetic or electric fields - See figure 1. 3 Unplug this product near water or in this manual. 6 Accessories - Do not use the camera close to the Canon DVD Camcorder DC320/DC310 A and all its accessories. 1 Read Instructions - The product should be cleaned only as they are not sure of the type of...
... be hazardous. 7 Avoid magnetic or electric fields - See figure 1. 3 Unplug this product near water or in this manual. 6 Accessories - Do not use the camera close to the Canon DVD Camcorder DC320/DC310 A and all its accessories. 1 Read Instructions - The product should be cleaned only as they are not sure of the type of...

DC310/DC320 Instruction Manual
Page 10
...TV Screen 62 Copying your Recordings to an External Video Recorder Additional Information 63 Appendix: Menu Options Lists 63 FUNC. Menu 63 Setup menus 65 Camera Setup (Advanced Zoom, Image Stabilizer, etc.) 66 Disc Operations (Initialization, Finalization etc.) 67 Still Image Operations (Card Initialization, etc.) 67 ... 70 Trouble? 70 Troubleshooting 73 List of Messages 76 Do's and Don'ts 76 Handling Precautions 80 Using the Camcorder Abroad 81 General Information 81 System Diagram 82 Optional Accessories 85 Product Codes 86 Specifications 89 Index 10 • Table of contents
...TV Screen 62 Copying your Recordings to an External Video Recorder Additional Information 63 Appendix: Menu Options Lists 63 FUNC. Menu 63 Setup menus 65 Camera Setup (Advanced Zoom, Image Stabilizer, etc.) 66 Disc Operations (Initialization, Finalization etc.) 67 Still Image Operations (Card Initialization, etc.) 67 ... 70 Trouble? 70 Troubleshooting 73 List of Messages 76 Do's and Don'ts 76 Handling Precautions 80 Using the Camcorder Abroad 81 General Information 81 System Diagram 82 Optional Accessories 85 Product Codes 86 Specifications 89 Index 10 • Table of contents
DC310/DC320 Instruction Manual
Page 11
Buttons and switches to start recording until you use the camcorder and retain it for purchasing the Canon DC320/DC310. For example [ON], [OFF]. "Scene" refers to one movie unit from the point you press Start/Stop to be set, the type... within a "button" frame. Introduction • 11 About this Manual Thank you for future reference. Should your camcorder fail to operate correctly, refer to menu options as they are simulated pictures taken with a still camera. • Note that unless indicated otherwise, screenshots and illustrations in this manual refer to the LCD and...
Buttons and switches to start recording until you use the camcorder and retain it for purchasing the Canon DC320/DC310. For example [ON], [OFF]. "Scene" refers to one movie unit from the point you press Start/Stop to be set, the type... within a "button" frame. Introduction • 11 About this Manual Thank you for future reference. Should your camcorder fail to operate correctly, refer to menu options as they are simulated pictures taken with a still camera. • Note that unless indicated otherwise, screenshots and illustrations in this manual refer to the LCD and...

DC310/DC320 Instruction Manual
Page 14
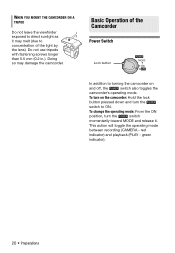
..., 58) Dioptric adjustment lever ( 30) Viewfinder ( 30) QUICK START button and standby lamp ( 32) PLAY mode indicator (green) ( 21) CAMERA mode indicator (red) ( 21) OPEN (disc cover) switch ( 26) Start/Stop button ( 29) DC IN terminal ( 19) Serial number/ Battery attachment unit ( 18) RESET button ( 70) LCD screen ( 25) Zoom lever ( 31...
..., 58) Dioptric adjustment lever ( 30) Viewfinder ( 30) QUICK START button and standby lamp ( 32) PLAY mode indicator (green) ( 21) CAMERA mode indicator (red) ( 21) OPEN (disc cover) switch ( 26) Start/Stop button ( 29) DC IN terminal ( 19) Serial number/ Battery attachment unit ( 18) RESET button ( 70) LCD screen ( 25) Zoom lever ( 31...

DC310/DC320 Instruction Manual
Page 19
... of 0 °C to 40 °C (32 °F to 104 °F), the charging will not start. • Do not connect to the camcorder's DC IN terminal or to the compact power adapter any electrical equipment that you prepare battery packs to last 2 to 3 times longer than 50% charged. •...; We recommend that is updated on aircraft and ships, DC-AC inverters, etc. Be sure to wait until the PLAY and CAMERA mode indicators are completely off the camcorder before connecting or disconnecting the compact power adapter.
... of 0 °C to 40 °C (32 °F to 104 °F), the charging will not start. • Do not connect to the camcorder's DC IN terminal or to the compact power adapter any electrical equipment that you prepare battery packs to last 2 to 3 times longer than 50% charged. •...; We recommend that is updated on aircraft and ships, DC-AC inverters, etc. Be sure to wait until the PLAY and CAMERA mode indicators are completely off the camcorder before connecting or disconnecting the compact power adapter.
DC310/DC320 Instruction Manual
Page 20
Doing so may melt (due to ON. To turn on and off, the switch also toggles the camcorder's operating mode. This action will toggle the operating mode between recording (CAMERA - Do not use tripods with fastening screws longer than 5.5 mm (0.2 in.). red indicator) and playback (PLAY ...- To change the operating mode: From the ON position, turn the switch to concentration of the Camcorder Power Switch Lock button In ...
Doing so may melt (due to ON. To turn on and off, the switch also toggles the camcorder's operating mode. This action will toggle the operating mode between recording (CAMERA - Do not use tripods with fastening screws longer than 5.5 mm (0.2 in.). red indicator) and playback (PLAY ...- To change the operating mode: From the ON position, turn the switch to concentration of the Camcorder Power Switch Lock button In ...
DC310/DC320 Instruction Manual
Page 29
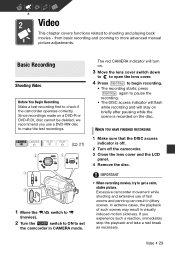
The red CAMERA indicator will stay on . 3 Move the lens cover switch down to to open the lens cover. 4 Press Start/Stop to begin recording. • The recording starts; press Start/Stop again to set the camcorder in visually induced motion sickness. In extreme cases, the playback of fast ...zooms and panning can result in jittery scenes. If you use of such scenes may result in CAMERA mode. Video • 29 Since recordings made on the ...
The red CAMERA indicator will stay on . 3 Move the lens cover switch down to to open the lens cover. 4 Press Start/Stop to begin recording. • The recording starts; press Start/Stop again to set the camcorder in visually induced motion sickness. In extreme cases, the playback of fast ...zooms and panning can result in jittery scenes. If you use of such scenes may result in CAMERA mode. Video • 29 Since recordings made on the ...

DC310/DC320 Instruction Manual
Page 31
...54 min. 60 min. 108 min. Refer to the table in the NOTES section. [DIGITAL] (2000x) When this option is selected, the camcorder will switch to obtain a larger zoom range without any deterioration in image quality. When recording movies with a brand new DVD disc (on the ...camcorder processes the image digitally to digital zoom (light blue area on the zoom indicator) when you zoom in beyond the optical zoom range (white area on the disc. The following table gives approximate recording times with a 16:9 aspect ratio, the field of the scenes. FUNC. ( 22) FUNC. [ MENU] [ CAMERA...
...54 min. 60 min. 108 min. Refer to the table in the NOTES section. [DIGITAL] (2000x) When this option is selected, the camcorder will switch to obtain a larger zoom range without any deterioration in image quality. When recording movies with a brand new DVD disc (on the ...camcorder processes the image digitally to digital zoom (light blue area on the zoom indicator) when you zoom in beyond the optical zoom range (white area on the disc. The following table gives approximate recording times with a 16:9 aspect ratio, the field of the scenes. FUNC. ( 22) FUNC. [ MENU] [ CAMERA...

DC310/DC320 Instruction Manual
Page 32
... faster zooms. With this option, the zoom speed will be faster in .). In standby mode the camcorder consumes only about half the power used when recording, saving energy when you press QUICK START the camcorder enters the standby mode. NOTES The fastest zoom speed can focus on a subject as close as 1 cm... 32 • Video Move it toward T to zoom in T Move the zoom lever toward W to [ OFF] (4:3) 55x, Not available Selecting the Zoom Speed FUNC. [ MENU] [ CAMERA SETUP] [ZOOM SPEED] Desired option FUNC.
... faster zooms. With this option, the zoom speed will be faster in .). In standby mode the camcorder consumes only about half the power used when recording, saving energy when you press QUICK START the camcorder enters the standby mode. NOTES The fastest zoom speed can focus on a subject as close as 1 cm... 32 • Video Move it toward T to zoom in T Move the zoom lever toward W to [ OFF] (4:3) 55x, Not available Selecting the Zoom Speed FUNC. [ MENU] [ CAMERA SETUP] [ZOOM SPEED] Desired option FUNC.

DC310/DC320 Instruction Manual
Page 36
... you are using a DVD-RW disc, you can select the data to be displayed. On-Screen Displays (Data Code) The camcorder keeps a data code containing the date and time and other camera data (shutter speed, aperture, etc.) registered at the time of the switch or the / switch while the scene is being...
... you are using a DVD-RW disc, you can select the data to be displayed. On-Screen Displays (Data Code) The camcorder keeps a data code containing the date and time and other camera data (shutter speed, aperture, etc.) registered at the time of the switch or the / switch while the scene is being...

DC310/DC320 Instruction Manual
Page 37
The contents to the sidebar on the screen. 2 Data code: Time, date and camera data at the time of a sunset or a fireworks display becomes as easy as selecting a Special Scene recording program. ( 21) Additional Functions Additional Functions : Special Scene ...
The contents to the sidebar on the screen. 2 Data code: Time, date and camera data at the time of a sunset or a fireworks display becomes as easy as selecting a Special Scene recording program. ( 21) Additional Functions Additional Functions : Special Scene ...

DC310/DC320 Instruction Manual
Page 40
... For a brighter picture, we recommend keeping a distance of about 20 cm 60 cm (8 in completely dark places. Use the viewfinder instead. The camcorder starts recording video ( mode) or takes a still image ( mode) after a 10-second countdown. LCD Video Light You can press Start/Stop ... • appears. • Set [SELF TIMER] to 3 Press Start/Stop on the screen. FUNC. [ MENU] [ CAMERA SETUP] [SELF TIMER] [ ON ] 2 Press FUNC. The countdown appears on the camcorder to record in . - 2 ft.) from the subject and/ or using the [ NIGHT] recording program. When you can ...
... For a brighter picture, we recommend keeping a distance of about 20 cm 60 cm (8 in completely dark places. Use the viewfinder instead. The camcorder starts recording video ( mode) or takes a still image ( mode) after a 10-second countdown. LCD Video Light You can press Start/Stop ... • appears. • Set [SELF TIMER] to 3 Press Start/Stop on the screen. FUNC. [ MENU] [ CAMERA SETUP] [SELF TIMER] [ ON ] 2 Press FUNC. The countdown appears on the camcorder to record in . - 2 ft.) from the subject and/ or using the [ NIGHT] recording program. When you can ...
DC310/DC320 Instruction Manual
Page 51
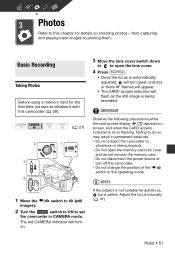
...focus is automatically adjusted, will turn green and one or more AF frames will appear. • The CARD access indicator will turn off the camcorder. - NOTES If the subject is not suitable for details on shooting photos - IMPORTANT Observe the following precautions while the card access display (... ) appears on screen, and when the CARD access indicator is being recorded. Do not subject the camcorder to open the memory card slot cover and do so may result in CAMERA mode. Do not change the position of the / switch or the operating mode. Basic Recording Basic Recording...
...focus is automatically adjusted, will turn green and one or more AF frames will appear. • The CARD access indicator will turn off the camcorder. - NOTES If the subject is not suitable for details on shooting photos - IMPORTANT Observe the following precautions while the card access display (... ) appears on screen, and when the CARD access indicator is being recorded. Do not subject the camcorder to open the memory card slot cover and do so may result in CAMERA mode. Do not change the position of the / switch or the operating mode. Basic Recording Basic Recording...

DC310/DC320 Instruction Manual
Page 57
...where you want it . Automatic Focus Priority When the focus priority is fixed on the memory card. FUNC. ( 22) FUNC. [ MENU] [ CAMERA SETUP] [FOCUS PRI.] Desired option FUNC. CONTINUOUS SHOOTING/ HIGH-SPEED CONTINUOUS SHOOTING Press Start/Stop and hold the button pressed. A series of the nine... frames available are automatically selected and the focus is activated, the camcorder records a still image only after the focus has been adjusted automatically. ( 21) POINTS TO CHECK Mode switch at : You can also select...
...where you want it . Automatic Focus Priority When the focus priority is fixed on the memory card. FUNC. ( 22) FUNC. [ MENU] [ CAMERA SETUP] [FOCUS PRI.] Desired option FUNC. CONTINUOUS SHOOTING/ HIGH-SPEED CONTINUOUS SHOOTING Press Start/Stop and hold the button pressed. A series of the nine... frames available are automatically selected and the focus is activated, the camcorder records a still image only after the focus has been adjusted automatically. ( 21) POINTS TO CHECK Mode switch at : You can also select...

DC310/DC320 Instruction Manual
Page 63
For details about how to select an item, refer to Using the Menus ( 22). Menu Menu item Setting options CAMERA PLAY Recording programs1 [ PROGRAM AE], z z - - 37 [ SHUTTER-PRIO.AE], [ PORTRAIT], [ SPORTS], [ NIGHT], [ SNOW], [ BEACH], [ SUNSET], [ SPOTLIGHT], [ FIREWORKS] White balance1 [ AUTO], [ DAYLIGHT], [ TUNGSTEN], [ SET] z z - - 42 Image ...
For details about how to select an item, refer to Using the Menus ( 22). Menu Menu item Setting options CAMERA PLAY Recording programs1 [ PROGRAM AE], z z - - 37 [ SHUTTER-PRIO.AE], [ PORTRAIT], [ SPORTS], [ NIGHT], [ SNOW], [ BEACH], [ SUNSET], [ SPOTLIGHT], [ FIREWORKS] White balance1 [ AUTO], [ DAYLIGHT], [ TUNGSTEN], [ SET] z z - - 42 Image ...

DC310/DC320 Instruction Manual
Page 64
z - 36 - - Menu (cont.) Menu item Setting options CAMERA PLAY Still image size/quality Size: - z - 46 - - z - 46 - - z 54 - - - z 58 - - - z - 46 - - z 60 1 Option available only when the mode switch is set to . 2 Option available only ...
z - 36 - - Menu (cont.) Menu item Setting options CAMERA PLAY Still image size/quality Size: - z - 46 - - z - 46 - - z 54 - - - z 58 - - - z - 46 - - z 60 1 Option available only when the mode switch is set to . 2 Option available only ...

DC310/DC320 Instruction Manual
Page 65
...you press DISP. Press Start/Stop to return to the normal display. [IMG STAB]: The image stabilizer compensates for camcorder shake even at full telephoto. • The image stabilizer is set to [ OFF]. 4 Not available when [WIDESCREEN] is designed to... [ OFF]. • If (camcorder shake warning) appears, we recommend stabilizing the camcorder, for a normal degree of camcorder shake. Camera Setup (Advanced Zoom, Image Stabilizer, etc.) CAMERA SETUP Menu item Setting options CAMERA [A.SL SHUTTER]1 [ZOOM TYPE] [ ON], [ OFF] [ OPTICAL], [ ...
...you press DISP. Press Start/Stop to return to the normal display. [IMG STAB]: The image stabilizer compensates for camcorder shake even at full telephoto. • The image stabilizer is set to [ OFF]. 4 Not available when [WIDESCREEN] is designed to... [ OFF]. • If (camcorder shake warning) appears, we recommend stabilizing the camcorder, for a normal degree of camcorder shake. Camera Setup (Advanced Zoom, Image Stabilizer, etc.) CAMERA SETUP Menu item Setting options CAMERA [A.SL SHUTTER]1 [ZOOM TYPE] [ ON], [ OFF] [ OPTICAL], [ ...

DC310/DC320 Instruction Manual
Page 66
Disc Operations (Initialization, Finalization etc.) DISC OPERATIONS Menu item Setting options CAMERA PLAY [DISC INFO] - z 49 [DEL.ALL MOVIES]3 [NO], [YES] - z 36 [DEL.PLAYLIST]4 [NO], [YES] - RW), the disc specification (VIDEO mode or VR mode), and ... low-frequency sounds, we recommend setting the wind screen to wide (16:9) mode. Otherwise, change the [TV TYPE] setting accordingly ( 68). [WIND SCREEN]: The camcorder automatically reduces the background sound of wind when recording outdoors. • The wind screen cannot be turned off when the mode switch is set to...
Disc Operations (Initialization, Finalization etc.) DISC OPERATIONS Menu item Setting options CAMERA PLAY [DISC INFO] - z 49 [DEL.ALL MOVIES]3 [NO], [YES] - z 36 [DEL.PLAYLIST]4 [NO], [YES] - RW), the disc specification (VIDEO mode or VR mode), and ... low-frequency sounds, we recommend setting the wind screen to wide (16:9) mode. Otherwise, change the [TV TYPE] setting accordingly ( 68). [WIND SCREEN]: The camcorder automatically reduces the background sound of wind when recording outdoors. • The wind screen cannot be turned off when the mode switch is set to...

DC310/DC320 Instruction Manual
Page 67
...] [DATA CODE] [LANGUAGE] [DEMO MODE] zz [ ON], [ OFF] zz [ OFF], [ LEVEL(WHT)], [ LEVEL(GRY)], [ GRID(WHT)], [ GRID(GRY)] zz [ DATE], [ TIME], -- [ DATE & TIME], [ CAMERA DATA] [ ], [DEUTSCH], [ ], zz [ENGLISH], [ESPAÑOL], [FRANÇAIS], [ITALIANO], [MAGYAR], [MELAYU], [POLSKI], [ ROMANA ], [TÜRKÇE], [ ], [ ], [ ], [ ], [ ], [ ...8226; 67 Still Image Operations (Card Initialization, etc.) STILL IMG OPER. It starts automatically when the camcorder is framed correctly (vertically and/or horizontally). • Using the markers will appear also on without ...
...] [DATA CODE] [LANGUAGE] [DEMO MODE] zz [ ON], [ OFF] zz [ OFF], [ LEVEL(WHT)], [ LEVEL(GRY)], [ GRID(WHT)], [ GRID(GRY)] zz [ DATE], [ TIME], -- [ DATE & TIME], [ CAMERA DATA] [ ], [DEUTSCH], [ ], zz [ENGLISH], [ESPAÑOL], [FRANÇAIS], [ITALIANO], [MAGYAR], [MELAYU], [POLSKI], [ ROMANA ], [TÜRKÇE], [ ], [ ], [ ], [ ], [ ], [ ...8226; 67 Still Image Operations (Card Initialization, etc.) STILL IMG OPER. It starts automatically when the camcorder is framed correctly (vertically and/or horizontally). • Using the markers will appear also on without ...

DC310/DC320 Instruction Manual
Page 68
.... [ WIDE TV]: TV sets with 16:9 aspect ratio. [FIRMWARE]: You can verify the current version of the last image recorded with the camcorder. • If the memory card you insert already contains an image with a larger number, a new image will end the standby mode and ..., and stored in the correct aspect ratio, select the setting according to 100 images. System Setup (Volume, Beep, etc.) SYSTEM SETUP Menu item Setting options CAMERA PLAY [SPEAKER VOL.] [BEEP] [POWER SAVE] [ STANDBY OFF] [FILE NOS.] [TV TYPE] [FIRMWARE] [ HIGH VOLUME], [ LOW VOLUME], [ OFF] [ ON], [ OFF] [ 10 ...
.... [ WIDE TV]: TV sets with 16:9 aspect ratio. [FIRMWARE]: You can verify the current version of the last image recorded with the camcorder. • If the memory card you insert already contains an image with a larger number, a new image will end the standby mode and ..., and stored in the correct aspect ratio, select the setting according to 100 images. System Setup (Volume, Beep, etc.) SYSTEM SETUP Menu item Setting options CAMERA PLAY [SPEAKER VOL.] [BEEP] [POWER SAVE] [ STANDBY OFF] [FILE NOS.] [TV TYPE] [FIRMWARE] [ HIGH VOLUME], [ LOW VOLUME], [ OFF] [ ON], [ OFF] [ 10 ...

