
DC100 Instruction Manual
Page 3
...are not sure of power supply to be walked on the product and in the operating instructions should be adhered to the Canon DVD Camcorder DC100 Power Adapter should be hazardous. Regarding other 13. The 2-prong polarized plug will fit into the outlet, try .... 3 in this product near water or in this manual as recommended polarized plug. outside antenna is grounded permanently damage the camera. Polarization - Retain Instructions - The safety and operating instructions should be retained such as battery power, refer to instructions in rainy...
...are not sure of power supply to be walked on the product and in the operating instructions should be adhered to the Canon DVD Camcorder DC100 Power Adapter should be hazardous. Regarding other 13. The 2-prong polarized plug will fit into the outlet, try .... 3 in this product near water or in this manual as recommended polarized plug. outside antenna is grounded permanently damage the camera. Polarization - Retain Instructions - The safety and operating instructions should be retained such as battery power, refer to instructions in rainy...
DC100 Instruction Manual
Page 8
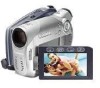
MENU / FUNC 33 MENU Options 33 Camera Setup (Digital Zoom, Image Stabilizer, etc 33 Still Image Operations (Erase All Images 34 Disc Operations (Photomovie, Finalize, etc 34 Display Setup (LCD Brightness, Language, ... 10 Checking the Supplied Accessories 12 Components Guide 13 Screen Displays 15 Preparations Getting Started 17 Step 1: Preparing the Power Supply 17 Step 2: Preparing the Camcorder 19 Step 3: Adjusting the LCD Screen 19 Step 4: Changing the Display Language 20 Step 5: Setting the Time Zone / Daylight Saving Time 20 Step 6: Setting the...
MENU / FUNC 33 MENU Options 33 Camera Setup (Digital Zoom, Image Stabilizer, etc 33 Still Image Operations (Erase All Images 34 Disc Operations (Photomovie, Finalize, etc 34 Display Setup (LCD Brightness, Language, ... 10 Checking the Supplied Accessories 12 Components Guide 13 Screen Displays 15 Preparations Getting Started 17 Step 1: Preparing the Power Supply 17 Step 2: Preparing the Camcorder 19 Step 3: Adjusting the LCD Screen 19 Step 4: Changing the Display Language 20 Step 5: Setting the Time Zone / Daylight Saving Time 20 Step 6: Setting the...
DC100 Instruction Manual
Page 10
... are indicated as *** (for purchasing the Canon DC100. In most places, press the multi selector itself ( ) to make a selection or change settings. Many of the camcorder's functions can be operated About the Multi Selector... the Troubleshooting table ( 66). MENU/ FUNC. ( 33). Please read this Manual Thank you use the camcorder and retain it the list of settings. 10 Menu options in boldface indicate a default setting (for future ... included in the manual are simulated pictures taken with a still camera. button ( FUNC. ). Selecting an Option - Selecting MENU options 1.
... are indicated as *** (for purchasing the Canon DC100. In most places, press the multi selector itself ( ) to make a selection or change settings. Many of the camcorder's functions can be operated About the Multi Selector... the Troubleshooting table ( 66). MENU/ FUNC. ( 33). Please read this Manual Thank you use the camcorder and retain it the list of settings. 10 Menu options in boldface indicate a default setting (for future ... included in the manual are simulated pictures taken with a still camera. button ( FUNC. ). Selecting an Option - Selecting MENU options 1.
DC100 Instruction Manual
Page 11
...4. Menu Options 1. Select ( ) the icon of the function you will appear on and off, the power switch also toggles the camcorder's operating mode. Follow the additional operation guides that will need to change and press ( ). • The orange selection bar indicates the... menu setting currently selected. Press FUNC. About the Operating Modes Operating Mode Operating Mode Indicator Operation / (CAMERA) Recording movies 24 * Red LED Recording still images 26 (PLAY) Playing movies 28 * Green LED Viewing still images 30 * To ...
...4. Menu Options 1. Select ( ) the icon of the function you will appear on and off, the power switch also toggles the camcorder's operating mode. Follow the additional operation guides that will need to change and press ( ). • The orange selection bar indicates the... menu setting currently selected. Press FUNC. About the Operating Modes Operating Mode Operating Mode Indicator Operation / (CAMERA) Recording movies 24 * Red LED Recording still images 26 (PLAY) Playing movies 28 * Green LED Viewing still images 30 * To ...
DC100 Instruction Manual
Page 14
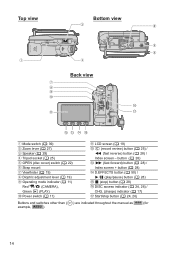
... lever ( 27) Speaker ( 29) Tripod socket ( 25) OPEN (disc cover) switch ( 22) Strap mount Viewfinder ( 19) Dioptric adjustment lever ( 19) Operating mode indicator ( 11) Red / (CAMERA), Green (PLAY) Power switch ( 11) LCD screen ( 19) (record review) button ( 25) / (fast reverse) button ( 28) / Index screen -
... lever ( 27) Speaker ( 29) Tripod socket ( 25) OPEN (disc cover) switch ( 22) Strap mount Viewfinder ( 19) Dioptric adjustment lever ( 19) Operating mode indicator ( 11) Red / (CAMERA), Green (PLAY) Power switch ( 11) LCD screen ( 19) (record review) button ( 25) / (fast reverse) button ( 28) / Index screen -

DC100 Instruction Manual
Page 32
MENU ( 33) DISPLAY SETUP DATA CODE DATE & TIME Options [ DATE] [ TIME] [ DATE & TIME] [ CAMERA DATA] [ CAM.& D/T] Displays the date or time when the scene or still image was recorded. Selecting the Data Code 1. Press MENU . 2. Select ( ) [DISPLAY SETUP] ...on -screen displays off 32 Displays both the date and time of the recording. Selecting the Recording Data Display The camcorder keeps a data code containing the recording date and time and other camera data such as shutter speed and exposure (f-stop ) and shutter speed used when recording the image. Displays the ...
MENU ( 33) DISPLAY SETUP DATA CODE DATE & TIME Options [ DATE] [ TIME] [ DATE & TIME] [ CAMERA DATA] [ CAM.& D/T] Displays the date or time when the scene or still image was recorded. Selecting the Data Code 1. Press MENU . 2. Select ( ) [DISPLAY SETUP] ...on -screen displays off 32 Displays both the date and time of the recording. Selecting the Recording Data Display The camcorder keeps a data code containing the recording date and time and other camera data such as shutter speed and exposure (f-stop ) and shutter speed used when recording the image. Displays the ...

DC100 Instruction Manual
Page 33
... the zoom lever: Press lightly for example, by mounting it on the screen. E MENU Options Camera Setup (Digital Zoom, Image Stabilizer, etc.) CAMERA SETUP A.SL SHUTTER. [ ON], [ OFF] The camcorder automatically uses slow shutter speeds to [ VARIABLE] the zoom speed depends on how you zoom in...used with the [ NIGHT] recording program ( ) or with the multi-image screen. IMG STAB [ ON ], [ OFF] The image stabilizer compensates for camcorder shake even at full telephoto. The image stabilizer is the fastest and [ SPEED 1] the slowest. MENU / FUNC. AdvancedFunctions Menu items not ...
... the zoom lever: Press lightly for example, by mounting it on the screen. E MENU Options Camera Setup (Digital Zoom, Image Stabilizer, etc.) CAMERA SETUP A.SL SHUTTER. [ ON], [ OFF] The camcorder automatically uses slow shutter speeds to [ VARIABLE] the zoom speed depends on how you zoom in...used with the [ NIGHT] recording program ( ) or with the multi-image screen. IMG STAB [ ON ], [ OFF] The image stabilizer compensates for camcorder shake even at full telephoto. The image stabilizer is the fastest and [ SPEED 1] the slowest. MENU / FUNC. AdvancedFunctions Menu items not ...

DC100 Instruction Manual
Page 35
... left reversed) so that the image on the display will match that of the screen. DATA CODE ( 32) [ DATE], [ TIME], [ ( 32) [ DATE], [ TIME], [ DATE & TIME], [ CAMERA DATA], [ DATE & TIME] CAM. & D/T] LEVEL MARKER [ ON], [ OFF] A horizontal line will be reversed. You can frame the picture by referring to face the subject, the...
... left reversed) so that the image on the display will match that of the screen. DATA CODE ( 32) [ DATE], [ TIME], [ ( 32) [ DATE], [ TIME], [ DATE & TIME], [ CAMERA DATA], [ DATE & TIME] CAM. & D/T] LEVEL MARKER [ ON], [ OFF] A horizontal line will be reversed. You can frame the picture by referring to face the subject, the...

DC100 Instruction Manual
Page 46
... : Press Start/Stop , first halfway to activate the autofocus and then fully to About the Operating Modes ( 11). : Set the camcorder in record pause mode. The countdown appears on the screen. The camcorder will be canceled if you can also press Start/Stop to cancel the self timer. The... camcorder starts recording after a 10-second countdown. Using the Self Timer To change the operating mode, refer to record the still image. MENU CAMERA SETUP SELF TIMER MENU ON "...
... : Press Start/Stop , first halfway to activate the autofocus and then fully to About the Operating Modes ( 11). : Set the camcorder in record pause mode. The countdown appears on the screen. The camcorder will be canceled if you can also press Start/Stop to cancel the self timer. The... camcorder starts recording after a 10-second countdown. Using the Self Timer To change the operating mode, refer to record the still image. MENU CAMERA SETUP SELF TIMER MENU ON "...

