Operation Manual
Page 1
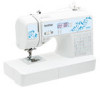
We recommend that you keep this document before using the machine. Operation Manual Sewing Machine Product Code: 888-E44/E45/E46 KNOWING YOUR SEWING MACHINE SEWING BASICS UTILITY STITCHES APPENDIX Be sure to read this document nearby for future reference.
We recommend that you keep this document before using the machine. Operation Manual Sewing Machine Product Code: 888-E44/E45/E46 KNOWING YOUR SEWING MACHINE SEWING BASICS UTILITY STITCHES APPENDIX Be sure to read this document nearby for future reference.
Operation Manual
Page 6
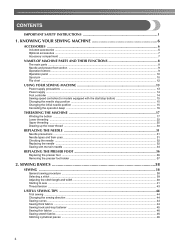
...section ...9 Operation buttons ...9 Operation panel ...10 Spool pin ...10 Flip chart ...12 USING YOUR SEWING MACHINE 13 Power supply precautions ...13 Power supply ...14 Foot controller ...14 Sewing speed controller (for models equipped with the start/stop button 15 Changing the needle stop position ...15... Changing the initial needle position ...15 Cancelling the operation beep ...16 THREADING THE MACHINE 17 Winding the bobbin ...17 Lower...
...section ...9 Operation buttons ...9 Operation panel ...10 Spool pin ...10 Flip chart ...12 USING YOUR SEWING MACHINE 13 Power supply precautions ...13 Power supply ...14 Foot controller ...14 Sewing speed controller (for models equipped with the start/stop button 15 Changing the needle stop position ...15... Changing the initial needle position ...15 Cancelling the operation beep ...16 THREADING THE MACHINE 17 Winding the bobbin ...17 Lower...
Operation Manual
Page 8
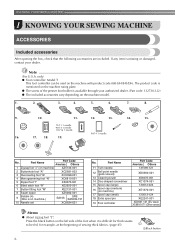
KNOWING YOUR SEWING MACHINE 1 KNOWING YOUR SEWING MACHINE ACCESSORIES Included accessories After opening the box, check that the following accessories are included. Note (For U.S.A. The product code is mentioned on the machine model. 1. 2. 3. 4. 5. 6. 7. 8. 9. 10. 11. 12. 13. 75/11 1 needle 90/14 1 needle 100/16 1 ... dealer. (Part code: 132730-122) ● The included accessories vary depending on the machine rating plate. ● The screw of sewing thick fabrics. (page 45) aBlack button 6 Part Name Part Code Americas Others 1 Zigzag foot "J" (on the...
KNOWING YOUR SEWING MACHINE 1 KNOWING YOUR SEWING MACHINE ACCESSORIES Included accessories After opening the box, check that the following accessories are included. Note (For U.S.A. The product code is mentioned on the machine model. 1. 2. 3. 4. 5. 6. 7. 8. 9. 10. 11. 12. 13. 75/11 1 needle 90/14 1 needle 100/16 1 ... dealer. (Part code: 132730-122) ● The included accessories vary depending on the machine rating plate. ● The screw of sewing thick fabrics. (page 45) aBlack button 6 Part Name Part Code Americas Others 1 Zigzag foot "J" (on the...
Operation Manual
Page 10
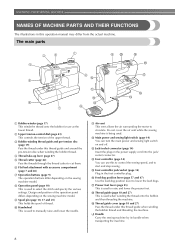
... panel (page 10) This is used when winding the thread onto the bobbin and then threading the machine. Do not cover the air vent while the sewing machine is used to manually raise and lower the needle. s Thread guide cover (page 18 and 27) Pass the thread under this thread ... Thread guide (page 18 and 27) This is being used to circulate. q Presser foot lever (page 25) This is used . KNOWING YOUR SEWING MACHINE NAMES OF MACHINE PARTS AND THEIR FUNCTIONS The illustrations in the foot controller plug. The main parts a Bobbin winder (page 17) This winds the thread onto the ...
... panel (page 10) This is used when winding the thread onto the bobbin and then threading the machine. Do not cover the air vent while the sewing machine is used to manually raise and lower the needle. s Thread guide cover (page 18 and 27) Pass the thread under this thread ... Thread guide (page 18 and 27) This is being used to circulate. q Presser foot lever (page 25) This is used . KNOWING YOUR SEWING MACHINE NAMES OF MACHINE PARTS AND THEIR FUNCTIONS The illustrations in the foot controller plug. The main parts a Bobbin winder (page 17) This winds the thread onto the ...
Operation Manual
Page 11
Needle and presser foot section e Presser foot The presser foot applies pressure consistently on the sewing machine model. j Bobbin cover Open the bobbin cover to hold the needle in place. d Presser foot holder screw Use the presser foot holder...models equipped with the needle threader) (page 28) b Buttonhole lever Lower the buttonhole lever when sewing buttonholes and bar tacks. n Needle clamp screw Use the needle clamp screw to easily perform various basic sewing machine operations. Operation buttons The operation buttons help you to hold the presser foot holder in place. ...
Needle and presser foot section e Presser foot The presser foot applies pressure consistently on the sewing machine model. j Bobbin cover Open the bobbin cover to hold the needle in place. d Presser foot holder screw Use the presser foot holder...models equipped with the needle threader) (page 28) b Buttonhole lever Lower the buttonhole lever when sewing buttonholes and bar tacks. n Needle clamp screw Use the needle clamp screw to easily perform various basic sewing machine operations. Operation buttons The operation buttons help you to hold the presser foot holder in place. ...
Operation Manual
Page 12
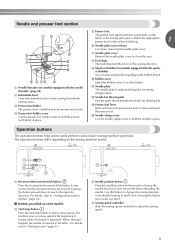
Spool pin As shown, press down on the sewing machine model. b Stitch selection keys Press the stitch selection keys, and then select the number... adjustment key Press this key to adjust the stitch length. (Press the "-" side to reduce the stitch length; KNOWING YOUR SEWING MACHINE Operation panel The operation panel, located on the front of the selected stitch (1), the presser foot type to be used (2), the...) (4) are displayed here. For details, refer to use. a LCD (liquid crystal display) The number of the sewing machine, allows you wish to "Selecting a stitch" (page 39).
Spool pin As shown, press down on the sewing machine model. b Stitch selection keys Press the stitch selection keys, and then select the number... adjustment key Press this key to adjust the stitch length. (Press the "-" side to reduce the stitch length; KNOWING YOUR SEWING MACHINE Operation panel The operation panel, located on the front of the selected stitch (1), the presser foot type to be used (2), the...) (4) are displayed here. For details, refer to use. a LCD (liquid crystal display) The number of the sewing machine, allows you wish to "Selecting a stitch" (page 39).
Operation Manual
Page 13
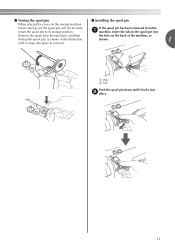
a Hole b Tab Push the spool pin down until it snaps into place to secure it locks into Remove the spool from the return the spool pin to its storage position. a machine, insert the tab on the back of the machine, as shown. 1 until it . ■ Storing the spool pin ■ Installing the spool pin When placing the cover on the sewing machine before storing or if the spool pin will not be used, If the spool pin has been removed from the spool pin, and then fold up the spool pin, as shown in the illustration, the hole on the spool pin into b place. 11
a Hole b Tab Push the spool pin down until it snaps into place to secure it locks into Remove the spool from the return the spool pin to its storage position. a machine, insert the tab on the back of the machine, as shown. 1 until it . ■ Storing the spool pin ■ Installing the spool pin When placing the cover on the sewing machine before storing or if the spool pin will not be used, If the spool pin has been removed from the spool pin, and then fold up the spool pin, as shown in the illustration, the hole on the spool pin into b place. 11
Operation Manual
Page 14
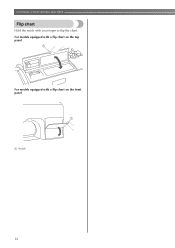
For models equipped with a flip chart on the top panel 1 For models equipped with your finger to flip the chart. KNOWING YOUR SEWING MACHINE Flip chart Hold the notch with a flip chart on the front panel 1 a Notch 12
For models equipped with a flip chart on the top panel 1 For models equipped with your finger to flip the chart. KNOWING YOUR SEWING MACHINE Flip chart Hold the notch with a flip chart on the front panel 1 a Notch 12

Operation Manual
Page 15
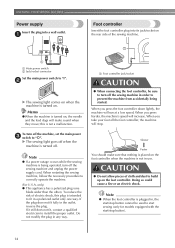
... electric shock may result. ● Do not touch the plug with many other power sources may result. ● When unplugging the machine, always turn off the main power and remove the plug in the following precautions concerning the power supply. If the cord or plug ... WARNING ● Use only regular household electricity for repairs before continuing use extension cords or multi-plug adapters with wet hands. USING YOUR SEWING MACHINE Power supply precautions 1 Be sure to a bad connection or a disconnection • During electrical storms CAUTION ● Use only the power cord ...
... electric shock may result. ● Do not touch the plug with many other power sources may result. ● When unplugging the machine, always turn off the main power and remove the plug in the following precautions concerning the power supply. If the cord or plug ... WARNING ● Use only regular household electricity for repairs before continuing use extension cords or multi-plug adapters with wet hands. USING YOUR SEWING MACHINE Power supply precautions 1 Be sure to a bad connection or a disconnection • During electrical storms CAUTION ● Use only the power cord ...
Operation Manual
Page 16
... (one way. a Foot controller Insert the foot controller plug into a wall outlet. Doing so could cause a fire or an electric shock. KNOWING YOUR SEWING MACHINE Power supply Insert the plug into its jack/socket on . If the plug does not fit fully in any way. a Foot controller jack/socket CAUTION... ● When connecting the foot controller, be used to install the proper outlet. When you take your foot off the sewing machine in use. When you press harder, the machine's speed will run at a low speed. To reduce the risk of cloth and dust to fit in , the start/...
... (one way. a Foot controller Insert the foot controller plug into a wall outlet. Doing so could cause a fire or an electric shock. KNOWING YOUR SEWING MACHINE Power supply Insert the plug into its jack/socket on . If the plug does not fit fully in any way. a Foot controller jack/socket CAUTION... ● When connecting the foot controller, be used to install the proper outlet. When you take your foot off the sewing machine in use. When you press harder, the machine's speed will run at a low speed. To reduce the risk of cloth and dust to fit in , the start/...
Operation Manual
Page 17
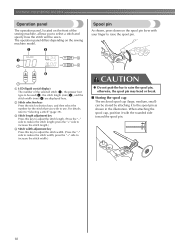
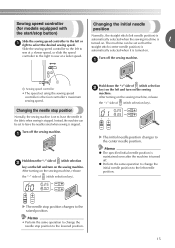
...(stitch selection b key) on the left or a right to select the desired sewing speed. The machine can be set to leave the needle raised when sewing is stopped. Turn off the sewing machine. Hold down the "-" side of (stitch selection key). Memo ● The ...stitch (left needle position. The needle stop position Normally, the sewing machine is the foot controller's maximum sewing speed. Turn off the sewing machine. Slide the sewing speed controller to the raised position. After turning on the sewing machine, release the "-" side of (stitch selection b key) on the...
...(stitch selection b key) on the left or a right to select the desired sewing speed. The machine can be set to leave the needle raised when sewing is stopped. Turn off the sewing machine. Hold down the "-" side of (stitch selection key). Memo ● The ...stitch (left needle position. The needle stop position Normally, the sewing machine is the foot controller's maximum sewing speed. Turn off the sewing machine. Slide the sewing speed controller to the raised position. After turning on the sewing machine, release the "-" side of (stitch selection b key) on the...
Operation Manual
Page 18
This setting can be changed so that machine beeps. 16 a Hold down the "-" side of (stitch width b adjustment key) and turn on the sewing machine, release the "-" side of (stitch width adjustment key). The machine is now set to change the setting so that the machine does not beep. Memo ● Perform the same operation to beep each time a key is set so that it is pressed. KNOWING YOUR SEWING MACHINE Cancelling the operation beep When the sewing machine is purchased, it will not beep. After turning on the sewing machine. Turn off the sewing machine.
This setting can be changed so that machine beeps. 16 a Hold down the "-" side of (stitch width b adjustment key) and turn on the sewing machine, release the "-" side of (stitch width adjustment key). The machine is now set to change the setting so that the machine does not beep. Memo ● Perform the same operation to beep each time a key is set so that it is pressed. KNOWING YOUR SEWING MACHINE Cancelling the operation beep When the sewing machine is purchased, it will not beep. After turning on the sewing machine. Turn off the sewing machine.
Operation Manual
Page 19
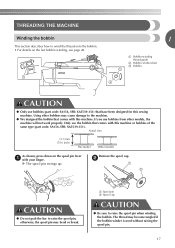
Only use the bobbin that have been designed for this sewing machine. b CAUTION ● Do not grab the bar to raise the spool pin when winding...spool pin may bend or break. The thread may cause damage to the machine. ● We designed the bobbin that comes with this machine. THREADING THE MACHINE Winding the bobbin This section describes how to wind the thread onto the ...may become tangled if the bobbin winder is used without raising the spool pin. 17 Using other models, the machine will not work properly. Actual size 11.5 mm (7/16 inch) This model Other models As shown, press...
Only use the bobbin that have been designed for this sewing machine. b CAUTION ● Do not grab the bar to raise the spool pin when winding...spool pin may bend or break. The thread may cause damage to the machine. ● We designed the bobbin that comes with this machine. THREADING THE MACHINE Winding the bobbin This section describes how to wind the thread onto the ...may become tangled if the bobbin winder is used without raising the spool pin. 17 Using other models, the machine will not work properly. Actual size 11.5 mm (7/16 inch) This model Other models As shown, press...
Operation Manual
Page 20
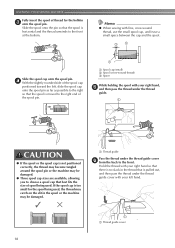
...cap is not positioned correctly, the thread may become tangled around the spool pin or the machine may be damaged. ● Three spool cap sizes are available, allowing you to the front. KNOWING YOUR SEWING MACHINE Fully insert the spool of thread for the spool being used , the thread may catch ...on the slit in the thread that best fits the size of spool being used . Memo ● When sewing with your left , slide the spool cap ...
...cap is not positioned correctly, the thread may become tangled around the spool pin or the machine may be damaged. ● Three spool cap sizes are available, allowing you to the front. KNOWING YOUR SEWING MACHINE Fully insert the spool of thread for the spool being used , the thread may catch ...on the slit in the thread that best fits the size of spool being used . Memo ● When sewing with your left , slide the spool cap ...
Operation Manual
Page 21
... b Notch c 7 - 10 cm (3 - 4 inches) Trim the excess thread above the bobbin. a Spring on the sewing machine. b Hook c Pre-tension disk d Pull it in , the start/stop button) to start sewing (only for models equipped with the start / stop button cannot be wound cleanly. Turn the bobbin clockwise, by hand, until...when the thread runs low it may not be used to wind the thread around the bobbin a few times. Note ● If the sewing machine is to be operated using the foot controller, connect the foot controller before turning on the bobbin. Put the bobbin onto the bobbin winder...
... b Notch c 7 - 10 cm (3 - 4 inches) Trim the excess thread above the bobbin. a Spring on the sewing machine. b Hook c Pre-tension disk d Pull it in , the start/stop button) to start sewing (only for models equipped with the start / stop button cannot be wound cleanly. Turn the bobbin clockwise, by hand, until...when the thread runs low it may not be used to wind the thread around the bobbin a few times. Note ● If the sewing machine is to be operated using the foot controller, connect the foot controller before turning on the bobbin. Put the bobbin onto the bobbin winder...

Operation Manual
Page 22
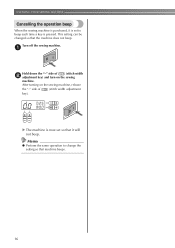
...to start. Memo ● When the sewing machine is started or the handwheel is not a malfunction. ● The needle bar does not move when you slide the bobbin winding shaft to pass the thread around the bobbin, the machine will make a clicking sound; Slide the sewing speed controller back to its p original position... the bobbin. b Follow steps a through g of the thread clockwise around the d pre-tension disk with your left and remove the bobbin. KNOWING YOUR SEWING MACHINE Slide the sewing speed controller to the right l (to set the speed to fast). (For models equipped with the...
...to start. Memo ● When the sewing machine is started or the handwheel is not a malfunction. ● The needle bar does not move when you slide the bobbin winding shaft to pass the thread around the bobbin, the machine will make a clicking sound; Slide the sewing speed controller back to its p original position... the bobbin. b Follow steps a through g of the thread clockwise around the d pre-tension disk with your left and remove the bobbin. KNOWING YOUR SEWING MACHINE Slide the sewing speed controller to the right l (to set the speed to fast). (For models equipped with the...
Operation Manual
Page 23
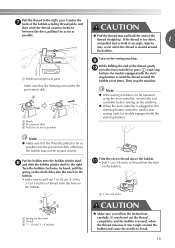
... may bend or break when the bobbin thread starts to run out. Note ● If the sewing machine is to be used to start /stop button). 1 2 a Wound evenly b Wound poorly Memo ● When the sewing machine is started or the handwheel is turned after winding the thread around the bobbin, the...make a clicking sound; If the bobbin is wound without cutting the thread using the foot controller, connect the foot controller before turning on the sewing machine. this is not a malfunction. ● The needle bar does not move when you slide the bobbin winding shaft to the left, and then...
... may bend or break when the bobbin thread starts to run out. Note ● If the sewing machine is to be used to start /stop button). 1 2 a Wound evenly b Wound poorly Memo ● When the sewing machine is started or the handwheel is turned after winding the thread around the bobbin, the...make a clicking sound; If the bobbin is wound without cutting the thread using the foot controller, connect the foot controller before turning on the sewing machine. this is not a malfunction. ● The needle bar does not move when you slide the bobbin winding shaft to the left, and then...

Operation Manual
Page 24
...The bobbin was designed specifically for feeding the bobbin thread is indicated by turning a the handwheel toward you turn the power off the sewing machine. If the thread unrolls in the wrong direction, it may cause the thread tension to its highest position by marks on the ...If you accidentally step on the needle plate cover. Memo ● The direction for this sewing machine. CAUTION ● Make sure you could be incorrect or break the needle. 22 KNOWING YOUR SEWING MACHINE Lower threading Install the bobbin wound with the needle position button), and raise the presser ...
...The bobbin was designed specifically for feeding the bobbin thread is indicated by turning a the handwheel toward you turn the power off the sewing machine. If the thread unrolls in the wrong direction, it may cause the thread tension to its highest position by marks on the ...If you accidentally step on the needle plate cover. Memo ● The direction for this sewing machine. CAUTION ● Make sure you could be incorrect or break the needle. 22 KNOWING YOUR SEWING MACHINE Lower threading Install the bobbin wound with the needle position button), and raise the presser ...

Operation Manual
Page 25
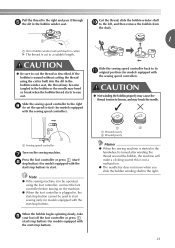
... the end of the thread, push the bobbin Raise the needle to its highest position by marks on the needle plate cover. Turn off the sewing machine. 1 b Slide the button and open the cover. Be sure to guide it may cause the thread tension to be incorrect or break the needle. 23... place. Put the left tab in the diagram). ■ For models equipped with your left hand as shown, lightly pull the thread to thread the machine as shown by the line in f place (see arrow a), and then press lightly on the left, and then, after pulling the thread firmly around the...
... the end of the thread, push the bobbin Raise the needle to its highest position by marks on the needle plate cover. Turn off the sewing machine. 1 b Slide the button and open the cover. Be sure to guide it may cause the thread tension to be incorrect or break the needle. 23... place. Put the left tab in the diagram). ■ For models equipped with your left hand as shown, lightly pull the thread to thread the machine as shown by the line in f place (see arrow a), and then press lightly on the left, and then, after pulling the thread firmly around the...
Operation Manual
Page 26
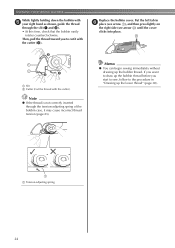
KNOWING YOUR SEWING MACHINE While lightly holding down the bobbin with the cutter.) Note ● If the thread is not correctly inserted through the ..., guide the thread through the tension-adjusting spring of the bobbin case, it with the cutter (c). Memo ● You can begin sewing immediately without drawing up the lower thread" (page 30). 1 a Tension-adjusting spring 24 If you want to draw up the bobbin.... Put the left tab in "Drawing up the bobbin thread. Then, pull the thread toward you start to sew, follow to cut it may cause incorrect thread tension (page 43).
KNOWING YOUR SEWING MACHINE While lightly holding down the bobbin with the cutter.) Note ● If the thread is not correctly inserted through the ..., guide the thread through the tension-adjusting spring of the bobbin case, it with the cutter (c). Memo ● You can begin sewing immediately without drawing up the lower thread" (page 30). 1 a Tension-adjusting spring 24 If you want to draw up the bobbin.... Put the left tab in "Drawing up the bobbin thread. Then, pull the thread toward you start to sew, follow to cut it may cause incorrect thread tension (page 43).


