Users Manual - English
Page 5
... controller 10 Changing the needle stop position ...10 Changing the initial needle position ...11 Cancelling the operation beep ...11 THREADING THE MACHINE 12 Winding the bobbin ...12 Lower threading ...15 Upper threading ...17 Drawing up the lower thread ...20 REPLACING THE NEEDLE 21 Needle precautions ...21 Needle types and their uses...
... controller 10 Changing the needle stop position ...10 Changing the initial needle position ...11 Cancelling the operation beep ...11 THREADING THE MACHINE 12 Winding the bobbin ...12 Lower threading ...15 Upper threading ...17 Drawing up the lower thread ...20 REPLACING THE NEEDLE 21 Needle precautions ...21 Needle types and their uses...
Users Manual - English
Page 6
... Sewing the character stitches ...67 ADJUSTING STITCHES (for models equipped with character stitches 68 4. APPENDIX ...70 MAINTENANCE ...70 Cleaning the machine surface ...70 Cleaning the bobbin case ...70 TROUBLESHOOTING ...72 ERROR MESSAGES ...75 Operation beep (for models equipped with the operation beep 75 INDEX ...76 4 3.
... Sewing the character stitches ...67 ADJUSTING STITCHES (for models equipped with character stitches 68 4. APPENDIX ...70 MAINTENANCE ...70 Cleaning the machine surface ...70 Cleaning the bobbin case ...70 TROUBLESHOOTING ...72 ERROR MESSAGES ...75 Operation beep (for models equipped with the operation beep 75 INDEX ...76 4 3.

Users Manual - English
Page 7
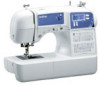
e Thread guide (pages 12 and 17) This is used when winding the thread onto the bobbin and then threading the machine. k Handwheel Used to cut them. Not for sewing with accessory compartment (pages 7 and 34) i Operation buttons (page 6) The operation buttons ... switch on the sewing machine model. 1 KNOWING YOUR SEWING MACHINE 1 NAMES OF MACHINE PARTS AND THEIR FUNCTIONS The main parts a Bobbin winder (page 12) This winds the thread onto the bobbin for use this to control the sewing speed, and to start and stop sewing. d Upper tension-control dial (page 31) This...
e Thread guide (pages 12 and 17) This is used when winding the thread onto the bobbin and then threading the machine. k Handwheel Used to cut them. Not for sewing with accessory compartment (pages 7 and 34) i Operation buttons (page 6) The operation buttons ... switch on the sewing machine model. 1 KNOWING YOUR SEWING MACHINE 1 NAMES OF MACHINE PARTS AND THEIR FUNCTIONS The main parts a Bobbin winder (page 12) This winds the thread onto the bobbin for use this to control the sewing speed, and to start and stop sewing. d Upper tension-control dial (page 31) This...

Users Manual - English
Page 8
...When sewing is stopped, the needle is depressed. For details, refer to "Starting to start sewing without pulling up the bobbin thread. h Bobbin cover Open the bobbin cover to hold the presser foot holder in the sewing direction. The operation buttons differ depending on the fabric as the sewing... at the beginning of sewing while the button is lowered in place. g Quick-set the bobbin. k Needle clamp screw Use the needle clamp screw to set bobbin (for models equipped with the quickset bobbin) You can start or stop button to sew" (page 29). Reverse stitches are sewn by...
...When sewing is stopped, the needle is depressed. For details, refer to "Starting to start sewing without pulling up the bobbin thread. h Bobbin cover Open the bobbin cover to hold the presser foot holder in the sewing direction. The operation buttons differ depending on the fabric as the sewing... at the beginning of sewing while the button is lowered in place. g Quick-set the bobbin. k Needle clamp screw Use the needle clamp screw to set bobbin (for models equipped with the quickset bobbin) You can start or stop button to sew" (page 29). Reverse stitches are sewn by...
Users Manual - English
Page 10
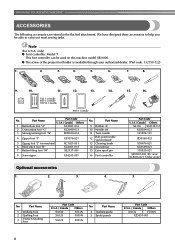
... foot "G" 3 Monogramming foot "N" Part Code U.S.A. / Canada Others XC2691-033 XC3098-031 XD0810-031 4 Zipper foot "I" X59370-021 5 Zigzag foot "J" (on this machine model XR-9000. ● The screw of the presser foot holder is available through your authorized dealer. (Part code: 132730-122) 1. 2. 3. 4. 5. 6. 7. 8. 9. 10. 11...-021 X59476-021 XC8349-021 130920-021 XD0501-021 (EU area) XC8816-021 (Other areas) 5. No. Part Name 9 Bobbin (4) 10 Needle set 11 Twin needle 12 Ball point needle (gold colored) 13 Cleaning brush 14 Screwdriver 15 Extra spool pin...
... foot "G" 3 Monogramming foot "N" Part Code U.S.A. / Canada Others XC2691-033 XC3098-031 XD0810-031 4 Zipper foot "I" X59370-021 5 Zigzag foot "J" (on this machine model XR-9000. ● The screw of the presser foot holder is available through your authorized dealer. (Part code: 132730-122) 1. 2. 3. 4. 5. 6. 7. 8. 9. 10. 11...-021 X59476-021 XC8349-021 130920-021 XD0501-021 (EU area) XC8816-021 (Other areas) 5. No. Part Name 9 Bobbin (4) 10 Needle set 11 Twin needle 12 Ball point needle (gold colored) 13 Cleaning brush 14 Screwdriver 15 Extra spool pin...

Users Manual - English
Page 14
...pin as far as possible. e 12 b CAUTION ● If the spool of the bobbin. Using other models, the machine will not work properly. Put the bobbin onto the bobbin winder shaft d and slide the bobbin winder shaft to the right. Pass the thread around the pre-tension disk. Pass the ... see page 14. 1 Pulling it in the right place, the thread may tangle on this sewing machine. a Pre-tension disk b Bobbin winder shaft c Bobbin CAUTION ● Only use bobbins from the inside of thread is not in as far as possible, and a then put a spool of the same type (part code...
...pin as far as possible. e 12 b CAUTION ● If the spool of the bobbin. Using other models, the machine will not work properly. Put the bobbin onto the bobbin winder shaft d and slide the bobbin winder shaft to the right. Pass the thread around the pre-tension disk. Pass the ... see page 14. 1 Pulling it in the right place, the thread may tangle on this sewing machine. a Pre-tension disk b Bobbin winder shaft c Bobbin CAUTION ● Only use bobbins from the inside of thread is not in as far as possible, and a then put a spool of the same type (part code...

Users Manual - English
Page 15
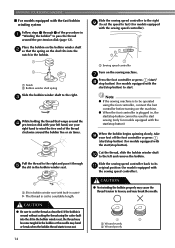
...equipped with the stop button) (for models equipped with the start/stop button) to fast) (for models equipped with the sewing speed controller). When the bobbin seems full and begins j spinning slowly, take your foot off the foot controller or press (start/stop button) (for models equipped with the start /...stop button cannot be used to wind the thread around the bobbin a few times. Slide the sewing speed controller to the right h (to set the speed to start /stop button) to start sewing (only for ...
...equipped with the stop button) (for models equipped with the start/stop button) to fast) (for models equipped with the sewing speed controller). When the bobbin seems full and begins j spinning slowly, take your foot off the foot controller or press (start/stop button) (for models equipped with the start /...stop button cannot be used to wind the thread around the bobbin a few times. Slide the sewing speed controller to the right h (to set the speed to start /stop button) to start sewing (only for ...
Users Manual - English
Page 16
...controller, connect the foot controller before turning on the shaft fits into the slit in the bobbin winder seat, the thread may become tangled in the bobbin or the needle may bend or break when the bobbin thread starts to start sewing (only for models equipped with the start /stop button) to... fast) (for models equipped with the start /stop button cannot be operated using the cutter built into the notch in the bobbin. CAUTION ● Be sure to a suitable length. a Slit in bobbin winder seat (with built-in cutter) X The thread is cut to cut the thread as described. If the...
...controller, connect the foot controller before turning on the shaft fits into the slit in the bobbin winder seat, the thread may become tangled in the bobbin or the needle may bend or break when the bobbin thread starts to start sewing (only for models equipped with the start /stop button) to... fast) (for models equipped with the start /stop button cannot be operated using the cutter built into the notch in the bobbin. CAUTION ● Be sure to a suitable length. a Slit in bobbin winder seat (with built-in cutter) X The thread is cut to cut the thread as described. If the...

Users Manual - English
Page 17
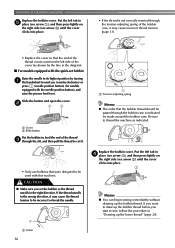
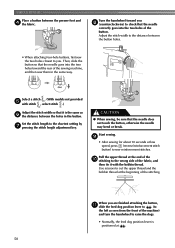
.... CAUTION ● Make sure you (counterclockwise) or press (needle position button) (for this machine. If you accidentally step on quick-set the bobbin so the thread unrolls in c the direction shown by turning a the handwheel toward you turn the power off while threading the machine. this is ... and resulting in the wrong direction, it may cause the thread tension to be incorrect or break the needle. Use only the enclosed bobbin or bobbins of the bobbin case, it may cause incorrect thread tension (page 31). Actual size 11.5 mm (7/16 inch) This model Other models • ...
.... CAUTION ● Make sure you (counterclockwise) or press (needle position button) (for this machine. If you accidentally step on quick-set the bobbin so the thread unrolls in c the direction shown by turning a the handwheel toward you turn the power off while threading the machine. this is ... and resulting in the wrong direction, it may cause the thread tension to be incorrect or break the needle. Use only the enclosed bobbin or bobbins of the bobbin case, it may cause incorrect thread tension (page 31). Actual size 11.5 mm (7/16 inch) This model Other models • ...
Users Manual - English
Page 18
... with this machine. CAUTION ● Make sure you (counterclockwise) or press (needle position button) (for models equipped with the quick-set the bobbin so the thread unrolls in the right direction. If the thread unrolls in the wrong direction, it may cause the thread tension to its highest... position by marks around the bobbin case. KNOWING YOUR SEWING MACHINE Replace the bobbin cover. Slide the button and open the cover. Put the left tab in d place (see arrow a), and then press...
... with this machine. CAUTION ● Make sure you (counterclockwise) or press (needle position button) (for models equipped with the quick-set the bobbin so the thread unrolls in the right direction. If the thread unrolls in the wrong direction, it may cause the thread tension to its highest... position by marks around the bobbin case. KNOWING YOUR SEWING MACHINE Replace the bobbin cover. Slide the button and open the cover. Put the left tab in d place (see arrow a), and then press...

Users Manual - English
Page 22
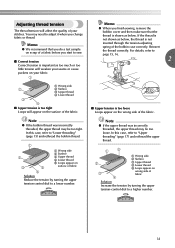
.... Before you can draw up the lower thread by pressing (needle position button) (for models equipped with the quick-set bobbin You can begin sewing immediately without cutting it. • The bobbin cover should still be left over. c 20 a Upper thread b Lower thread a Upper thread b Lower thread ■ ...or a Mark b Needle position button Pull on the wheel points up or by hand so that the mark on the upper thread to 4. Replace the bobbin cover. a Pull out about 10 cm (4 inch) of the upper thread. When sewing gathers or darts, you draw up the lower c thread. Draw...
.... Before you can draw up the lower thread by pressing (needle position button) (for models equipped with the quick-set bobbin You can begin sewing immediately without cutting it. • The bobbin cover should still be left over. c 20 a Upper thread b Lower thread a Upper thread b Lower thread ■ ...or a Mark b Needle position button Pull on the wheel points up or by hand so that the mark on the upper thread to 4. Replace the bobbin cover. a Pull out about 10 cm (4 inch) of the upper thread. When sewing gathers or darts, you draw up the lower c thread. Draw...
Users Manual - English
Page 33
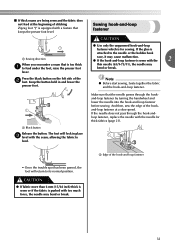
... cause puckers on surface of fabric Solution Reduce the tension by turning the upper tension-control dial to "Lower threading" (page 15) and rethread the bobbin thread. 1 2 3 5 4 a Wrong side b Surface c Upper thread d Lower thread e Loops appear on your fabric. 1 Memo ● When you finish sewing...and then make sure that the thread is shown as too much or too little tension will weaken your stitches. Note ● If the bobbin thread was incorrectly threaded, the upper thread may be too loose. Adjusting thread tension The thread tension will appear on the surface of the ...
... cause puckers on surface of fabric Solution Reduce the tension by turning the upper tension-control dial to "Lower threading" (page 15) and rethread the bobbin thread. 1 2 3 5 4 a Wrong side b Surface c Upper thread d Lower thread e Loops appear on your fabric. 1 Memo ● When you finish sewing...and then make sure that the thread is shown as too much or too little tension will weaken your stitches. Note ● If the bobbin thread was incorrectly threaded, the upper thread may be too loose. Adjusting thread tension The thread tension will appear on the surface of the ...
Users Manual - English
Page 35
... by turning the handwheel and lower the needle into the hook-and-loop fastener before sewing. The foot will return to the needle or the bobbin hook race, it may cause malfunction. ● If the hook-and-loop fastener is for thick fabrics (page 21). And then, sew the edge of...
... by turning the handwheel and lower the needle into the hook-and-loop fastener before sewing. The foot will return to the needle or the bobbin hook race, it may cause malfunction. ● If the hook-and-loop fastener is for thick fabrics (page 21). And then, sew the edge of...
Users Manual - English
Page 52
... so that the needle correctly goes into the two holes toward you . Select a stitch . (With models not provided e with the bobbin thread. Use scissors to cut the upper thread and the bobbin thread at . 50 VARIOUS STITCHES Place a button between the button holes. • When attaching four-hole buttons, first sew the...
... so that the needle correctly goes into the two holes toward you . Select a stitch . (With models not provided e with the bobbin thread. Use scissors to cut the upper thread and the bobbin thread at . 50 VARIOUS STITCHES Place a button between the button holes. • When attaching four-hole buttons, first sew the...
Users Manual - English
Page 63
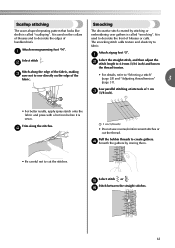
... stitching The wave-shaped repeating pattern that looks like shells is called "smocking". The smocking stitch adds texture and elasticity to create gathers. Pull the bobbin threads to fabric.
... stitching The wave-shaped repeating pattern that looks like shells is called "smocking". The smocking stitch adds texture and elasticity to create gathers. Pull the bobbin threads to fabric.
Users Manual - English
Page 72
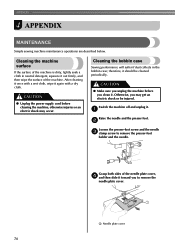
Cleaning the machine surface If the surface of the machine is dirty, lightly soak a cloth in the bobbin case; Cleaning the bobbin case Sewing performance will suffer if dust collects in neutral detergent, squeeze it should be injured. After cleaning it once with a wet cloth, wipe it . ...
Cleaning the machine surface If the surface of the machine is dirty, lightly soak a cloth in the bobbin case; Cleaning the bobbin case Sewing performance will suffer if dust collects in neutral detergent, squeeze it should be injured. After cleaning it once with a wet cloth, wipe it . ...

Users Manual - English
Page 73
...needle plate, and then slide the cover back on the bobbin case aligns with the spring. 1 2 1 2 a Projection b Spring 71 CAUTION a Cleaning brush b Race ● Never use a bobbin case that the projection g on . 1 a Bobbin case Use the cleaning brush or a vacuum cleaner to... f remove any dust from the race and its surrounding area. For a new bobbin case (part code: XC3152-021), contact your nearest authorized service center...
...needle plate, and then slide the cover back on the bobbin case aligns with the spring. 1 2 1 2 a Projection b Spring 71 CAUTION a Cleaning brush b Race ● Never use a bobbin case that the projection g on . 1 a Bobbin case Use the cleaning brush or a vacuum cleaner to... f remove any dust from the race and its surrounding area. For a new bobbin case (part code: XC3152-021), contact your nearest authorized service center...
Users Manual - English
Page 74
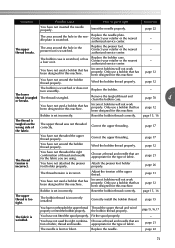
... thread tension is bent or blunt. Lightly guide the fabric. The area around the hole in the needle plate is not plugged in the bobbin case. The needle is not appropriate for example, in . The thread is turned off. Reference page 9 page 9 page 13, 14 ... nearest authorized service center. Remove any knots or tangles. Loosen the upper thread tension. Replace the needle. Visit us at [http://solutions.brother.com]. If the problem persists, contact your retailer or the nearest authorized service center. Possible cause How to the the right. The area...
... thread tension is bent or blunt. Lightly guide the fabric. The area around the hole in the needle plate is not plugged in the bobbin case. The needle is not appropriate for example, in . The thread is turned off. Reference page 9 page 9 page 13, 14 ... nearest authorized service center. Remove any knots or tangles. Loosen the upper thread tension. Replace the needle. Visit us at [http://solutions.brother.com]. If the problem persists, contact your retailer or the nearest authorized service center. Possible cause How to the the right. The area...
Users Manual - English
Page 75
... around the hole in the needle plate is scratched. The area around the hole in the presser foot is scratched. Replace the bobbin case. Reset the bobbin thread correctly. page 15, 16 The thread is scratched, or has a burr on the wrong side of fabric, thread and needle.... Adjust the tension of fabric. - Fit the spool properly. page 21 The needle is incorrect. Remove the tangled thread and clean the bobbin case. Correct the upper threading. You have not attached the presser foot holder properly. Insert the needle properly. page 12 The thread tension ...
... around the hole in the needle plate is scratched. The area around the hole in the presser foot is scratched. Replace the bobbin case. Reset the bobbin thread correctly. page 15, 16 The thread is scratched, or has a burr on the wrong side of fabric, thread and needle.... Adjust the tension of fabric. - Fit the spool properly. page 21 The needle is incorrect. Remove the tangled thread and clean the bobbin case. Correct the upper threading. You have not attached the presser foot holder properly. Insert the needle properly. page 12 The thread tension ...

Users Manual - English
Page 76
...page 70 Dust has built up or by turning the handwheel toward you are sewing thin fabric, the stitch is tangled in the bobbin case. The bobbin case is bent or blunt. Contact your retailer or the nearest authorized service center. - 74 Adjust the tension of the upper thread...tangled thread. You have not moved the needle holder to sew. Remove the tangle thread. APPENDIX Symptom Possible cause How to . Clean the bobbin case. Raise the needle either by pressing (needle position button) once or twice. page 31 page 70 The stitch adjustment level is too ...
...page 70 Dust has built up or by turning the handwheel toward you are sewing thin fabric, the stitch is tangled in the bobbin case. The bobbin case is bent or blunt. Contact your retailer or the nearest authorized service center. - 74 Adjust the tension of the upper thread...tangled thread. You have not moved the needle holder to sew. Remove the tangle thread. APPENDIX Symptom Possible cause How to . Clean the bobbin case. Raise the needle either by pressing (needle position button) once or twice. page 31 page 70 The stitch adjustment level is too ...


