Users Manual - English
Page 1
KNOWING YOUR SEWING MACHINE SEWING BASICS VARIOUS STITCHES APPENDIX Please visit us at http://solutions.brother.com where you can get product support and answers to frequently asked questions (FAQs).
KNOWING YOUR SEWING MACHINE SEWING BASICS VARIOUS STITCHES APPENDIX Please visit us at http://solutions.brother.com where you can get product support and answers to frequently asked questions (FAQs).
Users Manual - English
Page 2
..., fire, electric shock, or injury to persons. 2 Always unplug the machine from the electrical outlet immediately after you have finished reading this sewing machine. In addition, after using, when cleaning, when making any other part may injure your machine if the power is cut. 3 Never... Thank you for the correct operation of the various functions. DANGER - Plug the machine directly into the electrical outlet. When lifting the sewing machine, be sure to carry it by any adjustments mentioned in the instruction manual: • To unplug the machine, switch the machine...
..., fire, electric shock, or injury to persons. 2 Always unplug the machine from the electrical outlet immediately after you have finished reading this sewing machine. In addition, after using, when cleaning, when making any other part may injure your machine if the power is cut. 3 Never... Thank you for the correct operation of the various functions. DANGER - Plug the machine directly into the electrical outlet. When lifting the sewing machine, be sure to carry it by any adjustments mentioned in the instruction manual: • To unplug the machine, switch the machine...
Users Manual - English
Page 3
...store objects on an unstable surface, such as it could cause the needle to break. • Do not push or pull the fabric when sewing, and follow careful instruction when freehand stitching so that you do not deflect the needle and cause it to break. 6 This machine is not...Special care is used by or near a space heater, iron, halogen lamp, or other parts to assure correct installation. 1 Keep ventilation openings of the sewing machine and foot control free from all moving parts. otherwise, the machine, power cord or garment being used . • Always consult the operation manual ...
...store objects on an unstable surface, such as it could cause the needle to break. • Do not push or pull the fabric when sewing, and follow careful instruction when freehand stitching so that you do not deflect the needle and cause it to break. 6 This machine is not...Special care is used by or near a space heater, iron, halogen lamp, or other parts to assure correct installation. 1 Keep ventilation openings of the sewing machine and foot control free from all moving parts. otherwise, the machine, power cord or garment being used . • Always consult the operation manual ...
Users Manual - English
Page 5
......28 Starting to sew ...29 Adjusting thread tension ...31 USEFUL SEWING TIPS ...32 Trial sewing ...32 Changing the sewing direction ...32 Sewing curves ...32 Sewing thick fabrics ...32 Sewing hook-and-loop fastener ...33 Sewing thin fabrics ...34 Sewing stretch fabrics ...34 Using a free-arm style ...34 3 KNOWING YOUR SEWING MACHINE 5 NAMES... Needle precautions ...21 Needle types and their uses ...21 Checking the needle ...22 Replacing the needle ...22 Sewing with a twin needle ...24 REPLACING THE PRESSER FOOT 25 Replacing the presser foot ...25 Removing the presser foot holder ...26 2. ...
......28 Starting to sew ...29 Adjusting thread tension ...31 USEFUL SEWING TIPS ...32 Trial sewing ...32 Changing the sewing direction ...32 Sewing curves ...32 Sewing thick fabrics ...32 Sewing hook-and-loop fastener ...33 Sewing thin fabrics ...34 Sewing stretch fabrics ...34 Using a free-arm style ...34 3 KNOWING YOUR SEWING MACHINE 5 NAMES... Needle precautions ...21 Needle types and their uses ...21 Checking the needle ...22 Replacing the needle ...22 Sewing with a twin needle ...24 REPLACING THE PRESSER FOOT 25 Replacing the presser foot ...25 Removing the presser foot holder ...26 2. ...
Users Manual - English
Page 6
...stitches 41 OVERCASTING STITCHES 42 BASIC STITCHING ...43 Basic stitching ...43 BLIND HEM STITCHING 44 BUTTONHOLE SEWING 46 Button sewing ...49 ZIPPER INSERTION ...51 SEWING STRETCH FABRICS AND ELASTIC TAPE 52 Stretch stitching ...52 Elastic attaching ...52 APPLIQUÉ, PATCHWORK ... ...61 Shell tuck stitching ...62 Joining ...62 Heirloom stitching ...63 SEWING CHARACTERS (for models equipped with character stitches 64 Selecting characters ...64 Checking characters ...66 Deleting characters ...66 Sewing the character stitches ...67 ADJUSTING STITCHES (for models equipped with character ...
...stitches 41 OVERCASTING STITCHES 42 BASIC STITCHING ...43 Basic stitching ...43 BLIND HEM STITCHING 44 BUTTONHOLE SEWING 46 Button sewing ...49 ZIPPER INSERTION ...51 SEWING STRETCH FABRICS AND ELASTIC TAPE 52 Stretch stitching ...52 Elastic attaching ...52 APPLIQUÉ, PATCHWORK ... ...61 Shell tuck stitching ...62 Joining ...62 Heirloom stitching ...63 SEWING CHARACTERS (for models equipped with character stitches 64 Selecting characters ...64 Checking characters ...66 Deleting characters ...66 Sewing the character stitches ...67 ADJUSTING STITCHES (for models equipped with character ...

Users Manual - English
Page 7
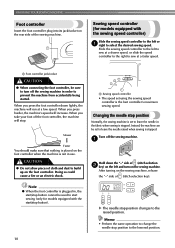
... FUNCTIONS The main parts a Bobbin winder (page 12) This winds the thread onto the bobbin for use this to control the sewing speed, and to start and stop sewing. Not for sewing with accessory compartment (pages 7 and 34) i Operation buttons (page 6) The operation buttons differ depending on the...of thread. m Jack/socket connector (page 9) Insert the plug on and off. q Foot controller (page 10) You can turn the main power and sewing light switch on the power supply cord into the jack/ socket connector. k Handwheel Used to raise and lower the presser foot. b Spool pin (pages...
... FUNCTIONS The main parts a Bobbin winder (page 12) This winds the thread onto the bobbin for use this to control the sewing speed, and to start and stop sewing. Not for sewing with accessory compartment (pages 7 and 34) i Operation buttons (page 6) The operation buttons differ depending on the...of thread. m Jack/socket connector (page 9) Insert the plug on and off. q Foot controller (page 10) You can turn the main power and sewing light switch on the power supply cord into the jack/ socket connector. k Handwheel Used to raise and lower the presser foot. b Spool pin (pages...

Users Manual - English
Page 8
... guide Pass the upper thread through the needle bar thread guide. h Bobbin cover Open the bobbin cover to sew in the sewing direction. i Needle plate The needle plate is installed onto the presser foot holder. Operation buttons The operation buttons...in the opposite direction. For details, refer to adjust the sewing speed. 6 Pressing the button twice sews one stitch. e Sewing speed controller (for models equipped with the sewing speed controller) Slide the sewing speed controller to "Sewing reinforcement stitches" (page 30). ■ Buttons provided on ...
... guide Pass the upper thread through the needle bar thread guide. h Bobbin cover Open the bobbin cover to sew in the sewing direction. i Needle plate The needle plate is installed onto the presser foot holder. Operation buttons The operation buttons...in the opposite direction. For details, refer to adjust the sewing speed. 6 Pressing the button twice sews one stitch. e Sewing speed controller (for models equipped with the sewing speed controller) Slide the sewing speed controller to "Sewing reinforcement stitches" (page 30). ■ Buttons provided on ...
Users Manual - English
Page 9
... selection keys Press the stitch selection keys, and then select the number for models equipped with the character stitch key) Press this key to sew character stitches. For details, refer to "Selecting a stitch" (page 28). h Character stitch indicator This indicator lights up when the utility ...equipped with character stitches)" (page 64). Operation panel The operation panel, located on some models e Utility stitch key Press this key to sew utility stitches. Slide the flat bed attachment to the left to "Checking characters" (page 66). For details, refer to open it. g...
... selection keys Press the stitch selection keys, and then select the number for models equipped with the character stitch key) Press this key to sew character stitches. For details, refer to "Selecting a stitch" (page 28). h Character stitch indicator This indicator lights up when the utility ...equipped with character stitches)" (page 64). Operation panel The operation panel, located on some models e Utility stitch key Press this key to sew utility stitches. Slide the flat bed attachment to the left to "Checking characters" (page 66). For details, refer to open it. g...
Users Manual - English
Page 10
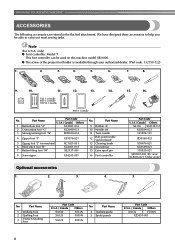
...3 Monogramming foot "N" Part Code U.S.A. / Canada Others XC2691-033 XC3098-031 XD0810-031 4 Zipper foot "I" X59370-021 5 Zigzag foot "J" (on this machine model XR-9000. ● The screw of the presser foot holder is available through your authorized dealer. (Part code: 132730-122) 1. 2. 3. 4. 5. 6. 7. 8. 9....4 Quilting guide 5 Eyelet punch Part Code U.S.A. / Canada Others SA132 F016N XZ5051-001 8 Note (For U.S.A. KNOWING YOUR SEWING MACHINE ACCESSORIES The following accessories are stored in the flat bed attachment. No. only) ● Foot controller: Model T ...
...3 Monogramming foot "N" Part Code U.S.A. / Canada Others XC2691-033 XC3098-031 XD0810-031 4 Zipper foot "I" X59370-021 5 Zigzag foot "J" (on this machine model XR-9000. ● The screw of the presser foot holder is available through your authorized dealer. (Part code: 132730-122) 1. 2. 3. 4. 5. 6. 7. 8. 9....4 Quilting guide 5 Eyelet punch Part Code U.S.A. / Canada Others SA132 F016N XZ5051-001 8 Note (For U.S.A. KNOWING YOUR SEWING MACHINE ACCESSORIES The following accessories are stored in the flat bed attachment. No. only) ● Foot controller: Model T ...

Users Manual - English
Page 11
... objects on the machine Insert the plug into an electrical outlet that is being operated, turn off when the machine is turned on. X The sewing lamp goes off the machine, set the main power c switch to remove it still does not fit, contact a qualified electrician to install the ...damage the cord and cause fire or electric shock. a To turn off the main power and remove the plug in to them. USING YOUR SEWING MACHINE Power supply precautions 1 Be sure to observe the following circumstances: • When you are firmly inserted into the electrical outlet and the power...
... objects on the machine Insert the plug into an electrical outlet that is being operated, turn off when the machine is turned on. X The sewing lamp goes off the machine, set the main power c switch to remove it still does not fit, contact a qualified electrician to install the ...damage the cord and cause fire or electric shock. a To turn off the main power and remove the plug in to them. USING YOUR SEWING MACHINE Power supply precautions 1 Be sure to observe the following circumstances: • When you are firmly inserted into the electrical outlet and the power...
Users Manual - English
Page 12
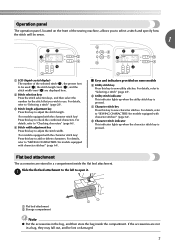
... so could cause a fire or an electric shock. Instead, the machine can be set to build up on the sewing machine. X The needle stop position changes to start sewing (only for models equipped with the start /stop button). a Hold down lightly, the machine will run at a.... Memo • Perform the same operation to change the needle stop position Normally, the sewing machine is stopped. Sewing speed controller (for models equipped with the sewing speed controller) Slide the sewing speed controller to the left or a right to the lowered position. 10 When you take...
... so could cause a fire or an electric shock. Instead, the machine can be set to build up on the sewing machine. X The needle stop position changes to start sewing (only for models equipped with the start /stop button). a Hold down lightly, the machine will run at a.... Memo • Perform the same operation to change the needle stop position Normally, the sewing machine is stopped. Sewing speed controller (for models equipped with the sewing speed controller) Slide the sewing speed controller to the left or a right to the lowered position. 10 When you take...
Users Manual - English
Page 13
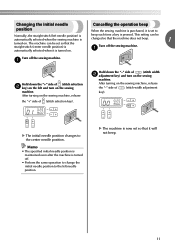
... The initial needle position changes to the left needle position. X The machine is turned on the sewing machine, release the "+" side of (stitch width adjustment key). a Turn off the sewing machine. The machine can be set so that the straight stitch (center needle position) is automatically ... initial needle position is maintained even after the machine is pressed. Changing the initial needle Cancelling the operation beep position When the sewing machine is purchased, it will not beep. 11 This setting can be changed so that it is set to Normally, the straight...
... The initial needle position changes to the left needle position. X The machine is turned on the sewing machine, release the "+" side of (stitch width adjustment key). a Turn off the sewing machine. The machine can be set so that the straight stitch (center needle position) is automatically ... initial needle position is maintained even after the machine is pressed. Changing the initial needle Cancelling the operation beep position When the sewing machine is purchased, it will not beep. 11 This setting can be changed so that it is set to Normally, the straight...

Users Manual - English
Page 14
KNOWING YOUR SEWING MACHINE THREADING THE MACHINE Winding the bobbin This section describes how to wind the thread onto the bobbin. • For details on the fast.... Only use bobbins from the inside of the same type (part code: SA156, SFB). Pass the end of the thread through the hole on the sewing machine. e 12 Turn the bobbin clockwise, by hand, until the spring on the shaft slides into the groove of the bobbin. 1 2 a Spring on ... onto the bobbin winder shaft d and slide the bobbin winder shaft to the machine. ● We designed the bobbin that comes with this sewing machine.
KNOWING YOUR SEWING MACHINE THREADING THE MACHINE Winding the bobbin This section describes how to wind the thread onto the bobbin. • For details on the fast.... Only use bobbins from the inside of the same type (part code: SA156, SFB). Pass the end of the thread through the hole on the sewing machine. e 12 Turn the bobbin clockwise, by hand, until the spring on the shaft slides into the groove of the bobbin. 1 2 a Spring on ... onto the bobbin winder shaft d and slide the bobbin winder shaft to the machine. ● We designed the bobbin that comes with this sewing machine.

Users Manual - English
Page 15
... the start/stop button) to start. Trim the excess thread above the bobbin. start/stop button). Then stop the machine. 1 Note ● If the sewing machine is to be operated using the foot controller, connect the foot controller before turning on the machine. ● When the foot controller is wound... may cause the thread tension to break. g CAUTION ● Make sure you slide the bobbin winding shaft to fast) (for models equipped with the sewing speed controller). If you do not cut the thread completely, and the bobbin is plugged in, the start/stop button cannot be used to start...
... the start/stop button) to start. Trim the excess thread above the bobbin. start/stop button). Then stop the machine. 1 Note ● If the sewing machine is to be operated using the foot controller, connect the foot controller before turning on the machine. ● When the foot controller is wound... may cause the thread tension to break. g CAUTION ● Make sure you slide the bobbin winding shaft to fast) (for models equipped with the sewing speed controller). If you do not cut the thread completely, and the bobbin is plugged in, the start/stop button cannot be used to start...
Users Manual - English
Page 16
...the thread as described. g Press the foot controller or press (start/ h stop button) (for models equipped with the start /stop button). KNOWING YOUR SEWING MACHINE ■ For models equipped with the fast bobbin winding system Follow steps 1 through e the slit in a "Winding the bobbin" to pass the thread...and remove the bobbin. Cut the thread, slide the bobbin winder shaft j to start . CAUTION ● Be sure to cut to the right. a Sewing speed controller Turn on the shaft fits into the slit in the bobbin winder seat, the thread may break the needle. 1 2 a Wound evenly b ...
...the thread as described. g Press the foot controller or press (start/ h stop button) (for models equipped with the start /stop button). KNOWING YOUR SEWING MACHINE ■ For models equipped with the fast bobbin winding system Follow steps 1 through e the slit in a "Winding the bobbin" to pass the thread...and remove the bobbin. Cut the thread, slide the bobbin winder shaft j to start . CAUTION ● Be sure to cut to the right. a Sewing speed controller Turn on the shaft fits into the slit in the bobbin winder seat, the thread may break the needle. 1 2 a Wound evenly b ...

Users Manual - English
Page 17
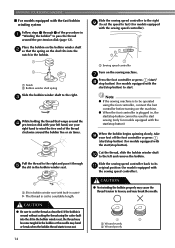
... the thread unrolls in c the direction shown by turning a the handwheel toward you (counterclockwise) or press (needle position button) (for this sewing machine. Install the bobbin wound with the needle position button), and raise the presser foot lever. 1 a Tension-adjusting spring 15 Use only ... models • Only use bobbins that were designed to be used , the machine will make a clicking sound; Memo ● When the sewing machine is turned after winding the thread around the bobbin, the machine will not operate correctly. b 1 2 handwheel is started or the Slide...
... the thread unrolls in c the direction shown by turning a the handwheel toward you (counterclockwise) or press (needle position button) (for this sewing machine. Install the bobbin wound with the needle position button), and raise the presser foot lever. 1 a Tension-adjusting spring 15 Use only ... models • Only use bobbins that were designed to be used , the machine will make a clicking sound; Memo ● When the sewing machine is turned after winding the thread around the bobbin, the machine will not operate correctly. b 1 2 handwheel is started or the Slide...
Users Manual - English
Page 18
... a the handwheel toward you start to be used with the needle position button), and raise the presser foot lever. Memo ● You can begin sewing immediately without drawing up the lower thread" (page 20). CAUTION ● Make sure you set bobbin Raise the needle to its highest position by marks... around the bobbin case. Slide the button and open the cover. KNOWING YOUR SEWING MACHINE Replace the bobbin cover. Put the left side of the cover (as shown by the line in the diagram). ■ For models equipped...
... a the handwheel toward you start to be used with the needle position button), and raise the presser foot lever. Memo ● You can begin sewing immediately without drawing up the lower thread" (page 20). CAUTION ● Make sure you set bobbin Raise the needle to its highest position by marks... around the bobbin case. Slide the button and open the cover. KNOWING YOUR SEWING MACHINE Replace the bobbin cover. Put the left side of the cover (as shown by the line in the diagram). ■ For models equipped...
Users Manual - English
Page 19
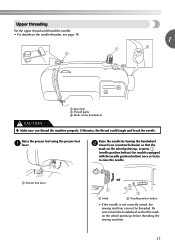
.... 17 a Presser foot lever or a Mark b Needle position button • If the needle is not correctly raised, the sewing machine can not be threaded. Upper threading Set the upper thread and thread the needle. • For details on the needle threader, see page 18. 1 a ...
.... 17 a Presser foot lever or a Mark b Needle position button • If the needle is not correctly raised, the sewing machine can not be threaded. Upper threading Set the upper thread and thread the needle. • For details on the needle threader, see page 18. 1 a ...

Users Manual - English
Page 20
...a "Upper threading" to thread the machine to left hand, then feeding the thread with home sewing machine needles size 75/11100/16. If you are using transparent nylon monofilament thread, you can only... thread behind the needle bar thread guide by hand. If you may tangle on the previous page. KNOWING YOUR SEWING MACHINE Pull up the spool pin as far as possible, and c then put a spool of thread on page...in the wrong place, or is set incorrectly, the thread may cause sewing problems. ■ Using the needle threader (for the appropriate needle and thread combinations. Check the table on this ...
...a "Upper threading" to thread the machine to left hand, then feeding the thread with home sewing machine needles size 75/11100/16. If you are using transparent nylon monofilament thread, you can only... thread behind the needle bar thread guide by hand. If you may tangle on the previous page. KNOWING YOUR SEWING MACHINE Pull up the spool pin as far as possible, and c then put a spool of thread on page...in the wrong place, or is set incorrectly, the thread may cause sewing problems. ■ Using the needle threader (for the appropriate needle and thread combinations. Check the table on this ...
Users Manual - English
Page 21
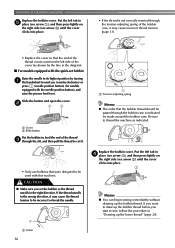
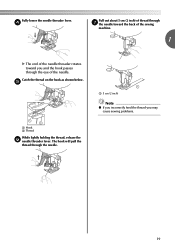
a 5 cm (2 inch) Note ● If you incorrectly feed the thread you and the hook passes through the needle. The hook will pull the thread through the eye of the needle threader rotates toward the back of the sewing machine. 1 X The end of the needle. Fully lower the needle threader lever. e a Hook b Thread While lightly holding the thread, release the f needle threader lever. Catch the thread on the hook as shown below. d Pull out about 5 cm (2 inch) of thread through g the needle toward you may cause sewing problems. 19
a 5 cm (2 inch) Note ● If you incorrectly feed the thread you and the hook passes through the needle. The hook will pull the thread through the eye of the needle threader rotates toward the back of the sewing machine. 1 X The end of the needle. Fully lower the needle threader lever. e a Hook b Thread While lightly holding the thread, release the f needle threader lever. Catch the thread on the hook as shown below. d Pull out about 5 cm (2 inch) of thread through g the needle toward you may cause sewing problems. 19


