Users Manual - English
Page 2
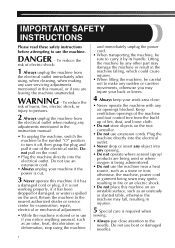
... not to turn it off, then grasp the plug and pull it by any other part may damage the machine or result in the machine falling, which could cause injuries. • When lifting the machine, be sure to carry it out of burns, fire, electric shock, or injury to...8226; Do not operate where aerosol (spray) products are leaving the machine unattended. Return the machine to the nearest authorized dealer or service center for examination, repair, electrical or mechanical adjustment. • While the machine is required when sewing: • Always pay close attention to use if you are ...
... not to turn it off, then grasp the plug and pull it by any other part may damage the machine or result in the machine falling, which could cause injuries. • When lifting the machine, be sure to carry it out of burns, fire, electric shock, or injury to...8226; Do not operate where aerosol (spray) products are leaving the machine unattended. Return the machine to the nearest authorized dealer or service center for examination, repair, electrical or mechanical adjustment. • While the machine is required when sewing: • Always pay close attention to use if you are ...
Users Manual - English
Page 3
...could cause the needle to break. • Do not push or pull the fabric when sewing, and follow the troubleshooting table in this manual. Use accessories recommended by ASTA to the danger...clean the case. For additional product information, visit our web site at www.brother.com SAVE THESE INSTRUCTIONS This machine is required, first follow careful instruction when freehand stitching so that you should... a space heater, iron, halogen lamp, or other parts to inspect and adjust the machine yourself. • Keep fingers away from all moving parts. FOR USERS IN THE UK, EIRE, MALTA AND ...
...could cause the needle to break. • Do not push or pull the fabric when sewing, and follow the troubleshooting table in this manual. Use accessories recommended by ASTA to the danger...clean the case. For additional product information, visit our web site at www.brother.com SAVE THESE INSTRUCTIONS This machine is required, first follow careful instruction when freehand stitching so that you should... a space heater, iron, halogen lamp, or other parts to inspect and adjust the machine yourself. • Keep fingers away from all moving parts. FOR USERS IN THE UK, EIRE, MALTA AND ...
Users Manual - English
Page 4
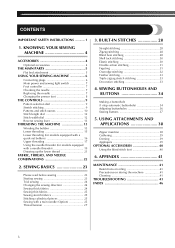
... AND BUTTONS 34 Making a buttonhole (1-step automatic buttonhole 34 Adjusting buttonholes 36 Sewing buttons 37 5. KNOWING YOUR SEWING MACHINE 4 ACCESSORIES 4 Optional accessories 4 THE MAIN PARTS 5 Flat bed attachment 5 USING YOUR SEWING MACHINE 6 Connecting plugs 6 Main power and sewing light switch 7 Foot controller 7 Checking the needle 7 Replacing the needle 7 Changing the presser foot 8 THE CONTROLS 9 Pattern selection dial...
... AND BUTTONS 34 Making a buttonhole (1-step automatic buttonhole 34 Adjusting buttonholes 36 Sewing buttons 37 5. KNOWING YOUR SEWING MACHINE 4 ACCESSORIES 4 Optional accessories 4 THE MAIN PARTS 5 Flat bed attachment 5 USING YOUR SEWING MACHINE 6 Connecting plugs 6 Main power and sewing light switch 7 Foot controller 7 Checking the needle 7 Replacing the needle 7 Changing the presser foot 8 THE CONTROLS 9 Pattern selection dial...
Users Manual - English
Page 5
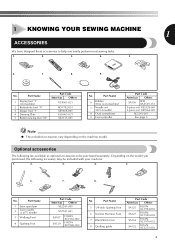
No. 1 KNOWING YOUR SEWING MACHINE 1 ACCESSORIES We have designed these accessories to be included with your machine. 1. 2. 3. 4. 5. 6. 7. 8. Depending on the model you easily perform most sewing tasks. 1. 2. 3. 4. 5. 6. 7. 8. 9. Optional accessories The following are available as optional accessories to help you purchased, the following accessory may be purchased separately. Part Name 5 1/4-inch Quilting Foot 6 Narrow Hemmer Foot 7 Blind...
No. 1 KNOWING YOUR SEWING MACHINE 1 ACCESSORIES We have designed these accessories to be included with your machine. 1. 2. 3. 4. 5. 6. 7. 8. Depending on the model you easily perform most sewing tasks. 1. 2. 3. 4. 5. 6. 7. 8. 9. Optional accessories The following are available as optional accessories to help you purchased, the following accessory may be purchased separately. Part Name 5 1/4-inch Quilting Foot 6 Narrow Hemmer Foot 7 Blind...
Users Manual - English
Page 6
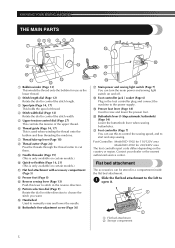
... in the foot controller plug and connect the machine to choose the stitch you want. Contact your dealer or the nearest authorized service center. I G Main power and sewing light switch (Page 7) You can turn the main power and sewing light switch on and off. F Buttonhole fine... Flat bed attachment 2 Storage compartment 5 Slide the flat bed attachment to the left to manually raise and lower the needle. KNOWING YOUR SEWING MACHINE THE MAIN PARTS 654 3 2 1 7 E 8 9 D 0 A C B 1 Bobbin winder (Page 13) This winds the thread onto the bobbin for 220/240V area The...
... in the foot controller plug and connect the machine to choose the stitch you want. Contact your dealer or the nearest authorized service center. I G Main power and sewing light switch (Page 7) You can turn the main power and sewing light switch on and off. F Buttonhole fine... Flat bed attachment 2 Storage compartment 5 Slide the flat bed attachment to the left to manually raise and lower the needle. KNOWING YOUR SEWING MACHINE THE MAIN PARTS 654 3 2 1 7 E 8 9 D 0 A C B 1 Bobbin winder (Page 13) This winds the thread onto the bobbin for 220/240V area The...
Users Manual - English
Page 9
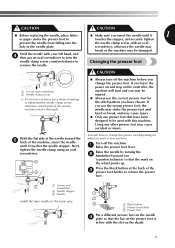
... screwdriver. 2 3 You will start and you may cause injury. ● Only use excessive force when loosening or tightening the needle clamp screw, otherwise certain parts of the sewing machine may be damaged. Hold the needle with the slot on the presser foot is in the needle plate. If you use the wrong presser... foot, the needle may strike the presser foot and bend or break, and may be used with this machine. Press the black button at the back...
... screwdriver. 2 3 You will start and you may cause injury. ● Only use excessive force when loosening or tightening the needle clamp screw, otherwise certain parts of the sewing machine may be damaged. Hold the needle with the slot on the presser foot is in the needle plate. If you use the wrong presser... foot, the needle may strike the presser foot and bend or break, and may be used with this machine. Press the black button at the back...
Users Manual - English
Page 14
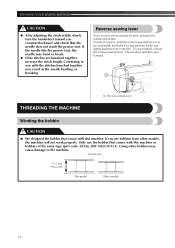
... together, increase the stitch length. Using other models, the machine will then sew forward. 1 1 Reverse sewing lever THREADING THE MACHINE Winding the bobbin CAUTION ● We designed the bobbin that comes with this machine or bobbins of the same type (part code: SA156, SFB: XA5539-151). Actual size 11.5 ...mm (7/16 inch) This model Other models 13 To sew forward, release the reverse sewing lever. If you lightly push the foot controller....
... together, increase the stitch length. Using other models, the machine will then sew forward. 1 1 Reverse sewing lever THREADING THE MACHINE Winding the bobbin CAUTION ● We designed the bobbin that comes with this machine or bobbins of the same type (part code: SA156, SFB: XA5539-151). Actual size 11.5 ...mm (7/16 inch) This model Other models 13 To sew forward, release the reverse sewing lever. If you lightly push the foot controller....
Users Manual - English
Page 24
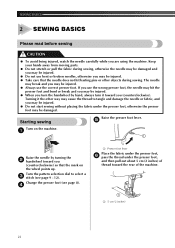
Turning it toward the rear of the machine. 1 1 5 cm (2 inches) 23 The needle may break and you (counterclockwise). Keep your hands away from moving parts. ● Do not stretch or pull the fabric during sewing, otherwise the needle may be damaged and you may be injured. ● Do not use... ● Take care that the mark on the wheel points up. Change the presser foot (see page 9 - 12). Starting sewing Raise the presser foot lever. 5 Turn on the machine. 1 1 Raise the needle by hand, always turn the handwheel by turning the 2 handwheel toward you may be injured. ●...
Turning it toward the rear of the machine. 1 1 5 cm (2 inches) 23 The needle may break and you (counterclockwise). Keep your hands away from moving parts. ● Do not stretch or pull the fabric during sewing, otherwise the needle may be damaged and you may be injured. ● Do not use... ● Take care that the mark on the wheel points up. Change the presser foot (see page 9 - 12). Starting sewing Raise the presser foot lever. 5 Turn on the machine. 1 1 Raise the needle by hand, always turn the handwheel by turning the 2 handwheel toward you may be injured. ●...
Users Manual - English
Page 26
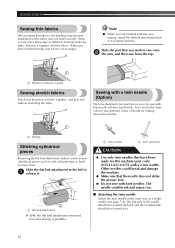
... have been made for making decorative stitches. 1 1 Basting Stitching cylindrical pieces Removing the flat bed attachment makes it together with the fabric. If this machine (part code: X57521-021:2.0/75 with free-arm sewing, install the flat bed attachment back in the same way as cuffs and pant legs, or hardto-reach areas...
... have been made for making decorative stitches. 1 1 Basting Stitching cylindrical pieces Removing the flat bed attachment makes it together with the fabric. If this machine (part code: X57521-021:2.0/75 with free-arm sewing, install the flat bed attachment back in the same way as cuffs and pant legs, or hardto-reach areas...

Users Manual - English
Page 43
...the needle may break, or sewing performance may break. 3 6 1 ▲ mark 2 ● mark 3 Bobbin case • Make sure that is scratched; CAUTION ● Never use a bobbin case that the indicated points are aligned before installing the bobbin case. 42 For a new bobbin case (part code: XE9326-001), contact ... the race and its surrounding area. Insert the bobbin case so that the ▲ mark 7 on the bobbin case aligns with the ● mark on machine as shown below. 1 1 2 2 • Align the ▲ and ● marks. 1 Screws • Make sure that you fit the bobbin case properly...
...the needle may break, or sewing performance may break. 3 6 1 ▲ mark 2 ● mark 3 Bobbin case • Make sure that is scratched; CAUTION ● Never use a bobbin case that the indicated points are aligned before installing the bobbin case. 42 For a new bobbin case (part code: XE9326-001), contact ... the race and its surrounding area. Insert the bobbin case so that the ▲ mark 7 on the bobbin case aligns with the ● mark on machine as shown below. 1 1 2 2 • Align the ▲ and ● marks. 1 Screws • Make sure that you fit the bobbin case properly...


