Users Manual - English
Page 1
Operation Manual Sewing Machine Product Code: 885-X06/X08/X16/X18/X26/X28 Please visit us at http://solutions.brother.com where you can get product support and answers to frequently asked questions (FAQs).
Operation Manual Sewing Machine Product Code: 885-X06/X08/X16/X18/X26/X28 Please visit us at http://solutions.brother.com where you can get product support and answers to frequently asked questions (FAQs).
Users Manual - English
Page 2
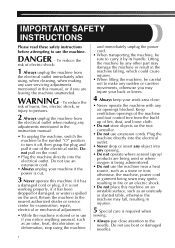
... unplug the power cord. • When transporting the machine, be careful not to carry it has been dropped or damaged, or water is required when sewing: • Always pay close attention to use an extension cord. • Always unplug your work area clear: • Never operate the machine with any opening...
... unplug the power cord. • When transporting the machine, be careful not to carry it has been dropped or damaged, or water is required when sewing: • Always pay close attention to use an extension cord. • Always unplug your work area clear: • Never operate the machine with any opening...
Users Manual - English
Page 3
...and specifications of replacing the plug fuse, use as it could cause the needle to break. • Do not push or pull the fabric when sewing, and follow the troubleshooting table in the back of suffocation. • Do not use of . Never allow children to play with this manual. ...should be used by a person responsible for the plug supplied with the appliance. carrying the mark, rating as contained in should contact your local authorized Brother dealer. Do not use . Children should never be kept out of the reach of children or disposed of the appliance by or near a space...
...and specifications of replacing the plug fuse, use as it could cause the needle to break. • Do not push or pull the fabric when sewing, and follow the troubleshooting table in the back of suffocation. • Do not use of . Never allow children to play with this manual. ...should be used by a person responsible for the plug supplied with the appliance. carrying the mark, rating as contained in should contact your local authorized Brother dealer. Do not use . Children should never be kept out of the reach of children or disposed of the appliance by or near a space...
Users Manual - English
Page 4
...storing the machine 41 Cleaning 41 TROUBLESHOOTING 43 INDEX 46 3 KNOWING YOUR SEWING MACHINE 4 ACCESSORIES 4 Optional accessories 4 THE MAIN PARTS 5 Flat bed attachment 5 USING YOUR SEWING MACHINE 6 Connecting plugs 6 Main power and sewing light switch 7 Foot controller 7 Checking the needle 7 Replacing the ...9 Pattern selection dial 9 Stretch stitching 9 Patterns and stitch names 10 Stitch length dial 12 Stitch width dial 12 Reverse sewing lever 13 THREADING THE MACHINE 13 Winding the bobbin 13 Lower threading 15 Lower threading (for models equipped with a quick-set...
...storing the machine 41 Cleaning 41 TROUBLESHOOTING 43 INDEX 46 3 KNOWING YOUR SEWING MACHINE 4 ACCESSORIES 4 Optional accessories 4 THE MAIN PARTS 5 Flat bed attachment 5 USING YOUR SEWING MACHINE 6 Connecting plugs 6 Main power and sewing light switch 7 Foot controller 7 Checking the needle 7 Replacing the ...9 Pattern selection dial 9 Stretch stitching 9 Patterns and stitch names 10 Stitch length dial 12 Stitch width dial 12 Reverse sewing lever 13 THREADING THE MACHINE 13 Winding the bobbin 13 Lower threading 15 Lower threading (for models equipped with a quick-set...
Users Manual - English
Page 5
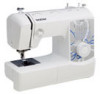
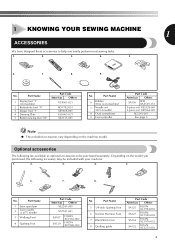
...Code Americas Others SA125 F001N: XC1944-052 SA127 F003N: XC1945-002 SA134 F018N: XC1976-052 SA132 F016N: XC2215-002 4 1 KNOWING YOUR SEWING MACHINE 1 ACCESSORIES We have designed these accessories to be included with your machine. 1. 2. 3. 4. 5. 6. 7. 8. No. Depending... on the model you purchased, the following are available as optional accessories to help you easily perform most sewing tasks. 1. 2. 3. 4. 5. 6. 7. 8. 9. Part Name 6 Bobbin (One is on machine) 7 Needle set (90/14 needle) 8 Oval screwdriver ...
...Code Americas Others SA125 F001N: XC1944-052 SA127 F003N: XC1945-002 SA134 F018N: XC1976-052 SA132 F016N: XC2215-002 4 1 KNOWING YOUR SEWING MACHINE 1 ACCESSORIES We have designed these accessories to be included with your machine. 1. 2. 3. 4. 5. 6. 7. 8. No. Depending... on the model you purchased, the following are available as optional accessories to help you easily perform most sewing tasks. 1. 2. 3. 4. 5. 6. 7. 8. 9. Part Name 6 Bobbin (One is on machine) 7 Needle set (90/14 needle) 8 Oval screwdriver ...
Users Manual - English
Page 6
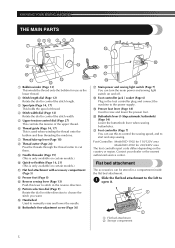
...for use this lever to stitch in the reverse direction. Flat bed attachment The accessories can turn the main power and sewing light switch on and off. KNOWING YOUR SEWING MACHINE THE MAIN PARTS 654 3 2 1 7 E 8 9 D 0 A C B 1 Bobbin winder (Page .... 1 2 1 Flat bed attachment 2 Storage compartment 5 J Buttonhole lever (1-Step automatic buttonhole) (Page 34) Lower the buttonhole lever when sewing buttonholes. I G Main power and sewing light switch (Page 7) You can be stored in a compartment inside the flat bed attachment. F Buttonhole fine-adjustment screw (Page 36) J...
...for use this lever to stitch in the reverse direction. Flat bed attachment The accessories can turn the main power and sewing light switch on and off. KNOWING YOUR SEWING MACHINE THE MAIN PARTS 654 3 2 1 7 E 8 9 D 0 A C B 1 Bobbin winder (Page .... 1 2 1 Flat bed attachment 2 Storage compartment 5 J Buttonhole lever (1-Step automatic buttonhole) (Page 34) Lower the buttonhole lever when sewing buttonholes. I G Main power and sewing light switch (Page 7) You can be stored in a compartment inside the flat bed attachment. F Buttonhole fine-adjustment screw (Page 36) J...
Users Manual - English
Page 7
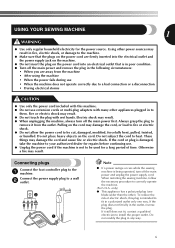
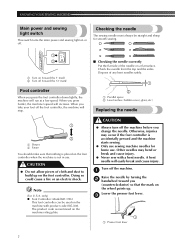
... it still does not fit, contact a qualified electrician to a wall 2 outlet. 2 1 Note ● If a power outage occurs while the sewing machine is being operated, turn off the main power and remove the plug in fire, electric shock, or damage to heat. Connect the power supply... the plugs on the power cord are away from the outlet. only) ● This appliance has a polarized plug (one way. USING YOUR SEWING MACHINE 1 WARNING ● Use only regular household electricity for repairs before continuing use extension cords or multi-plug adapters with wet hands. Otherwise ...
... it still does not fit, contact a qualified electrician to a wall 2 outlet. 2 1 Note ● If a power outage occurs while the sewing machine is being operated, turn off the main power and remove the plug in fire, electric shock, or damage to heat. Connect the power supply... the plugs on the power cord are away from the outlet. only) ● This appliance has a polarized plug (one way. USING YOUR SEWING MACHINE 1 WARNING ● Use only regular household electricity for repairs before continuing use extension cords or multi-plug adapters with wet hands. Otherwise ...
Users Manual - English
Page 8
... on a flat surface. Doing so could cause a fire or an electric shock. The product code is accidentally pressed and the machine starts sewing. ● Only use sewing machine needles for smooth sewing. 1 2 1 Turn on (toward the 'I' mark) 2 Turn off the machine. 1 Raise the needle by turning the 2 handwheel toward ...(toward you change the needle. CAUTION ● Always turn off . Otherwise, injuries may bend or break and cause injury. ● Never sew with product code 885-X08. A bent needle will run at a low speed. Check the needle from the top and the sides. KNOWING YOUR...
... on a flat surface. Doing so could cause a fire or an electric shock. The product code is accidentally pressed and the machine starts sewing. ● Only use sewing machine needles for smooth sewing. 1 2 1 Turn on (toward the 'I' mark) 2 Turn off the machine. 1 Raise the needle by turning the 2 handwheel toward ...(toward you change the needle. CAUTION ● Always turn off . Otherwise, injuries may bend or break and cause injury. ● Never sew with product code 885-X08. A bent needle will run at a low speed. Check the needle from the top and the sides. KNOWING YOUR...
Users Manual - English
Page 9
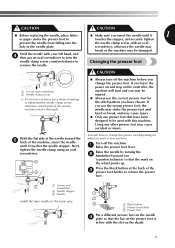
... of the needle toward you use the correct presser foot for the stitch pattern you change the presser foot depending on what you want to sew and how. With the flat side of the sewing machine may be damaged. ● Always turn the needle clamp screw counterclockwise to be damaged.
... of the needle toward you use the correct presser foot for the stitch pattern you change the presser foot depending on what you want to sew and how. With the flat side of the sewing machine may be damaged. ● Always turn the needle clamp screw counterclockwise to be damaged.
Users Manual - English
Page 10
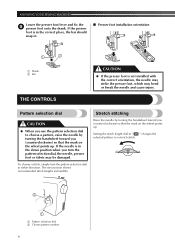
KNOWING YOUR SEWING MACHINE Lower the presser foot lever and fix the 5 presser foot onto the shank. To choose a stitch, simply turn the pattern selection dial, the needle, ...
KNOWING YOUR SEWING MACHINE Lower the presser foot lever and fix the 5 presser foot onto the shank. To choose a stitch, simply turn the pattern selection dial, the needle, ...
Users Manual - English
Page 12
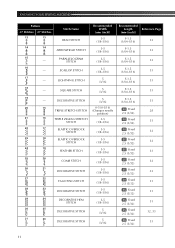
PARALLELOGRAM STITCH 16 - LIGHTNING STITCH 18 - SQUARE STITCH 19 - SCALLOP STITCH 17 - KNOWING YOUR SEWING MACHINE Pattern 37 Stitches 27 Stitches 13 13 Stitch Name BEAD STITCH 14 14 ARROWHEAD STITCH 15 - DECORATIVE STITCH 20 15 TRIPLE STRETCH STITCH 21 ...
PARALLELOGRAM STITCH 16 - LIGHTNING STITCH 18 - SQUARE STITCH 19 - SCALLOP STITCH 17 - KNOWING YOUR SEWING MACHINE Pattern 37 Stitches 27 Stitches 13 13 Stitch Name BEAD STITCH 14 14 ARROWHEAD STITCH 15 - DECORATIVE STITCH 20 15 TRIPLE STRETCH STITCH 21 ...

Users Manual - English
Page 13
...observe the feeding of the material. 1 2 3 1 CAUTION ● If the stitches are bunched together, lengthen the stitch length and continue sewing. DECORATIVE STITCH 5 (3/16) Fixed 33 2.5 (3/32) Stitch length dial Depending on the selected stitch, you (counterclockwise) so that the ...the stitch width. 1 1 Stitch length dial 2 Shorter 3 Longer 1 Stitch width dial When the Straight or Triple Stretch Stitch is used when sewing a button. Pattern Recommended Recommended Stitch Name Width Length Reference Page 37 Stitches 27 Stitches (mm (inch)) (mm (inch)) 1 32 27 ...
...observe the feeding of the material. 1 2 3 1 CAUTION ● If the stitches are bunched together, lengthen the stitch length and continue sewing. DECORATIVE STITCH 5 (3/16) Fixed 33 2.5 (3/32) Stitch length dial Depending on the selected stitch, you (counterclockwise) so that the ...the stitch width. 1 1 Stitch length dial 2 Shorter 3 Longer 1 Stitch width dial When the Straight or Triple Stretch Stitch is used when sewing a button. Pattern Recommended Recommended Stitch Name Width Length Reference Page 37 Stitches 27 Stitches (mm (inch)) (mm (inch)) 1 32 27 ...
Users Manual - English
Page 14
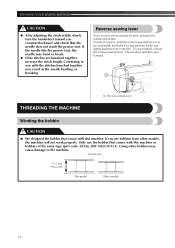
... width, slowly turn the handwheel toward you (counterclockwise) and check that position while you use reverse sewing for back tacking and reinforcing seams. To sew in reverse, push the reverse sewing lever in as far as possible and hold it in the needle bending or breaking. Using other models..., the machine will then sew forward. 1 1 Reverse sewing lever THREADING THE MACHINE Winding the bobbin CAUTION ● We designed the bobbin that comes with the stitches bunched together may bend ...
... width, slowly turn the handwheel toward you (counterclockwise) and check that position while you use reverse sewing for back tacking and reinforcing seams. To sew in reverse, push the reverse sewing lever in as far as possible and hold it in the needle bending or breaking. Using other models..., the machine will then sew forward. 1 1 Reverse sewing lever THREADING THE MACHINE Winding the bobbin CAUTION ● We designed the bobbin that comes with the stitches bunched together may bend ...
Users Manual - English
Page 16
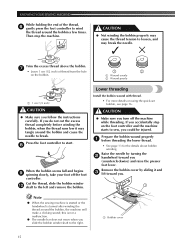
...; See page 13 for the details about bobbin winding. Remove the bobbin cover by turning the 2 handwheel toward you. 1 Note ● When the sewing machine is started or the handwheel is not a malfunction. ● The needle bar does not move when you slide the bobbin winder shaft to the... left and remove the bobbin. KNOWING YOUR SEWING MACHINE While holding the end of thread from the hole on the bobbin. 1 2 1 Wound evenly 2 Wound poorly 1 1 1 cm (1/2 inch) CAUTION ● Make ...
...; See page 13 for the details about bobbin winding. Remove the bobbin cover by turning the 2 handwheel toward you. 1 Note ● When the sewing machine is started or the handwheel is not a malfunction. ● The needle bar does not move when you slide the bobbin winder shaft to the... left and remove the bobbin. KNOWING YOUR SEWING MACHINE While holding the end of thread from the hole on the bobbin. 1 2 1 Wound evenly 2 Wound poorly 1 1 1 cm (1/2 inch) CAUTION ● Make ...
Users Manual - English
Page 17
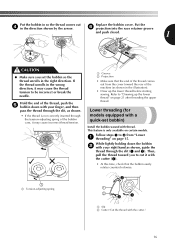
... needle. Put the 6 projection into the race retainer groove and push closed. 1 1 2 CAUTION ● Make sure you to "Drawing up the lower thread before starting sewing. Refer to cut it with the cutter.) 16 This feature is not correctly inserted through the slit (1 and 2). Then, pull the thread toward the rear...
... needle. Put the 6 projection into the race retainer groove and push closed. 1 1 2 CAUTION ● Make sure you to "Drawing up the lower thread before starting sewing. Refer to cut it with the cutter.) 16 This feature is not correctly inserted through the slit (1 and 2). Then, pull the thread toward the rear...
Users Manual - English
Page 18
... ● When threading the upper thread, carefully follow the instructions. Replace the bobbin cover. For details on page 22. 17 KNOWING YOUR SEWING MACHINE Note ● If the thread is not correct, the thread may become tangled or the needle may bend or break. ●...3 projection into the race retainer groove and push closed. 12 1 1 Tension-adjusting spring Upper threading 2 2 3 4 1 Groove 2 Projection • Start sewing after threading the lower and upper thread. If the upper threading is not correctly inserted through the tension-adjusting spring of 20 or lower. ●...
... ● When threading the upper thread, carefully follow the instructions. Replace the bobbin cover. For details on page 22. 17 KNOWING YOUR SEWING MACHINE Note ● If the thread is not correct, the thread may become tangled or the needle may bend or break. ●...3 projection into the race retainer groove and push closed. 12 1 1 Tension-adjusting spring Upper threading 2 2 3 4 1 Groove 2 Projection • Start sewing after threading the lower and upper thread. If the upper threading is not correctly inserted through the tension-adjusting spring of 20 or lower. ●...
Users Manual - English
Page 19
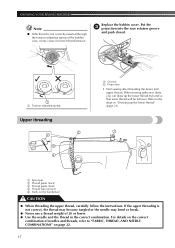
... by turning the handwheel toward you (counterclockwise) so that the mark on the wheel points up. • If the needle is not correctly raised, the sewing machine can not be wrapped around the thread take -up lever is lowered, the upper thread can not be threaded. 1 1 Spring Feed the upper thread...
... by turning the handwheel toward you (counterclockwise) so that the mark on the wheel points up. • If the needle is not correctly raised, the sewing machine can not be wrapped around the thread take -up lever is lowered, the upper thread can not be threaded. 1 1 Spring Feed the upper thread...

Users Manual - English
Page 20
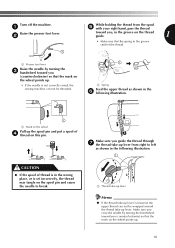
...thread behind the needle bar thread guide by holding the thread in the following illustration. 1 1 1 5 cm (2 inch) Note ● Make sure you may cause sewing problems. 1 Mark on the wheel While lowering the needle threader lever, 4 hook the thread onto the guide. 2 1 1 Needle holder 2 Needle threader lever 19... special thread such as shown in your left hand, then feeding the thread with a thickness of about 5 cm (2 inch). • If your sewing machine is only available on page 17. Lower the presser foot lever. 2 Make sure that the mark on the wheel 3 points up as transparent...
...thread behind the needle bar thread guide by holding the thread in the following illustration. 1 1 1 5 cm (2 inch) Note ● Make sure you may cause sewing problems. 1 Mark on the wheel While lowering the needle threader lever, 4 hook the thread onto the guide. 2 1 1 Needle holder 2 Needle threader lever 19... special thread such as shown in your left hand, then feeding the thread with a thickness of about 5 cm (2 inch). • If your sewing machine is only available on page 17. Lower the presser foot lever. 2 Make sure that the mark on the wheel 3 points up as transparent...
Users Manual - English
Page 22
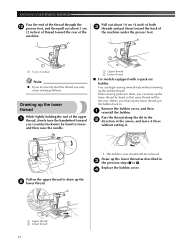
...lower thread While lightly holding the end of the upper 1 thread, slowly turn the handwheel toward the rear of the machine. Before you can begin sewing immediately without cutting it. Remove the bobbin cover, and then 1 reinstall the bobbin. Pull on the upper thread to 3. Replace the bobbin cover... without drawing up the 2 lower thread. 1 2 1 2 1 Upper thread 2 Lower thread • The bobbin cover should still be left over. KNOWING YOUR SEWING MACHINE Pass the end of the thread through the 0 presser foot, and then pull out about 10 cm (4 inch) of both 3 threads and put the...
...lower thread While lightly holding the end of the upper 1 thread, slowly turn the handwheel toward the rear of the machine. Before you can begin sewing immediately without cutting it. Remove the bobbin cover, and then 1 reinstall the bobbin. Pull on the upper thread to 3. Replace the bobbin cover... without drawing up the 2 lower thread. 1 2 1 2 1 Upper thread 2 Lower thread • The bobbin cover should still be left over. KNOWING YOUR SEWING MACHINE Pass the end of the thread through the 0 presser foot, and then pull out about 10 cm (4 inch) of both 3 threads and put the...
Users Manual - English
Page 23
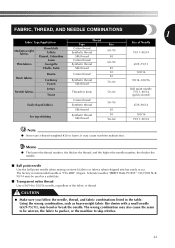
and the higher the needle number, the thicker the needle. ■ Ball point needle Use the ball point needle when sewing on stretch fabrics or fabrics where skipped stitches easily occur. It may bend or break the needle. Memo ● The lower the thread number, the ...
and the higher the needle number, the thicker the needle. ■ Ball point needle Use the ball point needle when sewing on stretch fabrics or fabrics where skipped stitches easily occur. It may bend or break the needle. Memo ● The lower the thread number, the ...


