
Users Manual - English
Page 2
... main switch to be used by pulling on the cord. "SAVE THESE INSTRUCTIONS" "This sewing machine is required around the sewing machine needle. 11. Close attention is necessary when the sewing machine is being administered. 8. Use only accessories recommended by young children or infirm persons without supervision...after using and before changing the light bulb. Never operate the sewing machine with any openings. 6. The wrong plate can cause the needle to break. 14. Always unplug the sewing machine from the electrical outlet when removing covers, lubricating, or when ...
... main switch to be used by pulling on the cord. "SAVE THESE INSTRUCTIONS" "This sewing machine is required around the sewing machine needle. 11. Close attention is necessary when the sewing machine is being administered. 8. Use only accessories recommended by young children or infirm persons without supervision...after using and before changing the light bulb. Never operate the sewing machine with any openings. 6. The wrong plate can cause the needle to break. 14. Always unplug the sewing machine from the electrical outlet when removing covers, lubricating, or when ...

Users Manual - English
Page 6
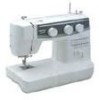
... KNOWING YOUR SEWING MACHINE PRINCIPAL PARTS 1 ACCESSORIES 3 OPERATING YOUR SEWING MACHINE 5 Connecting Plugs 5 Main Power and Sewing Light Switches 6 Foot Controller 6 Inserting the Needle 7 Checking the Needle 7 Changing the Presser Foot 8 Converting to Free-Arm Style 9 Steadying the Machine 9 VARIOUS ...39 Feather Stitching 40 Triple Zigzag Stretch Stitching 41 Decorative Stitching 41 BUTTONHOLE AND BUTTON SEWING Making a Buttonhole (1 Step Automatic Buttonhole 42 Making a Buttonhole (4 Step Buttonhole 44 Buttonhole Fine Adjustment 47 Button Sewing 49 USING ATTACHMENTS...
... KNOWING YOUR SEWING MACHINE PRINCIPAL PARTS 1 ACCESSORIES 3 OPERATING YOUR SEWING MACHINE 5 Connecting Plugs 5 Main Power and Sewing Light Switches 6 Foot Controller 6 Inserting the Needle 7 Checking the Needle 7 Changing the Presser Foot 8 Converting to Free-Arm Style 9 Steadying the Machine 9 VARIOUS ...39 Feather Stitching 40 Triple Zigzag Stretch Stitching 41 Decorative Stitching 41 BUTTONHOLE AND BUTTON SEWING Making a Buttonhole (1 Step Automatic Buttonhole 42 Making a Buttonhole (4 Step Buttonhole 44 Buttonhole Fine Adjustment 47 Button Sewing 49 USING ATTACHMENTS...

Users Manual - English
Page 9
... toward you (counterclockwise) to control sewing speed start and stop. H Foot controller Used to raise and lower the needle. E Main power/sewing light switch Turns the main power and sewing light on and off. D C E G F H BUTTONHOLE AND BUTTON SEWING USING ATTACHMENTS AND APPLICATIONS MAINTENANCE INDEX ... dial Turn in the reverse direction. G Presser foot lever Raises and lowers the presser foot. CONTENTS KNOWING YOUR SEWING MACHINE STRAIGHT AND ZIGZAG STITCHING BUILT-IN STITCHES PRINCIPAL PARTS 34 62 1 1 Bobbin winding assembly Winds the thread onto the...
... toward you (counterclockwise) to control sewing speed start and stop. H Foot controller Used to raise and lower the needle. E Main power/sewing light switch Turns the main power and sewing light on and off. D C E G F H BUTTONHOLE AND BUTTON SEWING USING ATTACHMENTS AND APPLICATIONS MAINTENANCE INDEX ... dial Turn in the reverse direction. G Presser foot lever Raises and lowers the presser foot. CONTENTS KNOWING YOUR SEWING MACHINE STRAIGHT AND ZIGZAG STITCHING BUILT-IN STITCHES PRINCIPAL PARTS 34 62 1 1 Bobbin winding assembly Winds the thread onto the...

Users Manual - English
Page 13
... evitar choques eléctricos. 1. FUNCIONAMIENTO DE LA MÁQUINA DE COSER FONCTIONNEMENT DE LA MACHINE A COUDRE Conexión de los enchufes Raccordement 1. Brancher la fiche d'alimentation à une...in the outlet, reverse the plug. When changing the needle, bobbin or light bulb or when the sew- PRÉCAUTION: 1. BUTTONHOLE AND BUTTON SEWING USING ATTACHMENTS AND APPLICATIONS MAINTENANCE INDEX 5 Connect the power... ATENCIÓN: 1. CONTENTS KNOWING YOUR SEWING MACHINE STRAIGHT AND ZIGZAG STITCHING BUILT-IN STITCHES OPERATING YOUR...
... evitar choques eléctricos. 1. FUNCIONAMIENTO DE LA MÁQUINA DE COSER FONCTIONNEMENT DE LA MACHINE A COUDRE Conexión de los enchufes Raccordement 1. Brancher la fiche d'alimentation à une...in the outlet, reverse the plug. When changing the needle, bobbin or light bulb or when the sew- PRÉCAUTION: 1. BUTTONHOLE AND BUTTON SEWING USING ATTACHMENTS AND APPLICATIONS MAINTENANCE INDEX 5 Connect the power... ATENCIÓN: 1. CONTENTS KNOWING YOUR SEWING MACHINE STRAIGHT AND ZIGZAG STITCHING BUILT-IN STITCHES OPERATING YOUR...
Users Manual - English
Page 19
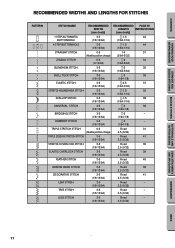
...SEWING MACHINE STRAIGHT AND ZIGZAG STITCHING BUILT-IN STITCHES RECOMMENDED WIDTHS AND LENGTHS FOR STITCHES PATTERN C A STITCH NAME RECOMMENDED WIDTH [mm (inch)] RECOMMENDED PAGE IN LENGTH INSTRUCTIONS [mm (inch)] 1 STEP AUTOMATIC BUTTONHOLE 3-5 -1.5 42 (1/8-13/64) (1/64-1/16) 4 STEP BUTTONHOLE 3-5 -1.5 44 (1/8-13/64) (1/64-1/16) STRAIGHT STITCH 0-5 1-4 31 (Needle... 2.5 (3/32) ELASTIC OVERLOCK STITCH 3-5 Fixed 39 (1/8-13/64) 2.5 (3/32) FEATHER STITCH 3-5 Fixed 40 (1/8-13/64) 2.5 (3/32) ARROW HEAD STITCH 3-5 Fixed 39 (1/8-13/64) 2.5 (3/32) DECORATIVE...
...SEWING MACHINE STRAIGHT AND ZIGZAG STITCHING BUILT-IN STITCHES RECOMMENDED WIDTHS AND LENGTHS FOR STITCHES PATTERN C A STITCH NAME RECOMMENDED WIDTH [mm (inch)] RECOMMENDED PAGE IN LENGTH INSTRUCTIONS [mm (inch)] 1 STEP AUTOMATIC BUTTONHOLE 3-5 -1.5 42 (1/8-13/64) (1/64-1/16) 4 STEP BUTTONHOLE 3-5 -1.5 44 (1/8-13/64) (1/64-1/16) STRAIGHT STITCH 0-5 1-4 31 (Needle... 2.5 (3/32) ELASTIC OVERLOCK STITCH 3-5 Fixed 39 (1/8-13/64) 2.5 (3/32) FEATHER STITCH 3-5 Fixed 40 (1/8-13/64) 2.5 (3/32) ARROW HEAD STITCH 3-5 Fixed 39 (1/8-13/64) 2.5 (3/32) DECORATIVE...

Users Manual - English
Page 28
... take -up lever to the left (fig. Bring the thread through guides. (See fig. CONTENTS KNOWING YOUR SEWING MACHINE STRAIGHT AND ZIGZAG STITCHING BUILT-IN STITCHES 1 2 4 3 BUTTONHOLE AND BUTTON SEWING USING ATTACHMENTS AND APPLICATIONS A 4 23 1 C B D 4 4 E 5 Upper (Needle) Threading Turn power switch to break, skip stitches or wrinkle the fabric. 20 MAINTENANCE INDEX Raise the...
... take -up lever to the left (fig. Bring the thread through guides. (See fig. CONTENTS KNOWING YOUR SEWING MACHINE STRAIGHT AND ZIGZAG STITCHING BUILT-IN STITCHES 1 2 4 3 BUTTONHOLE AND BUTTON SEWING USING ATTACHMENTS AND APPLICATIONS A 4 23 1 C B D 4 4 E 5 Upper (Needle) Threading Turn power switch to break, skip stitches or wrinkle the fabric. 20 MAINTENANCE INDEX Raise the...

Users Manual - English
Page 30
... 5 Align 5. Turn the balance wheel toward you (counterclockwise) until the bottom of the needle holder aligns with the bottom of the machine (toward the front of the needlethreading-hook holder. 1 Needle holder 2 Needle threader lever NOTE: When using transparent nylon thread, use needles of the sewing machine. • Only use the needle threader with needle sizes #70 to #100.
... 5 Align 5. Turn the balance wheel toward you (counterclockwise) until the bottom of the needle holder aligns with the bottom of the machine (toward the front of the needlethreading-hook holder. 1 Needle holder 2 Needle threader lever NOTE: When using transparent nylon thread, use needles of the sewing machine. • Only use the needle threader with needle sizes #70 to #100.

Users Manual - English
Page 33
...Le fil supérieur doit alors former une boucle avec le fil inférieur. Pull the upper thread toward you (counterclockwise) until the needle moves down and back up from the bobbin in a loop. Avec la main gauche, tenir l'extrémité du fil supé...et l'aiguille. 2. Tire del hilo superior hacia usted y el hilo inferior saldrá de la canilla en un amplio enlace. 4. CONTENTS KNOWING YOUR SEWING MACHINE STRAIGHT AND ZIGZAG STITCHING BUILT-IN STITCHES 1 2 Drawing Up Lower Thread 1. With your right hand, turn the balance wheel toward the back of the ...
...Le fil supérieur doit alors former une boucle avec le fil inférieur. Pull the upper thread toward you (counterclockwise) until the needle moves down and back up from the bobbin in a loop. Avec la main gauche, tenir l'extrémité du fil supé...et l'aiguille. 2. Tire del hilo superior hacia usted y el hilo inferior saldrá de la canilla en un amplio enlace. 4. CONTENTS KNOWING YOUR SEWING MACHINE STRAIGHT AND ZIGZAG STITCHING BUILT-IN STITCHES 1 2 Drawing Up Lower Thread 1. With your right hand, turn the balance wheel toward the back of the ...

Users Manual - English
Page 37
... thread for the upper (spool) and lower (bobbin) threads. CONTENTS KNOWING YOUR SEWING MACHINE STRAIGHT AND ZIGZAG STITCHING BUILT-IN STITCHES CHART OF SEWING FABRICS, NEEDLES AND THREAD COMBINATIONS VERY THIN LIGHTWEIGHT MEDIUM WEIGHT HEAVYWEIGHT SEWING FABRICS Fine tricot, Fine lace, Thin linen, Silk, Organza, Chiffon Voile, Taffeta...Mercería 50 Algodón: 50/60 Seda: "A" Sintético Mercería 50/60 n° 100/16 Algodón: 40/50 Hilo mercería gruesa PRENDAS DE PUNTO Prendas de punto simple, Prendas de punto doble, Jersey, Tricot n° 90/14 ...
... thread for the upper (spool) and lower (bobbin) threads. CONTENTS KNOWING YOUR SEWING MACHINE STRAIGHT AND ZIGZAG STITCHING BUILT-IN STITCHES CHART OF SEWING FABRICS, NEEDLES AND THREAD COMBINATIONS VERY THIN LIGHTWEIGHT MEDIUM WEIGHT HEAVYWEIGHT SEWING FABRICS Fine tricot, Fine lace, Thin linen, Silk, Organza, Chiffon Voile, Taffeta...Mercería 50 Algodón: 50/60 Seda: "A" Sintético Mercería 50/60 n° 100/16 Algodón: 40/50 Hilo mercería gruesa PRENDAS DE PUNTO Prendas de punto simple, Prendas de punto doble, Jersey, Tricot n° 90/14 ...

Users Manual - English
Page 57
... 10 stitches. 6. Remove the material from the machine. CONTENTS KNOWING YOUR SEWING MACHINE STRAIGHT AND ZIGZAG STITCHING BUILT-IN STITCHES Button Sewing Pattern (Zigzag Stitch) Stitch Length Stitch Width Any Foot Button Sewing Foot 1. For example, if the distance between the holes and set ...with the stitch width dial. Attach the button sewing foot. 3. If it hits, see step 1. 5. BUTTONHOLE AND BUTTON SEWING USING ATTACHMENTS AND APPLICATIONS MAINTENANCE INDEX 49 Place the darning plate on the needle plate. (When the machine is 1.5 mm (1/16"), set the appropriate ...
... 10 stitches. 6. Remove the material from the machine. CONTENTS KNOWING YOUR SEWING MACHINE STRAIGHT AND ZIGZAG STITCHING BUILT-IN STITCHES Button Sewing Pattern (Zigzag Stitch) Stitch Length Stitch Width Any Foot Button Sewing Foot 1. For example, if the distance between the holes and set ...with the stitch width dial. Attach the button sewing foot. 3. If it hits, see step 1. 5. BUTTONHOLE AND BUTTON SEWING USING ATTACHMENTS AND APPLICATIONS MAINTENANCE INDEX 49 Place the darning plate on the needle plate. (When the machine is 1.5 mm (1/16"), set the appropriate ...

Users Manual - English
Page 59
..., XL5232, XR34, XL5340 and XR42, use the stitch width dial to select the center needle position. CONTENTS KNOWING YOUR SEWING MACHINE STRAIGHT AND ZIGZAG STITCHING BUILT-IN STITCHES A 1 2 3 B Zipper Inserting Pattern (Straight Stitch) Stitch Length 2-3 Stitch Width 2.5 (Center needle position) Foot Zipper Foot NOTE: After selecting the pattern, set the stitch width dial to...
..., XL5232, XR34, XL5340 and XR42, use the stitch width dial to select the center needle position. CONTENTS KNOWING YOUR SEWING MACHINE STRAIGHT AND ZIGZAG STITCHING BUILT-IN STITCHES A 1 2 3 B Zipper Inserting Pattern (Straight Stitch) Stitch Length 2-3 Stitch Width 2.5 (Center needle position) Foot Zipper Foot NOTE: After selecting the pattern, set the stitch width dial to...

Users Manual - English
Page 68
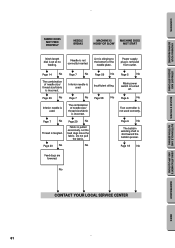
... manual that details the operation you are performing to the bottom of the needle plate. CONTENTS KNOWING YOUR SEWING MACHINE STRAIGHT AND ZIGZAG STITCHING BUILT-IN STITCHES Performance Checklist Whenever sewing difficulties are encountered, review the section in the shuttle hook. Needle is too tight. w Page 20 No w Upper thread tension is incorrectly inserted. Thread...
... manual that details the operation you are performing to the bottom of the needle plate. CONTENTS KNOWING YOUR SEWING MACHINE STRAIGHT AND ZIGZAG STITCHING BUILT-IN STITCHES Performance Checklist Whenever sewing difficulties are encountered, review the section in the shuttle hook. Needle is too tight. w Page 20 No w Upper thread tension is incorrectly inserted. Thread...
Users Manual - English
Page 69
... AND APPLICATIONS MAINTENANCE INDEX 61 w Page 29 No w Fabric is set at no feeding. CONTENTS KNOWING YOUR SEWING MACHINE STRAIGHT AND ZIGZAG STITCHING BUILT-IN STITCHES FABRIC DOES NOT FEED PROPERLY NEEDLE BREAKS MACHINE IS NOISY OR SLOW MACHINE DOES NOT START Stitch length dial is pulled excessively. Do not pull the fabric. w Page 6 No...
... AND APPLICATIONS MAINTENANCE INDEX 61 w Page 29 No w Fabric is set at no feeding. CONTENTS KNOWING YOUR SEWING MACHINE STRAIGHT AND ZIGZAG STITCHING BUILT-IN STITCHES FABRIC DOES NOT FEED PROPERLY NEEDLE BREAKS MACHINE IS NOISY OR SLOW MACHINE DOES NOT START Stitch length dial is pulled excessively. Do not pull the fabric. w Page 6 No...

Users Manual - English
Page 75
CONTENTS KNOWING YOUR SEWING MACHINE STRAIGHT AND ZIGZAG STITCHING BUILT-IN STITCHES Page A Accessories 3 Appliques 54 B Blindhem Stitching 35 Bobbin Threading 19, 24 Winding 18 Bridging Stitch 11 Buttonhole Sewing 42, 44 Buttonhole Fine Adjustment 47 Button Sewing 49 C Chart of Sewing Fabrics, Needles and Thread Combinations .. 29 Cleaning 59 Connecting Plugs 5 D Decorative Stitch 11, 41 Darning...
CONTENTS KNOWING YOUR SEWING MACHINE STRAIGHT AND ZIGZAG STITCHING BUILT-IN STITCHES Page A Accessories 3 Appliques 54 B Blindhem Stitching 35 Bobbin Threading 19, 24 Winding 18 Bridging Stitch 11 Buttonhole Sewing 42, 44 Buttonhole Fine Adjustment 47 Button Sewing 49 C Chart of Sewing Fabrics, Needles and Thread Combinations .. 29 Cleaning 59 Connecting Plugs 5 D Decorative Stitch 11, 41 Darning...


