
Users Manual - English
Page 2
...bobbin, or changing the presser foot. 15. Switch the sewing machine to ensure that they do not play with same type rated 15 watts. This sewing machine is not working properly, if it to break. 12. "SAVE THESE INSTRUCTIONS" "This sewing machine is required around the sewing machine needle. 11. DANGER -...manufac- To unplug, grasp the plug and pull, not the cord. 10. Keep fingers away from the accumulation of the sewing machine and foot controller free from all instructions before using and before changing the light bulb. The wrong plate can cause the needle to ...
...bobbin, or changing the presser foot. 15. Switch the sewing machine to ensure that they do not play with same type rated 15 watts. This sewing machine is not working properly, if it to break. 12. "SAVE THESE INSTRUCTIONS" "This sewing machine is required around the sewing machine needle. 11. DANGER -...manufac- To unplug, grasp the plug and pull, not the cord. 10. Keep fingers away from the accumulation of the sewing machine and foot controller free from all instructions before using and before changing the light bulb. The wrong plate can cause the needle to ...

Users Manual - English
Page 6
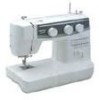
... KNOWING YOUR SEWING MACHINE PRINCIPAL PARTS 1 ACCESSORIES 3 OPERATING YOUR SEWING MACHINE 5 Connecting Plugs 5 Main Power and Sewing Light Switches 6 Foot Controller 6 Inserting the Needle 7 Checking the Needle 7 Changing the Presser Foot 8 Converting to Free-Arm Style 9 Steadying the Machine 9 VARIOUS ...Stitching 37 Scallop Stitching 38 Universal Stitching 38 Overedge Stitching 39 Feather Stitching 40 Triple Zigzag Stretch Stitching 41 Decorative Stitching 41 BUTTONHOLE AND BUTTON SEWING Making a Buttonhole (1 Step Automatic Buttonhole 42 Making a Buttonhole (4 Step...
... KNOWING YOUR SEWING MACHINE PRINCIPAL PARTS 1 ACCESSORIES 3 OPERATING YOUR SEWING MACHINE 5 Connecting Plugs 5 Main Power and Sewing Light Switches 6 Foot Controller 6 Inserting the Needle 7 Checking the Needle 7 Changing the Presser Foot 8 Converting to Free-Arm Style 9 Steadying the Machine 9 VARIOUS ...Stitching 37 Scallop Stitching 38 Universal Stitching 38 Overedge Stitching 39 Feather Stitching 40 Triple Zigzag Stretch Stitching 41 Decorative Stitching 41 BUTTONHOLE AND BUTTON SEWING Making a Buttonhole (1 Step Automatic Buttonhole 42 Making a Buttonhole (4 Step...

Users Manual - English
Page 9
... the length of the upper thread. F Foot controller receptacle Insert the foot controller plug for stitching in the reverse direction. G Presser foot lever Raises and lowers the presser foot. D C E G F H BUTTONHOLE AND BUTTON SEWING USING ATTACHMENTS AND APPLICATIONS MAINTENANCE INDEX 1 A... Thread cutter 7 6 Upper tension control dial Controls the tension of the stitches. 0 Reverse sewing lever Push for operation. CONTENTS KNOWING YOUR SEWING MACHINE STRAIGHT AND ZIGZAG STITCHING BUILT-IN STITCHES PRINCIPAL PARTS 34 62 1 1 Bobbin winding assembly Winds ...
... the length of the upper thread. F Foot controller receptacle Insert the foot controller plug for stitching in the reverse direction. G Presser foot lever Raises and lowers the presser foot. D C E G F H BUTTONHOLE AND BUTTON SEWING USING ATTACHMENTS AND APPLICATIONS MAINTENANCE INDEX 1 A... Thread cutter 7 6 Upper tension control dial Controls the tension of the stitches. 0 Reverse sewing lever Push for operation. CONTENTS KNOWING YOUR SEWING MACHINE STRAIGHT AND ZIGZAG STITCHING BUILT-IN STITCHES PRINCIPAL PARTS 34 62 1 1 Bobbin winding assembly Winds ...
Users Manual - English
Page 14
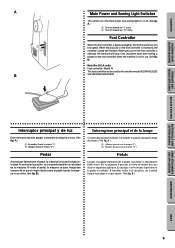
... Este interruptor permite apagar y encender la máquina y la luz. (Ver fig. B.) BUTTONHOLE AND BUTTON SEWING USING ATTACHMENTS AND APPLICATIONS MAINTENANCE INDEX 6 La machine s'arrête lorsque la pression sur la pédale est relâchée. When the pressure on... d'allumer et d'éteindre la machine ainsi que la lampe de couture. (Voir fig. CONTENTS KNOWING YOUR SEWING MACHINE STRAIGHT AND ZIGZAG STITCHING BUILT-IN STITCHES A 1 2 B Main Power and Sewing Light Switches This switch turns the main power and sewing light on the foot controller is not in use. ...
... Este interruptor permite apagar y encender la máquina y la luz. (Ver fig. B.) BUTTONHOLE AND BUTTON SEWING USING ATTACHMENTS AND APPLICATIONS MAINTENANCE INDEX 6 La machine s'arrête lorsque la pression sur la pédale est relâchée. When the pressure on... d'allumer et d'éteindre la machine ainsi que la lampe de couture. (Voir fig. CONTENTS KNOWING YOUR SEWING MACHINE STRAIGHT AND ZIGZAG STITCHING BUILT-IN STITCHES A 1 2 B Main Power and Sewing Light Switches This switch turns the main power and sewing light on the foot controller is not in use. ...

Users Manual - English
Page 28
...the eyelet. 6. Thread the needle from front to "O". 1. While holding the thread as shown in fig. Raise the presser foot lever and turn the balance wheel toward you (counterclockwise) to the left (fig. Guide the thread to the back of the... shown in fig. Pull up lever to break, skip stitches or wrinkle the fabric. 20 MAINTENANCE INDEX CONTENTS KNOWING YOUR SEWING MACHINE STRAIGHT AND ZIGZAG STITCHING BUILT-IN STITCHES 1 2 4 3 BUTTONHOLE AND BUTTON SEWING USING ATTACHMENTS AND APPLICATIONS A 4 23 1 C B D 4 4 E 5 Upper (Needle) Threading Turn power switch...
...the eyelet. 6. Thread the needle from front to "O". 1. While holding the thread as shown in fig. Raise the presser foot lever and turn the balance wheel toward you (counterclockwise) to the left (fig. Guide the thread to the back of the... shown in fig. Pull up lever to break, skip stitches or wrinkle the fabric. 20 MAINTENANCE INDEX CONTENTS KNOWING YOUR SEWING MACHINE STRAIGHT AND ZIGZAG STITCHING BUILT-IN STITCHES 1 2 4 3 BUTTONHOLE AND BUTTON SEWING USING ATTACHMENTS AND APPLICATIONS A 4 23 1 C B D 4 4 E 5 Upper (Needle) Threading Turn power switch...

Users Manual - English
Page 30
... the hook grabs it. 1 Needle holder 2 Needle threader lever 3 Guide 4 Hook holder 5 Align 5. Lower the presser foot lever. 2. BUTTONHOLE AND BUTTON SEWING USING ATTACHMENTS AND APPLICATIONS MAINTENANCE INDEX 22 Turn the balance wheel toward the front of thread through the needle. 6 Hook 7 Thread... the thread through the needle toward you). Raise the needle threader lever and pull out about 5 cm (2") of the machine (toward the back of the sewing machine. • Only use needles of the needlethreading-hook holder. 1 Needle holder 2 Needle threader lever NOTE: When using ...
... the hook grabs it. 1 Needle holder 2 Needle threader lever 3 Guide 4 Hook holder 5 Align 5. Lower the presser foot lever. 2. BUTTONHOLE AND BUTTON SEWING USING ATTACHMENTS AND APPLICATIONS MAINTENANCE INDEX 22 Turn the balance wheel toward the front of thread through the needle. 6 Hook 7 Thread... the thread through the needle toward you). Raise the needle threader lever and pull out about 5 cm (2") of the machine (toward the back of the sewing machine. • Only use needles of the needlethreading-hook holder. 1 Needle holder 2 Needle threader lever NOTE: When using ...

Users Manual - English
Page 33
... boucle avec le fil inférieur. Tirer environ 15 cm de chacun des deux fils et les placer vers l'arrière de la machine, juste derrière le pied-de-biche. Levante el prensatelas y la aguja a sus posiciones más elevadas. 2. Con la mano izquierda, sujete.... 4. Avec la main gauche, tenir l'extrémité du fil supérieur. CONTENTS KNOWING YOUR SEWING MACHINE STRAIGHT AND ZIGZAG STITCHING BUILT-IN STITCHES 1 2 Drawing Up Lower Thread 1. Raise the presser foot and the needle to its highest position. 3. The upper thread should pass between the toes of the...
... boucle avec le fil inférieur. Tirer environ 15 cm de chacun des deux fils et les placer vers l'arrière de la machine, juste derrière le pied-de-biche. Levante el prensatelas y la aguja a sus posiciones más elevadas. 2. Con la mano izquierda, sujete.... 4. Avec la main gauche, tenir l'extrémité du fil supérieur. CONTENTS KNOWING YOUR SEWING MACHINE STRAIGHT AND ZIGZAG STITCHING BUILT-IN STITCHES 1 2 Drawing Up Lower Thread 1. Raise the presser foot and the needle to its highest position. 3. The upper thread should pass between the toes of the...

Users Manual - English
Page 50
... them into the grooves and temporarily tie them there. 3. Hook the gimp thread onto the back end of the buttonhole foot, then bring the two gimp thread ends to " ". 2. CONTENTS KNOWING YOUR SEWING MACHINE STRAIGHT AND ZIGZAG STITCHING BUILT-IN STITCHES A B 1 2 - 3 C PUSH D 3 2 4 1 E PUSH Making a Buttonhole (1 Step Automatic Buttonhole) 4 Pattern Stitch Length Stitch Width...
... them into the grooves and temporarily tie them there. 3. Hook the gimp thread onto the back end of the buttonhole foot, then bring the two gimp thread ends to " ". 2. CONTENTS KNOWING YOUR SEWING MACHINE STRAIGHT AND ZIGZAG STITCHING BUILT-IN STITCHES A B 1 2 - 3 C PUSH D 3 2 4 1 E PUSH Making a Buttonhole (1 Step Automatic Buttonhole) 4 Pattern Stitch Length Stitch Width...

Users Manual - English
Page 57
... at the back of the fabric. If it hits, see step 1. 5. CONTENTS KNOWING YOUR SEWING MACHINE STRAIGHT AND ZIGZAG STITCHING BUILT-IN STITCHES Button Sewing Pattern (Zigzag Stitch) Stitch Length Stitch Width Any Foot Button Sewing Foot 1. Measure the distance between the foot and the fabric and make sure that the needle enters the holes without hitting...
... at the back of the fabric. If it hits, see step 1. 5. CONTENTS KNOWING YOUR SEWING MACHINE STRAIGHT AND ZIGZAG STITCHING BUILT-IN STITCHES Button Sewing Pattern (Zigzag Stitch) Stitch Length Stitch Width Any Foot Button Sewing Foot 1. Measure the distance between the foot and the fabric and make sure that the needle enters the holes without hitting...

Users Manual - English
Page 59
... the left side of the zipper 3 Left pin for correct needle setting. CONTENTS KNOWING YOUR SEWING MACHINE STRAIGHT AND ZIGZAG STITCHING BUILT-IN STITCHES A 1 2 3 B Zipper Inserting Pattern (Straight Stitch) Stitch Length 2-3 Stitch Width 2.5 (Center needle position) Foot Zipper Foot NOTE: After selecting the pattern, set the stitch width dial to 2.5 to the Straight Stitch...
... the left side of the zipper 3 Left pin for correct needle setting. CONTENTS KNOWING YOUR SEWING MACHINE STRAIGHT AND ZIGZAG STITCHING BUILT-IN STITCHES A 1 2 3 B Zipper Inserting Pattern (Straight Stitch) Stitch Length 2-3 Stitch Width 2.5 (Center needle position) Foot Zipper Foot NOTE: After selecting the pattern, set the stitch width dial to 2.5 to the Straight Stitch...
Users Manual - English
Page 69
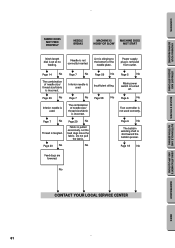
... 59 No w Insufficient oiling. Needle is used. Power supply plug is not used correctly. Do not pull the fabric. w Page 6 No w Foot controller is removed from outlet. w Page 18 No Feed dogs are lowered. w Page 7 No w The combination of needle size/ thread size/fabric...Page 29 No w Inferior needle is set at no feeding. CONTENTS KNOWING YOUR SEWING MACHINE STRAIGHT AND ZIGZAG STITCHING BUILT-IN STITCHES FABRIC DOES NOT FEED PROPERLY NEEDLE BREAKS MACHINE IS NOISY OR SLOW MACHINE DOES NOT START Stitch length dial is used. Lint is turned off. w...
... 59 No w Insufficient oiling. Needle is used. Power supply plug is not used correctly. Do not pull the fabric. w Page 6 No w Foot controller is removed from outlet. w Page 18 No Feed dogs are lowered. w Page 7 No w The combination of needle size/ thread size/fabric...Page 29 No w Inferior needle is set at no feeding. CONTENTS KNOWING YOUR SEWING MACHINE STRAIGHT AND ZIGZAG STITCHING BUILT-IN STITCHES FABRIC DOES NOT FEED PROPERLY NEEDLE BREAKS MACHINE IS NOISY OR SLOW MACHINE DOES NOT START Stitch length dial is used. Lint is turned off. w...

Users Manual - English
Page 75
... KNOWING YOUR SEWING MACHINE STRAIGHT AND ZIGZAG STITCHING BUILT-IN STITCHES Page A Accessories 3 Appliques 54 B Blindhem Stitching 35 Bobbin Threading 19, 24 Winding 18 Bridging Stitch 11 Buttonhole Sewing 42, 44 Buttonhole Fine Adjustment 47 Button Sewing 49 C Chart of Sewing Fabrics, Needles... Elastic Stitching 37 Elastic Overlock 39 Embroidering 55 F Feed Dog Cleaning 59 Lever 17 Finishing a Seam 32-33 Foot Controller Connecting 5 Operating 6 Free-Arm Sewing 9 G Gathering 51 L Legs Stitch 11 Light Bulb Replacement 57 Lower Threading 19 M Main Power Switch 6...
... KNOWING YOUR SEWING MACHINE STRAIGHT AND ZIGZAG STITCHING BUILT-IN STITCHES Page A Accessories 3 Appliques 54 B Blindhem Stitching 35 Bobbin Threading 19, 24 Winding 18 Bridging Stitch 11 Buttonhole Sewing 42, 44 Buttonhole Fine Adjustment 47 Button Sewing 49 C Chart of Sewing Fabrics, Needles... Elastic Stitching 37 Elastic Overlock 39 Embroidering 55 F Feed Dog Cleaning 59 Lever 17 Finishing a Seam 32-33 Foot Controller Connecting 5 Operating 6 Free-Arm Sewing 9 G Gathering 51 L Legs Stitch 11 Light Bulb Replacement 57 Lower Threading 19 M Main Power Switch 6...


