

Users Manual - Multi
Page 2
...needle, changing the needle, threading the bobbin, or changing the presser foot. 15. Always unplug this sewing machine from all instructions before changing the light bulb. Do not allow this machine to ensure that they do not play with same type rated ... with this sewing machine. Do not unplug by young children or impaired persons without supervision. 17. This sewing machine is required around the sewing machine needle. 11. Switch the sewing machine to break. 12. Always unplug the sewing machine from the accumulation of the sewing machine and foot controller free from the ...
...needle, changing the needle, threading the bobbin, or changing the presser foot. 15. Always unplug this sewing machine from all instructions before changing the light bulb. Do not allow this machine to ensure that they do not play with same type rated ... with this sewing machine. Do not unplug by young children or impaired persons without supervision. 17. This sewing machine is required around the sewing machine needle. 11. Switch the sewing machine to break. 12. Always unplug the sewing machine from the accumulation of the sewing machine and foot controller free from the ...
Users Manual - Multi
Page 39
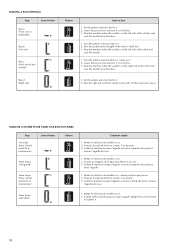
... sur b. 2. Abaisser le pied-de-biche et coudre 5 à 6 points. 3. Stop the machine when the needle is at the left side of the stitch and raise the needle. 1. Turn the pattern selection dial to 6 stitches. 3. Lower the presser foot and sew 5 to b. 2. Sew the predetermined length of the tailor's chalk line. 3. Mettre le sélecteur...
... sur b. 2. Abaisser le pied-de-biche et coudre 5 à 6 points. 3. Stop the machine when the needle is at the left side of the stitch and raise the needle. 1. Turn the pattern selection dial to 6 stitches. 3. Lower the presser foot and sew 5 to b. 2. Sew the predetermined length of the tailor's chalk line. 3. Mettre le sélecteur...
Users Manual - Multi
Page 55
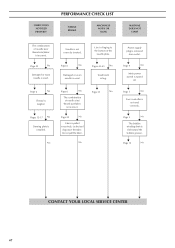
...Fabric is turned off. Page 22 No Damaged or worn needle is not used . Page 5 No Foot controller is used correctly. Page 6 No The combination of the needle plate. Page 4 No Main ...inserted. Page 5 No The bobbin winding shaft is tangled. Page 6 No Thread is slid toward the bobbin presser. Pages 12-17 No Darning plate is used. Page 6 No Damaged or worn needle is installed. Lint ...DOES NOT FEED PROPERLY PERFORMANCE CHECK LIST NEEDLE BREAKS MACHINE IS NOISY OR SLOW MACHINE DOES NOT START The combination of needle size/ thread size/fabric is incorrect.
...Fabric is turned off. Page 22 No Damaged or worn needle is not used . Page 5 No Foot controller is used correctly. Page 6 No The combination of the needle plate. Page 4 No Main ...inserted. Page 5 No The bobbin winding shaft is tangled. Page 6 No Thread is slid toward the bobbin presser. Pages 12-17 No Darning plate is used. Page 6 No Damaged or worn needle is installed. Lint ...DOES NOT FEED PROPERLY PERFORMANCE CHECK LIST NEEDLE BREAKS MACHINE IS NOISY OR SLOW MACHINE DOES NOT START The combination of needle size/ thread size/fabric is incorrect.
Quick Setup Guide - English
Page 1
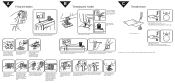
...latch. Hold the bobbin case as shown, insert the bobbin with the top opening around the bobbin winder thread guide. 2 3 4 4 Raise the presser foot lifter. 5 * Raise the thread takeup lever to its highest position by pulling the latch. Guide the thread up lever. Pass the thread into the....) Increase the tension by turning the dial to the left . 6 7 8 ∗If these actions do not correct the problem, please rethread the machine using step A and B. Place the thread spool on the surface of the fabric.) Decrease the tension by turning the dial a higher number. A Filling...
...latch. Hold the bobbin case as shown, insert the bobbin with the top opening around the bobbin winder thread guide. 2 3 4 4 Raise the presser foot lifter. 5 * Raise the thread takeup lever to its highest position by pulling the latch. Guide the thread up lever. Pass the thread into the....) Increase the tension by turning the dial to the left . 6 7 8 ∗If these actions do not correct the problem, please rethread the machine using step A and B. Place the thread spool on the surface of the fabric.) Decrease the tension by turning the dial a higher number. A Filling...


