

Basic Instruction Manual - English
Page 5
... out cleaning. Cleaning Turn off the power switch. Use only the proper replacement parts as the rotary hook If the power switch needs to be left on when carrying out some adjustment, be extremely careful to carry out any applications other injuries. Any problems in machine operation which has casters, the casters should only be used , the weight of the electrical system. CAUTION Sewing This sewing machine...
... out cleaning. Cleaning Turn off the power switch. Use only the proper replacement parts as the rotary hook If the power switch needs to be left on when carrying out some adjustment, be extremely careful to carry out any applications other injuries. Any problems in machine operation which has casters, the casters should only be used , the weight of the electrical system. CAUTION Sewing This sewing machine...

Basic Instruction Manual - English
Page 9
... polyester thread. 2510B Selectable starting speed The sewing speed at the sewing start can be rotated 90 degrees as standard. It prevents seam slippage and also prevents damage to the preferences of the operator. (Contact the place of purchase.) < G50 operation panel > Easy setting of sewing speed from operation panel < When using the G10 operation panel > INSTRUCTION MANUAL CD 8-5. Condensed stitches have a smaller sewing pitch and they help prevent fraying. Adjusting the presser foot...
... polyester thread. 2510B Selectable starting speed The sewing speed at the sewing start can be rotated 90 degrees as standard. It prevents seam slippage and also prevents damage to the preferences of the operator. (Contact the place of purchase.) < G50 operation panel > Easy setting of sewing speed from operation panel < When using the G10 operation panel > INSTRUCTION MANUAL CD 8-5. Condensed stitches have a smaller sewing pitch and they help prevent fraying. Adjusting the presser foot...

Basic Instruction Manual - English
Page 11
INSTALLATION CAUTION Machine installation should be affected by electronic interference from the sewing machine. Do not connect the power cord until installation is used . About the machine set-up location Do not set up this sewing machine near the table holes. 2. 3. Contact your Brother dealer or a qualified electrician for any tools, etc. The machine may operate if the treadle is depressed by mistake, which may be near other injuries. Use both...
INSTALLATION CAUTION Machine installation should be affected by electronic interference from the sewing machine. Do not connect the power cord until installation is used . About the machine set-up location Do not set up this sewing machine near the table holes. 2. 3. Contact your Brother dealer or a qualified electrician for any tools, etc. The machine may operate if the treadle is depressed by mistake, which may be near other injuries. Use both...
Basic Instruction Manual - English
Page 33
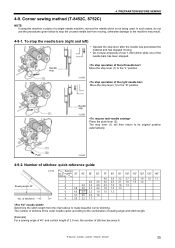
... stitches: quick-reference guide Sewing angle 40° No. of a single-needle machine, remove the needle which is not being used. 4. To stop the needle bars (right and left) Operate the stop lever (1) will then return to the machine may result. 4-9-1. The stop lever after the needle has penetrated the material and has stopped moving , otherwise damage to its original position automatically. Corner sewing method (T-8452C, 8752C) NOTE: If using this machine...
... stitches: quick-reference guide Sewing angle 40° No. of a single-needle machine, remove the needle which is not being used. 4. To stop the needle bars (right and left) Operate the stop lever (1) will then return to the machine may result. 4-9-1. The stop lever after the needle has penetrated the material and has stopped moving , otherwise damage to its original position automatically. Corner sewing method (T-8452C, 8752C) NOTE: If using this machine...

Basic Instruction Manual - English
Page 34
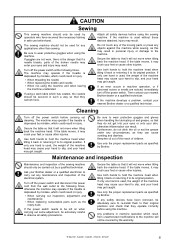
..., the number of stitches can be changed and the function can be operated while sewing is sewn, and then the sewing machine stops automatically. 4164M 26 T-8421C, 8422C, 8452C, 8722C, 8752C After the sewing machine sews a full cycle of stitches set the number of stitches before starting sewing. • In the case of backtack stitches (0−99) in progress. Select the keys and set by A, B, C and D, the thread is trimmed automatically (models with indicators...
..., the number of stitches can be changed and the function can be operated while sewing is sewn, and then the sewing machine stops automatically. 4164M 26 T-8421C, 8422C, 8452C, 8722C, 8752C After the sewing machine sews a full cycle of stitches set the number of stitches before starting sewing. • In the case of backtack stitches (0−99) in progress. Select the keys and set by A, B, C and D, the thread is trimmed automatically (models with indicators...

Basic Instruction Manual - English
Page 35
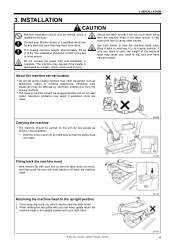
.... The sewing speed can be adjusted while sewing is in the instruction manual CD.) 4170M (17) RESET key This key is depressed to set . • If all bars are switched off . 4174M T-8421C, 8422C, 8452C, 8722C, 8752C 27 Using the lower thread counter" in the instruction manual CD.) 4173M (18) Thread wiper key • When this key. 4172M (15) Lower thread counter display This shows the lower thread counter value...
.... The sewing speed can be adjusted while sewing is in the instruction manual CD.) 4170M (17) RESET key This key is depressed to set . • If all bars are switched off . 4174M T-8421C, 8422C, 8452C, 8722C, 8752C 27 Using the lower thread counter" in the instruction manual CD.) 4173M (18) Thread wiper key • When this key. 4172M (15) Lower thread counter display This shows the lower thread counter value...
Instruction Manual - English
Page 5
... power switch. T-8421C, 8422C, 8452C, 8722C, 8752C iii Secure the table so that it to observe all safety devices before carrying out cleaning. CAUTION Sewing This sewing machine should only be used by Brother. y When threading the needle y When replacing the bobbin and needle y When not using the machine and when leaving the machine unattended If using the machine. Maintenance and inspection Maintenance and inspection of the broken needle may enter your feet...
... power switch. T-8421C, 8422C, 8452C, 8722C, 8752C iii Secure the table so that it to observe all safety devices before carrying out cleaning. CAUTION Sewing This sewing machine should only be used by Brother. y When threading the needle y When replacing the bobbin and needle y When not using the machine and when leaving the machine unattended If using the machine. Maintenance and inspection Maintenance and inspection of the broken needle may enter your feet...
Instruction Manual - English
Page 8
... 5 3-3. Opening the control box cover 11 3-4-2. Connecting the cords 11 3-5. Installing the needle 18 4-2. Using the thread wiper (models with thread trimmer only 44 8-5. Number of stitches: quick-reference guide 26 5. Sewing start 42 8-3. Sewing fixed stitches 31 5-5. Using the lower thread counter 33 6. Sewing continuous backtack stitches 40 8. Setting the maximum sewing speed 45 8-6. Backtacking 49 9-3. Adjusting the thread tension 51 10-2. Table processing diagram 5 3-2. Test operation (Operating the treadle 16 3-6. Threading the upper thread 23...
... 5 3-3. Opening the control box cover 11 3-4-2. Connecting the cords 11 3-5. Installing the needle 18 4-2. Using the thread wiper (models with thread trimmer only 44 8-5. Number of stitches: quick-reference guide 26 5. Sewing start 42 8-3. Sewing fixed stitches 31 5-5. Using the lower thread counter 33 6. Sewing continuous backtack stitches 40 8. Setting the maximum sewing speed 45 8-6. Backtacking 49 9-3. Adjusting the thread tension 51 10-2. Table processing diagram 5 3-2. Test operation (Operating the treadle 16 3-6. Threading the upper thread 23...
Instruction Manual - English
Page 13
... back the machine head. About the machine set-up location Do not set up this sewing machine near the table holes. 2. INSTALLATION 3. Do not connect the power cord until installation is used . If the table moves, it will not move , and then push the arm with both hands to hold the machine head when tilting it back or returning it to the upright position with your feet or...
... back the machine head. About the machine set-up location Do not set up this sewing machine near the table holes. 2. INSTALLATION 3. Do not connect the power cord until installation is used . If the table moves, it will not move , and then push the arm with both hands to hold the machine head when tilting it back or returning it to the upright position with your feet or...

Instruction Manual - English
Page 35
... the machine may result. 4-9-1. Needle stop Move the stop lever (1) to the "R" position. Push 3130M 4-9-2. Needle stop lever (1) to the "L" position. 3128M Move the stop 3129M Press the push lever (2). of the needle bars has been stopped. PREPARATION BEFORE SEWING 4-9. The stop the unused needle bar from moving . Do not sew at speeds of over 1,000 sti/min while one of stitches 6 3131M Sewing No. Number of stitches: quick-reference guide Sewing...
... the machine may result. 4-9-1. Needle stop Move the stop lever (1) to the "R" position. Push 3130M 4-9-2. Needle stop lever (1) to the "L" position. 3128M Move the stop 3129M Press the push lever (2). of the needle bars has been stopped. PREPARATION BEFORE SEWING 4-9. The stop the unused needle bar from moving . Do not sew at speeds of over 1,000 sti/min while one of stitches 6 3131M Sewing No. Number of stitches: quick-reference guide Sewing...
Instruction Manual - English
Page 36
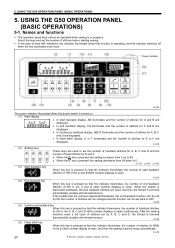
... stitches for E and F. • When the key is pressed, the setting increases from 0 up to 99. • When the key is pressed, the setting decreases from 99 down to set by A, B, C and D, the thread is in the C and D stitch number displays is sewn, and then the sewing machine stops automatically. 4164M 27 T-8421C, 8422C, 8452C, 8722C, 8752C USING THE G50 OPERATION PANEL (BASIC OPERATIONS...
... stitches for E and F. • When the key is pressed, the setting increases from 0 up to 99. • When the key is pressed, the setting decreases from 99 down to set by A, B, C and D, the thread is in the C and D stitch number displays is sewn, and then the sewing machine stops automatically. 4164M 27 T-8421C, 8422C, 8452C, 8722C, 8752C USING THE G50 OPERATION PANEL (BASIC OPERATIONS...

Instruction Manual - English
Page 37
... sewn automatically simply by depressing the treadle once. 4168M (11) Sewing speed control display This shows the sewing speed when the treadle is illuminated, the indicator of the thread wiper key (18) is depressed to the maximum amount. • If all bars are used to return the lower thread counter to "4-8. Using the lower thread counter".) 4170M (17) RESET key This key is used to set number of stitches (start...
... sewn automatically simply by depressing the treadle once. 4168M (11) Sewing speed control display This shows the sewing speed when the treadle is illuminated, the indicator of the thread wiper key (18) is depressed to the maximum amount. • If all bars are used to return the lower thread counter to "4-8. Using the lower thread counter".) 4170M (17) RESET key This key is used to set number of stitches (start...

Instruction Manual - English
Page 62
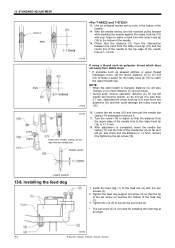
.... y The normal trailing length for increasing ease of working when sewing curves. 1. Use the lifting lever to adjust the floating amount. • To raise the presser foot (1) ... THREAD TENSION 10-3. 10. Raise Lower < Guide to adjustment when sewing curves > When the material is placed under the presser foot (1) and the feed dog (2) is moved to the floating amount for the presser foot (1) in the material. Turn the adjusting screw (5) counterclockwise. 5. Loosen the...
.... y The normal trailing length for increasing ease of working when sewing curves. 1. Use the lifting lever to adjust the floating amount. • To raise the presser foot (1) ... THREAD TENSION 10-3. 10. Raise Lower < Guide to adjustment when sewing curves > When the material is placed under the presser foot (1) and the feed dog (2) is moved to the floating amount for the presser foot (1) in the material. Turn the adjusting screw (5) counterclockwise. 5. Loosen the...
Instruction Manual - English
Page 78
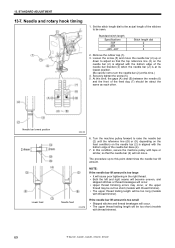
... the feed dog (7) should be about the same as each other. Standard stitch length Specifications -T[]F -[][]3 -405, -407 Stitch length dial 2 2 3 2. Needle bar lowest position Lower feed 2203B 6. Needle and rotary hook timing 1. Needle feed NOTE: If the needle bar lift amount is too large • It will cause poor tightening in the right thread. • Both the left and right seams will become uneven, and skipped stitches or thread breakages will occur. • Upper thread trimming errors...
... the feed dog (7) should be about the same as each other. Standard stitch length Specifications -T[]F -[][]3 -405, -407 Stitch length dial 2 2 3 2. Needle bar lowest position Lower feed 2203B 6. Needle and rotary hook timing 1. Needle feed NOTE: If the needle bar lift amount is too large • It will cause poor tightening in the right thread. • Both the left and right seams will become uneven, and skipped stitches or thread breakages will occur. • Upper thread trimming errors...
Instruction Manual - English
Page 80
... upper edge of the needle bar (2) as far as skipped stitches or upper thread breakages occur, set screw (4) is 1-1.5 mm. 18. Install the feed dog (1) to the rotary hook tip (15) is not used for installing the feed dog at such times. • During quick reverse operation, distance (C) for the left needle will become shorter, so do not set it to make it will go, and check that the tip of the feed dog (1). 3. Use an oil...
... upper edge of the needle bar (2) as far as skipped stitches or upper thread breakages occur, set screw (4) is 1-1.5 mm. 18. Install the feed dog (1) to the rotary hook tip (15) is not used for installing the feed dog at such times. • During quick reverse operation, distance (C) for the left needle will become shorter, so do not set it to make it will go, and check that the tip of the feed dog (1). 3. Use an oil...

Instruction Manual - English
Page 82
... height adjustment screw (5) as shown in stitch length may occur (models with thread trimmer). Recheck the height of the feed dog (1). 4. Feed dog height Turn the machine pulley forward until the feed dog (1) is at slow and fast sewing speeds. If the feed dog is too high • The feed dog may touch the needle plate. • The stitch length may become shorter than the stitch length dial setting. • Thread tightening may be poor when using thick threads. •...
... height adjustment screw (5) as shown in stitch length may occur (models with thread trimmer). Recheck the height of the feed dog (1). 4. Feed dog height Turn the machine pulley forward until the feed dog (1) is at slow and fast sewing speeds. If the feed dog is too high • The feed dog may touch the needle plate. • The stitch length may become shorter than the stitch length dial setting. • Thread tightening may be poor when using thick threads. •...

Parts Manual - English
Page 39
... SPRING GUIDE SET SCREW ADJUSTING THUMB SET SCREW, (CP) M3.5 COLLAR TENSION NUT STOPPER SCREW FLAT M3.5X6 NUT, WHIRL-STOP M3.5 STOPPER SCREW PAN M3.5X5 DISC, TENSION TENSION DISC PRESSER WASHER TENSION NUT THREAD GUIDE DISC PRE-TENSION SPRING A TENSION NUT TENSION RELEASE PLATE SET SCREW SOCKET (FT) M5X5 T-RELEASE SPRING SHOULDER SCREW, M3.5 TENSION RELEASE PIN, L TENSION RELEASE PIN, R THREAD GUIDE, U: ARM SCREW FLAT M3.5X6 THREAD QUANTITY ADJUST SCREW PAN M3X6 CAP SCREW PAN M5X8 THREAD RETAINER SET SCREW SOCKET (FT) M6X6 BAR, TENSION RELEASE THREAD GUIDE, M: ARM SCREW FLAT M5X8 T-8752C-401...
... SPRING GUIDE SET SCREW ADJUSTING THUMB SET SCREW, (CP) M3.5 COLLAR TENSION NUT STOPPER SCREW FLAT M3.5X6 NUT, WHIRL-STOP M3.5 STOPPER SCREW PAN M3.5X5 DISC, TENSION TENSION DISC PRESSER WASHER TENSION NUT THREAD GUIDE DISC PRE-TENSION SPRING A TENSION NUT TENSION RELEASE PLATE SET SCREW SOCKET (FT) M5X5 T-RELEASE SPRING SHOULDER SCREW, M3.5 TENSION RELEASE PIN, L TENSION RELEASE PIN, R THREAD GUIDE, U: ARM SCREW FLAT M3.5X6 THREAD QUANTITY ADJUST SCREW PAN M3X6 CAP SCREW PAN M5X8 THREAD RETAINER SET SCREW SOCKET (FT) M6X6 BAR, TENSION RELEASE THREAD GUIDE, M: ARM SCREW FLAT M5X8 T-8752C-401...

Instruction Manual - Spanish
Page 37
...M3 SET SCREW, (CP) M3.5 SPRING GUIDE SET SCREW ADJUSTING THUMB SET SCREW, (CP) M3.5 COLLAR TENSION NUT STOPPER SCREW FLAT M3.5X6 NUT, WHIRL-STOP M3.5 STOPPER SCREW PAN M3.5X5 DISC, TENSION TENSION DISC PRESSER WASHER TENSION NUT THREAD GUIDE DISC PRE-TENSION SPRING A TENSION NUT TENSION RELEASE PLATE SET SCREW SOCKET (FT) M5X5 T-RELEASE SPRING SHOULDER SCREW, M3.5 TENSION RELEASE PIN, L TENSION RELEASE PIN, R THREAD GUIDE, U: ARM SCREW FLAT M3.5X6 THREAD QUANTITY ADJUST SCREW PAN M3X6 SCREW PAN M5X8 THREAD RETAINER SET SCREW SOCKET (FT) M6X6 BAR, TENSION RELEASE THREAD GUIDE, M: ARM SCREW FLAT...
...M3 SET SCREW, (CP) M3.5 SPRING GUIDE SET SCREW ADJUSTING THUMB SET SCREW, (CP) M3.5 COLLAR TENSION NUT STOPPER SCREW FLAT M3.5X6 NUT, WHIRL-STOP M3.5 STOPPER SCREW PAN M3.5X5 DISC, TENSION TENSION DISC PRESSER WASHER TENSION NUT THREAD GUIDE DISC PRE-TENSION SPRING A TENSION NUT TENSION RELEASE PLATE SET SCREW SOCKET (FT) M5X5 T-RELEASE SPRING SHOULDER SCREW, M3.5 TENSION RELEASE PIN, L TENSION RELEASE PIN, R THREAD GUIDE, U: ARM SCREW FLAT M3.5X6 THREAD QUANTITY ADJUST SCREW PAN M3X6 SCREW PAN M5X8 THREAD RETAINER SET SCREW SOCKET (FT) M6X6 BAR, TENSION RELEASE THREAD GUIDE, M: ARM SCREW FLAT...
Brochure - English
Page 4
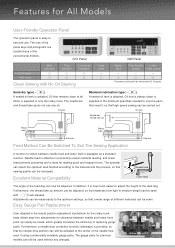
... Material Compatibility Needle feed Lower feed The angle of the feed dog. The needle bar and thread take-up do not use . Needle feed is effective in preventing uneven material feeding, and lower feed prevents puckering and is ideal for making quick and frequent turns. Furthermore, the thread take -up amount can be adjusted. Oil tank Needle bar/ Thread take -up Rotary hook Rotary hook Sub tank Feed Method Can Be Switched To Suit The Sewing Application...
... Material Compatibility Needle feed Lower feed The angle of the feed dog. The needle bar and thread take-up do not use . Needle feed is effective in preventing uneven material feeding, and lower feed prevents puckering and is ideal for making quick and frequent turns. Furthermore, the thread take -up amount can be adjusted. Oil tank Needle bar/ Thread take -up Rotary hook Rotary hook Sub tank Feed Method Can Be Switched To Suit The Sewing Application...

Brochure - English
Page 5
... setting can easily pucker when reverse stitches are also compliant with the adoption of the stop lever automatically and accurately returns to the center position to the twin needle sewing. This device is ideal for Split Needle Bar Models T-8450C,T-8452C,T-8750C,T-8752C All Possible Measures To Prevent The Needle Bar From Falling Quick Needle Bar Select Function Reduces Out Have Been Taken Avoid Damages To The Sewing Machine Operator Fatigue...
... setting can easily pucker when reverse stitches are also compliant with the adoption of the stop lever automatically and accurately returns to the center position to the twin needle sewing. This device is ideal for Split Needle Bar Models T-8450C,T-8452C,T-8750C,T-8752C All Possible Measures To Prevent The Needle Bar From Falling Quick Needle Bar Select Function Reduces Out Have Been Taken Avoid Damages To The Sewing Machine Operator Fatigue...


