
Users Manual - English
Page 1
GETTING READY SEWING BASICS Read when additional information is required. UTILITY STITCHES APPENDIX Sewing Machine Product Code: 885-S61 Operation Manual Read before use.
GETTING READY SEWING BASICS Read when additional information is required. UTILITY STITCHES APPENDIX Sewing Machine Product Code: 885-S61 Operation Manual Read before use.

Users Manual - English
Page 2
Enclosed Accessories After opening the box, check that the following items should also be used on machine) 12 Needle set 25 Operation manual 26 Quick reference guide 27 Hard case Part Code Americas Others X59476-021 XZ5051-001 XC8349-021 X55468-021 130012-024 XE1372-001 130013... brush 15 Eyelet punch 16 Screwdriver (large) 17 Screwdriver (small) 18 Spool cap (large) 19 Spool cap (medium)(2) (one is on this machine model SB3129. ● The screw of the presser foot holder is available through your authorized dealer. (Part code: XA4813-051) ● The organized accessory tray is ...
Enclosed Accessories After opening the box, check that the following items should also be used on machine) 12 Needle set 25 Operation manual 26 Quick reference guide 27 Hard case Part Code Americas Others X59476-021 XZ5051-001 XC8349-021 X55468-021 130012-024 XE1372-001 130013... brush 15 Eyelet punch 16 Screwdriver (large) 17 Screwdriver (small) 18 Spool cap (large) 19 Spool cap (medium)(2) (one is on this machine model SB3129. ● The screw of the presser foot holder is available through your authorized dealer. (Part code: XA4813-051) ● The organized accessory tray is ...
Users Manual - English
Page 8
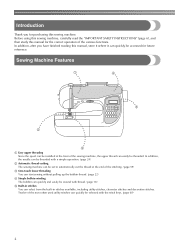
Introduction Thank you have finished reading this manual, store it where it can select from the built-in stitches You can quickly be threaded. In addition, after you for future reference. Sewing Machine ... can be set to automatically cut the thread at the end of the most often used utility stitches can easily be accessed for purchasing this manual for the correct operation of the sewing machine, the upper thread can quickly be installed at the front of the various functions.
Introduction Thank you have finished reading this manual, store it where it can select from the built-in stitches You can quickly be threaded. In addition, after you for future reference. Sewing Machine ... can be set to automatically cut the thread at the end of the most often used utility stitches can easily be accessed for purchasing this manual for the correct operation of the sewing machine, the upper thread can quickly be installed at the front of the various functions.
Users Manual - English
Page 9
... precautions ...18 Winding the bobbin ...18 Installing the bobbin ...22 Upper Threading ...24 Threading the upper thread ...24 Threading the needle ...27 Threading the needle manually (without using the needle threader 28 Using the twin needle ...28 Using thread that winds off quickly ...31 Pulling up the bobbin thread ...31 Replacing...
... precautions ...18 Winding the bobbin ...18 Installing the bobbin ...22 Upper Threading ...24 Threading the upper thread ...24 Threading the needle ...27 Threading the needle manually (without using the needle threader 28 Using the twin needle ...28 Using thread that winds off quickly ...31 Pulling up the bobbin thread ...31 Replacing...

Users Manual - English
Page 12
... make any sudden or careless movements, otherwise you are not sure what kind of purchase only. 4 Never operate this manual, or if you may damage the machine or result in the instruction manual: • To unplug the machine, switch the machine to the symbol "O" position to turn it off, then grasp the...
... make any sudden or careless movements, otherwise you are not sure what kind of purchase only. 4 Never operate this manual, or if you may damage the machine or result in the instruction manual: • To unplug the machine, switch the machine to the symbol "O" position to turn it off, then grasp the...

Users Manual - English
Page 13
... plate, as a stove or iron; Benzene, thinner, and scouring powders can damage the case and machine, and should be used. • Always consult the operation manual when replacing or installing any opening. • Do not operate where aerosol (spray) products are being administered. • Do not use outdoors. 8 For a longer service...
... plate, as a stove or iron; Benzene, thinner, and scouring powders can damage the case and machine, and should be used. • Always consult the operation manual when replacing or installing any opening. • Do not operate where aerosol (spray) products are being administered. • Do not use outdoors. 8 For a longer service...

Users Manual - English
Page 14
...on plug. • Always replace the fuse cover. The contents of this manual and specifications of replacing the plug fuse, use a fuse approved by ASTA to BS 1362, i.e. Children should contact your local authorized Brother dealer. 9 For repair or adjustment: • If the Light unit (... supervision or instruction concerning use as described in this manual. If the problem persists, please consult your authorized dealer to obtain the correct lead. 8 For additional product information, visit our web site at www.brother.com SAVE THESE INSTRUCTIONS This machine is required, first...
...on plug. • Always replace the fuse cover. The contents of this manual and specifications of replacing the plug fuse, use a fuse approved by ASTA to BS 1362, i.e. Children should contact your local authorized Brother dealer. 9 For repair or adjustment: • If the Light unit (... supervision or instruction concerning use as described in this manual. If the problem persists, please consult your authorized dealer to obtain the correct lead. 8 For additional product information, visit our web site at www.brother.com SAVE THESE INSTRUCTIONS This machine is required, first...
Users Manual - English
Page 19
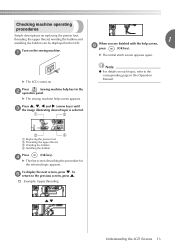
... ● For details on replacing the presser foot, threading the upper thread, winding the bobbin and 1 installing the bobbin can be displayed in this Operation Manual. 3 4 1 Replacing the presser foot 2 Threading the upper thread 3 Winding the bobbin 4 Installing the bobbin Press (OK key). 4 X The first screen describing the procedure for the...
... ● For details on replacing the presser foot, threading the upper thread, winding the bobbin and 1 installing the bobbin can be displayed in this Operation Manual. 3 4 1 Replacing the presser foot 2 Threading the upper thread 3 Winding the bobbin 4 Installing the bobbin Press (OK key). 4 X The first screen describing the procedure for the...

Users Manual - English
Page 33
... disk Cut the thread with the wing needle or the twin needle. ● If the needle threader cannot be used, refer to "Threading the needle manually (without using the needle threader)" on the left , then pass the thread through the eye of the thread guide disk marked "7" all the way 2. Now...
... disk Cut the thread with the wing needle or the twin needle. ● If the needle threader cannot be used, refer to "Threading the needle manually (without using the needle threader)" on the left , then pass the thread through the eye of the thread guide disk marked "7" all the way 2. Now...

Users Manual - English
Page 34
... needle 3 from front to "Replacing the needle" (page 35). Be sure to press the needle position button to "Stitch Settings" (page 128). Threading the needle manually (without using the needle threader) When using the needle threader. ● If the twin needle is accidentally pressed, the machine will begin sewing and your...
... needle 3 from front to "Replacing the needle" (page 35). Be sure to press the needle position button to "Stitch Settings" (page 128). Threading the needle manually (without using the needle threader) When using the needle threader. ● If the twin needle is accidentally pressed, the machine will begin sewing and your...

Users Manual - English
Page 35
... zigzag foot "J". 9 • For details on . CAUTION ● When using the twin needle, be sure to step 8 through the 8 needle bar thread hook, manually thread the right needle. Manually thread the left side was threaded. 1 1 • The needle threader cannot be used with the twin needle. Without passing the thread through 0 of...
... zigzag foot "J". 9 • For details on . CAUTION ● When using the twin needle, be sure to step 8 through the 8 needle bar thread hook, manually thread the right needle. Manually thread the left side was threaded. 1 1 • The needle threader cannot be used with the twin needle. Without passing the thread through 0 of...

Users Manual - English
Page 46
... to securely tighten the screw with the screwdriver, otherwise the needle may bend or break. ■ Attaching the walking foot Note ● Thread the needle manually when using the walking foot, or only attach the walking foot after threading the needle using the needle threader. Turn off the sewing machine. 2 1 Connecting...
... to securely tighten the screw with the screwdriver, otherwise the needle may bend or break. ■ Attaching the walking foot Note ● Thread the needle manually when using the walking foot, or only attach the walking foot after threading the needle using the needle threader. Turn off the sewing machine. 2 1 Connecting...

Users Manual - English
Page 59
... you wish to cut the threads. 1 1 Thread cutter button X The threads are cut automatically, refer to "Automatically cutting the thread" (page 59). ■ Using the manual thread cutter When sewing with nylon or metallic threads, or other special threads, use the thread cutter on setting the machine so that the threads...
... you wish to cut the threads. 1 1 Thread cutter button X The threads are cut automatically, refer to "Automatically cutting the thread" (page 59). ■ Using the manual thread cutter When sewing with nylon or metallic threads, or other special threads, use the thread cutter on setting the machine so that the threads...

Users Manual - English
Page 76
... the presser foot that is used to sew overcasting with overcasting foot "G". Stitch Name Pattern Stitch Key Application Stitch Width [mm (inch.)] Auto Manual Stitch Length [mm (inch.)] Auto Manual Presser Foot 11 Preventing fraying in medium 3.5 2.5-5.0 2.0 1.0-4.0 weight and thin fabrics (1/8) (3/32-3/16) (1/16) (1/16-3/16) Overcasting 12 stitch 13 Preventing fraying...
... the presser foot that is used to sew overcasting with overcasting foot "G". Stitch Name Pattern Stitch Key Application Stitch Width [mm (inch.)] Auto Manual Stitch Length [mm (inch.)] Auto Manual Presser Foot 11 Preventing fraying in medium 3.5 2.5-5.0 2.0 1.0-4.0 weight and thin fabrics (1/8) (3/32-3/16) (1/16) (1/16-3/16) Overcasting 12 stitch 13 Preventing fraying...

Users Manual - English
Page 77
Stitch Name Pattern Stitch Key Application Stitch Width [mm (inch.)] Auto Manual Stitch Length [mm (inch.)] Auto Manual Presser Foot Zigzag stitch (center 7 needle position) Preventing fraying (center baseline/reverse stitching) 3.5 0.0-7.0 1.4 0.0-4.0 (1/8) (0-1/4) (1/16) (0-3/16) Zigzag stitch 8 (right needle position) Preventing fraying (right - Preventing fraying ...
Stitch Name Pattern Stitch Key Application Stitch Width [mm (inch.)] Auto Manual Stitch Length [mm (inch.)] Auto Manual Presser Foot Zigzag stitch (center 7 needle position) Preventing fraying (center baseline/reverse stitching) 3.5 0.0-7.0 1.4 0.0-4.0 (1/8) (0-1/4) (1/16) (0-3/16) Zigzag stitch 8 (right needle position) Preventing fraying (right - Preventing fraying ...

Users Manual - English
Page 78
...clamp screw Position the side cutter so that side cutter pin 5 is used . Lower the presser foot lever, and then 2 manually thread the needle. • The needle threader cannot be used with the side cutter. UTILITY STITCHES Sewing overcasting stitches using the ... (1/16-3/16) Hook the connecting fork of the fabric is attached. 72 Stitch Name Pattern Application Stitch Width [mm (inch.)] Auto Manual Stitch Length [mm (inch.)] Auto Manual Presser Foot 63 Sewing straight stitches while cutting 0.0 0.0-2.5 2.5 0.2-5.0 the fabric (0) (0-3/32) (3/32) (1/64-3/16) 64 Sewing ...
...clamp screw Position the side cutter so that side cutter pin 5 is used . Lower the presser foot lever, and then 2 manually thread the needle. • The needle threader cannot be used with the side cutter. UTILITY STITCHES Sewing overcasting stitches using the ... (1/16-3/16) Hook the connecting fork of the fabric is attached. 72 Stitch Name Pattern Application Stitch Width [mm (inch.)] Auto Manual Stitch Length [mm (inch.)] Auto Manual Presser Foot 63 Sewing straight stitches while cutting 0.0 0.0-2.5 2.5 0.2-5.0 the fabric (0) (0-3/32) (3/32) (1/64-3/16) 64 Sewing ...

Users Manual - English
Page 80
baseline/reverse stitching) Triple 4 stretch stitch Reinforcing seams and sewing 0.0 0.0-7.0 stretch fabrics (0) (0-1/4) Stitch Length [mm (inch.)] Auto Manual Presser Foot - - 2.5 0.2-5.0 (3/32) (1/64-3/16) 2.5 0.2-5.0 (3/32) (1/64-3/16) J 2.5 0.2-5.0 (3/32) (1/64-3/16) 2.5 1.5-4.0 (3/32) ...For details, refer to "Replacing the presser foot" (page 37). Stitch Name Pattern Stitch Key Application Stitch Width [mm (inch.)] Auto Manual Basting 6 stitch - Basic stitching and sewing gathers or pintucks (left baseline/reverse stitching) 0.0 (0) - Start sewing. 3 • For...
baseline/reverse stitching) Triple 4 stretch stitch Reinforcing seams and sewing 0.0 0.0-7.0 stretch fabrics (0) (0-1/4) Stitch Length [mm (inch.)] Auto Manual Presser Foot - - 2.5 0.2-5.0 (3/32) (1/64-3/16) 2.5 0.2-5.0 (3/32) (1/64-3/16) J 2.5 0.2-5.0 (3/32) (1/64-3/16) 2.5 1.5-4.0 (3/32) ...For details, refer to "Replacing the presser foot" (page 37). Stitch Name Pattern Stitch Key Application Stitch Width [mm (inch.)] Auto Manual Basting 6 stitch - Basic stitching and sewing gathers or pintucks (left baseline/reverse stitching) 0.0 (0) - Start sewing. 3 • For...

Users Manual - English
Page 82
... fabric with a blind hem. Two stitches are available for blind hem stitching. Stitch Name Pattern Stitch Key Application Stitch Width [mm (inch.)] Auto Manual Stitch Length [mm (inch.)] Auto Manual Presser Foot 17 Blind hem stitch 18 Blind hem stitching on mediumweight fabrics 0.0 (0) 3← - 3→ 2.0 (1/16) 1.0-3.5 (1/16-1/8) R Blind hem stitching on stretch...
... fabric with a blind hem. Two stitches are available for blind hem stitching. Stitch Name Pattern Stitch Key Application Stitch Width [mm (inch.)] Auto Manual Stitch Length [mm (inch.)] Auto Manual Presser Foot 17 Blind hem stitch 18 Blind hem stitching on mediumweight fabrics 0.0 (0) 3← - 3→ 2.0 (1/16) 1.0-3.5 (1/16-1/8) R Blind hem stitching on stretch...

Users Manual - English
Page 84
... - Eleven stitches are subject to strain (3/16) (1/8-3/16) (1/64) (1/64-1/16) 44 - Stitch Name Pattern Stitch Key Application Stitch Width [mm (inch.)] Auto Manual Stitch Length [mm (inch.)] Auto Manual Presser Foot 42 Horizontal buttonholes on buttons and one-step buttonholes. Keyhole buttonholes for thick 7.0 or plush fabrics (1/4) 3.0-7.0 0.5 0.3-1.0 (1/8-1/4) (1/32) (1/64-1/16) 50...
... - Eleven stitches are subject to strain (3/16) (1/8-3/16) (1/64) (1/64-1/16) 44 - Stitch Name Pattern Stitch Key Application Stitch Width [mm (inch.)] Auto Manual Stitch Length [mm (inch.)] Auto Manual Presser Foot 42 Horizontal buttonholes on buttons and one-step buttonholes. Keyhole buttonholes for thick 7.0 or plush fabrics (1/4) 3.0-7.0 0.5 0.3-1.0 (1/8-1/4) (1/32) (1/64-1/16) 50...

Users Manual - English
Page 91
... Attach the presser foot holder to the right pin 5 of zipper opening . Stitch Name Pattern Stitch Key Application Stitch Width [mm (inch.)] Auto Manual Stitch Length [mm (inch.)] Auto Manual Presser Foot Straight stitch (center 3 needle position) Attaching zippers Sewing concealed seams and - The procedures for inserting a centered zipper and a side zipper...
... Attach the presser foot holder to the right pin 5 of zipper opening . Stitch Name Pattern Stitch Key Application Stitch Width [mm (inch.)] Auto Manual Stitch Length [mm (inch.)] Auto Manual Presser Foot Straight stitch (center 3 needle position) Attaching zippers Sewing concealed seams and - The procedures for inserting a centered zipper and a side zipper...


