
Users Manual - English
Page 3
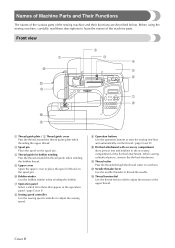
... thread guide when winding the bobbin thread. 5 Upper cover Open the upper cover to place the spool of thread on the spool pin. 6 Bobbin winder Use the bobbin winder when winding the bobbin. 7 Operation panel Select a stitch from those that appear in the operation panel. (page Cover E) 8 Sewing speed controller Use the sewing speed controller to adjust the sewing speed. 9 Operation buttons Use the operation buttons to adjust the tension of the machine parts. B Needle threader lever Use the needle threader to learn the names of the upper thread. C Thread tension dial Use the thread...
... thread guide when winding the bobbin thread. 5 Upper cover Open the upper cover to place the spool of thread on the spool pin. 6 Bobbin winder Use the bobbin winder when winding the bobbin. 7 Operation panel Select a stitch from those that appear in the operation panel. (page Cover E) 8 Sewing speed controller Use the sewing speed controller to adjust the sewing speed. 9 Operation buttons Use the operation buttons to adjust the tension of the machine parts. B Needle threader lever Use the needle threader to learn the names of the upper thread. C Thread tension dial Use the thread...

Users Manual - English
Page 4
... stitching. 8 Presser foot holder The presser foot is installed onto the presser foot holder. 5 6 8 7 1 Presser foot dial Use the presser foot dial to adjust the amount of Machine Parts and Their Functions Needle and presser foot section 1 2 3 Right-side/rear view 1 2 3 4 4 8 76 5 1 Buttonhole lever Lower the buttonhole lever when sewing buttonholes and bar tacks. 2 Thread guide discs Pass the thread through the thread guide discs when using the needle threader to thread the needle. 3 Needle bar thread hook Pass the upper thread through the needle bar thread hook. 4 Needle plate...
... stitching. 8 Presser foot holder The presser foot is installed onto the presser foot holder. 5 6 8 7 1 Presser foot dial Use the presser foot dial to adjust the amount of Machine Parts and Their Functions Needle and presser foot section 1 2 3 Right-side/rear view 1 2 3 4 4 8 76 5 1 Buttonhole lever Lower the buttonhole lever when sewing buttonholes and bar tacks. 2 Thread guide discs Pass the thread through the thread guide discs when using the needle threader to thread the needle. 3 Needle bar thread hook Pass the upper thread through the needle bar thread hook. 4 Needle plate...

Users Manual - English
Page 5
Operation buttons The operation buttons help you to easily perform various basic sewing machine operations. 2 3 5 1 4 6 1 Start/stop button Press the start/stop sewing. The machine sews at a slow speed at the beginning of the machine. Reverse stitches are sewn by keeping the button pressed down to the machine may occur. For details, refer to "Cutting the thread" (page 53). 5 Sewing speed controller Slide the sewing speed controller to adjust the sewing speed. 6 Presser foot lever Raise and lower the presser foot lever to start or stop button to raise and...
Operation buttons The operation buttons help you to easily perform various basic sewing machine operations. 2 3 5 1 4 6 1 Start/stop button Press the start/stop sewing. The machine sews at a slow speed at the beginning of the machine. Reverse stitches are sewn by keeping the button pressed down to the machine may occur. For details, refer to "Cutting the thread" (page 53). 5 Sewing speed controller Slide the sewing speed controller to adjust the sewing speed. 6 Presser foot lever Raise and lower the presser foot lever to start or stop button to raise and...

Users Manual - English
Page 6
... sewing settings, such as the operation beep. 0 Stitch keys Use these keys to move in the LCD. Cover E Simple descriptions on threading the upper thread, installing the bobbin, winding the bobbin and replacing the presser foot can be displayed. 3 Stitch selection key Press this key to select the desired type of stitch. 4 + key Press this key to add a pattern when sewing combinations of characters or decorative stitches. 5 C key Press this key to quickly...
... sewing settings, such as the operation beep. 0 Stitch keys Use these keys to move in the LCD. Cover E Simple descriptions on threading the upper thread, installing the bobbin, winding the bobbin and replacing the presser foot can be displayed. 3 Stitch selection key Press this key to select the desired type of stitch. 4 + key Press this key to add a pattern when sewing combinations of characters or decorative stitches. 5 C key Press this key to quickly...
Users Manual - English
Page 8
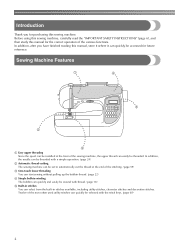
... correct operation of the stitching. (page 59) 3 One-touch lower threading You can start sewing without pulling up the bobbin thread. (page 22) 4 Simple bobbin-winding The bobbin can select from the built-in stitches You can quickly and easily be installed at the end of the various functions. Before using this sewing machine, carefully read the "IMPORTANT SAFETY INSTRUCTIONS" (page 6), and then study this manual for purchasing this sewing machine...
... correct operation of the stitching. (page 59) 3 One-touch lower threading You can start sewing without pulling up the bobbin thread. (page 22) 4 Simple bobbin-winding The bobbin can select from the built-in stitches You can quickly and easily be installed at the end of the various functions. Before using this sewing machine, carefully read the "IMPORTANT SAFETY INSTRUCTIONS" (page 6), and then study this manual for purchasing this sewing machine...
Users Manual - English
Page 9
... (without using the needle threader 28 Using the twin needle ...28 Using thread that winds off quickly ...31 Pulling up the bobbin thread ...31 Replacing the Needle ...33 Needle precautions ...33 Needle types and their uses ...33 Checking the needle ...34 Replacing the needle ...35 Replacing the Presser Foot 37 Presser foot precautions ...37 Replacing the presser foot ...37 Adjusting the pressure of the presser foot ...39 Removing the presser foot holder ...39 Using the walking foot ...40 Sewing Cylindrical or Large Pieces 42 Stitching cylindrical pieces ...42 Sewing large pieces of fabric...
... (without using the needle threader 28 Using the twin needle ...28 Using thread that winds off quickly ...31 Pulling up the bobbin thread ...31 Replacing the Needle ...33 Needle precautions ...33 Needle types and their uses ...33 Checking the needle ...34 Replacing the needle ...35 Replacing the Presser Foot 37 Presser foot precautions ...37 Replacing the presser foot ...37 Adjusting the pressure of the presser foot ...39 Removing the presser foot holder ...39 Using the walking foot ...40 Sewing Cylindrical or Large Pieces 42 Stitching cylindrical pieces ...42 Sewing large pieces of fabric...

Users Manual - English
Page 10
... the thread ...53 Adjusting the Thread Tension 54 Changing the tension of the upper thread ...54 Adjusting the Stitch Width and Length 55 Adjusting the stitch width ...55 Adjusting the stitch length ...56 Useful Functions ...57 Automatically sewing reverse/reinforcement stitches 57 Automatically cutting the thread ...59 Saving stitch settings ...60 Useful Sewing Tips ...62 Trial sewing ...62 Changing the sewing direction ...62 Sewing curves ...62 Sewing thick fabrics ...63 Sewing thin fabrics ...64 Sewing stretch fabrics ...64 Sewing leathers or vinyl fabrics ...64 Sewing an even seam...
... the thread ...53 Adjusting the Thread Tension 54 Changing the tension of the upper thread ...54 Adjusting the Stitch Width and Length 55 Adjusting the stitch width ...55 Adjusting the stitch length ...56 Useful Functions ...57 Automatically sewing reverse/reinforcement stitches 57 Automatically cutting the thread ...59 Saving stitch settings ...60 Useful Sewing Tips ...62 Trial sewing ...62 Changing the sewing direction ...62 Sewing curves ...62 Sewing thick fabrics ...63 Sewing thin fabrics ...64 Sewing stretch fabrics ...64 Sewing leathers or vinyl fabrics ...64 Sewing an even seam...

Users Manual - English
Page 28
... sure to install the bobbin so that 6 the end of the same type (part code: SA156, XA5539-151). Insert the bobbin with your right hand so that the thread unwinds in the correct direction, otherwise the thread may break or the thread tension will not operate correctly. Press (needle position button) once or 1 twice to raise the needle, and then raise the presser foot lever. GETTING READY Installing the bobbin Install the bobbin wound with...
... sure to install the bobbin so that 6 the end of the same type (part code: SA156, XA5539-151). Insert the bobbin with your right hand so that the thread unwinds in the correct direction, otherwise the thread may break or the thread tension will not operate correctly. Press (needle position button) once or 1 twice to raise the needle, and then raise the presser foot lever. GETTING READY Installing the bobbin Install the bobbin wound with...

Users Manual - English
Page 61
Turn on the sewing machine. 1 X The LCD comes on the range of utility stitches can be changed , the highlighted value is selected, the appropriate width and length are automatically selected. To make the stitch width wider, press (+). Increasing the width moves the needle to "Satin stitching" (page 98). For details, refer to the right; Adjusting the Thread Tension/Adjusting the Stitch Width and Length 55 Normally, when a stitch is erased...
Turn on the sewing machine. 1 X The LCD comes on the range of utility stitches can be changed , the highlighted value is selected, the appropriate width and length are automatically selected. To make the stitch width wider, press (+). Increasing the width moves the needle to "Satin stitching" (page 98). For details, refer to the right; Adjusting the Thread Tension/Adjusting the Stitch Width and Length 55 Normally, when a stitch is erased...

Users Manual - English
Page 86
... sewing is completed, the machine automatically sews reinforcement stitches, then stops Cut the threads, raise the presser foot lever, 8 and then remove the fabric. UTILITY STITCHES ■ If the button does not fit in the button guide plate Add together the diameter and thickness of the button, and then set . Select a stitch. 4 • For details, refer to "Replacing the presser foot" (page 37). Pull down through the hole in the presser foot. • When lowering the presser foot...
... sewing is completed, the machine automatically sews reinforcement stitches, then stops Cut the threads, raise the presser foot lever, 8 and then remove the fabric. UTILITY STITCHES ■ If the button does not fit in the button guide plate Add together the diameter and thickness of the button, and then set . Select a stitch. 4 • For details, refer to "Replacing the presser foot" (page 37). Pull down through the hole in the presser foot. • When lowering the presser foot...

Users Manual - English
Page 88
... buttonhole. With a seam ripper, cut the middle part of the 8 gimp thread remaining at the rear of the machine on with 4 holes can be attached. Trim off any slack. Select stitch 46 or 47 . 3 Adjust the stitch width to the thickness of the machine) 2 Back side X The feed dogs are lowered. When sewing is finished, gently pull the gimp 6 thread to remove any excess of the gimp thread. 2 1 Drop feed lever...
... buttonhole. With a seam ripper, cut the middle part of the 8 gimp thread remaining at the rear of the machine on with 4 holes can be attached. Trim off any slack. Select stitch 46 or 47 . 3 Adjust the stitch width to the thickness of the machine) 2 Back side X The feed dogs are lowered. When sewing is finished, gently pull the gimp 6 thread to remove any excess of the gimp thread. 2 1 Drop feed lever...

Users Manual - English
Page 89
... button, perform the button-sewing operation twice. • Do not press the thread cutter button. Start sewing. 6 X The sewing machine automatically stops after sewing reinforcement stitches. • If additional strength is needed to . Adjust the stitch width to you. Place the button into button-sewing foot "M". 3 CAUTION ● When sewing, be sure that the needle correctly goes into the two holes toward you are finished attaching the button, 8 slide the drop feed lever to (to raise the feed dogs. 1 1 Back side Buttonhole Stitching...
... button, perform the button-sewing operation twice. • Do not press the thread cutter button. Start sewing. 6 X The sewing machine automatically stops after sewing reinforcement stitches. • If additional strength is needed to . Adjust the stitch width to you. Place the button into button-sewing foot "M". 3 CAUTION ● When sewing, be sure that the needle correctly goes into the two holes toward you are finished attaching the button, 8 slide the drop feed lever to (to raise the feed dogs. 1 1 Back side Buttonhole Stitching...

Users Manual - English
Page 134
Twin Needle Reverse/ Reinforcement Stitching Programmed Thread-Cutting Walking Foot Presser Foot Utility stitches Stitch Name Pattern Application Stitch Width [mm (inch.)] Stitch Length [mm (inch.)] Auto Manual Auto Manual Left 1 2 Straight stitch 3 Center Triple stretch 4 stitch 5 Stretch stitch 6 Basting stitch 7 Zigzag stitch 8 Right Center 2-point zigzag 9 stitch 3-point zigzag 10 stitch J Basic stitching, sewing gathers or pintucks, etc. 0.0 (0) 0.0-7.0 (0-1/4) 2.5 0.2-5.0 (3/32) (1/64-3/16) Yes Reverse Reverse + thread-cut - etc. - 2.5 0.2-5.0 (3/32) (1/64-3/16...
Twin Needle Reverse/ Reinforcement Stitching Programmed Thread-Cutting Walking Foot Presser Foot Utility stitches Stitch Name Pattern Application Stitch Width [mm (inch.)] Stitch Length [mm (inch.)] Auto Manual Auto Manual Left 1 2 Straight stitch 3 Center Triple stretch 4 stitch 5 Stretch stitch 6 Basting stitch 7 Zigzag stitch 8 Right Center 2-point zigzag 9 stitch 3-point zigzag 10 stitch J Basic stitching, sewing gathers or pintucks, etc. 0.0 (0) 0.0-7.0 (0-1/4) 2.5 0.2-5.0 (3/32) (1/64-3/16) Yes Reverse Reverse + thread-cut - etc. - 2.5 0.2-5.0 (3/32) (1/64-3/16...

Users Manual - English
Page 143
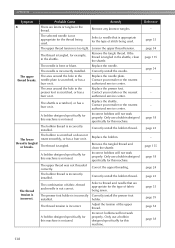
... not use the start/stop button. page 49 The bobbin winder shaft is loose. Correctly install the needle. Use the screwdriver to sew. authorized service center. page 24 Troubleshooting 137 The needle clamp screw is pushed to Move the bobbin winder shaft to sew. page 128 The needle breaks. Correct the upper threading. Replace the needle. The area around the hole in the needle plate is not turned on the machine. The area around the hole in the Replace the presser foot...
... not use the start/stop button. page 49 The bobbin winder shaft is loose. Correctly install the needle. Use the screwdriver to sew. authorized service center. page 24 Troubleshooting 137 The needle clamp screw is pushed to Move the bobbin winder shaft to sew. page 128 The needle breaks. Correct the upper threading. Replace the needle. The area around the hole in the needle plate is not turned on the machine. The area around the hole in the Replace the presser foot...
Users Manual - English
Page 144
.... Correctly install the bobbin thread. Select a thread and needle that is not correct. Only use a bobbin designed specifically for the type of stitch being used . If the thread is not used . Replace the shuttle. Only use a bobbin designed specifically for this machine. Remove the tangled thread and clean the shuttle. The upper thread was not threaded correctly. The thread tension is tangled or breaks. A bobbin designed specifically for this machine is tangled in the thread. Replace the needle. The area around the hole in the needle plate is...
.... Correctly install the bobbin thread. Select a thread and needle that is not correct. Only use a bobbin designed specifically for the type of stitch being used . If the thread is not used . Replace the shuttle. Only use a bobbin designed specifically for this machine. Remove the tangled thread and clean the shuttle. The upper thread was not threaded correctly. The thread tension is tangled or breaks. A bobbin designed specifically for this machine is tangled in the thread. Replace the needle. The area around the hole in the needle plate is...

Users Manual - English
Page 145
... the needle position button to sew. Slide the drop feed lever to sew. page 34 If thin fabrics are lowered. Adjust the tension of the upper thread. Correct the upper threading. A bobbin designed specifically for the type of stitch that you wish to sew. Remove the tangle thread. page 135 The feed dogs are being sewn, the stitch is appropriate for this machine. Symptom Probable Cause Remedy Reference The upper thread was not threaded correctly, or the bobbin is incorrectly installed. Correctly thread the upper thread...
... the needle position button to sew. Slide the drop feed lever to sew. page 34 If thin fabrics are lowered. Adjust the tension of the upper thread. Correct the upper threading. A bobbin designed specifically for the type of stitch that you wish to sew. Remove the tangle thread. page 135 The feed dogs are being sewn, the stitch is appropriate for this machine. Symptom Probable Cause Remedy Reference The upper thread was not threaded correctly, or the bobbin is incorrectly installed. Correctly thread the upper thread...

Users Manual - English
Page 146
... The pressure of the presser foot is incorrectly installed. Bobbin spins slowly. Fabric being sewn with the machine cannot be fast). direction. Correct the upper threading. The upper thread has tightened up the fabric and cut the threads below the needle plate. Remove the tangle thread. The sewing lamp is either in the opposite The feed mechanism is tangled below it, and clean the race. too light or too dark. The thread is...
... The pressure of the presser foot is incorrectly installed. Bobbin spins slowly. Fabric being sewn with the machine cannot be fast). direction. Correct the upper threading. The upper thread has tightened up the fabric and cut the threads below the needle plate. Remove the tangle thread. The sewing lamp is either in the opposite The feed mechanism is tangled below it, and clean the race. too light or too dark. The thread is...

Users Manual - English
Page 147
... be changed with the twin needle is selected. The reverse/reinforcement stitch button, needle position button or thread cutter button was pressed without connecting the foot controller while the setting for adjusting the stitch width using the sewing speed controller is set up because the thread is tangled. A stitch other than 71 patterns are combined. F01~F09 More than the buttonhole, bar tack or darning stitch was selected and the start/stop button was pressed while the buttonhole lever is lowered. 4 The buttonhole, bar tack or darning stitch...
... be changed with the twin needle is selected. The reverse/reinforcement stitch button, needle position button or thread cutter button was pressed without connecting the foot controller while the setting for adjusting the stitch width using the sewing speed controller is set up because the thread is tangled. A stitch other than 71 patterns are combined. F01~F09 More than the buttonhole, bar tack or darning stitch was selected and the start/stop button was pressed while the buttonhole lever is lowered. 4 The buttonhole, bar tack or darning stitch...

Users Manual - English
Page 150
...even seam allowance 64 , extra spool pin Cover A 29 eyelet 104 eyelet punch Cover A, 81, 104 F fagoting 106 features 2 , feed dog position switch Cover C 97 , feed dogs Cover C 97 flipping 119 , foot controller Cover A 49 foot controller jack Cover C free-arm sewing 42 free-motion quilting 97 front view Cover B H handle Cover C hard case Cover A heirloom stitching 110 J joining 109 joining stitch 93 L language 17 LCD Cover E, 12, 142 , brightness 16 142 lower threading 22 M , main power switch Cover C 11 maintenance 135 N needle 33 , needle bar thread hook Cover C 26...
...even seam allowance 64 , extra spool pin Cover A 29 eyelet 104 eyelet punch Cover A, 81, 104 F fagoting 106 features 2 , feed dog position switch Cover C 97 , feed dogs Cover C 97 flipping 119 , foot controller Cover A 49 foot controller jack Cover C free-arm sewing 42 free-motion quilting 97 front view Cover B H handle Cover C hard case Cover A heirloom stitching 110 J joining 109 joining stitch 93 L language 17 LCD Cover E, 12, 142 , brightness 16 142 lower threading 22 M , main power switch Cover C 11 maintenance 135 N needle 33 , needle bar thread hook Cover C 26...
Users Manual - English
Page 151
...63 Q quick reference guide Cover A quilting 96 , quilting foot Cover A 97 , quilting guide 1 96 thin fabrics 64 , thread cutter Cover B 53 , thread cutter button Cover D 53 thread guide cover Cover B, 20, 26 , thread guide discs Cover C 27 , thread guide for bobbin winding Cover B 20 thread guide plate Cover B, 20, 26 thread tension 54 R , thread tension dial Cover B 54 thread that quickly unwinds 31 realigning 121 trial sewing 62 rear view Cover C triple stretch stitch 100 recalling a pattern 120 , reinforcement stitching 51 100 troubleshooting 137 twin needle...
...63 Q quick reference guide Cover A quilting 96 , quilting foot Cover A 97 , quilting guide 1 96 thin fabrics 64 , thread cutter Cover B 53 , thread cutter button Cover D 53 thread guide cover Cover B, 20, 26 , thread guide discs Cover C 27 , thread guide for bobbin winding Cover B 20 thread guide plate Cover B, 20, 26 thread tension 54 R , thread tension dial Cover B 54 thread that quickly unwinds 31 realigning 121 trial sewing 62 rear view Cover C triple stretch stitch 100 recalling a pattern 120 , reinforcement stitching 51 100 troubleshooting 137 twin needle...


