

Users Manual - English
Page 8
... ...133 Selecting alphabet characters ...136 Selecting an embroidery pattern ...137 Selecting a frame pattern...137 Using an embroidery card ...138 Embroidering...139 Embroidering a pattern ...139 Appliquéing ...141 Editing and Saving Patterns 143 Adjusting the layout and the size...143 Adjusting the thread tension ...145 Connecting character patterns ...146 Resewing ...147 Thread runs out partway through...
... ...133 Selecting alphabet characters ...136 Selecting an embroidery pattern ...137 Selecting a frame pattern...137 Using an embroidery card ...138 Embroidering...139 Embroidering a pattern ...139 Appliquéing ...141 Editing and Saving Patterns 143 Adjusting the layout and the size...143 Adjusting the thread tension ...145 Connecting character patterns ...146 Resewing ...147 Thread runs out partway through...

Users Manual - English
Page 72
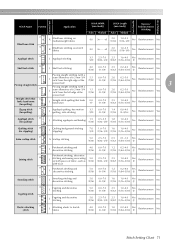
... attaching appliqués 3.5 0.0-7.0 1.4 0.0-4.0 Yes (1/8) (0-1/4) (1/16) (0-3/16) (J) Reverse No 8 J Beginning sewing from the right needle position 3.5 (1/8) 2.5-5.0 1.4 0.3-4.0 Yes (3/32-3/16) (1/16) (1/64-3/16) (J) Reinforcement Yes 9 2-point zigzag stitch 3-point 10 zigzag stitch 11 Overcasting on mediumweight J or stretch fabrics, attaching elastic, darning, etc. Utility stitches Twin Needle Walking Foot Presser Foot Stitch Name Pattern...
... attaching appliqués 3.5 0.0-7.0 1.4 0.0-4.0 Yes (1/8) (0-1/4) (1/16) (0-3/16) (J) Reverse No 8 J Beginning sewing from the right needle position 3.5 (1/8) 2.5-5.0 1.4 0.3-4.0 Yes (3/32-3/16) (1/16) (1/64-3/16) (J) Reinforcement Yes 9 2-point zigzag stitch 3-point 10 zigzag stitch 11 Overcasting on mediumweight J or stretch fabrics, attaching elastic, darning, etc. Utility stitches Twin Needle Walking Foot Presser Foot Stitch Name Pattern...
Users Manual - English
Page 73
...Pattern Application 17 Blind hem stitch 18 R Blind hem stitching on mediumweight fabrics R Blind hem stitching on stretch fabrics Stitch Width [mm (inch)] Stitch Length [mm (inch)] Auto Manual Auto Manual Reverse/ Reinforcement Stitching 00 3← - →3 2.0 (1/16) 1.0-3.5 (1/16-1/8) No Reinforcement No 00 3← - →3 2.0 (1/16) 1.0-3.5 (1/16-1/8) No Reinforcement No 19 Appliqu...é stitch J Appliqué stitching 3.5 (1/8) 2.5-7.0 (3/32-1/4) 2.5 1.6-4.0 Yes (3/32) (1/16...
...Pattern Application 17 Blind hem stitch 18 R Blind hem stitching on mediumweight fabrics R Blind hem stitching on stretch fabrics Stitch Width [mm (inch)] Stitch Length [mm (inch)] Auto Manual Auto Manual Reverse/ Reinforcement Stitching 00 3← - →3 2.0 (1/16) 1.0-3.5 (1/16-1/8) No Reinforcement No 00 3← - →3 2.0 (1/16) 1.0-3.5 (1/16-1/8) No Reinforcement No 19 Appliqu...é stitch J Appliqué stitching 3.5 (1/8) 2.5-7.0 (3/32-1/4) 2.5 1.6-4.0 Yes (3/32) (1/16...
Users Manual - English
Page 99
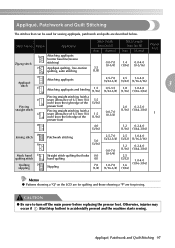
...-3/16) 1.2 0.2-4.0 (1/16) (1/64-3/16) 2.5 (3/32) 1.6 (1/16) 1.0-4.0 (1/16-3/16) Memo z Patterns showing a "Q" on the LCD are for quilting and those showing a "P" are for sewing appliqués, patchwork and quilts are described below. Otherwise, injuries may occur if (Start/stop button) is accidentally pressed ...Be sure to turn off the main power before replacing the pressor foot. Stitch Name Pattern Application 7 Zigzag stitch 24 Attaching appliqués (center baseline/reverse stitching) Appliqué quilting, free-motion quilting, satin stitching Stitch Width [mm (inch)] Auto...
...-3/16) 1.2 0.2-4.0 (1/16) (1/64-3/16) 2.5 (3/32) 1.6 (1/16) 1.0-4.0 (1/16-3/16) Memo z Patterns showing a "Q" on the LCD are for quilting and those showing a "P" are for sewing appliqués, patchwork and quilts are described below. Otherwise, injuries may occur if (Start/stop button) is accidentally pressed ...Be sure to turn off the main power before replacing the pressor foot. Stitch Name Pattern Application 7 Zigzag stitch 24 Attaching appliqués (center baseline/reverse stitching) Appliqué quilting, free-motion quilting, satin stitching Stitch Width [mm (inch)] Auto...

Users Manual - English
Page 100
a a Seam allowance Place a pattern made of thick paper or b stabilizer on replacing the presser foot, refer to . 1 a Basting stitching Attach zigzag foot "J". Turn the fabric over the seam allowance using an iron. When sewing around the edge of the appliqué, making sure that it c onto ...foot" (page 43). e • For details, refer to change the sewing direction. 98 d J • For details on the back of the appliqué, raise the presser foot lever, and then turn the fabric as needed to "Selecting stitching" (page 49). Turn the handwheel toward you f (...
a a Seam allowance Place a pattern made of thick paper or b stabilizer on replacing the presser foot, refer to . 1 a Basting stitching Attach zigzag foot "J". Turn the fabric over the seam allowance using an iron. When sewing around the edge of the appliqué, making sure that it c onto ...foot" (page 43). e • For details, refer to change the sewing direction. 98 d J • For details on the back of the appliqué, raise the presser foot lever, and then turn the fabric as needed to "Selecting stitching" (page 49). Turn the handwheel toward you f (...

Users Manual - English
Page 101
... the edge of the fabric, and sew using stitch 22 . 1 a 6.5 mm (1/4 inch) Memo z To change the width of fabric together so the b pattern spans over the lower piece. Sew with the side of the presser foot aligned d with the edge of the fabric. 3 ■ For a seam allowance on... a 6.5 mm (1/4 inch) ■ For a seam allowance on the right side Align the right side of the presser foot with a 6.5 mm (1/4 inch) seam allowance. Appliqué, Patchwork and Quilt Stitching 99 Select stitch 21 or 22 . b J • For details on the LCD. Sew the two pieces of the seam allowance...
... the edge of the fabric, and sew using stitch 22 . 1 a 6.5 mm (1/4 inch) Memo z To change the width of fabric together so the b pattern spans over the lower piece. Sew with the side of the presser foot aligned d with the edge of the fabric. 3 ■ For a seam allowance on... a 6.5 mm (1/4 inch) ■ For a seam allowance on the right side Align the right side of the presser foot with a 6.5 mm (1/4 inch) seam allowance. Appliqué, Patchwork and Quilt Stitching 99 Select stitch 21 or 22 . b J • For details on the LCD. Sew the two pieces of the seam allowance...

Users Manual - English
Page 141
..., and hold it lightly in the setting screen. Note z Before using the needle threader, be changed. Embroidering a pattern „ Example: Embroidery thread number selected Embroidery patterns are done, you can be used for embroidering and appliquéing. Give the thread a little slack. Embroidering After the preparations are embroidered with a change the setting...
..., and hold it lightly in the setting screen. Note z Before using the needle threader, be changed. Embroidering a pattern „ Example: Embroidery thread number selected Embroidery patterns are done, you can be used for embroidering and appliquéing. Give the thread a little slack. Embroidering After the preparations are embroidered with a change the setting...

Users Manual - English
Page 143
... fabric Embroidering 141 Select an appliqué pattern. f Apply iron-on stabilizer to NAME OF COLOR, so "APPLIQUE MATERIAL", "APPLIQUE POSITION" and "APPLIQUE" are displayed on the screen. a b a Cut-out line b Appliqué piece fabric X "APPLIQUE POSITION" will be displayed on the screen. Appliquéing Prepare the base fabric and the appliqué fabric (appliqué piece). Set up...
... fabric Embroidering 141 Select an appliqué pattern. f Apply iron-on stabilizer to NAME OF COLOR, so "APPLIQUE MATERIAL", "APPLIQUE POSITION" and "APPLIQUE" are displayed on the screen. a b a Cut-out line b Appliqué piece fabric X "APPLIQUE POSITION" will be displayed on the screen. Appliquéing Prepare the base fabric and the appliqué fabric (appliqué piece). Set up...
Users Manual - English
Page 167
...adjusting stitch width 57 adjusting thread tension 59, 145 E air vent 11 appliqu 97 appliqué pattern selection 141 elastic tape 95 embroidering 118, 139 appliqué stitch 97 embroidering pattern 139 attaching presser foot holder 45 embroidering steps 119 attaching stabilizer material 126 ...9 free-arm sewing 46 cleaning machine surface 152 free-motion quilting 102 concealed seams 90 front view 10 connecting character patterns 146 country thread 19, 134 G crazy quilt stitching 99 cuffs 46 general sewing procedures 48 curve sewing 65 cutting ...
...adjusting stitch width 57 adjusting thread tension 59, 145 E air vent 11 appliqu 97 appliqué pattern selection 141 elastic tape 95 embroidering 118, 139 appliqué stitch 97 embroidering pattern 139 attaching presser foot holder 45 embroidering steps 119 attaching stabilizer material 126 ...9 free-arm sewing 46 cleaning machine surface 152 free-motion quilting 102 concealed seams 90 front view 10 connecting character patterns 146 country thread 19, 134 G crazy quilt stitching 99 cuffs 46 general sewing procedures 48 curve sewing 65 cutting ...


