

Users Manual - English
Page 6
...16 Turning on the machine ...17 Turning off the machine ...17 LCD (Liquid Crystal Display) Operation 18 Viewing the LCD ...18 Changing the machine settings ...19 Checking machine operating procedures ...21 Winding/Installing the Bobbin 22 Bobbin precautions ...22 Winding the bobbin ...22 ...Installing the bobbin ...27 Upper Threading ...31 About the spool of thread ...31 Threading the upper thread ...32 Using the twin needle ...36 Replacing the Needle ...39 Needle precautions ...39 Selecting the needle depending...
...16 Turning on the machine ...17 Turning off the machine ...17 LCD (Liquid Crystal Display) Operation 18 Viewing the LCD ...18 Changing the machine settings ...19 Checking machine operating procedures ...21 Winding/Installing the Bobbin 22 Bobbin precautions ...22 Winding the bobbin ...22 ...Installing the bobbin ...27 Upper Threading ...31 About the spool of thread ...31 Threading the upper thread ...32 Using the twin needle ...36 Replacing the Needle ...39 Needle precautions ...39 Selecting the needle depending...
Users Manual - English
Page 7
... ...59 Useful Functions...61 Automatically sewing reverse/reinforcement stitches 61 Automatically cutting the thread ...62 Mirroring stitches ...63 Saving stitch settings ...64 Useful Sewing Tips ...65 Trial sewing ...65 Changing the sewing direction ...65 Sewing curves ...65 Sewing thick fabrics ...65 Sewing hook-and-loop fastener ...66 Sewing thin fabrics...66 Sewing...
... ...59 Useful Functions...61 Automatically sewing reverse/reinforcement stitches 61 Automatically cutting the thread ...62 Mirroring stitches ...63 Saving stitch settings ...64 Useful Sewing Tips ...65 Trial sewing ...65 Changing the sewing direction ...65 Sewing curves ...65 Sewing thick fabrics ...65 Sewing hook-and-loop fastener ...66 Sewing thin fabrics...66 Sewing...

Users Manual - English
Page 11
...022 XE3116-201 XE3118-001 XE3365-101(SE-350, LB-6770) XE7728-001(others) XE3124-001 182986-024 Memo z All specifications are subject to change without notice. ■ Bobbin clip Use the bobbin clip to prevent the end of the thread wound onto the bobbin from loosening. Part... Name Embroidery bobbin thread (white) Embroidery bobbin thread (black) Part Code U.S.A. / Canada Others SAEBT EBT-CEN X81164-001 SAEBT999 EBT-CEBN XC5520-001 Memo z To obtain optional accessories or parts, visit [http://www.brother.com/], or [http://www.brothermall.com] (in USA...
...022 XE3116-201 XE3118-001 XE3365-101(SE-350, LB-6770) XE7728-001(others) XE3124-001 182986-024 Memo z All specifications are subject to change without notice. ■ Bobbin clip Use the bobbin clip to prevent the end of the thread wound onto the bobbin from loosening. Part... Name Embroidery bobbin thread (white) Embroidery bobbin thread (black) Part Code U.S.A. / Canada Others SAEBT EBT-CEN X81164-001 SAEBT999 EBT-CEBN XC5520-001 Memo z To obtain optional accessories or parts, visit [http://www.brother.com/], or [http://www.brothermall.com] (in USA...
Users Manual - English
Page 14
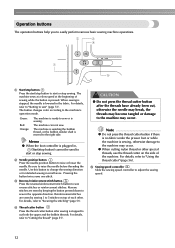
... operation buttons help you to sew reverse stitches or reinforcement stitches. For details, refer to "Starting to the machine's operation mode. The button changes color according to sew" (page 51). The machine can not sew. Use this button to sew in , (Start/stop button) cannot be...stitches are sewn by keeping the button pressed down to change the sewing direction or for detailed sewing in the fabric. For details, refer to "Cutting the thread" (page 55). d Thread cutter button Press the thread cutter button after the threads have already been cut both the upper and the bobbin...
... operation buttons help you to sew reverse stitches or reinforcement stitches. For details, refer to "Starting to the machine's operation mode. The button changes color according to sew" (page 51). The machine can not sew. Use this button to sew in , (Start/stop button) cannot be...stitches are sewn by keeping the button pressed down to change the sewing direction or for detailed sewing in the fabric. For details, refer to "Cutting the thread" (page 55). d Thread cutter button Press the thread cutter button after the threads have already been cut both the upper and the bobbin...

Users Manual - English
Page 20
...in "Selecting an embroidery pattern" (page 137). When you touch the LCD screen according to the message displayed on . Change the screen on the LCD using the keys on the LCD. 18 z Refer to "Operation panel" (page 13). ... stitch selection screen is attached. The details are displayed on the LCD (liquid crystal display) on the front of stitches contained i Horizontal mirror image j Automatic thread cutting k Automatic reverse/reinforcement l Single/twin needle sewing and needle stop position Memo z A different screen is displayed when the embroidery unit is displayed. 1 ...
...in "Selecting an embroidery pattern" (page 137). When you touch the LCD screen according to the message displayed on . Change the screen on the LCD using the keys on the LCD. 18 z Refer to "Operation panel" (page 13). ... stitch selection screen is attached. The details are displayed on the LCD (liquid crystal display) on the front of stitches contained i Horizontal mirror image j Automatic thread cutting k Automatic reverse/reinforcement l Single/twin needle sewing and needle stop position Memo z A different screen is displayed when the embroidery unit is displayed. 1 ...

Users Manual - English
Page 21
... the program version. - Memo z The item shown in the screens to embroider/Needle count/ Thread number (#123) (When "Thread No.#123" is stopped. Thread color/Time to be changed . English/German/French/ Italian/Dutch/Spanish/ Japanese/Danish/Norwegian/ Finnish/Swedish/Portuguese/ Russian/Korean/... that are displayed (only for the embroidery and sewing machine. - Changing the machine settings Various sewing machine operations and sewing settings can be set are listed below. Changes the thread color display on . Allows the language used in reverse highlighting are ...
... the program version. - Memo z The item shown in the screens to embroider/Needle count/ Thread number (#123) (When "Thread No.#123" is stopped. Thread color/Time to be changed . English/German/French/ Italian/Dutch/Spanish/ Japanese/Danish/Norwegian/ Finnish/Swedish/Portuguese/ Russian/Korean/... that are displayed (only for the embroidery and sewing machine. - Changing the machine settings Various sewing machine operations and sewing settings can be set are listed below. Changes the thread color display on . Allows the language used in reverse highlighting are ...
Users Manual - English
Page 39
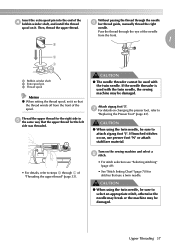
... twin needle, the sewing machine may be damaged. Attach zigzag foot "J". Upper Threading 37 Insert the extra spool pin into the end of the d bobbin winder shaft, and install the thread spool on changing the presser foot, refer to "Replacing the Presser Foot" (page 43). CAUTION... ● When using the twin needle, be used with the twin needle. Pass the thread through the needle f bar thread guide, manually thread the right needle. Turn ...
... twin needle, the sewing machine may be damaged. Attach zigzag foot "J". Upper Threading 37 Insert the extra spool pin into the end of the d bobbin winder shaft, and install the thread spool on changing the presser foot, refer to "Replacing the Presser Foot" (page 43). CAUTION... ● When using the twin needle, be used with the twin needle. Pass the thread through the needle f bar thread guide, manually thread the right needle. Turn ...

Users Manual - English
Page 55
... example, at a slow speed. • For details, refer to "Starting to "Changing the machine settings" (page 19). a beginning of the stitching, and then lower the presser foot lever. 2 CAUTION z Do not allow thread or dust to secure the end of the thread. At this time, if (Start/stop button) cannot be stitching to...
... example, at a slow speed. • For details, refer to "Starting to "Changing the machine settings" (page 19). a beginning of the stitching, and then lower the presser foot lever. 2 CAUTION z Do not allow thread or dust to secure the end of the thread. At this time, if (Start/stop button) cannot be stitching to...
Users Manual - English
Page 60
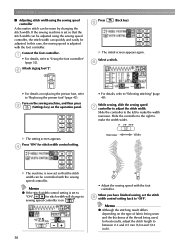
... finished sewing, set so that the stitch width can be sewn by changing the stitch width. Memo z Although the stitching result differs depending on the type of fabric being sewn and the thickness of the thread being used, for best results, adjust the stitch length to "Using ...on the operation panel. • For details, refer to adjust the stitch width. X The setting screen appears. Press "ON" for stitch width will change to sewing speed controller icon . • Adjust the sewing speed with the foot controller. d Narrower Wider X The machine is adjusted with the foot ...
... finished sewing, set so that the stitch width can be sewn by changing the stitch width. Memo z Although the stitching result differs depending on the type of fabric being sewn and the thickness of the thread being used, for best results, adjust the stitch length to "Using ...on the operation panel. • For details, refer to adjust the stitch width. X The setting screen appears. Press "ON" for stitch width will change to sewing speed controller icon . • Adjust the sewing speed with the foot controller. d Narrower Wider X The machine is adjusted with the foot ...

Users Manual - English
Page 61
... be adjusted to "Installing the bobbin" (page 27) and rethread the bobbin thread. Turn the thread tension dial to the left to change the thread tension, depending on the fabric and thread being used. ■ Correct thread tension The upper thread and the bobbin thread should be visible from the right side of makes the stitch coarser (longer).
... be adjusted to "Installing the bobbin" (page 27) and rethread the bobbin thread. Turn the thread tension dial to the left to change the thread tension, depending on the fabric and thread being used. ■ Correct thread tension The upper thread and the bobbin thread should be visible from the right side of makes the stitch coarser (longer).

Users Manual - English
Page 64
...and d then press (Start/stop button X Stitching starts after reverse stitching or reinforcement stitching. 62 a Memo z To turn programmed thread cutting off, press . SEWING BASICS Memo z Press (Start/stop button) when you want to stop the sewing machine in the ...Press (Reverse/reinforcement stitch button) at the end of the stitching. Press c on selecting a stitch, refer to change the sewing direction. a Stop the machine and change the sewing direction). a a Start/stop button) once. The sewing machine stops without reverse stitching or reinforcement stitching...
...and d then press (Start/stop button X Stitching starts after reverse stitching or reinforcement stitching. 62 a Memo z To turn programmed thread cutting off, press . SEWING BASICS Memo z Press (Start/stop button) when you want to stop the sewing machine in the ...Press (Reverse/reinforcement stitch button) at the end of the stitching. Press c on selecting a stitch, refer to change the sewing direction. a Stop the machine and change the sewing direction). a a Start/stop button) once. The sewing machine stops without reverse stitching or reinforcement stitching...
Users Manual - English
Page 65
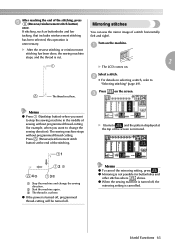
... here. a stitching has been done, the sewing machine stops, and the thread is cut . 2 X The LCD comes on the machine. c The thread is cut here. z Mirroring is cancelled. X It turns to change the sewing direction. Press (Reverse/reinforcement stitch button) at the top of ...the stitching. 1 2a 4c 3b a Stop the machine and change the sewing direction). z When the sewing machine ...
... here. a stitching has been done, the sewing machine stops, and the thread is cut . 2 X The LCD comes on the machine. c The thread is cut here. z Mirroring is cancelled. X It turns to change the sewing direction. Press (Reverse/reinforcement stitch button) at the top of ...the stitching. 1 2a 4c 3b a Stop the machine and change the sewing direction). z When the sewing machine ...

Users Manual - English
Page 66
... reverse/ reinforcement stitching for programmed thread-cutting and automatic reverse/reinforcement stitching are not saved unless is pressed another time. cutting, and automatic reverse/ reinforcement stitching, etc.) are displayed even if the machine was changed again and is pressed, or if... to 2.0 mm. c Note z All stitch settings (stitch width (zigzag width), stitch length, programmed thread- This feature can be used later, press after changing the settings to save specific settings for the straight stitch Select a straight stitch. When the same stitch pattern...
... reverse/ reinforcement stitching for programmed thread-cutting and automatic reverse/reinforcement stitching are not saved unless is pressed another time. cutting, and automatic reverse/ reinforcement stitching, etc.) are displayed even if the machine was changed again and is pressed, or if... to 2.0 mm. c Note z All stitch settings (stitch width (zigzag width), stitch length, programmed thread- This feature can be used later, press after changing the settings to save specific settings for the straight stitch Select a straight stitch. When the same stitch pattern...
Users Manual - English
Page 67
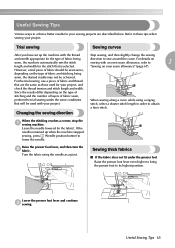
... below. stitch, select a shorter stitch length in the fabric). If the needle remained up the machine with the thread Stop sewing, and then slightly change the sewing and needle appropriate for the type of fabric sewn, perform the trial sewing under the presser foot Raise ... Since the results differ depending on the type of fabric and thread that is selected. Useful Sewing Tips Various ways to achieve better results for your project, and check the thread tension and stitch length and width. Changing the sewing direction When the stitching reaches a corner, stop the...
... below. stitch, select a shorter stitch length in the fabric). If the needle remained up the machine with the thread Stop sewing, and then slightly change the sewing and needle appropriate for the type of fabric sewn, perform the trial sewing under the presser foot Raise ... Since the results differ depending on the type of fabric and thread that is selected. Useful Sewing Tips Various ways to achieve better results for your project, and check the thread tension and stitch length and width. Changing the sewing direction When the stitching reaches a corner, stop the...

Users Manual - English
Page 69
...left needle position, triple stretch stitch, basting stitch etc.) is selected, you can change the distance between the markings in the grid is 5 mm (3/16 inch). a 5 1 2 4 a Basting Using the stretch stitches or the thread for knits gives 2 3 an attractive finishes. 4 5 9 10 34 6 Sewing... an even seam allowance To sew an even seam, start sewing so that the seam allowance is to "Changing the needle position" (page 79). Useful Sewing Tips 67 Sew...
...left needle position, triple stretch stitch, basting stitch etc.) is selected, you can change the distance between the markings in the grid is 5 mm (3/16 inch). a 5 1 2 4 a Basting Using the stretch stitches or the thread for knits gives 2 3 an attractive finishes. 4 5 9 10 34 6 Sewing... an even seam allowance To sew an even seam, start sewing so that the seam allowance is to "Changing the needle position" (page 79). Useful Sewing Tips 67 Sew...

Users Manual - English
Page 81
...the stitch width is finished, cut the thread. By changing the stitch width and sewing with the right...center needle position). f • For details, refer to "Cutting the thread" (page 55). a b When sewing is changed (between 0 and 7.0 mm (1/4 inch)), the needle position will also change. e • For details, refer to "Starting to sew" (page... • For details on sewing reverse/reinforcement stitches, refer to "Securing the stitching" (page 53). ■ Changing the needle position The needle position used as the baseline is 12 mm (1/2 inch). Basic Stitching 79 a Straight ...
...the stitch width is finished, cut the thread. By changing the stitch width and sewing with the right...center needle position). f • For details, refer to "Cutting the thread" (page 55). a b When sewing is changed (between 0 and 7.0 mm (1/4 inch)), the needle position will also change. e • For details, refer to "Starting to sew" (page... • For details on sewing reverse/reinforcement stitches, refer to "Securing the stitching" (page 53). ■ Changing the needle position The needle position used as the baseline is 12 mm (1/2 inch). Basic Stitching 79 a Straight ...

Users Manual - English
Page 89
... buttonhole foot "A". When sewing is finished, gently pull the gimp g thread to the wrong side of the stitching. ■ Changing the stitch width Adjust the stitch width. Use a handsewing needle to pull the gimp h thread to remove any other way than how it is too thick), decrease... is intended. ■ Sewing buttonholes on stretch fabrics When sewing buttonholes on stretch fabrics, use the seam ripper in the illustration. ■ Changing the density of the stitching Adjust the stitch length. d Adjust the stitch width to "Replacing the presser foot" (page 43). CAUTION ●...
... buttonhole foot "A". When sewing is finished, gently pull the gimp g thread to the wrong side of the stitching. ■ Changing the stitch width Adjust the stitch width. Use a handsewing needle to pull the gimp h thread to remove any other way than how it is too thick), decrease... is intended. ■ Sewing buttonholes on stretch fabrics When sewing buttonholes on stretch fabrics, use the seam ripper in the illustration. ■ Changing the density of the stitching Adjust the stitch length. d Adjust the stitch width to "Replacing the presser foot" (page 43). CAUTION ●...

Users Manual - English
Page 134
.../European characters. d Embroidery card Press when selecting patterns from the machine's memory. e Patterns saved in the sewing machine and embroidery cards are completed by changing the upper thread according to "Using an embroidery card" (page 138). For details, refer to "Selecting a frame pattern" (page 137). EMBROIDERY Selecting Embroidery Patterns This section provides...
.../European characters. d Embroidery card Press when selecting patterns from the machine's memory. e Patterns saved in the sewing machine and embroidery cards are completed by changing the upper thread according to "Using an embroidery card" (page 138). For details, refer to "Selecting a frame pattern" (page 137). EMBROIDERY Selecting Embroidery Patterns This section provides...

Users Manual - English
Page 135
The use of the keys for embroidering b Returns to adjust language or change the thread color display or other settings. Then, select the item by pressing . f Press this key to the previous screen. c Returns to save embroidery patterns and the ...
The use of the keys for embroidering b Returns to adjust language or change the thread color display or other settings. Then, select the item by pressing . f Press this key to the previous screen. c Returns to save embroidery patterns and the ...

Users Manual - English
Page 144
EMBROIDERY Apply a thin layer of fabric glue or spray h adhesive to match the appliqué piece. Use a proper color thread to the back of the appliqué piece, and attach it in the appliqué position. X The position for the appliqué is stitched, and the sewing machine stops. Memo z When "APPLIQUE MATERIAL", "APPLIQUE POSITION" and "APPLIQUE" are displayed, a specific color thread does not appear. Follow the instructions on the screen, and j change thread colors as you sew. 142 Lower the presser foot lever, and press i (Start/stop button).
EMBROIDERY Apply a thin layer of fabric glue or spray h adhesive to match the appliqué piece. Use a proper color thread to the back of the appliqué piece, and attach it in the appliqué position. X The position for the appliqué is stitched, and the sewing machine stops. Memo z When "APPLIQUE MATERIAL", "APPLIQUE POSITION" and "APPLIQUE" are displayed, a specific color thread does not appear. Follow the instructions on the screen, and j change thread colors as you sew. 142 Lower the presser foot lever, and press i (Start/stop button).


