

Users Manual - English
Page 8
... ...125 Preparing the Fabric ...126 Attaching a stabilizer material to the fabric 126 Setting the fabric in the embroidery frame ...127 Attaching the Embroidery Frame 130 Attaching the embroidery frame ...130 Removing the embroidery frame ...131 Selecting Embroidery Patterns 132 Copyright information ...132 Embroidery pattern types ...132 LCD (liquid crystal display) operation ...133 Selecting alphabet characters ...136 Selecting an...
... ...125 Preparing the Fabric ...126 Attaching a stabilizer material to the fabric 126 Setting the fabric in the embroidery frame ...127 Attaching the Embroidery Frame 130 Attaching the embroidery frame ...130 Removing the embroidery frame ...131 Selecting Embroidery Patterns 132 Copyright information ...132 Embroidery pattern types ...132 LCD (liquid crystal display) operation ...133 Selecting alphabet characters ...136 Selecting an...

Users Manual - English
Page 9
i Embroidery You can start sewing without pulling up (page 12). g Lighting Start/Stop button When the green light is on dark fabrics. e Quick-set bobbin You ... (page 11). f Bright light The convenient LED lamp makes it easy to -use needle threader You can select from the built-in embroidery patterns, characters, framed decorations, and designs from optional embroidery cards (page 117). 7 b Fast bobbin winding system With the fast and simple bobbin winder, you can be cut automatically after sewing...
i Embroidery You can start sewing without pulling up (page 12). g Lighting Start/Stop button When the green light is on dark fabrics. e Quick-set bobbin You ... (page 11). f Bright light The convenient LED lamp makes it easy to -use needle threader You can select from the built-in embroidery patterns, characters, framed decorations, and designs from optional embroidery cards (page 117). 7 b Fast bobbin winding system With the fast and simple bobbin winder, you can be cut automatically after sewing...
Users Manual - English
Page 12
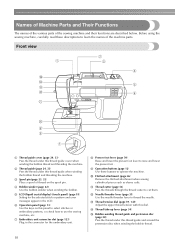
... threading the machine. e LCD (liquid crystal display) (touch panel) (page 18) Setting for the selected stitch or pattern and error messages appear in the connector for the embroidery unit. l Needle threader lever (page 35) Use the needle threader lever to learn the names of the machine parts....these descriptions to thread the needle. Front view a Thread guide cover (page 24, 33) Pass the thread under this panel to select stitches or embroidery patterns, or check how to operate the machine. c Spool pin (page 23, 32) Place a spool of the sewing machine and their functions are ...
... threading the machine. e LCD (liquid crystal display) (touch panel) (page 18) Setting for the selected stitch or pattern and error messages appear in the connector for the embroidery unit. l Needle threader lever (page 35) Use the needle threader lever to learn the names of the machine parts....these descriptions to thread the needle. Front view a Thread guide cover (page 24, 33) Pass the thread under this panel to select stitches or embroidery patterns, or check how to operate the machine. c Spool pin (page 23, 32) Place a spool of the sewing machine and their functions are ...

Users Manual - English
Page 15
... using the sewing machine. into the sewing machine memory. f Utility stitch key Press this key to enter alphabet character embroidery or embroidery patterns you have edited or adjusted, etc. i Sewing machine help key Press to get help on the LCD with your..., and more. Displays simple explanations of setting upper thread / bobbin winding / setting bobbin thread / needle replacement / embroidery unit attachment / embroidery frame attachment / embroidery foot attachment / presser foot replacement. 13 c Previous page key Displays the previous page when there are items that are...
... using the sewing machine. into the sewing machine memory. f Utility stitch key Press this key to enter alphabet character embroidery or embroidery patterns you have edited or adjusted, etc. i Sewing machine help key Press to get help on the LCD with your..., and more. Displays simple explanations of setting upper thread / bobbin winding / setting bobbin thread / needle replacement / embroidery unit attachment / embroidery frame attachment / embroidery foot attachment / presser foot replacement. 13 c Previous page key Displays the previous page when there are items that are...

Users Manual - English
Page 20
...image j Automatic thread cutting k Automatic reverse/reinforcement l Single/twin needle sewing and needle stop position Memo z A different screen is displayed when the embroidery unit is attached. z Refer to be used c Stitches d Stitch settings and twin needle sewing e Stitch width f Stitch length g Number of ... 7 5 6 a Selected stitch b Presser foot to "Error messages" (page 159) for messages displayed on the LCD. 18 GETTING READY LCD (Liquid Crystal Display) Operation Selected stitch, pattern settings and messages are explained in "Selecting an embroidery pattern" (page 137).
...image j Automatic thread cutting k Automatic reverse/reinforcement l Single/twin needle sewing and needle stop position Memo z A different screen is displayed when the embroidery unit is attached. z Refer to be used c Stitches d Stitch settings and twin needle sewing e Stitch width f Stitch length g Number of ... 7 5 6 a Selected stitch b Presser foot to "Error messages" (page 159) for messages displayed on the LCD. 18 GETTING READY LCD (Liquid Crystal Display) Operation Selected stitch, pattern settings and messages are explained in "Selecting an embroidery pattern" (page 137).

Users Manual - English
Page 119
4 EMBROIDERY The steps for embroidering are described in this chapter. Embroidering Neatly 118 Attaching the Embroidery Foot 120 Attaching the Embroidery Unit 123 Preparing the Fabric 126 Attaching the Embroidery Frame 130 Selecting Embroidery Patterns 132 Embroidering...139 Editing and Saving Patterns 143
4 EMBROIDERY The steps for embroidering are described in this chapter. Embroidering Neatly 118 Attaching the Embroidery Foot 120 Attaching the Embroidery Unit 123 Preparing the Fabric 126 Attaching the Embroidery Frame 130 Selecting Embroidery Patterns 132 Embroidering...139 Editing and Saving Patterns 143

Users Manual - English
Page 121
... needle Use a needle matched to "Upper Threading" (page 31). Embroidering Neatly 119 For details on selecting embroidery patterns, refer to the embroidery unit. For details on attaching the embroidery frame, refer to "Attaching the Embroidery Frame" (page 130). ↓ 7 Pattern selection Turn the power on preparing the fabric, refer to "Preparing the Fabric" (page 126). ↓...
... needle Use a needle matched to "Upper Threading" (page 31). Embroidering Neatly 119 For details on selecting embroidery patterns, refer to the embroidery unit. For details on attaching the embroidery frame, refer to "Attaching the Embroidery Frame" (page 130). ↓ 7 Pattern selection Turn the power on preparing the fabric, refer to "Preparing the Fabric" (page 126). ↓...

Users Manual - English
Page 126
... objects or hands are near the carriage, the screen may result. After removing whatever is displayed. Note z Make sure that no gap between the embroidery unit and the sewing machine, otherwise the embroidery pattern may cause injury. Turn on the embroidery patterns, refer to the initial display. X The carriage moves to its initial position. 124
... objects or hands are near the carriage, the screen may result. After removing whatever is displayed. Note z Make sure that no gap between the embroidery unit and the sewing machine, otherwise the embroidery pattern may cause injury. Turn on the embroidery patterns, refer to the initial display. X The carriage moves to its initial position. 124

Users Manual - English
Page 129
...removing inner frame upward. Preparing the Fabric 127 Loosen the embroidery frame adjustment a screw and remove the inner and outer frames, placing the outer frame on b top of the embroidery pattern may be sewn. CAUTION ● Use the embroidery frame that matches the size of the c fabric. If... the fabric is used for which embroidery frame (small) cannot be used. Have the right side of the ...
...removing inner frame upward. Preparing the Fabric 127 Loosen the embroidery frame adjustment a screw and remove the inner and outer frames, placing the outer frame on b top of the embroidery pattern may be sewn. CAUTION ● Use the embroidery frame that matches the size of the c fabric. If... the fabric is used for which embroidery frame (small) cannot be used. Have the right side of the ...

Users Manual - English
Page 130
... inner frame in from the frame e without loosening the adjustment screw. The goal is to the embroidery frame is used, the embroidery can be embroidered. Memo z This precautionary step will help reduce pattern distortion while embroidering. a b a Embroidery pattern b Mark 128 Embroidery sheet (large) [option] Make a mark with a chalk pen at the center of the f fabric again...
... inner frame in from the frame e without loosening the adjustment screw. The goal is to the embroidery frame is used, the embroidery can be embroidered. Memo z This precautionary step will help reduce pattern distortion while embroidering. a b a Embroidery pattern b Mark 128 Embroidery sheet (large) [option] Make a mark with a chalk pen at the center of the f fabric again...

Users Manual - English
Page 134
... the various types of copyright law and is an infringement of embroidery patterns available and the procedure for private use only. The patterns are total 70 patterns. For details, refer to "Selecting a frame pattern" (page 137). For details, refer to "Selecting an embroidery pattern" (page 137). bc a d e a Embroidery patterns There are completed by changing the upper thread according to...
... the various types of copyright law and is an infringement of embroidery patterns available and the procedure for private use only. The patterns are total 70 patterns. For details, refer to "Selecting a frame pattern" (page 137). For details, refer to "Selecting an embroidery pattern" (page 137). bc a d e a Embroidery patterns There are completed by changing the upper thread according to...

Users Manual - English
Page 135
... name a When there are patterns that are displayed. d Press this key to save embroidery patterns and the alphabet characters in the machine's memory. f Press this key to get help on the display panel. TIME: Time required for embroidery will be explained below. &#...) operation The LCD (liquid crystal display) is operated using the operation keys on embroidery unit attachment, embroidery frame attachment, etc. e Press to adjust language or change the thread color display or other settings. Selecting Embroidery Patterns 133 c Returns to the previous screen.
... name a When there are patterns that are displayed. d Press this key to save embroidery patterns and the alphabet characters in the machine's memory. f Press this key to get help on the display panel. TIME: Time required for embroidery will be explained below. &#...) operation The LCD (liquid crystal display) is operated using the operation keys on embroidery unit attachment, embroidery frame attachment, etc. e Press to adjust language or change the thread color display or other settings. Selecting Embroidery Patterns 133 c Returns to the previous screen.

Users Manual - English
Page 137
...147). Example: Selecting an embroidery pattern The needle progresses one color or one stitch • For details, refer to change the thread settings. Press to change the thread density (characters and frame patterns only). Press this key again to adjust the pattern. Press this key to cancel... color is changed . Press this key to change the color, character by character in the middle of the operation. Selecting Embroidery Patterns 135 Press or to switch the display. Back one color Forward one color Back one stitch Forward one stitch (if pressed continuously...
...147). Example: Selecting an embroidery pattern The needle progresses one color or one stitch • For details, refer to change the thread settings. Press to change the thread density (characters and frame patterns only). Press this key again to adjust the pattern. Press this key to cancel... color is changed . Press this key to change the color, character by character in the middle of the operation. Selecting Embroidery Patterns 135 Press or to switch the display. Back one color Forward one color Back one stitch Forward one stitch (if pressed continuously...

Users Manual - English
Page 139
... stitch types. Select the frame shape. a Selecting a frame pattern 10 shapes, such as flowers and animals, saved in the machine's memory. 70 Embroidery patterns Memo z Refer to "Frame patterns" in the Quick reference guide for frame pattern shapes and stitches. a 4 X The pattern selection screen is displayed. Selecting Embroidery Patterns 137 Press . X When a pattern is selected, it can be embroidered.
... stitch types. Select the frame shape. a Selecting a frame pattern 10 shapes, such as flowers and animals, saved in the machine's memory. 70 Embroidery patterns Memo z Refer to "Frame patterns" in the Quick reference guide for frame pattern shapes and stitches. a 4 X The pattern selection screen is displayed. Selecting Embroidery Patterns 137 Press . X When a pattern is selected, it can be embroidered.

Users Manual - English
Page 140
... storage cases. e The operation is used, you , and insert it in "Selecting an embroidery pattern" (page 137). There are not in use, keep them in foreign countries may cause your machine. Select a pattern. z Use only embroidery cards manufactured for the patterns saved in the direction of the sewing machine. Turn on the right side of...
... storage cases. e The operation is used, you , and insert it in "Selecting an embroidery pattern" (page 137). There are not in use, keep them in foreign countries may cause your machine. Select a pattern. z Use only embroidery cards manufactured for the patterns saved in the direction of the sewing machine. Turn on the right side of...

Users Manual - English
Page 141
Embroidering a pattern „ Example: Embroidery thread number selected Embroidery patterns are done, you can be used for embroidering b Current color step/Number of colors in your left hand. (liquid crystal display) operation" (page 133). Prepare embroidery thread of thread after each color. thread colors can be sure ...in the setting screen. Note z Before using the needle threader, be changed. For details, refer to "LCD Pass the thread through the embroidery foot c hole, and hold it lightly in design c Current name of color d Current color part e Next color part • ...
Embroidering a pattern „ Example: Embroidery thread number selected Embroidery patterns are done, you can be used for embroidering b Current color step/Number of colors in your left hand. (liquid crystal display) operation" (page 133). Prepare embroidery thread of thread after each color. thread colors can be sure ...in the setting screen. Note z Before using the needle threader, be changed. For details, refer to "LCD Pass the thread through the embroidery foot c hole, and hold it lightly in design c Current name of color d Current color part e Next color part • ...
Users Manual - English
Page 145
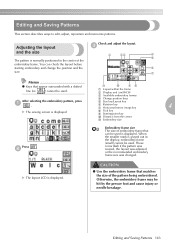
... b Display unit (cm/INCH) c Available embroidery frames d Change position keys After selecting the embroidery pattern, press a . Check and adjust the layout. When the smaller mark is displayed. e Size key/Layout key f Rotation key g Horizontal mirror image key 4 X The sewing screen is grayed out in the center of the pattern being embroidered. h Trial key i Starting...
... b Display unit (cm/INCH) c Available embroidery frames d Change position keys After selecting the embroidery pattern, press a . Check and adjust the layout. When the smaller mark is displayed. e Size key/Layout key f Rotation key g Horizontal mirror image key 4 X The sewing screen is grayed out in the center of the pattern being embroidered. h Trial key i Starting...

Users Manual - English
Page 146
... time. Press (Back key) to return to "Saving patterns" (page 150). EMBROIDERY Size key Increases/decreases the size of the pattern or reverse it, the embroidery which have been moved will return to its initial position. Memo z Mirroring patterns is larger than 10cm (4 inches) x 10cm (4 inches... the stitching starting point between center and lower left Rotates the pattern 1degree to the right Returns the pattern to its original position Memo zWhen the pattern is possible only for a embroidery pattern or a frame pattern. Memo z If you have changed the size and position in...
... time. Press (Back key) to return to "Saving patterns" (page 150). EMBROIDERY Size key Increases/decreases the size of the pattern or reverse it, the embroidery which have been moved will return to its initial position. Memo z Mirroring patterns is larger than 10cm (4 inches) x 10cm (4 inches... the stitching starting point between center and lower left Rotates the pattern 1degree to the right Returns the pattern to its original position Memo zWhen the pattern is possible only for a embroidery pattern or a frame pattern. Memo z If you have changed the size and position in...
Users Manual - English
Page 147
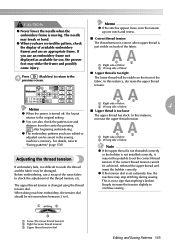
...dial. z You can be achieved, rethread the upper thread and insert the bobbin correctly. z The embroidery patterns you have revised the pattern, check the display of available embroidery frames and use an appropriate frame. Before embroidering, use , the presser foot may strike the frame and...c a Loose (Decrease thread tension) b Tight (Increase thread tension) c Upper thread tension dial Editing and Saving Patterns 145 CAUTION ● Never lower the needle when the embroidery frame is just visible on the front of the fabric. In this instance, returns to the d previous screen. ...
...dial. z You can be achieved, rethread the upper thread and insert the bobbin correctly. z The embroidery patterns you have revised the pattern, check the display of available embroidery frames and use an appropriate frame. Before embroidering, use , the presser foot may strike the frame and...c a Loose (Decrease thread tension) b Tight (Increase thread tension) c Upper thread tension dial Editing and Saving Patterns 145 CAUTION ● Never lower the needle when the embroidery frame is just visible on the front of the fabric. In this instance, returns to the d previous screen. ...
Users Manual - English
Page 152
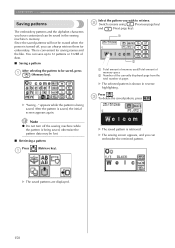
EMBROIDERY Saving patterns The embroidery patterns and the alphabet characters you can always retrieve them for saving names and the like. You can save up to 12 patterns or 512KB of pages X The selected pattern is shown in the sewing machine's memory. After the pattern is retrieved. X "Saving..." X The saved pattern is saved, the initial screen appears again. This...
EMBROIDERY Saving patterns The embroidery patterns and the alphabet characters you can always retrieve them for saving names and the like. You can save up to 12 patterns or 512KB of pages X The selected pattern is shown in the sewing machine's memory. After the pattern is retrieved. X "Saving..." X The saved pattern is saved, the initial screen appears again. This...


