
Users Manual - English
Page 4
... any opening. • Do not operate where aerosol (spray) products are subject to change without notice. Special care is required around the machine needle. • Switch the sewing machine to the symbol "O" position to turn it to break. 6 This machine is not a toy: •...additional product information and updates, visit our web site at www.brother.com 2 If the problem persists, please consult your local authorized Brother dealer. • Never drop or insert any object into any assemblies, the presser feet, needle, or other hot objects. • Use only neutral soaps ...
... any opening. • Do not operate where aerosol (spray) products are subject to change without notice. Special care is required around the machine needle. • Switch the sewing machine to the symbol "O" position to turn it to break. 6 This machine is not a toy: •...additional product information and updates, visit our web site at www.brother.com 2 If the problem persists, please consult your local authorized Brother dealer. • Never drop or insert any object into any assemblies, the presser feet, needle, or other hot objects. • Use only neutral soaps ...

Users Manual - English
Page 6
...1 Machine Features ...7 Accessories ...8 Included accessories ...8 Optional accessories ...9 Names of Machine Parts and Their Functions 10 Front view...10 Needle and presser foot section ...11 Right-side/rear view ...11 Operation buttons ...12 Operation panel ...13 GETTING READY 15 Turning the... ...31 Threading the upper thread ...32 Using the twin needle ...36 Replacing the Needle ...39 Needle precautions ...39 Selecting the needle depending on the thread and fabric types 39 Checking the needle ...40 Replacing the needle ...41 Replacing the Presser Foot 43 Presser foot precautions ...43...
...1 Machine Features ...7 Accessories ...8 Included accessories ...8 Optional accessories ...9 Names of Machine Parts and Their Functions 10 Front view...10 Needle and presser foot section ...11 Right-side/rear view ...11 Operation buttons ...12 Operation panel ...13 GETTING READY 15 Turning the... ...31 Threading the upper thread ...32 Using the twin needle ...36 Replacing the Needle ...39 Needle precautions ...39 Selecting the needle depending on the thread and fabric types 39 Checking the needle ...40 Replacing the needle ...41 Replacing the Presser Foot 43 Presser foot precautions ...43...

Users Manual - English
Page 9
...Fast bobbin winding system With the fast and simple bobbin winder, you can start sewing without pulling up (page 12). h Easy-to-use needle threader You can embroider built-in utility stitches available (page 70). A red or orange light indicates an error or that the machine is ...Seven-point feed dogs Ensure smooth, even feeding of multiple fabric layers and a variety of a button (page 22). i Embroidery You can thread the needle easily by one press of fabric weights (page 11). Machine Features 9 a Automatic thread cutting The thread can select from the built-in embroidery patterns,...
...Fast bobbin winding system With the fast and simple bobbin winder, you can start sewing without pulling up (page 12). h Easy-to-use needle threader You can embroider built-in utility stitches available (page 70). A red or orange light indicates an error or that the machine is ...Seven-point feed dogs Ensure smooth, even feeding of multiple fabric layers and a variety of a button (page 22). i Embroidery You can thread the needle easily by one press of fabric weights (page 11). Machine Features 9 a Automatic thread cutting The thread can select from the built-in embroidery patterns,...

Users Manual - English
Page 10
....*1 11. 12. 13. 14. 15. 16. 17. 18. 19. 20. 21. 22. 23. 24. 25. 26. 27.*2 28.*2 29. 30. 31.*2 32. 33. *1 75/11 2 needles 90/14 2 needles 90/14 2 needles: Ball point needle (gold colored) *2 Not included depending on the machine rating plate.
....*1 11. 12. 13. 14. 15. 16. 17. 18. 19. 20. 21. 22. 23. 24. 25. 26. 27.*2 28.*2 29. 30. 31.*2 32. 33. *1 75/11 2 needles 90/14 2 needles 90/14 2 needles: Ball point needle (gold colored) *2 Not included depending on the machine rating plate.

Users Manual - English
Page 11
... EF62: XA6628-102 XC6283-001 XC4487-021 XC4842-022 XE3116-201 XE3118-001 XE3365-101(SE-350, LB-6770) XE7728-001(others) XE3124-001 182986-024 Memo z All specifications...X81164-001 SAEBT999 EBT-CEBN XC5520-001 Memo z To obtain optional accessories or parts, visit [http://www.brother.com/], or [http://www.brothermall.com] (in USA). Part Name 18 Spool cap (small) 19 ...Blind stitch foot "R" 7 Button fitting foot "M" 8 Seam ripper 9 Bobbin (4) Bobbin clip (3) 10 Needle set 11 Twin needle 12 Cleaning brush XC3021-031 XC4051-031 XE2137-001 X54243-051 SA156 SFB: XA5539-151 XE3060-001 XE58358-...
... EF62: XA6628-102 XC6283-001 XC4487-021 XC4842-022 XE3116-201 XE3118-001 XE3365-101(SE-350, LB-6770) XE7728-001(others) XE3124-001 182986-024 Memo z All specifications...X81164-001 SAEBT999 EBT-CEBN XC5520-001 Memo z To obtain optional accessories or parts, visit [http://www.brother.com/], or [http://www.brothermall.com] (in USA). Part Name 18 Spool cap (small) 19 ...Blind stitch foot "R" 7 Button fitting foot "M" 8 Seam ripper 9 Bobbin (4) Bobbin clip (3) 10 Needle set 11 Twin needle 12 Cleaning brush XC3021-031 XC4051-031 XE2137-001 X54243-051 SA156 SFB: XA5539-151 XE3060-001 XE58358-...
Users Manual - English
Page 12
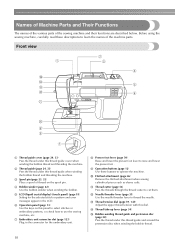
... sewing machine, carefully read these buttons to learn the names of the sewing machine and their functions are described below. l Needle threader lever (page 35) Use the needle threader lever to raise and lower the presser foot . Names of Machine Parts and Their Functions The names of the various ... cover when winding the bobbin thread and threading the machine. h Presser foot lever (page 50) Raise and lower the presser foot lever to thread the needle. f Operation panel (page 13) Use the keys on the spool pin. Front view a Thread guide cover (page 24, 33) Pass the thread ...
... sewing machine, carefully read these buttons to learn the names of the sewing machine and their functions are described below. l Needle threader lever (page 35) Use the needle threader lever to raise and lower the presser foot . Names of Machine Parts and Their Functions The names of the various ... cover when winding the bobbin thread and threading the machine. h Presser foot lever (page 50) Raise and lower the presser foot lever to thread the needle. f Operation panel (page 13) Use the keys on the spool pin. Front view a Thread guide cover (page 24, 33) Pass the thread ...
Users Manual - English
Page 13
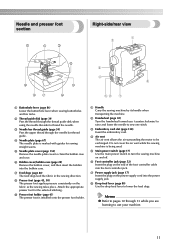
... the sewing machine on the power supply cord into the power supply jack. g Power supply jack (page 17) Insert the plug on and off. Needle and presser foot section Right-side/rear view a Buttonhole lever (page 86) Lower the buttonhole lever when sewing buttonholes and bar tacks. h Presser foot... the sewing machine is installed onto the presser foot holder. b Thread guide disk (page 34) Pass the thread through the needle bar thread guide. d Needle plate (page 67) The needle plate is marked with guides for the selected stitching. g Feed dogs (page 88) The feed dogs feed the fabric in ...
... the sewing machine on the power supply cord into the power supply jack. g Power supply jack (page 17) Insert the plug on and off. Needle and presser foot section Right-side/rear view a Buttonhole lever (page 86) Lower the buttonhole lever when sewing buttonholes and bar tacks. h Presser foot... the sewing machine is installed onto the presser foot holder. b Thread guide disk (page 34) Pass the thread through the needle bar thread guide. d Needle plate (page 67) The needle plate is marked with guides for the selected stitching. g Feed dogs (page 88) The feed dogs feed the fabric in ...
Users Manual - English
Page 14
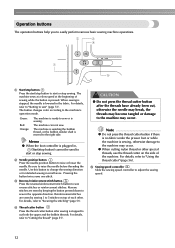
... stitch button Press the reverse/reinforcement stitch button to sew" (page 51). For details, refer to raise or lower the needle. b Needle position button Press the needle position button to "Securing the stitching" (page 53). Be sure to "Using the thread cutter" (page 56). Pressing ...the button twice sews one stitch. For details, refer to raise the needle before threading the needle. Operation buttons The operation buttons help you to the machine's operation mode. a Start/stop button Press the start/stop button ...
... stitch button Press the reverse/reinforcement stitch button to sew" (page 51). For details, refer to raise or lower the needle. b Needle position button Press the needle position button to "Securing the stitching" (page 53). Be sure to "Using the thread cutter" (page 56). Pressing ...the button twice sews one stitch. For details, refer to raise the needle before threading the needle. Operation buttons The operation buttons help you to the machine's operation mode. a Start/stop button Press the start/stop button ...

Users Manual - English
Page 15
... The front operation panel has an LCD (liquid crystal display) and operation keys. e Memory key Press to set the needle stop position, the buzzer sound, and more. h Settings key Press to enter alphabet character embroidery or embroidery patterns you ... items that are not displayed on using the sewing machine. Displays simple explanations of setting upper thread / bobbin winding / setting bobbin thread / needle replacement / embroidery unit attachment / embroidery frame attachment / embroidery foot attachment / presser foot replacement. 13 g Embroidery key Press this key to sew...
... The front operation panel has an LCD (liquid crystal display) and operation keys. e Memory key Press to set the needle stop position, the buzzer sound, and more. h Settings key Press to enter alphabet character embroidery or embroidery patterns you ... items that are not displayed on using the sewing machine. Displays simple explanations of setting upper thread / bobbin winding / setting bobbin thread / needle replacement / embroidery unit attachment / embroidery frame attachment / embroidery foot attachment / presser foot replacement. 13 g Embroidery key Press this key to sew...

Users Manual - English
Page 17
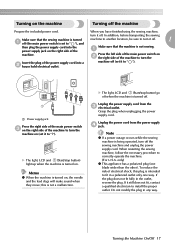
Turning the Machine On/Off 16 LCD (Liquid Crystal Display) Operation 18 Winding/Installing the Bobbin 22 Upper Threading ...31 Replacing the Needle 39 Replacing the Presser Foot 43 Sewing Cylindrical Pieces 46 1 GETTING READY The various preparations required before starting to sew are described in this chapter.
Turning the Machine On/Off 16 LCD (Liquid Crystal Display) Operation 18 Winding/Installing the Bobbin 22 Upper Threading ...31 Replacing the Needle 39 Replacing the Presser Foot 43 Sewing Cylindrical Pieces 46 1 GETTING READY The various preparations required before starting to sew are described in this chapter.
Users Manual - English
Page 19
... " "), and then plug the power supply cord into a b house hold electrical outlet. When you have finished using the sewing machine, turn the machine on , the needle and the feed dogs will make sound when they move; Note z If a power outage occurs while the sewing machine is turned on (set it still...
... " "), and then plug the power supply cord into a b house hold electrical outlet. When you have finished using the sewing machine, turn the machine on , the needle and the feed dogs will make sound when they move; Note z If a power outage occurs while the sewing machine is turned on (set it still...

Users Manual - English
Page 20
.... Viewing the LCD When the power is attached. When you touch the LCD screen according to be used c Stitches d Stitch settings and twin needle sewing e Stitch width f Stitch length g Number of the selected stitch h Number of the LCD, and make operations by directly touching the icons... using the keys on the right side of stitches contained i Horizontal mirror image j Automatic thread cutting k Automatic reverse/reinforcement l Single/twin needle sewing and needle stop position Memo z A different screen is displayed when the embroidery unit is turned on, the LCD comes on the LCD. 18 z ...
.... Viewing the LCD When the power is attached. When you touch the LCD screen according to be used c Stitches d Stitch settings and twin needle sewing e Stitch width f Stitch length g Number of the selected stitch h Number of the LCD, and make operations by directly touching the icons... using the keys on the right side of stitches contained i Horizontal mirror image j Automatic thread cutting k Automatic reverse/reinforcement l Single/twin needle sewing and needle stop position Memo z A different screen is displayed when the embroidery unit is turned on, the LCD comes on the LCD. 18 z ...

Users Manual - English
Page 21
... number NO.: The "NO." mm/INCH Buzzer Specifies whether or not a beep is sounded with the sewing speed controller (page 58). Initial needle position Language Selects whether "1 Straight stitch (left)" or "3 Straight stitch (middle)" that can be changed . Program version Version: Display the... program version. - Memo z The item shown in the screens to embroider/Needle count/ Thread number (#123) (When "Thread No.#123" is stopped. Changing the machine settings Various sewing machine operations and sewing settings ...
... number NO.: The "NO." mm/INCH Buzzer Specifies whether or not a beep is sounded with the sewing speed controller (page 58). Initial needle position Language Selects whether "1 Straight stitch (left)" or "3 Straight stitch (middle)" that can be changed . Program version Version: Display the... program version. - Memo z The item shown in the screens to embroider/Needle count/ Thread number (#123) (When "Thread No.#123" is stopped. Changing the machine settings Various sewing machine operations and sewing settings ...

Users Manual - English
Page 22
... is the individual number for the sewing machine. a The highlighted display is turned off. 20 Press b panel. (Settings key) on the display Example: Changing the needle stop position X The setting screen appears.
... is the individual number for the sewing machine. a The highlighted display is turned off. 20 Press b panel. (Settings key) on the display Example: Changing the needle stop position X The setting screen appears.

Users Manual - English
Page 23
...key), you finish viewing, press e key) two times. (Back h g fe a Upper threading b Bobbin winding c Bobbin installation d Needle replacement e Presser foot replacement f Embroidery foot attachment g Embroidery frame attachment h Embroidery unit attachment X The first screen describing the procedure for...page. LCD (Liquid Crystal Display) Operation 21 Memo z For details on the LCD. bobbin winding / setting bobbin thread / needle replacement / embroidery unit attachment / Example: Upper threading embroidery frame attachment / embroidery foot attachment / presser foot replacement on each ...
...key), you finish viewing, press e key) two times. (Back h g fe a Upper threading b Bobbin winding c Bobbin installation d Needle replacement e Presser foot replacement f Embroidery foot attachment g Embroidery frame attachment h Embroidery unit attachment X The first screen describing the procedure for...page. LCD (Liquid Crystal Display) Operation 21 Memo z For details on the LCD. bobbin winding / setting bobbin thread / needle replacement / embroidery unit attachment / Example: Upper threading embroidery frame attachment / embroidery foot attachment / presser foot replacement on each ...
Users Manual - English
Page 27
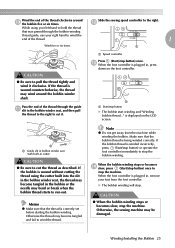
... as described. When the foot controller is displayed on the foot controller. a a Guide slit in bobbin winder seat (with built-in the bobbin or the needle may wind around j the bobbin five or six times. If the bobbin is being winded correctly. Make sure that was passed through the guide k slit...
... as described. When the foot controller is displayed on the foot controller. a a Guide slit in bobbin winder seat (with built-in the bobbin or the needle may wind around j the bobbin five or six times. If the bobbin is being winded correctly. Make sure that was passed through the guide k slit...
Users Manual - English
Page 28
... from the shaft. ■ When the thread became tangled under the bobbin winder seat. When the foot controller is set to the right side, the needle will make a clicking sound; a a Start/stop the bobbin winding. In such a case, wind off the thread by removing the screw. Memo z When the sewing machine...
... from the shaft. ■ When the thread became tangled under the bobbin winder seat. When the foot controller is set to the right side, the needle will make a clicking sound; a a Start/stop the bobbin winding. In such a case, wind off the thread by removing the screw. Memo z When the sewing machine...
Users Manual - English
Page 29
... Install the bobbin wound with scissors beside the bobbinb winding thread guide. Winding/Installing the Bobbin 27 Hold the thread end with thread, otherwise the needle may break or the thread tension will not operate correctly. e Note z Make sure that has been correctly wound with your right hand as shown below...
... Install the bobbin wound with scissors beside the bobbinb winding thread guide. Winding/Installing the Bobbin 27 Hold the thread end with thread, otherwise the needle may break or the thread tension will not operate correctly. e Note z Make sure that has been correctly wound with your right hand as shown below...
Users Manual - English
Page 30
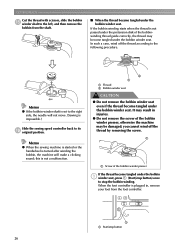
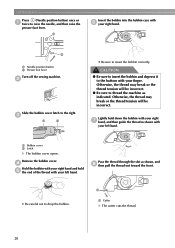
.... • Be careful not to insert the bobbin correctly. d Hold the bobbin with your right hand and hold down the bobbin with your left hand. b a Needle position button b Presser foot lever Turn off the sewing machine. Lightly hold e the end of the thread with your right g hand, and then guide the... or the thread tension will be incorrect. ● Be sure to the bottom with your left hand. b Slide the bobbin cover latch to raise the needle, and then raise the presser foot lever. GETTING READY Press...
.... • Be careful not to insert the bobbin correctly. d Hold the bobbin with your right hand and hold down the bobbin with your left hand. b a Needle position button b Presser foot lever Turn off the sewing machine. Lightly hold e the end of the thread with your right g hand, and then guide the... or the thread tension will be incorrect. ● Be sure to the bottom with your left hand. b Slide the bobbin cover latch to raise the needle, and then raise the presser foot lever. GETTING READY Press...

Users Manual - English
Page 31
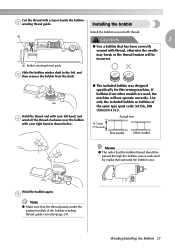
... thread may cause incorrect thread tension (page 59). Winding/Installing the Bobbin 29 Thread the upper thread. 1 a • Refer to raise the needle. a b 2 1 a Tab b Lower-left corner X The bobbin threading is looped around the upper thread and can begin sewing without pulling ...up the bobbin thread. z Make the bobbin cover removed. a a Needle position button X The bobbin thread is finished. case, it may be necessary". c a a Tension-adjusting spring Reattach the bobbin cover. i ...
... thread may cause incorrect thread tension (page 59). Winding/Installing the Bobbin 29 Thread the upper thread. 1 a • Refer to raise the needle. a b 2 1 a Tab b Lower-left corner X The bobbin threading is looped around the upper thread and can begin sewing without pulling ...up the bobbin thread. z Make the bobbin cover removed. a a Needle position button X The bobbin thread is finished. case, it may be necessary". c a a Tension-adjusting spring Reattach the bobbin cover. i ...


