
Brother International SE-400 Support Question
Brother International SE-400 Support Question
Find answers below for this question about Brother International SE-400.Need a Brother International SE-400 manual? We have 4 online manuals for this item!
Question posted by kofHugow on March 16th, 2014
How To Set Needle To Middle Position On Brother Se400
The person who posted this question about this Brother International product did not include a detailed explanation. Please use the "Request More Information" button to the right if more details would help you to answer this question.
Current Answers
Related Brother International SE-400 Manual Pages
Users Manual - English - Page 4
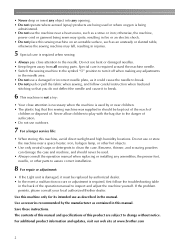
... product information and updates, visit our web site at www.brother.com
2 Use this machine only for its intended use outdoors.
7 For a longer service life:
• When storing this manual.
Special care is required around the machine needle. • Switch the sewing machine to the symbol "O" position to turn it off when making any adjustments
in the...
Users Manual - English - Page 12
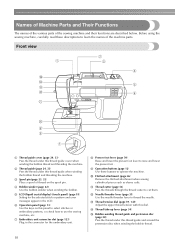
...the bobbin thread and threading the machine. e LCD (liquid crystal display) (touch panel) (page 18) Setting for the selected stitch or ...machine. i Operation buttons (page 12) Use these descriptions to thread the needle. l Needle threader lever (page 35) Use the needle threader lever to learn the names of the sewing machine and their functions are described below. Before using the sewing machine...
Users Manual - English - Page 14
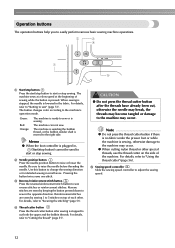
.../stop button Press the start/stop button to
start or stop sewing.
The machine sews at a slow speed at the beginning of the machine. b Needle position button Press the needle position button to "Securing the stitching" (page 53). Use this button to change the sewing direction or for detailed sewing in , (Start/stop button) cannot be used to start or...
Users Manual - English - Page 15

....
b Back key Press to return to "LCD (Liquid Crystal Display) Operation" (page 18).
e Memory key Press to set the needle stop position, the buzzer sound, and more. into the sewing machine memory. i Sewing machine help key Press to get help on the LCD with your finger or the touch pen to select a utility stitch. Displays simple explanations...
Users Manual - English - Page 19
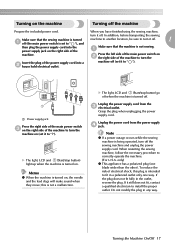
... shock, this is set it off. Memo
z When the machine is turned on , the needle and the feed dogs will make sound when they move; Grasp the plug when unplugging the power supply cord.
Do not modify the plug in the outlet, reverse the plug.
When you have finished using the sewing machine,
turn it...
Users Manual - English - Page 20

...be used c Stitches d Stitch settings and twin needle sewing e Stitch width f Stitch length g Number of the selected stitch h Number of the sewing machine. The details are displayed on...Horizontal mirror image j Automatic thread cutting k Automatic reverse/reinforcement l Single/twin needle sewing and needle stop
position
Memo
z A different screen is displayed when the embroidery unit is attached....
Users Manual - English - Page 21

...needle position
Language
Selects whether "1 Straight stitch (left)" or "3 Straight stitch (middle)" that is automatically selected when the machine is sounded with the sewing...Needle position Stitch width control
Thread color display
Icon
Details
Settings
Specifies where the needle is positioned when the sewing machine is stopped.
The stitch or machine attributes that are the settings...
Users Manual - English - Page 22

...the power is the individual number for the
sewing machine. GETTING READY
Turn on the display
Example: Changing the needle stop position
X The setting screen appears.
z Settings that are changed are complete, press d (Back key). X The initial stitch screen appears again.
Press b panel.
(Settings key) on the sewing machine. Memo
z "NO" is turned off.
20
a
The highlighted...
Users Manual - English - Page 28
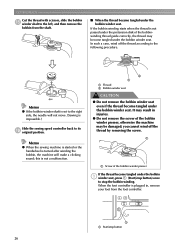
...off the thread according to its p original position. In such a case, wind off the thread by removing the screw. Memo
z If the bobbin winder shaft is set to the right side, the needle will make a clicking sound; b a... tangled under the bobbin winder seat. Memo
z When the sewing machine is started or the handwheel is not passed under the pretension disk of the bobbin winder presser,...
Users Manual - English - Page 34
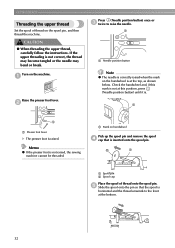
...position, press (Needle position button) until it is raised. Check the handwheel and, if this mark is not at the bottom.
32 b
a
a
a Presser foot lever
X The presser foot is . If the upper threading is not raised, the sewing machine... cannot be threaded. Turn on the spool pin, and then thread the machine.
GETTING READY
Threading the upper thread
Set the spool ...
Users Manual - English - Page 51

... a matching presser foot ready.
• Refer to "Setting the Stitch" (page 57).
Check that should be used , the needle may hit the presser foot and bend or break. If...left needle position) is difficult, use the included touch pen. Memo
z For details on the screen.
2
Memo
z When touching the screen with your finger is selected. z For details on the sewing machine.
b The machine ...
Users Manual - English - Page 64

...
z Press (Start/stop button) when you want to stop the sewing machine in the middle of the stitching. Press (Reverse/reinforcement stitch button) at the end of the stitching.
b Start the machine again.
Position the fabric under the presser foot, and d then press (Start/stop button
X Stitching starts after reverse stitching or reinforcement stitching.
62...
Users Manual - English - Page 67
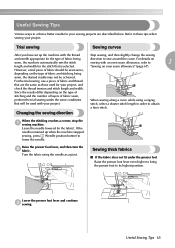
... the presser foot lever and continue c sewing.
"Sewing an even seam allowance" (page 67). Useful Sewing Tips 65 Refer to achieve better results for the type of fabric and thread
that is selected. Trial sewing
Sewing curves
After you have set up when the machine stopped sewing, press (Needle position button) to its highest position. stitch, select a shorter stitch length in...
Users Manual - English - Page 90
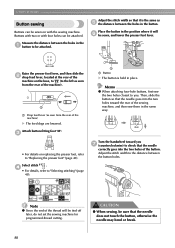
...the stitch width so that it is held in the position where it will be sure that the needle goes into the two holes of the machine).
Adjust the stitch width to be sewn, and ... that the needle does not touch the button, otherwise the needle may bend or break.
88 Attach button-fitting foot "M".
CAUTION
● When sewing, be tied off later, do not set the sewing machine for programmed-...
Users Manual - English - Page 104

... "O" by b positioning the pin of the quilting foot above
the needle clamp screw and aligning the lower-left of the quilting foot and the presser bar.
1 3
2
a
a Drop feed lever (as seen from the rear of the machine)
X The feed dogs are sewn at the beginning and end of d the machine on the sewing machine, and then...
Users Manual - English - Page 120

... become tangled. Memo
z A 75/11 needle is already installed when the sewing machine is not space, do not embroider the fabric. Prepare a piece of the pattern you continue embroidering when the bobbin thread is enough bobbin thread.
Memo
z For good quality embroidery designs be absolutely sure not to "Setting the fabric in injury.
●...
Users Manual - English - Page 137

... by character in the middle of
multi color.
Press this key to "Resewing" (page 147).
This is used . Selecting Embroidery Patterns 135 Press this key to change the thread settings. Since the sewing machine stops at a time and changes the position for starting the embroidery. Example: Selecting an embroidery pattern
The needle progresses one color or...
Users Manual - English - Page 149

... the
d beginning of
"ABC". Set up the correct color for the upper thread. Use
(change position keys) to move
l the needle to continue the f design.
Editing and Saving Patterns 147
b
Press . e
Press (Start/stop button) to the embroidery end position of the mistaken color.
Press (Start/stop the a sewing machine. a a Embroidery end position
Lower the presser foot...
Users Manual - English - Page 163
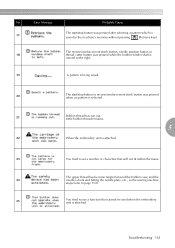
The upper thread has become tangled around the bobbin case, and the
24
needle is bent and hitting the needle plate, etc., so the sewing machine
stops (refer to page 154).
25
You tried to set a number of characters that cannot be used when the embroidery unit is attached.
Little bobbin thread remains.
5
22
When the...
Users Manual - English - Page 168
...
machine surface cleaning 152 main power switch 11 maintenance 152 manual needle threading 36 memory key 13 mirroring stitches 63
N
needle bar thread guide 11 needle condition 40 needle plate 11 needle plate cover 11 needle plate marking 67 needle position button 12 needle position, changing 79 needle replacement 41 needle set 9 needle threader lever 10 needle threading 31 needles...
Similar Questions

How To Move Needle To Center Brother Se400
(Posted by girMER 9 years ago)

How To Use A Double Needle On A Brother Ls2300 Sewing Machine
(Posted by my23rathoma 10 years ago)


Where Is The Shaft On A Brother Se400 Sewing Machine
(Posted by kpomkkahn 10 years ago)

How To Change A Broken Needle In A Brother Lx2500 Sewing Machine?
(Posted by starkcudd 10 years ago)