
Users Manual - English
Page 3
... falling, which could cause injuries. • When lifting the sewing machine, be careful not to make any adjustments mentioned in the instruction manual • To unplug the machine, switch the machine to the symbol "O" position to use the machine. To reduce the risk of...the machine is intended for future reference. Lifting the sewing machine by its handle. Important Safety Instructions Please read the "Important Safety Instructions", and then study this manual for purchasing this manual, or if you are leaving the machine unattended. DANGER - Introduction Thank you for the correct...
... falling, which could cause injuries. • When lifting the sewing machine, be careful not to make any adjustments mentioned in the instruction manual • To unplug the machine, switch the machine to the symbol "O" position to use the machine. To reduce the risk of...the machine is intended for future reference. Lifting the sewing machine by its handle. Important Safety Instructions Please read the "Important Safety Instructions", and then study this manual for purchasing this manual, or if you are leaving the machine unattended. DANGER - Introduction Thank you for the correct...
Users Manual - English
Page 4
...contents of this manual and specifications of this manual. Benzene, thinner, and scouring powders can damage the case and machine, and should be kept out of the reach of children or disposed of. Save these instructions. If the problem persists, please consult your local authorized Brother dealer. Use ... resulting in should never be replaced by authorized dealer. • In the event a malfunction occurs or adjustment is required, first follow careful instruction when freehand stitching so that you do not deflect the needle and cause it to break. 6 This machine is not a toy: •...
...contents of this manual and specifications of this manual. Benzene, thinner, and scouring powders can damage the case and machine, and should be kept out of the reach of children or disposed of. Save these instructions. If the problem persists, please consult your local authorized Brother dealer. Use ... resulting in should never be replaced by authorized dealer. • In the event a malfunction occurs or adjustment is required, first follow careful instruction when freehand stitching so that you do not deflect the needle and cause it to break. 6 This machine is not a toy: •...
Users Manual - English
Page 33
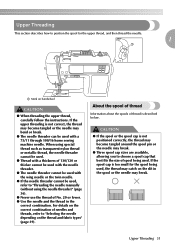
... on the correct combination of needles and threads, refer to position the spool for the spool being used , refer to "Threading the needle manually (without using special thread such as transparent nylon thread or metallic thread, the needle threader cannot be used. ● Thread with a thickness... the upper thread, and then thread the needle. 1 a a Mark on handwheel CAUTION ● When threading the upper thread, carefully follow the instructions. Upper Threading 31 If the spool cap is not positioned correctly, the thread may become tangled or the needle may break. ● Three spool...
... on the correct combination of needles and threads, refer to position the spool for the spool being used , refer to "Threading the needle manually (without using special thread such as transparent nylon thread or metallic thread, the needle threader cannot be used. ● Thread with a thickness... the upper thread, and then thread the needle. 1 a a Mark on handwheel CAUTION ● When threading the upper thread, carefully follow the instructions. Upper Threading 31 If the spool cap is not positioned correctly, the thread may become tangled or the needle may break. ● Three spool...
Users Manual - English
Page 168
...18, 133 LCD button 134 LCD messages 159 LCD operation 18 M machine surface cleaning 152 main power switch 11 maintenance 152 manual needle threading 36 memory key 13 mirroring stitches 63 N needle bar thread guide 11 needle condition 40 needle plate 11 needle...43 resewing 147 retrieving pattern 150 reverse stitching 53 reverse/reinforcement stitch button 12, 54 reverse/reinforcement stitches, automatic 61 S safety instructions 1 saving patterns 150 scallop stitch 109 scallop stitching 111 screwdriver 9 seam allowance, even 67 seam ripper 9 securing stitching 53 selecting...
...18, 133 LCD button 134 LCD messages 159 LCD operation 18 M machine surface cleaning 152 main power switch 11 maintenance 152 manual needle threading 36 memory key 13 mirroring stitches 63 N needle bar thread guide 11 needle condition 40 needle plate 11 needle...43 resewing 147 retrieving pattern 150 reverse stitching 53 reverse/reinforcement stitch button 12, 54 reverse/reinforcement stitches, automatic 61 S safety instructions 1 saving patterns 150 scallop stitch 109 scallop stitching 111 screwdriver 9 seam allowance, even 67 seam ripper 9 securing stitching 53 selecting...

Quick Setup Guide - English and Spanish
Page 4
Bobbin Winding and Setting Bobinado y ajuste Follow the numbered steps below in order. Use only the enclosed bobbin or bobbins of the same type. Para obtener instrucciones detalladas, consulte el manual de instrucciones. Refer to the operation manual for detailed instruction. Utilice sólo la bobina incluida o bobinas del mismo tipo. 9 10 87 4 5 6 2 3 11 12 16 17 18 11.5 mm (approx. 7/16 inch) 14 11,5 mm (aprox. 7/16 pulg.) 15 1 2 13 22 23 24 20 3 1 19 4 5 6 7 8 9 2 Realice los siguientes pasos numerados en el orden indicado.
Bobbin Winding and Setting Bobinado y ajuste Follow the numbered steps below in order. Use only the enclosed bobbin or bobbins of the same type. Para obtener instrucciones detalladas, consulte el manual de instrucciones. Refer to the operation manual for detailed instruction. Utilice sólo la bobina incluida o bobinas del mismo tipo. 9 10 87 4 5 6 2 3 11 12 16 17 18 11.5 mm (approx. 7/16 inch) 14 11,5 mm (aprox. 7/16 pulg.) 15 1 2 13 22 23 24 20 3 1 19 4 5 6 7 8 9 2 Realice los siguientes pasos numerados en el orden indicado.


