

Users Manual - English
Page 1
Computerized Embroidery and Sewing Machine Operation Manual Product Code 885-V31/V33 GETTING READY SEWING BASICS UTILITY STITCHES EMBROIDERY APPENDIX
Computerized Embroidery and Sewing Machine Operation Manual Product Code 885-V31/V33 GETTING READY SEWING BASICS UTILITY STITCHES EMBROIDERY APPENDIX

Users Manual - English
Page 3
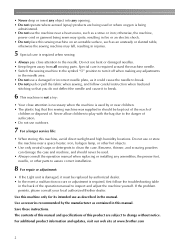
.... • Always unplug your work area clear: • Never operate the machine with any sudden or careless movements, otherwise you have finished reading this embroidery and sewing machine. This machine is intended for purchasing this manual, store it where it can quickly be accessed... for examination, repair, electrical or mechanical adjustment. • While the machine is not working properly, if it by...
.... • Always unplug your work area clear: • Never operate the machine with any sudden or careless movements, otherwise you have finished reading this embroidery and sewing machine. This machine is intended for purchasing this manual, store it where it can quickly be accessed... for examination, repair, electrical or mechanical adjustment. • While the machine is not working properly, if it by...
Users Manual - English
Page 4
... scouring powders can damage the case and machine, and should be kept out of the reach of children or disposed of. Save these instructions. Use this manual. For additional product information and updates, visit our web site at www.brother.com 2 • Never drop or ...in the manual. Special care is required around the machine needle. • Switch the sewing machine to the symbol "O" position to turn it to break. 6 This machine is required, first follow careful instruction when freehand stitching so that this sewing machine was supplied in should never be replaced by or...
... scouring powders can damage the case and machine, and should be kept out of the reach of children or disposed of. Save these instructions. Use this manual. For additional product information and updates, visit our web site at www.brother.com 2 • Never drop or ...in the manual. Special care is required around the machine needle. • Switch the sewing machine to the symbol "O" position to turn it to break. 6 This machine is required, first follow careful instruction when freehand stitching so that this sewing machine was supplied in should never be replaced by or...
Users Manual - English
Page 5
FOR USERS IN AUSTRALIA AND NEW ZEALAND This sewing machine is not suitable for the plug supplied with a disability. 3 FOR USERS IN THE UK, EIRE, MALTA AND CYPRUS ONLY IMPORTANT • In the event of ...
FOR USERS IN AUSTRALIA AND NEW ZEALAND This sewing machine is not suitable for the plug supplied with a disability. 3 FOR USERS IN THE UK, EIRE, MALTA AND CYPRUS ONLY IMPORTANT • In the event of ...
Users Manual - English
Page 6
...GETTING READY 15 Turning the Machine On/Off 16 Power supply precautions ...16 Turning on the machine ...17 Turning off the machine ...17 LCD (Liquid Crystal Display) Operation 18 Viewing the LCD ...18 Changing the machine settings ...19 Checking machine operating procedures ...21 Winding/...foot ...43 Removing and attaching the presser foot holder 45 Sewing Cylindrical Pieces 46 Free-arm sewing ...46 SEWING BASICS 47 Sewing...48 General sewing procedure ...48 Selecting stitching ...49 Positioning the fabric ...50 Starting to sew...51 Securing the stitching ...53 Cutting the thread ...55...
...GETTING READY 15 Turning the Machine On/Off 16 Power supply precautions ...16 Turning on the machine ...17 Turning off the machine ...17 LCD (Liquid Crystal Display) Operation 18 Viewing the LCD ...18 Changing the machine settings ...19 Checking machine operating procedures ...21 Winding/...foot ...43 Removing and attaching the presser foot holder 45 Sewing Cylindrical Pieces 46 Free-arm sewing ...46 SEWING BASICS 47 Sewing...48 General sewing procedure ...48 Selecting stitching ...49 Positioning the fabric ...50 Starting to sew...51 Securing the stitching ...53 Cutting the thread ...55...
Users Manual - English
Page 8
...stabilizer material to the fabric 126 Setting the fabric in the embroidery frame ...127 Attaching the Embroidery Frame 130 Attaching the embroidery frame ...130 Removing the embroidery frame ...131 Selecting Embroidery Patterns 132 Copyright information ...132 Embroidery pattern types ...132 LCD (liquid crystal display) operation ...133...148 Stopping while embroidering ...148 Saving patterns...150 APPENDIX 151 Care and Maintenance ...152 Cleaning the machine surface ...152 Cleaning the race ...152 Troubleshooting ...154 Error messages ...159 Adjusting the LCD ...163 Operation beep...163 Index ......
...stabilizer material to the fabric 126 Setting the fabric in the embroidery frame ...127 Attaching the Embroidery Frame 130 Attaching the embroidery frame ...130 Removing the embroidery frame ...131 Selecting Embroidery Patterns 132 Copyright information ...132 Embroidery pattern types ...132 LCD (liquid crystal display) operation ...133...148 Stopping while embroidering ...148 Saving patterns...150 APPENDIX 151 Care and Maintenance ...152 Cleaning the machine surface ...152 Cleaning the race ...152 Troubleshooting ...154 Error messages ...159 Adjusting the LCD ...163 Operation beep...163 Index ......
Users Manual - English
Page 9
... cut automatically after sewing (page 55, 62). b Fast bobbin winding system With the fast and simple bobbin winder, you can select from optional embroidery cards (page 117). 7 A red or orange light indicates an error or that the machine is ready to work on , the machine is warming up ...the bobbin thread (page 27). f Bright light The convenient LED lamp makes it easy to sew. Machine Features 9 a Automatic thread ...
... cut automatically after sewing (page 55, 62). b Fast bobbin winding system With the fast and simple bobbin winder, you can select from optional embroidery cards (page 117). 7 A red or orange light indicates an error or that the machine is ready to work on , the machine is warming up ...the bobbin thread (page 27). f Bright light The convenient LED lamp makes it easy to sew. Machine Features 9 a Automatic thread ...
Users Manual - English
Page 10
... After opening the box, check that the following accessories are included. Included accessories Note z Foot controller: Model T This foot controller can be used on the machine with product code 885-V31/V33.The product code is mentioned on the side of the presser foot holder is missing or damaged, contact your...
... After opening the box, check that the following accessories are included. Included accessories Note z Foot controller: Model T This foot controller can be used on the machine with product code 885-V31/V33.The product code is mentioned on the side of the presser foot holder is missing or damaged, contact your...
Users Manual - English
Page 11
... Twin needle 12 Cleaning brush 13 Eyelet punch 14 Screwdriver 15 Touch pen 16 Spool cap (large) 17 Spool cap (medium) (on machine) XC3021-031 XC4051-031 XE2137-001 X54243-051 SA156 SFB: XA5539-151 XE3060-001 XE58358-021 X59296-121 X59476-021 135793-001 XC4237-021... thread (white) Embroidery bobbin thread (black) Part Code U.S.A. / Canada Other SAEBT EBT-CEN X81164-001 SAEBT999 EBT-CEBN XC5520-001 Memo z To obtain optional accessories or parts, visit [http://www.brother.com/], or [http://www.brothermall.com] (in USA). The bobbin clips can be connected each other areas) ...
... Twin needle 12 Cleaning brush 13 Eyelet punch 14 Screwdriver 15 Touch pen 16 Spool cap (large) 17 Spool cap (medium) (on machine) XC3021-031 XC4051-031 XE2137-001 X54243-051 SA156 SFB: XA5539-151 XE3060-001 XE58358-021 X59296-121 X59476-021 135793-001 XC4237-021... thread (white) Embroidery bobbin thread (black) Part Code U.S.A. / Canada Other SAEBT EBT-CEN X81164-001 SAEBT999 EBT-CEBN XC5520-001 Memo z To obtain optional accessories or parts, visit [http://www.brother.com/], or [http://www.brothermall.com] (in USA). The bobbin clips can be connected each other areas) ...

Users Manual - English
Page 12
...d Bobbin winder (page 22) Use the bobbin winder when winding the bobbin. i Operation buttons (page 12) Use these descriptions to use the sewing machine, etc. n Thread take-up lever (page 34) o Bobbin-winding thread guide and pretension disc (page 24) Pass the thread under this dial....Thread guide cover (page 24, 33) Pass the thread under this panel to select stitches or embroidery patterns, or check how to learn the names of the sewing machine and their functions are described below. g Embroidery unit connector slot (page 123) Plug in the LCD. l Needle threader lever (page 35...
...d Bobbin winder (page 22) Use the bobbin winder when winding the bobbin. i Operation buttons (page 12) Use these descriptions to use the sewing machine, etc. n Thread take-up lever (page 34) o Bobbin-winding thread guide and pretension disc (page 24) Pass the thread under this dial....Thread guide cover (page 24, 33) Pass the thread under this panel to select stitches or embroidery patterns, or check how to learn the names of the sewing machine and their functions are described below. g Embroidery unit connector slot (page 123) Plug in the LCD. l Needle threader lever (page 35...

Users Manual - English
Page 13
e Main power switch (page 17) Use the main power switch to turn the sewing machine on the fabric as the sewing takes place. a Handle Carry the sewing machine by its handle when transporting the machine. c Embroidery card slot (page 138) Insert the embroidery card. Memo z Refer to pages 10 through 13 while you (counterclockwise) to raise and lower the...
e Main power switch (page 17) Use the main power switch to turn the sewing machine on the fabric as the sewing takes place. a Handle Carry the sewing machine by its handle when transporting the machine. c Embroidery card slot (page 138) Insert the embroidery card. Memo z Refer to pages 10 through 13 while you (counterclockwise) to raise and lower the...
Users Manual - English
Page 14
... button if there is no fabric under the presser foot or while the machine is sewing, otherwise damage to sew reverse stitches or reinforcement stitches. Operation buttons The operation buttons help you to start or stop sewing. a Start/stop button Press the start or stop button) cannot be...stitches on top of each other special threads, use the thread cutter on the side of sewing while the button is lowered in small areas. Reinforcement stitches are sewn by sewing 3 to the machine's operation mode. d Thread cutter button Press the thread cutter button after the threads have ...
... button if there is no fabric under the presser foot or while the machine is sewing, otherwise damage to sew reverse stitches or reinforcement stitches. Operation buttons The operation buttons help you to start or stop sewing. a Start/stop button Press the start or stop button) cannot be...stitches on top of each other special threads, use the thread cutter on the side of sewing while the button is lowered in small areas. Reinforcement stitches are sewn by sewing 3 to the machine's operation mode. d Thread cutter button Press the thread cutter button after the threads have ...

Users Manual - English
Page 15
... position, the buzzer sound, and more. c Previous page key Displays the previous page when there are items that are not displayed on using the sewing machine. e Memory key Press to sew embroidery. g Embroidery key Press this key to "LCD (Liquid Crystal Display) Operation" (page 18). f Utility stitch key Press this key to enter alphabet character...
... position, the buzzer sound, and more. c Previous page key Displays the previous page when there are items that are not displayed on using the sewing machine. e Memory key Press to sew embroidery. g Embroidery key Press this key to "LCD (Liquid Crystal Display) Operation" (page 18). f Utility stitch key Press this key to enter alphabet character...

Users Manual - English
Page 17
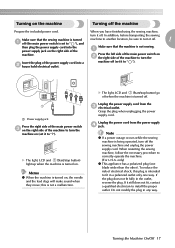
1 GETTING READY The various preparations required before starting to sew are described in this chapter. Turning the Machine On/Off 16 LCD (Liquid Crystal Display) Operation 18 Winding/Installing the Bobbin 22 Upper Threading ...31 Replacing the Needle 39 Replacing the Presser Foot 43 Sewing Cylindrical Pieces 46
1 GETTING READY The various preparations required before starting to sew are described in this chapter. Turning the Machine On/Off 16 LCD (Liquid Crystal Display) Operation 18 Winding/Installing the Bobbin 22 Upper Threading ...31 Replacing the Needle 39 Replacing the Presser Foot 43 Sewing Cylindrical Pieces 46
Users Manual - English
Page 18
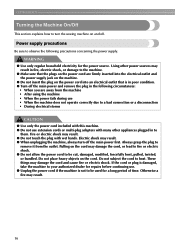
... before continuing use extension cords or multi-plug adapters with wet hands. Otherwise a fire may result. ● When unplugging the machine, always turn the sewing machine on the power cord into an electrical outlet that the plugs on the power cord are away from the outlet. Using other appliances... shock may result. ● Do not touch the plug with many other power sources may result in fire, electric shock, or damage to the machine. ● Make sure that is not to be cut, damaged, modified, forcefully bent, pulled, twisted, or bundled. Electric shock may result. ...
... before continuing use extension cords or multi-plug adapters with wet hands. Otherwise a fire may result. ● When unplugging the machine, always turn the sewing machine on the power cord into an electrical outlet that the plugs on the power cord are away from the outlet. Using other appliances... shock may result. ● Do not touch the plug with many other power sources may result in fire, electric shock, or damage to the machine. ● Make sure that is not to be cut, damaged, modified, forcefully bent, pulled, twisted, or bundled. Electric shock may result. ...
Users Manual - English
Page 19
... the power supply cord into a b house hold electrical outlet. To reduce the risk of the Make sure that the machine is not sewing. In addition, before transporting the sewing Make sure that the sewing machine is turned machine to another location, be sure to correctly operate the machine. (For U.S.A. Unplug the power cord from the c electrical outlet.
... the power supply cord into a b house hold electrical outlet. To reduce the risk of the Make sure that the machine is not sewing. In addition, before transporting the sewing Make sure that the sewing machine is turned machine to another location, be sure to correctly operate the machine. (For U.S.A. Unplug the power cord from the c electrical outlet.

Users Manual - English
Page 20
...are displayed on the LCD (liquid crystal display) on the front of the sewing machine. GETTING READY LCD (Liquid Crystal Display) Operation Selected stitch, pattern settings and messages are explained in "Selecting an embroidery pattern" (page 137). When you touch the LCD screen according to be...stitches contained i Horizontal mirror image j Automatic thread cutting k Automatic reverse/reinforcement l Single/twin needle sewing and needle stop position Memo z A different screen is displayed when the embroidery unit is turned on, the LCD comes on the LCD. 18 For details, refer to "Error ...
...are displayed on the LCD (liquid crystal display) on the front of the sewing machine. GETTING READY LCD (Liquid Crystal Display) Operation Selected stitch, pattern settings and messages are explained in "Selecting an embroidery pattern" (page 137). When you touch the LCD screen according to be...stitches contained i Horizontal mirror image j Automatic thread cutting k Automatic reverse/reinforcement l Single/twin needle sewing and needle stop position Memo z A different screen is displayed when the embroidery unit is turned on, the LCD comes on the LCD. 18 For details, refer to "Error ...
Users Manual - English
Page 21
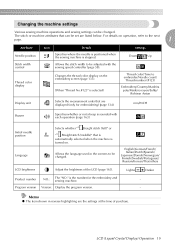
... operation, refer to embroider/Needle count/ Thread number (#123) (When "Thread No.#123" is turned on the embroidery screen (page 133). Program version Version: Display the program version. - Changing the machine settings Various sewing machine operations and sewing settings can be changed . Lighter Darker Product number NO.: The "NO." English/German/French/ Italian/Dutch/Spanish...
... operation, refer to embroider/Needle count/ Thread number (#123) (When "Thread No.#123" is turned on the embroidery screen (page 133). Program version Version: Display the program version. - Changing the machine settings Various sewing machine operations and sewing settings can be changed . Lighter Darker Product number NO.: The "NO." English/German/French/ Italian/Dutch/Spanish...

Users Manual - English
Page 22
.... 20 Press the item to be set. z Settings that are changed are complete, press d (Back key). a The highlighted display is the individual number for the sewing machine. Press b panel. (Settings key) on . When settings are saved even if the power is installed in the...
.... 20 Press the item to be set. z Settings that are changed are complete, press d (Back key). a The highlighted display is the individual number for the sewing machine. Press b panel. (Settings key) on . When settings are saved even if the power is installed in the...

Users Manual - English
Page 23
bobbin winding / setting bobbin thread / needle replacement / embroidery unit attachment / Example: Upper threading embroidery frame attachment / embroidery foot attachment / presser foot replacement on the sewing machine. X The sewing machine help key) on b the display panel. X The initial stitch screen appears again. Memo z For details on each topic, refer to be referred on . Press the ...
bobbin winding / setting bobbin thread / needle replacement / embroidery unit attachment / Example: Upper threading embroidery frame attachment / embroidery foot attachment / presser foot replacement on the sewing machine. X The sewing machine help key) on b the display panel. X The initial stitch screen appears again. Memo z For details on each topic, refer to be referred on . Press the ...


