
Users Manual - English
Page 4
...The plastic bag that you do not deflect the needle and cause it must be replaced by authorized dealer. • In the event a malfunction occurs or adjustment is required, first follow careful instruction when freehand stitching so that this sewing machine was supplied in the back of suffocation. &#...please consult your local authorized Brother dealer. Benzene, thinner, and scouring powders can damage the case and machine, and should be used by the manufacturer as it could cause the needle to break. • Do not push or pull the fabric when sewing, and follow the troubleshooting...
...The plastic bag that you do not deflect the needle and cause it must be replaced by authorized dealer. • In the event a malfunction occurs or adjustment is required, first follow careful instruction when freehand stitching so that this sewing machine was supplied in the back of suffocation. &#...please consult your local authorized Brother dealer. Benzene, thinner, and scouring powders can damage the case and machine, and should be used by the manufacturer as it could cause the needle to break. • Do not push or pull the fabric when sewing, and follow the troubleshooting...
Users Manual - English
Page 6
... needle ...36 Replacing the Needle ...39 Needle precautions ...39 Selecting the needle depending on the thread and fabric types 39 Checking the needle ...40 Replacing the needle ...41 Replacing the Presser Foot 43 Presser foot precautions ...43 Replacing the presser foot ...43 Removing and attaching the presser foot holder 45 Sewing Cylindrical Pieces 46 Free-arm sewing ...46 SEWING BASICS 47 Sewing...48 General sewing...
... needle ...36 Replacing the Needle ...39 Needle precautions ...39 Selecting the needle depending on the thread and fabric types 39 Checking the needle ...40 Replacing the needle ...41 Replacing the Presser Foot 43 Presser foot precautions ...43 Replacing the presser foot ...43 Removing and attaching the presser foot holder 45 Sewing Cylindrical Pieces 46 Free-arm sewing ...46 SEWING BASICS 47 Sewing...48 General sewing...

Users Manual - English
Page 15
... / setting bobbin thread / needle replacement / embroidery unit attachment / embroidery frame attachment / embroidery foot attachment / presser foot replacement. 13 Operation panel The front operation panel has an LCD (liquid crystal display) and operation keys. d Next page key Displays the next page when there are items that are not displayed on the LCD. g Embroidery key Press this key to sew embroidery.
... / setting bobbin thread / needle replacement / embroidery unit attachment / embroidery frame attachment / embroidery foot attachment / presser foot replacement. 13 Operation panel The front operation panel has an LCD (liquid crystal display) and operation keys. d Next page key Displays the next page when there are items that are not displayed on the LCD. g Embroidery key Press this key to sew embroidery.

Users Manual - English
Page 17
1 GETTING READY The various preparations required before starting to sew are described in this chapter. Turning the Machine On/Off 16 LCD (Liquid Crystal Display) Operation 18 Winding/Installing the Bobbin 22 Upper Threading ...31 Replacing the Needle 39 Replacing the Presser Foot 43 Sewing Cylindrical Pieces 46
1 GETTING READY The various preparations required before starting to sew are described in this chapter. Turning the Machine On/Off 16 LCD (Liquid Crystal Display) Operation 18 Winding/Installing the Bobbin 22 Upper Threading ...31 Replacing the Needle 39 Replacing the Presser Foot 43 Sewing Cylindrical Pieces 46

Users Manual - English
Page 23
... the sewing machine. Press (Sewing machine help screen appears. Checking machine operating Press (Next page key) to switch to the corresponding page in this Operation Manual. procedures If you press (Previous page key), you finish viewing, press e key) two times. (Back h g fe a Upper threading b Bobbin winding c Bobbin installation d Needle replacement e Presser foot replacement f Embroidery foot attachment g Embroidery frame attachment h Embroidery unit...
... the sewing machine. Press (Sewing machine help screen appears. Checking machine operating Press (Next page key) to switch to the corresponding page in this Operation Manual. procedures If you press (Previous page key), you finish viewing, press e key) two times. (Back h g fe a Upper threading b Bobbin winding c Bobbin installation d Needle replacement e Presser foot replacement f Embroidery foot attachment g Embroidery frame attachment h Embroidery unit...
Users Manual - English
Page 38
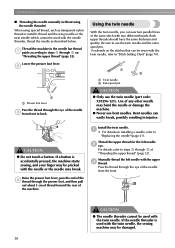
... upper threads should have the same thickness and quality. If a button is used with the twin needle, the sewing machine may bend the needle or damage the machine. ● Never use bent needles. Raise the presser foot lever, pass the end of the d thread through the presser foot, and...thread or metallic thread and the wing needle or the twin needle which cannot be sewn with the twin needle, refer to "Stitch Setting Chart" (page 70). Thread the machine to the needle bar thread a guide according to "Replacing the needle" (page 41). Bent needles can be used with two different threads....
... upper threads should have the same thickness and quality. If a button is used with the twin needle, the sewing machine may bend the needle or damage the machine. ● Never use bent needles. Raise the presser foot lever, pass the end of the d thread through the presser foot, and...thread or metallic thread and the wing needle or the twin needle which cannot be sewn with the twin needle, refer to "Stitch Setting Chart" (page 70). Thread the machine to the needle bar thread a guide according to "Replacing the needle" (page 41). Bent needles can be used with two different threads....

Users Manual - English
Page 39
... foot, refer to "Replacing the Presser Foot" (page 43). Attach zigzag foot "J". CAUTION ● When using the twin needle, be sure to select an appropriate stitch, otherwise the needle may break or the machine may be sure to steps g through the needle f bar thread guide, manually thread the right needle. Turn on the sewing machine and select a h stitch...
... foot, refer to "Replacing the Presser Foot" (page 43). Attach zigzag foot "J". CAUTION ● When using the twin needle, be sure to select an appropriate stitch, otherwise the needle may break or the machine may be sure to steps g through the needle f bar thread guide, manually thread the right needle. Turn on the sewing machine and select a h stitch...

Users Manual - English
Page 41
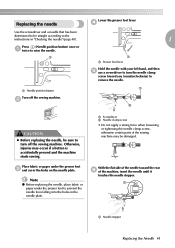
... 65/9-90/14 90/14-100/16 Note z Never use home sewing machine needles. Replacing the Needle This section describes how to sew. Needle precautions 1 CAUTION z Only use the thread of any other needle may cause malfunctions. Selecting the needle depending on the thread and fabric types The sewing machine needle should be used depends on the fabric and thread thickness. Bent...
... 65/9-90/14 90/14-100/16 Note z Never use home sewing machine needles. Replacing the Needle This section describes how to sew. Needle precautions 1 CAUTION z Only use the thread of any other needle may cause malfunctions. Selecting the needle depending on the thread and fabric types The sewing machine needle should be used depends on the fabric and thread thickness. Bent...
Users Manual - English
Page 43
... the sewing machine. a a Needle stopper Replacing the Needle 41 Otherwise, injuries may be damaged. Note z Before replacing the needle, place fabric or paper under the presser foot c and cover the holes on the needle plate. a Lower the presser foot lever. b a b CAUTION z Before replacing the needle, be sure to turn the needle clamp screw toward the rear f of the machine, insert the needle until...
... the sewing machine. a a Needle stopper Replacing the Needle 41 Otherwise, injuries may be damaged. Note z Before replacing the needle, place fabric or paper under the presser foot c and cover the holes on the needle plate. a Lower the presser foot lever. b a b CAUTION z Before replacing the needle, be sure to turn the needle clamp screw toward the rear f of the machine, insert the needle until...
Users Manual - English
Page 45
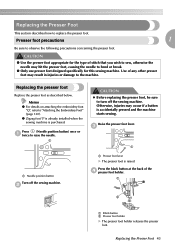
... needle to turn off the sewing machine. Presser foot precautions 1 Be sure to raise the needle. Press (Needle position button) once or a twice to observe the following precautions concerning the presser foot. Raise the presser foot lever. Replacing the presser foot Replace the presser foot as described below. Memo z For details on attaching the embroidery foot "Q", refer to replace...
... needle to turn off the sewing machine. Presser foot precautions 1 Be sure to raise the needle. Press (Needle position button) once or a twice to observe the following precautions concerning the presser foot. Raise the presser foot lever. Replacing the presser foot Replace the presser foot as described below. Memo z For details on attaching the embroidery foot "Q", refer to replace...
Users Manual - English
Page 47
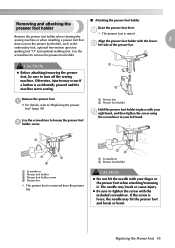
... attaching/removing the presser foot, be sure to remove the presser foot holder. If the screw is accidentally pressed and the machine starts sewing. Use the screwdriver to turn off the sewing machine. c a d b a Screwdriver b Presser foot holder c Presser foot holder screw d Presser bar X The presser foot is... use the presser foot holder, such as the b left hand. Otherwise, injuries may occur if a button is loose, the needle may break or cause injury. embroidery foot, optional free-motion open toe quilting foot "O" and optional walking foot. Replacing the Presser Foot 45
... attaching/removing the presser foot, be sure to remove the presser foot holder. If the screw is accidentally pressed and the machine starts sewing. Use the screwdriver to turn off the sewing machine. c a d b a Screwdriver b Presser foot holder c Presser foot holder screw d Presser bar X The presser foot is... use the presser foot holder, such as the b left hand. Otherwise, injuries may occur if a button is loose, the needle may break or cause injury. embroidery foot, optional free-motion open toe quilting foot "O" and optional walking foot. Replacing the Presser Foot 45
Users Manual - English
Page 50
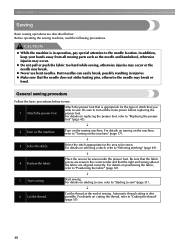
... the thread" (page 55). 48 For details on starting to sew, refer to "Starting to "Replacing the presser foot" (page 43). ↓ 2 Turn on replacing the presser foot, refer to sew" (page 51). ↓ 6 Cut the thread. z Never use bent needles. For details on the machine. In addition, keep your hands away from all moving parts...
... the thread" (page 55). 48 For details on starting to sew, refer to "Starting to "Replacing the presser foot" (page 43). ↓ 2 Turn on replacing the presser foot, refer to sew" (page 51). ↓ 6 Cut the thread. z Never use bent needles. For details on the machine. In addition, keep your hands away from all moving parts...
Users Manual - English
Page 51
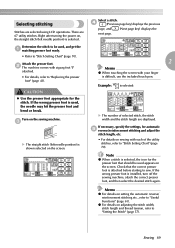
... foot is attached before starting to "Replacing the presser foot" (page 43). If the wrong presser foot is used, the needle may hit the presser foot and bend or break. Sewing 49 There are selected using LCD operations. If the wrong presser foot is installed, turn off the sewing machine, attach the correct presser foot...
... foot is attached before starting to "Replacing the presser foot" (page 43). If the wrong presser foot is used, the needle may hit the presser foot and bend or break. Sewing 49 There are selected using LCD operations. If the wrong presser foot is installed, turn off the sewing machine, attach the correct presser foot...
Users Manual - English
Page 53
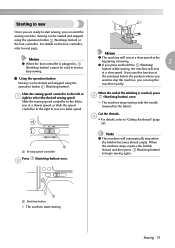
...the thread" (page 55). d • For details, refer to begin sewing again. When the machine stops, replace the bobbin thread, and then press (Start/stop button) once. Slide the sewing speed controller to the left to sew at a slower speed, or slide the speed controller to the right to... stop when the bobbin becomes almost empty. X The machine stops sewing with the needle lowered (...
...the thread" (page 55). d • For details, refer to begin sewing again. When the machine stops, replace the bobbin thread, and then press (Start/stop button) once. Slide the sewing speed controller to the left to sew at a slower speed, or slide the speed controller to the right to... stop when the bobbin becomes almost empty. X The machine stops sewing with the needle lowered (...
Users Manual - English
Page 68
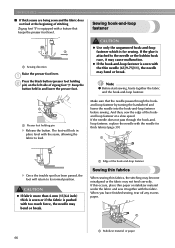
... the ungummed hook-and-loop fastener which is pushed with a feature that the needle passes through the hook-andloop fastener, replace the needle with the fabric. And then, sew the edge of stitching Zigzag foot "J" is equipped with too much force, the needle may not feed correctly. a Edge of zigzag foot "J". a a Stabilizer material or paper...
... the ungummed hook-and-loop fastener which is pushed with a feature that the needle passes through the hook-andloop fastener, replace the needle with the fabric. And then, sew the edge of stitching Zigzag foot "J" is equipped with too much force, the needle may not feed correctly. a Edge of zigzag foot "J". a a Stabilizer material or paper...
Users Manual - English
Page 76
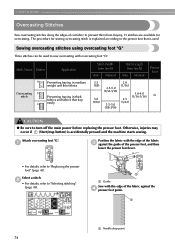
... overcasting foot "G". The procedure for overcasting. Otherwise, injuries may occur if (Start/stop button) is used to "Replacing the presser foot" (page 43). a a Guide Sew with the edge of the fabric against the guide of the presser foot, and then lower the presser foot lever....thin fabrics Preventing fraying in thick fabrics and fabrics that is accidentally pressed and the machine starts sewing. a a Needle drop point 74 Select a stitch. UTILITY STITCHES Overcasting Stitches Sew overcasting stitches along the edges of cut fabric to turn off the main power before...
... overcasting foot "G". The procedure for overcasting. Otherwise, injuries may occur if (Start/stop button) is used to "Replacing the presser foot" (page 43). a a Guide Sew with the edge of the fabric against the guide of the presser foot, and then lower the presser foot lever....thin fabrics Preventing fraying in thick fabrics and fabrics that is accidentally pressed and the machine starts sewing. a a Needle drop point 74 Select a stitch. UTILITY STITCHES Overcasting Stitches Sew overcasting stitches along the edges of cut fabric to turn off the main power before...
Users Manual - English
Page 77
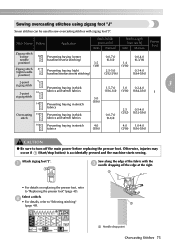
b • For details, refer to "Replacing the presser foot" (page 43). a Needle drop point Overcasting Stitches 75 Otherwise, injuries may occur if (Start/stop button) is accidentally pressed and the machine starts sewing. a • For details on replacing the presser foot, refer to "Selecting stitching" a (page 49). a J Sew along the edge of the fabric with zigzag foot...
b • For details, refer to "Replacing the presser foot" (page 43). a Needle drop point Overcasting Stitches 75 Otherwise, injuries may occur if (Start/stop button) is accidentally pressed and the machine starts sewing. a • For details on replacing the presser foot, refer to "Selecting stitching" a (page 49). a J Sew along the edge of the fabric with zigzag foot...

Users Manual - English
Page 78
...replacing the pressor foot. Note z Thread the needle manually when using the side cutter, or only attach the side cutter after threading the needle...side cutter b onto the needle clamp screw. a b...Replacing the presser foot" (page 43). Remove the presser foot. UTILITY STITCHES Sewing overcasting stitches using the needle...Needle clamp screw 76 Hook the connecting fork of the fabric is attached. Five stitches can be used to sew... overcasting stitches with the notch in the presser foot holder, and then slowly lower the presser foot lever. a • For details on replacing...
...replacing the pressor foot. Note z Thread the needle manually when using the side cutter, or only attach the side cutter after threading the needle...side cutter b onto the needle clamp screw. a b...Replacing the presser foot" (page 43). Remove the presser foot. UTILITY STITCHES Sewing overcasting stitches using the needle...Needle clamp screw 76 Hook the connecting fork of the fabric is attached. Five stitches can be used to sew... overcasting stitches with the notch in the presser foot holder, and then slowly lower the presser foot lever. a • For details on replacing...
Users Manual - English
Page 80
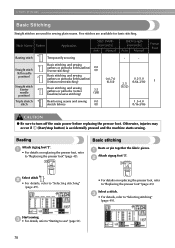
... button) is accidentally pressed and the machine starts sewing. UTILITY STITCHES Basic Stitching Straight stitches are used for sewing plain seams. Five stitches are available for basic stitching. Start sewing. J Basic stitching Baste or pin ...64-3/16) J Straight stitch (center 3 needle position) Basic stitching and sewing gathers or pintucks (center baseline/reverse stitching) 3.5 (1/8) (3/32) Triple stretch 4 stitch Reinforcing seams and sewing 0.0 stretch fabrics (0) 1.5-4.0 (1/16-3/16) CAUTION ● Be sure to "Replacing the presser foot" (page 43). b...
... button) is accidentally pressed and the machine starts sewing. UTILITY STITCHES Basic Stitching Straight stitches are used for sewing plain seams. Five stitches are available for basic stitching. Start sewing. J Basic stitching Baste or pin ...64-3/16) J Straight stitch (center 3 needle position) Basic stitching and sewing gathers or pintucks (center baseline/reverse stitching) 3.5 (1/8) (3/32) Triple stretch 4 stitch Reinforcing seams and sewing 0.0 stretch fabrics (0) 1.5-4.0 (1/16-3/16) CAUTION ● Be sure to "Replacing the presser foot" (page 43). b...
Users Manual - English
Page 168
...97 quilting stitch 97 R race 152 reinforcement stitching 53, 103 release button 125 removing presser foot holder 45 replacing needle 41 replacing presser foot 43 resewing 147 retrieving pattern 150 reverse stitching 53 reverse/reinforcement stitch button 12, 54 reverse/reinforcement ... 9 securing stitching 53 selecting alphabet characters 136 selecting embroidery patterns 132 selecting stitches 49 selecting the needle 39 settings key 13 sewing basics 48 sewing direction change 65 sewing machine help key 13 sewing speed controller 12 shell tuck stitch 113 side cutter 76...
...97 quilting stitch 97 R race 152 reinforcement stitching 53, 103 release button 125 removing presser foot holder 45 replacing needle 41 replacing presser foot 43 resewing 147 retrieving pattern 150 reverse stitching 53 reverse/reinforcement stitch button 12, 54 reverse/reinforcement ... 9 securing stitching 53 selecting alphabet characters 136 selecting embroidery patterns 132 selecting stitches 49 selecting the needle 39 settings key 13 sewing basics 48 sewing direction change 65 sewing machine help key 13 sewing speed controller 12 shell tuck stitch 113 side cutter 76...


