

Users Manual - English
Page 12
... descriptions to use the sewing machine, etc. c Spool pin (page 23, 32) Place a spool of thread on this thread guide cover when winding the bobbin thread and threading the machine. e LCD (liquid crystal display) (touch panel) (page 18) Setting for the embroidery unit. g Embroidery unit connector slot (page...the needle threader lever to raise and lower the presser foot . m Thread tension dial (page 59, 145) Adjust the upper thread tension with this thread guide when winding the bobbin thread and threading the machine. k Thread cutter (page 56) Pass the threads through the thread cutter...
... descriptions to use the sewing machine, etc. c Spool pin (page 23, 32) Place a spool of thread on this thread guide cover when winding the bobbin thread and threading the machine. e LCD (liquid crystal display) (touch panel) (page 18) Setting for the embroidery unit. g Embroidery unit connector slot (page...the needle threader lever to raise and lower the presser foot . m Thread tension dial (page 59, 145) Adjust the upper thread tension with this thread guide when winding the bobbin thread and threading the machine. k Thread cutter (page 56) Pass the threads through the thread cutter...
Users Manual - English
Page 26
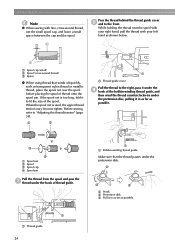
Before sewing, refer to the front. If the spool net is used, the upper thread tension may become tighter. c d a Spool net b Spool c Spool cap d Spool pin Pull the thread from the spool and pass the g thread under the pretension disk. a a Thread guide 24 a a Bobbin-winding thread guide Make ...before placing the spool of the spool. GETTING READY Note z When sewing with your left hand as shown below. b c d b Hook c Pretension disk d Pull it to the right, pass it under the i hook of the bobbin-winding thread guide, and then wind the thread counterclockwise under the pretension...
Before sewing, refer to the front. If the spool net is used, the upper thread tension may become tighter. c d a Spool net b Spool c Spool cap d Spool pin Pull the thread from the spool and pass the g thread under the pretension disk. a a Thread guide 24 a a Bobbin-winding thread guide Make ...before placing the spool of the spool. GETTING READY Note z When sewing with your left hand as shown below. b c d b Hook c Pretension disk d Pull it to the right, pass it under the i hook of the bobbin-winding thread guide, and then wind the thread counterclockwise under the pretension...
Users Manual - English
Page 29
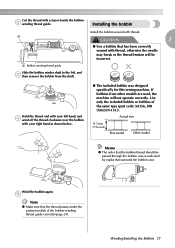
... shown below. ● The included bobbin was designed specifically for this sewing machine. a Bobbin-winding thread guide Slide the bobbin winder shaft to the left hand, and d wind off the thread clockwise near the bobbin with thread, otherwise the needle may break or the thread tension will not operate correctly. If bobbins from the shaft. Winding/Installing the...
... shown below. ● The included bobbin was designed specifically for this sewing machine. a Bobbin-winding thread guide Slide the bobbin winder shaft to the left hand, and d wind off the thread clockwise near the bobbin with thread, otherwise the needle may break or the thread tension will not operate correctly. If bobbins from the shaft. Winding/Installing the...
Users Manual - English
Page 30
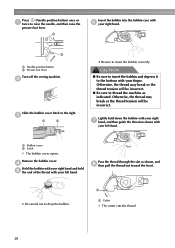
...Presser foot lever Turn off the sewing machine. c a b • Be sure to the bottom with your finger. Otherwise, the thread may break or the thread tension will be incorrect. Remove the bobbin cover. d Hold the bobbin with your right hand and hold down the bobbin with your right g hand, and...the presser foot lever. Otherwise, the thread may break or the thread tension will be incorrect. ● Be sure to drop the bobbin. a Bobbin cover b Latch X The bobbin cover opens. a Insert the bobbin into the bobbin case with your right hand. Lightly hold e the end of the thread...
...Presser foot lever Turn off the sewing machine. c a b • Be sure to the bottom with your finger. Otherwise, the thread may break or the thread tension will be incorrect. Remove the bobbin cover. d Hold the bobbin with your right hand and hold down the bobbin with your right g hand, and...the presser foot lever. Otherwise, the thread may break or the thread tension will be incorrect. ● Be sure to drop the bobbin. a Bobbin cover b Latch X The bobbin cover opens. a Insert the bobbin into the bobbin case with your right hand. Lightly hold e the end of the thread...
Users Manual - English
Page 31
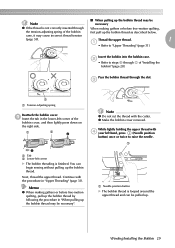
... thread. 1 a • Refer to steps c through the slot. You can be Note necessary z If the thread is looped around the upper thread and can begin sewing without pulling up the bobbin thread may cause incorrect thread tension (page 59). Note z Do not cut the thread with the procedure in "When pulling up the...
... thread. 1 a • Refer to steps c through the slot. You can be Note necessary z If the thread is looped around the upper thread and can begin sewing without pulling up the bobbin thread may cause incorrect thread tension (page 59). Note z Do not cut the thread with the procedure in "When pulling up the...
Users Manual - English
Page 61
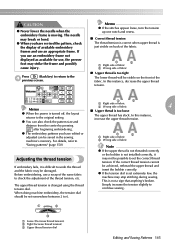
... on the fabric and thread being used. ■ Correct thread tension The upper thread and the bobbin thread should be adjusted. Note z If the bobbin thread was incorrectly threaded, the upper thread may result in the needle bending or breaking. Memo z means the setting cannot be visible ... is too tight. Setting the Stitch 59 You may need to sew with the stitches bunched together may be too tight. Turn the thread tension dial to the left to "Installing the bobbin" (page 27) and rethread the bobbin thread. In this case, refer to loosen the upper thread. Only the ...
... on the fabric and thread being used. ■ Correct thread tension The upper thread and the bobbin thread should be adjusted. Note z If the bobbin thread was incorrectly threaded, the upper thread may result in the needle bending or breaking. Memo z means the setting cannot be visible ... is too tight. Setting the Stitch 59 You may need to sew with the stitches bunched together may be too tight. Turn the thread tension dial to the left to "Installing the bobbin" (page 27) and rethread the bobbin thread. In this case, refer to loosen the upper thread. Only the ...
Users Manual - English
Page 62
... machine may stop sewing if tension is anything wrong with your machine. Turn the thread tension dial to the right to the correct stitch tension and begin again. Simply adjust to tighten the upper thread. 60 e a Memo z If the upper thread is not threaded correctly or the bobbin ...threaded, the upper thread may not be achieved, rethread the upper thread and insert the bobbin correctly. SEWING BASICS Memo z When you should always sew a stitch sample and adjust stitch tension before beginning on the tension dial is a guide for working normal fabrics (medium weight). b c d a ...
... machine may stop sewing if tension is anything wrong with your machine. Turn the thread tension dial to the right to the correct stitch tension and begin again. Simply adjust to tighten the upper thread. 60 e a Memo z If the upper thread is not threaded correctly or the bobbin ...threaded, the upper thread may not be achieved, rethread the upper thread and insert the bobbin correctly. SEWING BASICS Memo z When you should always sew a stitch sample and adjust stitch tension before beginning on the tension dial is a guide for working normal fabrics (medium weight). b c d a ...
Users Manual - English
Page 114
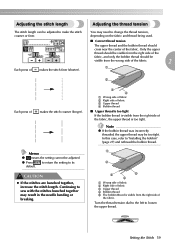
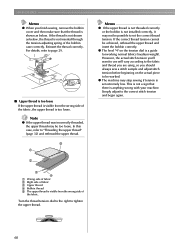
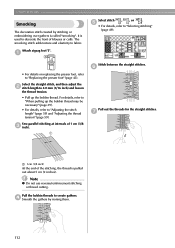
...Attach zigzag foot "J". Select the straight stitch, and then adjust the b stitch length to 4.0 mm (3/16 inch) and loosen the thread tension. • Pull up the bobbin thread may be necessary" (page 29). • For details, refer to "Adjusting the stitch length" (page 59) and "Adjusting ...For details on replacing the presser foot, refer to "Selecting stitching" (page 49). Sew parallel stitching at intervals of the stitching, the thread is used to "When pulling up the bobbin thread. Pull the bobbin threads to fabric. The smocking stitch adds texture and elasticity to create gathers. f...
...Attach zigzag foot "J". Select the straight stitch, and then adjust the b stitch length to 4.0 mm (3/16 inch) and loosen the thread tension. • Pull up the bobbin thread may be necessary" (page 29). • For details, refer to "Adjusting the stitch length" (page 59) and "Adjusting ...For details on replacing the presser foot, refer to "Selecting stitching" (page 49). Sew parallel stitching at intervals of the stitching, the thread is used to "When pulling up the bobbin thread. Pull the bobbin threads to fabric. The smocking stitch adds texture and elasticity to create gathers. f...
Users Manual - English
Page 147
... size and increase the upper thread tension. be saved in the sewing machine's memory. If the correct thread tension cannot If embroidery fails, it Adjusting the thread tension may not be damaged. Press (Back key) to return to continue sewing. Note z If the upper thread is not threaded correctly or the bobbin is not installed correctly, it is...
... size and increase the upper thread tension. be saved in the sewing machine's memory. If the correct thread tension cannot If embroidery fails, it Adjusting the thread tension may not be damaged. Press (Back key) to return to continue sewing. Note z If the upper thread is not threaded correctly or the bobbin is not installed correctly, it is...

Users Manual - English
Page 156
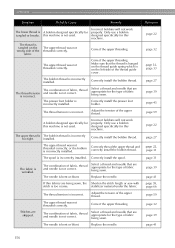
...The fabric is raised. Incorrect bobbins will not work properly. page 22 154 Symptom Probable Cause Remedy The machine is scratched, or has a burr on it . The needle clamp screw is too tight. The upper thread tension is loose. Reference page 17 ...bobbin. The needle is used . Press the start /stop button. The combination of fabric being sewn. Select a thread and needle that is bent or blunt. The presser foot that are appropriate for this machine is not used is not Attach the presser foot that you wish to sew. you need additional help, the Brother...
...The fabric is raised. Incorrect bobbins will not work properly. page 22 154 Symptom Probable Cause Remedy The machine is scratched, or has a burr on it . The needle clamp screw is too tight. The upper thread tension is loose. Reference page 17 ...bobbin. The needle is used . Press the start /stop button. The combination of fabric being sewn. Select a thread and needle that is bent or blunt. The presser foot that are appropriate for this machine is not used is not Attach the presser foot that you wish to sew. you need additional help, the Brother...

Users Manual - English
Page 157
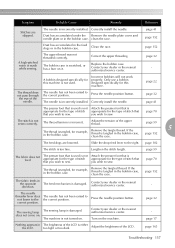
...25 The bobbin thread is scratched, or has a burr on it . page 59 The upper thread breaks. The thread is not appropriate for this machine is too tight. Remove any knots or tangles. - If the thread is tangled or breaks. Move the sewing speed controller ... 155 Contact your dealer or the nearest - Only use a bobbin designed specifically for the thread being used . The bobbin is incorrectly installed. Symptom Probable Cause Remedy Reference The needle breaks. Loosen the upper thread tension. The needle is scratched or does not rotate smoothly, or ...
...25 The bobbin thread is scratched, or has a burr on it . page 59 The upper thread breaks. The thread is not appropriate for this machine is too tight. Remove any knots or tangles. - If the thread is tangled or breaks. Move the sewing speed controller ... 155 Contact your dealer or the nearest - Only use a bobbin designed specifically for the thread being used . The bobbin is incorrectly installed. Symptom Probable Cause Remedy Reference The needle breaks. Loosen the upper thread tension. The needle is scratched or does not rotate smoothly, or ...
Users Manual - English
Page 158
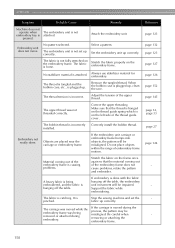
...correctly. Correctly thread the upper thread and correctly install the bobbin thread. The fabric is tangled on the wrong side of fabric being sewn, the Shorten the stitch length or sew with stitch is incorrectly installed. Replace the needle. Correct the... being sewn. A bobbin designed specifically for this machine is on the thread guide spring which is not used . The thread tension is incorrectly installed. The bobbin thread is incorrect. The thread tension is incorrect. The thread tension is incorrect. Incorrect bobbins will not work properly...
...correctly. Correctly thread the upper thread and correctly install the bobbin thread. The fabric is tangled on the wrong side of fabric being sewn, the Shorten the stitch length or sew with stitch is incorrectly installed. Replace the needle. Correct the... being sewn. A bobbin designed specifically for this machine is on the thread guide spring which is not used . The thread tension is incorrectly installed. The bobbin thread is incorrect. The thread tension is incorrect. The thread tension is incorrect. Incorrect bobbins will not work properly...
Users Manual - English
Page 159
... center. - Adjust the tension of the LCD. Slide the drop feed lever to sew. If the thread is not appropriate for the type of stitch that you wish to sew. Adjust the brightness of the upper thread. The bobbin case is made while sewing. page 22 The thread... type of the LCD is incorrect. The needle threader lever does The needle has not been raised to not lower to sew. The machine is incorrectly installed. Attach the presser foot that is damaged. correct position. page 163 Troubleshooting 157 page 59 The fabric does...
... center. - Adjust the tension of the LCD. Slide the drop feed lever to sew. If the thread is not appropriate for the type of stitch that you wish to sew. Adjust the brightness of the upper thread. The bobbin case is made while sewing. page 22 The thread... type of the LCD is incorrect. The needle threader lever does The needle has not been raised to not lower to sew. The machine is incorrectly installed. Attach the presser foot that is damaged. correct position. page 163 Troubleshooting 157 page 59 The fabric does...
Users Manual - English
Page 160
... correctly. The fabric is incorrectly Correctly install the bobbin thread. Correct the upper threading. If the embroidery unit carriage or embroidery frame bumps into objects, the pattern will be impaired. Stop the sewing machine and set up correctly. If the carriage is ...pattern. APPENDIX Symptom Probable Cause Remedy Machine does not operate when embroidery key is plugged up. Set the embroidery unit up correctly. The thread is tangled and the bobbin case, etc., is pressed. Adjust the tension of embroidery frame motion. Embroidery not neatly done. A heavy fabric ...
... correctly. The fabric is incorrectly Correctly install the bobbin thread. Correct the upper threading. If the embroidery unit carriage or embroidery frame bumps into objects, the pattern will be impaired. Stop the sewing machine and set up correctly. If the carriage is ...pattern. APPENDIX Symptom Probable Cause Remedy Machine does not operate when embroidery key is plugged up. Set the embroidery unit up correctly. The thread is tangled and the bobbin case, etc., is pressed. Adjust the tension of embroidery frame motion. Embroidery not neatly done. A heavy fabric ...
Users Manual - English
Page 167
... stitch 103 embroidery frame removal 131 basic sewing 48 embroidery key 13 basting stitch 78 embroidery pattern selection 132 beep 163 embroidery pattern types 132 blind hem stitch 80 embroidery sets 9 bobbin 22 embroidery sheet 128 bobbin case removal 152 embroidery threads 118 bobbin clip 9 bobbin cover 11 embroidery unit connector slot 10 embroidery unit installation 123 5 bobbin installation 27 embroidery unit removal 125 bobbin thread, pulling...
... stitch 103 embroidery frame removal 131 basic sewing 48 embroidery key 13 basting stitch 78 embroidery pattern selection 132 beep 163 embroidery pattern types 132 blind hem stitch 80 embroidery sets 9 bobbin 22 embroidery sheet 128 bobbin case removal 152 embroidery threads 118 bobbin clip 9 bobbin cover 11 embroidery unit connector slot 10 embroidery unit installation 123 5 bobbin installation 27 embroidery unit removal 125 bobbin thread, pulling...
Users Manual - English
Page 169
... thread take-up lever 10, 34 thread tension adjustment 59, 145 threading 31 threading bobbin 22 5 threading needle 31 threading needle manually 36 tips 65 touch panel 13 trial sewing 65 triple stretch stitch 78, 95, 103 troubleshooting 154 turning machine on/off 16 twin needle 9 twin needle sewing 36 U upper thread 31 upper thread...
... thread take-up lever 10, 34 thread tension adjustment 59, 145 threading 31 threading bobbin 22 5 threading needle 31 threading needle manually 36 tips 65 touch panel 13 trial sewing 65 triple stretch stitch 78, 95, 103 troubleshooting 154 turning machine on/off 16 twin needle 9 twin needle sewing 36 U upper thread 31 upper thread...


