
Operation Manual
Page 4
... • Do not operate where aerosol (spray) products are subject to change without notice. For additional product information, visit our website at www.brother.com ii otherwise, the machine, power cord or garment being sewn may ignite, resulting in injuries. 6 Special care is required when sewing: &#... Manual to inspect and adjust the machine yourself. Benzene, thinner, and scouring powders can damage the case and machine, and should never be replaced by the manufacturer as described in the needle area. • Do not use a damaged or incorrect needle plate, as a stove or iron...
... • Do not operate where aerosol (spray) products are subject to change without notice. For additional product information, visit our website at www.brother.com ii otherwise, the machine, power cord or garment being sewn may ignite, resulting in injuries. 6 Special care is required when sewing: &#... Manual to inspect and adjust the machine yourself. Benzene, thinner, and scouring powders can damage the case and machine, and should never be replaced by the manufacturer as described in the needle area. • Do not use a damaged or incorrect needle plate, as a stove or iron...

Operation Manual
Page 5
...suitable for household use. Children shall not play with the appliance. carrying the mark, rating as marked on plug. • Always replace the fuse cover. Children should contact your authorized Brother dealer to obtain the correct lead. iii FOR USERS IN THE UK, EIRE, MALTA AND CYPRUS ONLY IMPORTANT • In the...) with reduced physical, sensory or mental capabilities or lack of experience and knowledge if they have been given supervision or instruction concerning use of replacing the plug fuse, use of the appliance in a safe way and understand the hazards involved.
...suitable for household use. Children shall not play with the appliance. carrying the mark, rating as marked on plug. • Always replace the fuse cover. Children should contact your authorized Brother dealer to obtain the correct lead. iii FOR USERS IN THE UK, EIRE, MALTA AND CYPRUS ONLY IMPORTANT • In the...) with reduced physical, sensory or mental capabilities or lack of experience and knowledge if they have been given supervision or instruction concerning use of replacing the plug fuse, use of the appliance in a safe way and understand the hazards involved.

Operation Manual
Page 7
... threader 24 Pulling up the bobbin thread 25 Using the twin needle 26 Fabric/Thread/Needle Combinations 28 Replacing the Needle 29 Checking the needle 29 Replacing the needle 29 Replacing the Presser Foot 31 Replacing the presser foot 31 Removing and attaching the presser foot holder 32 Chapter 2 STARTING TO SEW 34 Sewing...
... threader 24 Pulling up the bobbin thread 25 Using the twin needle 26 Fabric/Thread/Needle Combinations 28 Replacing the Needle 29 Checking the needle 29 Replacing the needle 29 Replacing the Presser Foot 31 Replacing the presser foot 31 Removing and attaching the presser foot holder 32 Chapter 2 STARTING TO SEW 34 Sewing...

Operation Manual
Page 34
... Insert the horizontal spool pin onto the bobbin winder d shaft. Use of the spool. 1 2 • For details on installing a needle, refer to "Replacing the needle" on page B-29. Lower the presser foot. → The screen changes, and all keys and operation buttons are locked (except ). 1 Bobbin ...spool pin toward the left needle eye. Place the upper thread spool for creating pin tucks. Thread the upper thread for your nearest authorized Brother dealer to use the twin needle (2/11 needle, part code: X59296-121). CAUTION • Only use the twin needle, the horizontal ...
... Insert the horizontal spool pin onto the bobbin winder d shaft. Use of the spool. 1 2 • For details on installing a needle, refer to "Replacing the needle" on page B-29. Lower the presser foot. → The screen changes, and all keys and operation buttons are locked (except ). 1 Bobbin ...spool pin toward the left needle eye. Place the upper thread spool for creating pin tucks. Thread the upper thread for your nearest authorized Brother dealer to use the twin needle (2/11 needle, part code: X59296-121). CAUTION • Only use the twin needle, the horizontal ...

Operation Manual
Page 35
... thread in the same way that the g upper thread for stitches that use monogramming foot "N" or attach stabilizer material. k Set the twin needle mode to "Replacing the presser foot" on page B-21. Without passing the thread through the eye of the needle from the fabric, and then raise the presser foot...
... thread in the same way that the g upper thread for stitches that use monogramming foot "N" or attach stabilizer material. k Set the twin needle mode to "Replacing the presser foot" on page B-21. Without passing the thread through the eye of the needle from the fabric, and then raise the presser foot...
Operation Manual
Page 36
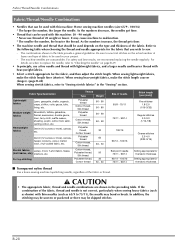
... 2.0-3.0 (1/16-1/8) Coarse stitches 2.5-4.0 (3/32-3/16) Setting appropriate for the fabric thickness Setting appropriate for the fabric that should be used depends on when to replace the needle, refer to malfunction. * The smaller the number, the heavier the thread. For safety and best results, we recommend... replacing the needle regularly. As the numbers decrease, the needles get finer. • Thread that can be used in your project. - As the numbers increase, ...
... 2.0-3.0 (1/16-1/8) Coarse stitches 2.5-4.0 (3/32-3/16) Setting appropriate for the fabric thickness Setting appropriate for the fabric that should be used depends on when to replace the needle, refer to malfunction. * The smaller the number, the heavier the thread. For safety and best results, we recommend... replacing the needle regularly. As the numbers decrease, the needles get finer. • Thread that can be used in your project. - As the numbers increase, ...

Operation Manual
Page 37
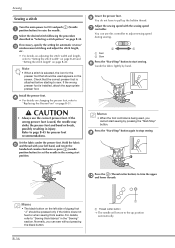
...twice to prevent the needle from falling into the machine. Be sure to observe the following precautions concerning the handling of thread. Replacing the Needle Replacing the Needle Be sure to read and carefully follow the instructions below : 1 If an unusual sound is raised, an error ...(The needle may bend the needle or damage the machine. • Never use recommended home sewing machine needles. GETTING READY Note • Replace the needle in "Checking the needle". Place fabric or paper under the presser foot to cover b the hole in injuries. Lower the presser...
...twice to prevent the needle from falling into the machine. Be sure to observe the following precautions concerning the handling of thread. Replacing the Needle Replacing the Needle Be sure to read and carefully follow the instructions below : 1 If an unusual sound is raised, an error ...(The needle may bend the needle or damage the machine. • Never use recommended home sewing machine needles. GETTING READY Note • Replace the needle in "Checking the needle". Place fabric or paper under the presser foot to cover b the hole in injuries. Lower the presser...

Operation Manual
Page 38
... clamp screw, otherwise certain parts of the machine may be loosened or tightened with the screwdriver, otherwise the needle may break or damage may result. Replacing the Needle Hold the needle with your left hand, and then use the g screwdriver to tighten the needle clamp screw. Press h to unlock all keys...
... clamp screw, otherwise certain parts of the machine may be loosened or tightened with the screwdriver, otherwise the needle may break or damage may result. Replacing the Needle Hold the needle with your left hand, and then use the g screwdriver to tighten the needle clamp screw. Press h to unlock all keys...

Operation Manual
Page 39
... presser foot Press (Needle position button) once or twice to a raise the needle. Lower the presser foot. Replacing the Presser Foot Replacing the Presser Foot CAUTION • Use the presser foot appropriate for the type of stitch that you wish to sew, otherwise the needle may result ...
... presser foot Press (Needle position button) once or twice to a raise the needle. Lower the presser foot. Replacing the Presser Foot Replacing the Presser Foot CAUTION • Use the presser foot appropriate for the type of stitch that you wish to sew, otherwise the needle may result ...

Operation Manual
Page 40
...holder Remove the presser foot holder when cleaning the machine or when installing a presser foot that the correct presser foot is attached before starting to "Replacing the presser foot" on page B-45. 2 13 1 Screwdriver 2 Presser foot holder 3 Presser foot holder screw ■ Attaching the presser foot...disc-shaped screwdriver. B-32 Lower the presser foot. → The screen changes, and all keys and operation buttons are locked (except ). Replacing the Presser Foot Note • When a stitch is raised, an error message appears. Check that does not use the presser foot holder,...
...holder Remove the presser foot holder when cleaning the machine or when installing a presser foot that the correct presser foot is attached before starting to "Replacing the presser foot" on page B-45. 2 13 1 Screwdriver 2 Presser foot holder 3 Presser foot holder screw ■ Attaching the presser foot...disc-shaped screwdriver. B-32 Lower the presser foot. → The screen changes, and all keys and operation buttons are locked (except ). Replacing the Presser Foot Note • When a stitch is raised, an error message appears. Check that does not use the presser foot holder,...

Operation Manual
Page 41
Note • If the presser foot holder is not correctly installed, the thread tension will be incorrect. Replacing the Presser Foot B GETTING READY Basic operations B-33 Turn the screw toward you (clockwise). 1 1 Screwdriver CAUTION • Be sure to securely tighten the presser foot holder screw, otherwise the presser foot holder may fall off and the needle may strike it, causing the needle to bend or break. Hold the presser foot holder in place with your right d hand, and then tighten the screw using the screwdriver in your left hand.
Note • If the presser foot holder is not correctly installed, the thread tension will be incorrect. Replacing the Presser Foot B GETTING READY Basic operations B-33 Turn the screw toward you (clockwise). 1 1 Screwdriver CAUTION • Be sure to securely tighten the presser foot holder screw, otherwise the presser foot holder may fall off and the needle may strike it, causing the needle to bend or break. Hold the presser foot holder in place with your right d hand, and then tighten the screw using the screwdriver in your left hand.
Operation Manual
Page 44
... the presser foot that the correct presser foot is installed, attach the appropriate presser foot. d • For details on changing the presser foot, refer to "Replacing the Presser Foot" on the left hand, and rotate the handwheel counterclockwise or press (needle position button) to set the needle in the sewing start...
... the presser foot that the correct presser foot is installed, attach the appropriate presser foot. d • For details on changing the presser foot, refer to "Replacing the Presser Foot" on the left hand, and rotate the handwheel counterclockwise or press (needle position button) to set the needle in the sewing start...

Operation Manual
Page 61
... and buttons, otherwise injuries may occur if the "Start/Stop" button or any other functions. Chapter1 SEWING ATTRACTIVE FINISHES S-2 Chapter2 UTILITY STITCHES S-7 CAUTION • Before replacing the presser foot, be sure to press (Presser foot/Needle exchange key) on basic sewing in addition to...
... and buttons, otherwise injuries may occur if the "Start/Stop" button or any other functions. Chapter1 SEWING ATTRACTIVE FINISHES S-2 Chapter2 UTILITY STITCHES S-7 CAUTION • Before replacing the presser foot, be sure to press (Presser foot/Needle exchange key) on basic sewing in addition to...

Operation Manual
Page 65
... recommended stitches and their stitch numbers are indicated below. Sewing Various Fabrics Sewing thin fabrics When sewing thin fabrics such as leather or vinyl fabrics, replace the presser foot with the walking foot*, non stick foot* or roller foot*. * Sold separately with some models. Move the needle (be sewn together with...
... recommended stitches and their stitch numbers are indicated below. Sewing Various Fabrics Sewing thin fabrics When sewing thin fabrics such as leather or vinyl fabrics, replace the presser foot with the walking foot*, non stick foot* or roller foot*. * Sold separately with some models. Move the needle (be sewn together with...

Operation Manual
Page 66
Make sure that the needle passes through the hook-and-loop fastener tape, replace the needle with the thin needle (65/9-75/11), the needle may cause malfunction. • If the hook-and-loop fastener tape is designed for ...
Make sure that the needle passes through the hook-and-loop fastener tape, replace the needle with the thin needle (65/9-75/11), the needle may cause malfunction. • If the hook-and-loop fastener tape is designed for ...

Operation Manual
Page 103
... needle. d CAUTION • When sewing with the wing needle, the needle holes are enlarged, creating a lace-like the previous stitching. e • For details, refer to "Replacing the Needle" in the "Basic operations" section. → The pattern displayed on the screen is called "drawnwork". Decorative Stitching Heirloom stitching When sewing with the...
... needle. d CAUTION • When sewing with the wing needle, the needle holes are enlarged, creating a lace-like the previous stitching. e • For details, refer to "Replacing the Needle" in the "Basic operations" section. → The pattern displayed on the screen is called "drawnwork". Decorative Stitching Heirloom stitching When sewing with the...

Operation Manual
Page 105
...or any other button is pressed and the machine starts. Chapter1 CHARACTER / DECORATIVE STITCHES D-2 Chapter2 MY CUSTOM STITCH D-12 CAUTION • Before replacing the presser foot, be sure to press (Presser foot/Needle exchange key) on the machine model. For details on adjusting and editing them. ... sewing This section provides instructions on sewing character stitches and decorative stitches as well as on changing the presser foot, refer to "Replacing the Presser Foot" in this section. In addition, it describes how to use MY CUSTOM STITCH, which allows you to create original stitch...
...or any other button is pressed and the machine starts. Chapter1 CHARACTER / DECORATIVE STITCHES D-2 Chapter2 MY CUSTOM STITCH D-12 CAUTION • Before replacing the presser foot, be sure to press (Presser foot/Needle exchange key) on the machine model. For details on adjusting and editing them. ... sewing This section provides instructions on sewing character stitches and decorative stitches as well as on changing the presser foot, refer to "Replacing the Presser Foot" in this section. In addition, it describes how to use MY CUSTOM STITCH, which allows you to create original stitch...

Operation Manual
Page 120
... machine surface If the surface of time without using the machine, and contact your authorized Brother dealer or the nearest Brother authorized service center. e Remove the needle plate cover. Press a (Needle position button) to "Replacing the Needle" and "Replacing the Presser Foot" in any of the locations described below, otherwise damage to the machine...
... machine surface If the surface of time without using the machine, and contact your authorized Brother dealer or the nearest Brother authorized service center. e Remove the needle plate cover. Press a (Needle position button) to "Replacing the Needle" and "Replacing the Presser Foot" in any of the locations described below, otherwise damage to the machine...

Operation Manual
Page 126
... • Refer to be removed. If the operation cannot be removed, remove it . c If the needle is not recommended to "Replacing the needle" in the "Basic operations" section. Lift up the fabric and cut the threads below to remove it forcefully, contact your nearest... Brother authorized service center. ■ Removing the fabric from the machine. If the fabric could be used. b Remove the needle. Remove the needle plate cover. Note • Be careful not to "Replacing the presser foot" and "Removing and attaching...
... • Refer to be removed. If the operation cannot be removed, remove it . c If the needle is not recommended to "Replacing the needle" in the "Basic operations" section. Lift up the fabric and cut the threads below to remove it forcefully, contact your nearest... Brother authorized service center. ■ Removing the fabric from the machine. If the fabric could be used. b Remove the needle. Remove the needle plate cover. Note • Be careful not to "Replacing the presser foot" and "Removing and attaching...

Operation Manual
Page 127
...; Never use a bobbin case that is bent, be removed, even after completing these steps, contact your nearest Brother authorized service center. CAUTION • Never use the disc-shaped screwdriver to "Checking the needle" and "Replacing the needle" in the machine. 1 S mark 2 z mark 3 Bobbin case • Make sure that you fit the bobbin...
...; Never use a bobbin case that is bent, be removed, even after completing these steps, contact your nearest Brother authorized service center. CAUTION • Never use the disc-shaped screwdriver to "Checking the needle" and "Replacing the needle" in the machine. 1 S mark 2 z mark 3 Bobbin case • Make sure that you fit the bobbin...


