
Users Guide
Page 2
... the specifications of this product are subject to change without notice. „ Brother reserves the right to make sure you read it before you use the Label Printer. This guide provides additional information about safety and proper operation. „ The Label Printer shown in the box 2 PDF manual on your model page to...
... the specifications of this product are subject to change without notice. „ Brother reserves the right to make sure you read it before you use the Label Printer. This guide provides additional information about safety and proper operation. „ The Label Printer shown in the box 2 PDF manual on your model page to...

Users Guide
Page 3
Indicates information or directions that can help you must follow to avoid minor personal injury or damage to avoid the risk of injury. ii Symbols Used in damage, or failed operations. Indicates notes that provide information or directions that should be followed. Ignoring them may result in This Guide The following symbols are used throughout this guide: WARNING CAUTION Important Note Tells you what to do to the Label Printer. Tells you about procedures you better understand and use the product more efficiently.
Indicates information or directions that can help you must follow to avoid minor personal injury or damage to avoid the risk of injury. ii Symbols Used in damage, or failed operations. Indicates notes that provide information or directions that should be followed. Ignoring them may result in This Guide The following symbols are used throughout this guide: WARNING CAUTION Important Note Tells you what to do to the Label Printer. Tells you about procedures you better understand and use the product more efficiently.

Users Guide
Page 4
...damage to the disc. „ DO NOT apply CD/DVD labels to drop the DK Roll. „ DK Rolls use with the CD/DVD label rolls. General Precautions DK Roll (DK Label and DK Tape) „ Use only genuine Brother accessories and supplies (with sunlight and heat. Note: To ...place. In addition, never apply labels to public or private property without permission. „ As the end of CD/DVD labels. „ Be careful not to CDs/DVDs designed for this happens, remove the remaining labels, insert a new DK Roll, and reprint the last label. Brother accepts no responsibility for applying CD/...
...damage to the disc. „ DO NOT apply CD/DVD labels to drop the DK Roll. „ DK Rolls use with the CD/DVD label rolls. General Precautions DK Roll (DK Label and DK Tape) „ Use only genuine Brother accessories and supplies (with sunlight and heat. Note: To ...place. In addition, never apply labels to public or private property without permission. „ As the end of CD/DVD labels. „ Be careful not to CDs/DVDs designed for this happens, remove the remaining labels, insert a new DK Roll, and reprint the last label. Brother accepts no responsibility for applying CD/...
Users Guide
Page 6
... the Mobile Device 11 Installing Applications for Use with Mobile Devices 11 Available Applications...11 Printing from a Mobile Device...12 Attaching Labels ...12 4 Changing the Label Printer Settings 13 Printer Setting Tool for Windows® ...13 Before Using the Printer Setting Tool 13 Using the Printer Setting ...for Windows®...16 Settings Dialog Box ...16 Menu Bar ...18 Basic Tab...18 Advanced Tab ...19 Applying Setting Changes to Multiple Label Printers 19 Printer Setting Tool for Mac ...20 Before Using the Printer Setting Tool 20 Using the Printer Setting Tool for Mac...20...
... the Mobile Device 11 Installing Applications for Use with Mobile Devices 11 Available Applications...11 Printing from a Mobile Device...12 Attaching Labels ...12 4 Changing the Label Printer Settings 13 Printer Setting Tool for Windows® ...13 Before Using the Printer Setting Tool 13 Using the Printer Setting ...for Windows®...16 Settings Dialog Box ...16 Menu Bar ...18 Basic Tab...18 Advanced Tab ...19 Applying Setting Changes to Multiple Label Printers 19 Printer Setting Tool for Mac ...20 Before Using the Printer Setting Tool 20 Using the Printer Setting Tool for Mac...20...

Users Guide
Page 7
...® only) and the Firmware 59 For Windows® ...59 For Mac ...61 Section III Appendix 10 Resetting the Label Printer 64 Resetting All Settings to the Factory Settings Using the Label Printer Buttons 64 Resetting Data Using the Printer Setting Tool 64 11 Maintenance 65 Cleaning the Exterior of the Unit...
...® only) and the Firmware 59 For Windows® ...59 For Mac ...61 Section III Appendix 10 Resetting the Label Printer 64 Resetting All Settings to the Factory Settings Using the Label Printer Buttons 64 Resetting Data Using the Printer Setting Tool 64 11 Maintenance 65 Cleaning the Exterior of the Unit...

Users Guide
Page 8
12 Troubleshooting 68 Overview...68 Printing Problems ...69 Version Information ...72 LED Indications...73 Troubleshooting ...75 13 Product Specifications 76 Label Printer Specifications ...76 vii
12 Troubleshooting 68 Overview...68 Printing Problems ...69 Version Information ...72 LED Indications...73 Troubleshooting ...75 13 Product Specifications 76 Label Printer Specifications ...76 vii

Users Guide
Page 9
Section I Basic Operations I Setting Up the Label Printer 2 Printing Using a Computer (P-touch Editor) 7 Printing Using the Mobile Device 11 Changing the Label Printer Settings 13 Other Functions 24
Section I Basic Operations I Setting Up the Label Printer 2 Printing Using a Computer (P-touch Editor) 7 Printing Using the Mobile Device 11 Changing the Label Printer Settings 13 Other Functions 24
Users Guide
Page 10
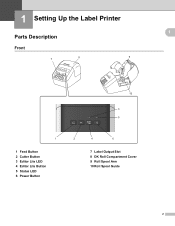
1 Setting Up the Label Printer 1 Parts Description Front 7 8 1 1 1 9 10 3 5 1 1 Feed Button 2 Cutter Button 3 Editor Lite LED 4 Editor Lite Button 5 Status LED 6 Power Button 2 4 6 7 Label Output Slot 8 DK Roll Compartment Cover 9 Roll Spool Arm 10 Roll Spool Guide 2
1 Setting Up the Label Printer 1 Parts Description Front 7 8 1 1 1 9 10 3 5 1 1 Feed Button 2 Cutter Button 3 Editor Lite LED 4 Editor Lite Button 5 Status LED 6 Power Button 2 4 6 7 Label Output Slot 8 DK Roll Compartment Cover 9 Roll Spool Arm 10 Roll Spool Guide 2
Users Guide
Page 11
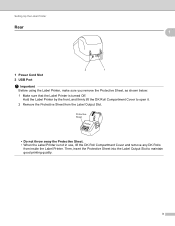
...Sheet • Do not throw away the Protective Sheet. • When the Label Printer is turned Off. Then, insert the Protective Sheet into the Label Output Slot to open it. 2 Remove the Protective Sheet from inside the Label Printer. Setting Up the Label Printer Rear 1 1 1 Power Cord Slot 2 USB Port 2 1 Important ...you remove the Protective Sheet, as shown below: 1 Make sure that the Label Printer is not in use, lift the DK Roll Compartment Cover and remove any DK Rolls from the Label Output Slot. Hold the Label Printer by the front, and firmly lift the DK Roll Compartment Cover to...
...Sheet • Do not throw away the Protective Sheet. • When the Label Printer is turned Off. Then, insert the Protective Sheet into the Label Output Slot to open it. 2 Remove the Protective Sheet from inside the Label Printer. Setting Up the Label Printer Rear 1 1 1 Power Cord Slot 2 USB Port 2 1 Important ...you remove the Protective Sheet, as shown below: 1 Make sure that the Label Printer is not in use, lift the DK Roll Compartment Cover and remove any DK Rolls from the Label Output Slot. Hold the Label Printer by the front, and firmly lift the DK Roll Compartment Cover to...
Users Guide
Page 12
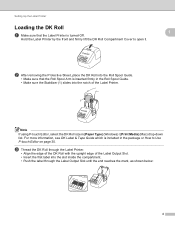
... package or How to open it. 1 1 b After removing the Protective Sheet, place the DK Roll into the Roll Spool Guide. • Make sure that the Label Printer is inserted firmly in the Roll Spool Guide. • Make sure the Stabilizer (1) slides into the notch of the... Label Output Slot. • Insert the first label into the slot inside the compartment. • Push the label through the Label Output Slot until the end reaches the mark, as shown below: 4 Setting Up the...
... package or How to open it. 1 1 b After removing the Protective Sheet, place the DK Roll into the Roll Spool Guide. • Make sure that the Label Printer is inserted firmly in the Roll Spool Guide. • Make sure the Stabilizer (1) slides into the notch of the... Label Output Slot. • Insert the first label into the slot inside the compartment. • Push the label through the Label Output Slot until the end reaches the mark, as shown below: 4 Setting Up the...
Users Guide
Page 13
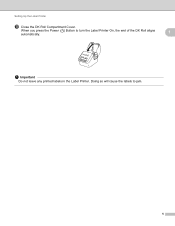
Setting Up the Label Printer d Close the DK Roll Compartment Cover. When you press the Power ( ) Button to jam. 5 Doing so will cause the labels to turn the Label Printer On, the end of the DK Roll aligns automatically. 1 Important Do not leave any printed labels in the Label Printer.
Setting Up the Label Printer d Close the DK Roll Compartment Cover. When you press the Power ( ) Button to jam. 5 Doing so will cause the labels to turn the Label Printer On, the end of the DK Roll aligns automatically. 1 Important Do not leave any printed labels in the Label Printer.
Users Guide
Page 14
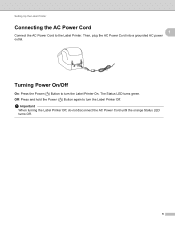
The Status LED turns green. Turning Power On/Off 1 On: Press the Power ( ) Button to turn the Label Printer Off. Important When turning the Label Printer Off, do not disconnect the AC Power Cord until the orange Status LED turns Off. 6 Off: Press and hold the Power ( ) Button again to the Label Printer. Setting Up the Label Printer Connecting the AC Power Cord 1 1 Connect the AC Power Cord to turn the Label Printer On. Then, plug the AC Power Cord into a grounded AC power outlet.
The Status LED turns green. Turning Power On/Off 1 On: Press the Power ( ) Button to turn the Label Printer Off. Important When turning the Label Printer Off, do not disconnect the AC Power Cord until the orange Status LED turns Off. 6 Off: Press and hold the Power ( ) Button again to the Label Printer. Setting Up the Label Printer Connecting the AC Power Cord 1 1 Connect the AC Power Cord to turn the Label Printer On. Then, plug the AC Power Cord into a grounded AC power outlet.

Users Guide
Page 15
...Double-click the downloaded EXE file (for Windows®) or DMG file (for the latest software and manuals. a Visit our website (install.brother) and download the Software Installer for Mac), and follow the on-screen instructions to the USB Port on the back of the...174; computer or Mac, install the printer drivers, P-touch Editor, and other applications to a Computer 2 a Before connecting the USB Cable, make sure that the Label Printer is complete. For Mac: Printer Driver, P-touch Editor, P-touch Update Software, and Printer Setting Tool. 2 Printing Using a Computer (P-touch Editor) 2 ...
...Double-click the downloaded EXE file (for Windows®) or DMG file (for the latest software and manuals. a Visit our website (install.brother) and download the Software Installer for Mac), and follow the on-screen instructions to the USB Port on the back of the...174; computer or Mac, install the printer drivers, P-touch Editor, and other applications to a Computer 2 a Before connecting the USB Cable, make sure that the Label Printer is complete. For Mac: Printer Driver, P-touch Editor, P-touch Update Software, and Printer Setting Tool. 2 Printing Using a Computer (P-touch Editor) 2 ...
Users Guide
Page 16
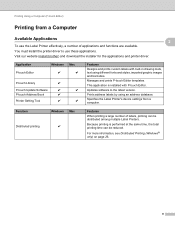
... functions are available. Visit our website (install.brother) and download the installer for the applications and printer driver. 2 2 Application P-touch Editor Windows Mac r r P-touch Library r P-touch Update Software r r P-touch Address Book r Printer Setting Tool r r Features Designs and prints custom labels with P-touch Editor. Prints address labels by using different fonts and styles, imported...
... functions are available. Visit our website (install.brother) and download the installer for the applications and printer driver. 2 2 Application P-touch Editor Windows Mac r r P-touch Library r P-touch Update Software r r P-touch Address Book r Printer Setting Tool r r Features Designs and prints custom labels with P-touch Editor. Prints address labels by using different fonts and styles, imported...

Users Guide
Page 17
...icon. d Select [File] and then select [Print] from the computer. Cutting Options 2 The cutting options allow you want to print. c Check the cutting options. Label Cut Option Table Auto Cut Cut at end Image No Yes ABC ABC No No Yes Yes or No ABC ABC ABC ABC 9 Printing Using... a Computer (P-touch Editor) Creating Labels from Your Computer 2 There are various methods for printing from a computer using P-touch Editor or P-touch Address Book. 2 a Start P-touch Editor or P-...
...icon. d Select [File] and then select [Print] from the computer. Cutting Options 2 The cutting options allow you want to print. c Check the cutting options. Label Cut Option Table Auto Cut Cut at end Image No Yes ABC ABC No No Yes Yes or No ABC ABC ABC ABC 9 Printing Using... a Computer (P-touch Editor) Creating Labels from Your Computer 2 There are various methods for printing from a computer using P-touch Editor or P-touch Address Book. 2 a Start P-touch Editor or P-...

Users Guide
Page 18
Printing Using a Computer (P-touch Editor) Attaching Labels 2 a Peel the backing from these surfaces. 10 b Position the label, and then press firmly from top to bottom with your finger to surfaces that are wet, dirty, or uneven. The labels may be difficult to attach to attach the label. 2 Note Labels may peel off easily from the label.
Printing Using a Computer (P-touch Editor) Attaching Labels 2 a Peel the backing from these surfaces. 10 b Position the label, and then press firmly from top to bottom with your finger to surfaces that are wet, dirty, or uneven. The labels may be difficult to attach to attach the label. 2 Note Labels may peel off easily from the label.
Users Guide
Page 19
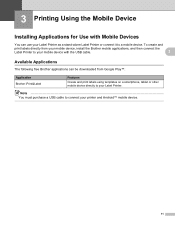
... to your mobile device with Mobile Devices 3 You can be downloaded from Google Play™: Application Brother iPrint&Label Features Create and print labels using templates on a smartphone, tablet or other mobile device directly to a mobile device. 3 Printing Using the Mobile Device 3 ...Installing Applications for Use with the USB cable. 3 Available Applications 3 The following free Brother applications can use your Label Printer as a stand-alone Label Printer or connect it to your printer and Android™ mobile device. 11
... to your mobile device with Mobile Devices 3 You can be downloaded from Google Play™: Application Brother iPrint&Label Features Create and print labels using templates on a smartphone, tablet or other mobile device directly to a mobile device. 3 Printing Using the Mobile Device 3 ...Installing Applications for Use with the USB cable. 3 Available Applications 3 The following free Brother applications can use your Label Printer as a stand-alone Label Printer or connect it to your printer and Android™ mobile device. 11
Users Guide
Page 20
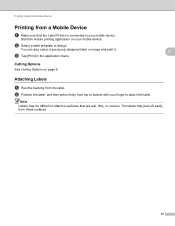
...application on page 9. 3 3 3 Attaching Labels 3 a Peel the backing from the label. b Select a label template or design. c Tap [Print] in the application menu. Note Labels may peel off easily from these surfaces. 12 You can also select a previously designed label or image and print it. Cutting Options See... your mobile device. b Position the label, and then press firmly from top to bottom with your mobile device. The labels may be difficult to attach to surfaces that the Label Printer is connected to your finger to attach the label. Printing Using the Mobile Device Printing...
...application on page 9. 3 3 3 Attaching Labels 3 a Peel the backing from the label. b Select a label template or design. c Tap [Print] in the application menu. Note Labels may peel off easily from these surfaces. 12 You can also select a previously designed label or image and print it. Cutting Options See... your mobile device. b Position the label, and then press firmly from top to bottom with your mobile device. The labels may be difficult to attach to surfaces that the Label Printer is connected to your finger to attach the label. Printing Using the Mobile Device Printing...
Users Guide
Page 21
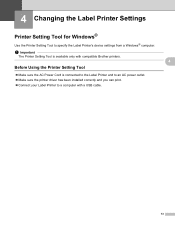
Important The Printer Setting Tool is connected to the Label Printer and to an AC power outlet. „ Make sure the printer driver has been installed correctly and you can print. „ Connect your Label Printer to specify the Label Printer's device settings from a Windows® computer. 4 Changing the Label Printer Settings 4 Printer Setting Tool for Windows® Use the Printer Setting Tool to a computer with compatible Brother printers. Before Using the Printer Setting Tool „ Make sure the AC Power Cord is available only with a USB cable. 4 4 4 13
Important The Printer Setting Tool is connected to the Label Printer and to an AC power outlet. „ Make sure the printer driver has been installed correctly and you can print. „ Connect your Label Printer to specify the Label Printer's device settings from a Windows® computer. 4 Changing the Label Printer Settings 4 Printer Setting Tool for Windows® Use the Printer Setting Tool to a computer with compatible Brother printers. Before Using the Printer Setting Tool „ Make sure the AC Power Cord is available only with a USB cable. 4 4 4 13
Users Guide
Page 22
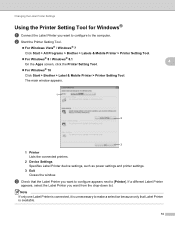
...3 Exit Closes the window. b Start the Printer Setting Tool. „ For Windows Vista® / Windows® 7 Click Start > All Programs > Brother > Labels & Mobile Printer > Printer Setting Tool. „ For Windows® 8 / Windows® 8.1 On the Apps screen, click the Printer Setting Tool. ...„ For Windows® 10 Click Start > Brother > Label & Mobile Printer > Printer Setting Tool. Note If only one Label Printer is connected, it is available. 14 Changing the Label Printer Settings Using the Printer Setting Tool for Windows® a Connect the...
...3 Exit Closes the window. b Start the Printer Setting Tool. „ For Windows Vista® / Windows® 7 Click Start > All Programs > Brother > Labels & Mobile Printer > Printer Setting Tool. „ For Windows® 8 / Windows® 8.1 On the Apps screen, click the Printer Setting Tool. ...„ For Windows® 10 Click Start > Brother > Label & Mobile Printer > Printer Setting Tool. Note If only one Label Printer is connected, it is available. 14 Changing the Label Printer Settings Using the Printer Setting Tool for Windows® a Connect the...


