
Quick Setup Guide - English
Page 1
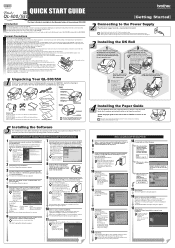
...brother.com [Getting Started] 2 Connecting to go back and correct. · The InstallShield Wizard completes preparations for more depending on the left , and then 8 continue installation from the electrical outlet. The License Agreement dialog box appears. 3 Carefully read the license agreement. Typical • P-touch...Files dialog box appears. 7 Review the settings to step 15. 11 Click [Next]. If this procedure varies depending on purchasing the QL-500/550. When the Add Printer Wizard dialog box appears. Refer to the User's Guide for directions to start and the dialog ...
...brother.com [Getting Started] 2 Connecting to go back and correct. · The InstallShield Wizard completes preparations for more depending on the left , and then 8 continue installation from the electrical outlet. The License Agreement dialog box appears. 3 Carefully read the license agreement. Typical • P-touch...Files dialog box appears. 7 Review the settings to step 15. 11 Click [Next]. If this procedure varies depending on purchasing the QL-500/550. When the Add Printer Wizard dialog box appears. Refer to the User's Guide for directions to start and the dialog ...
Users Manual - English
Page 23
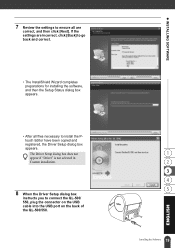
... the Driver Setup dialog box instructs you to install the Ptouch Editor have been copied and registered, the Driver Setup dialog box appears. 7 Review the settings to ensure all files necessary to connect the QL-500/ 550, plug the connector on the USB cable into the USB port on the back of the...
... the Driver Setup dialog box instructs you to install the Ptouch Editor have been copied and registered, the Driver Setup dialog box appears. 7 Review the settings to ensure all files necessary to connect the QL-500/ 550, plug the connector on the USB cable into the USB port on the back of the...
Users Manual - English
Page 27
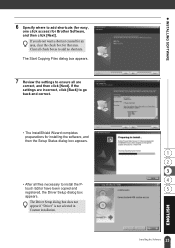
6 Specify where to add shortcuts (for easy, one click access) for that area. The Start Copying Files dialog box appears. 7 Review the settings to ensure all are incorrect, click [Back] to go back and correct. • The InstallShield Wizard completes preparations for installing the software, ...click [Next]. Clear all files necessary to add no shortcuts. If you do not want a shortcut created for an area, clear the check box for Brother Software, and then click [Next]. The Driver Setup dialog box does not appear if "Driver" is not selected in Custom installation. 23 Installing the ...
6 Specify where to add shortcuts (for easy, one click access) for that area. The Start Copying Files dialog box appears. 7 Review the settings to ensure all are incorrect, click [Back] to go back and correct. • The InstallShield Wizard completes preparations for installing the software, ...click [Next]. Clear all files necessary to add no shortcuts. If you do not want a shortcut created for an area, clear the check box for Brother Software, and then click [Next]. The Driver Setup dialog box does not appear if "Driver" is not selected in Custom installation. 23 Installing the ...