Users Guide
Page 2
...computer's operating system, your product model, and software version. Before using the Label Printer along with the Label Printer for any damages (including consequential) caused by reliance on the Brother Solutions Center website i Product Safety Guide 1 Quick Setup Guide 1 User's Guide 2... and maintenance instructions. 1 Printed manual in the illustrations may be responsible for information about using the Label Printer, make changes without notice. Brother reserves the right to download the latest manuals. read it before you read all the documents included ...
...computer's operating system, your product model, and software version. Before using the Label Printer along with the Label Printer for any damages (including consequential) caused by reliance on the Brother Solutions Center website i Product Safety Guide 1 Quick Setup Guide 1 User's Guide 2... and maintenance instructions. 1 Printed manual in the illustrations may be responsible for information about using the Label Printer, make changes without notice. Brother reserves the right to download the latest manuals. read it before you read all the documents included ...
Users Guide
Page 4
... to a surface, a portion of the label may remain applied. Prior to using discs with peeling labels can result in damage to the disc. DO NOT apply CD/DVD labels to CDs/DVDs designed for any persons, animals, or plants. Brother accepts no responsibility for use the adjustment options...light, wind, or rain. DO NOT expose the DK Rolls to which the label will fade with inkjet printers. General Precautions DK Roll (DK Label and DK Tape) Use only genuine Brother accessories and supplies (with damp or wet hands can cause the color to change or be...
... to a surface, a portion of the label may remain applied. Prior to using discs with peeling labels can result in damage to the disc. DO NOT apply CD/DVD labels to CDs/DVDs designed for any persons, animals, or plants. Brother accepts no responsibility for use the adjustment options...light, wind, or rain. DO NOT expose the DK Rolls to which the label will fade with inkjet printers. General Precautions DK Roll (DK Label and DK Tape) Use only genuine Brother accessories and supplies (with damp or wet hands can cause the color to change or be...

Users Guide
Page 5
...Using a Computer (P-touch Editor) 9 Install Printer Drivers and Software on a Computer 9 Connect the Label Printer to a Computer 9 Print from a Computer ...10 Available Applications...10 Create Labels from Your Computer 11 Attach Labels...12 3 Print Using P-touch Editor Lite (Windows only) 13 P-touch Editor Lite ...13 4 Print...Dialog Box ...22 Menu Bar ...24 Basic Tab...25 Advanced Tab ...25 Management Tab ...25 Apply Setting Changes to Multiple Label Printers 26 P-touch Template Settings for Windows 27 P-touch Template Settings Dialog Box 28 Printer Setting Tool for Mac ...30 Before...
...Using a Computer (P-touch Editor) 9 Install Printer Drivers and Software on a Computer 9 Connect the Label Printer to a Computer 9 Print from a Computer ...10 Available Applications...10 Create Labels from Your Computer 11 Attach Labels...12 3 Print Using P-touch Editor Lite (Windows only) 13 P-touch Editor Lite ...13 4 Print...Dialog Box ...22 Menu Bar ...24 Basic Tab...25 Advanced Tab ...25 Management Tab ...25 Apply Setting Changes to Multiple Label Printers 26 P-touch Template Settings for Windows 27 P-touch Template Settings Dialog Box 28 Printer Setting Tool for Mac ...30 Before...

Users Guide
Page 6
...31 Basic Tab...32 Advanced Tab ...32 Management Tab ...32 Apply Setting Changes to Multiple Label Printers 33 Change Settings When Printing from a Mobile Device 34 6 Print Labels Using P-touch Template 35 P-touch Template Operations...35 Preparation ...36 Specify Settings in the P-...) ...47 Barcode Numbering (Serializing)...48 Print with Numbering (Serializing) Advanced Operation 49 7 Other Functions 50 Confirm Label Printer Settings...50 Crop Print (Print Barcode Labels) (Windows only 50 Barcodes Compatible with Crop Print 51 Create a Barcode Document to Use with Crop Print 51...
...31 Basic Tab...32 Advanced Tab ...32 Management Tab ...32 Apply Setting Changes to Multiple Label Printers 33 Change Settings When Printing from a Mobile Device 34 6 Print Labels Using P-touch Template 35 P-touch Template Operations...35 Preparation ...36 Specify Settings in the P-...) ...47 Barcode Numbering (Serializing)...48 Print with Numbering (Serializing) Advanced Operation 49 7 Other Functions 50 Confirm Label Printer Settings...50 Crop Print (Print Barcode Labels) (Windows only 50 Barcodes Compatible with Crop Print 51 Create a Barcode Document to Use with Crop Print 51...

Users Guide
Page 7
...the Template to P-touch Transfer Manager 75 Transfer Templates or Other Data from the Computer to the Label Printer 78 Back up Templates or Other Data Saved in the Label Printer 83 Delete Label Printer Data ...84 Create Transfer Package Files ...85 P-touch Library ...86 Start P-touch Library...86... (.pdz 94 Distribute the Transfer Package File (.pdz) and P-touch Transfer Express to Others 96 Transfer the Transfer Package File (.pdz) to Your Label Printer 97 13 How to Update P-touch Software 100 Update P-touch Editor and P-touch Address Book (Windows only 100 Update P-touch Editor Lite ...
...the Template to P-touch Transfer Manager 75 Transfer Templates or Other Data from the Computer to the Label Printer 78 Back up Templates or Other Data Saved in the Label Printer 83 Delete Label Printer Data ...84 Create Transfer Package Files ...85 P-touch Library ...86 Start P-touch Library...86... (.pdz 94 Distribute the Transfer Package File (.pdz) and P-touch Transfer Express to Others 96 Transfer the Transfer Package File (.pdz) to Your Label Printer 97 13 How to Update P-touch Software 100 Update P-touch Editor and P-touch Address Book (Windows only 100 Update P-touch Editor Lite ...

Users Guide
Page 8
16 Troubleshooting 110 Overview...110 LED Indications...111 Printing Problems ...113 Version Information ...119 17 Product Specifications 120 Label Printer Specifications ...120 18 Software Development Kit 121 19 Notes on Using P-touch Transfer Manager 122 Notes on Creating Templates ...122 Notes on Transferring Templates ...... Barcodes for the P-touch Template Function 123 General Procedure for the P-touch Template Function 123 List of Barcodes for Specifying Settings 124 21 Use the Brother Barcode Scanner (Optional: PA-BR-001) 127 vii
16 Troubleshooting 110 Overview...110 LED Indications...111 Printing Problems ...113 Version Information ...119 17 Product Specifications 120 Label Printer Specifications ...120 18 Software Development Kit 121 19 Notes on Using P-touch Transfer Manager 122 Notes on Creating Templates ...122 Notes on Transferring Templates ...... Barcodes for the P-touch Template Function 123 General Procedure for the P-touch Template Function 123 List of Barcodes for Specifying Settings 124 21 Use the Brother Barcode Scanner (Optional: PA-BR-001) 127 vii

Users Guide
Page 9
Section I Basic Operations I Set Up the Label Printer 2 Print Using a Computer (P-touch Editor) 9 Print Using P-touch Editor Lite (Windows only) 13 Print Using a Mobile Device 16 Change the Label Printer Settings 19 Print Labels Using P-touch Template 35 Other Functions 50
Section I Basic Operations I Set Up the Label Printer 2 Print Using a Computer (P-touch Editor) 9 Print Using P-touch Editor Lite (Windows only) 13 Print Using a Mobile Device 16 Change the Label Printer Settings 19 Print Labels Using P-touch Template 35 Other Functions 50

Users Guide
Page 10
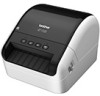
1 Set Up the Label Printer 1 1 Parts Description 1 Front 1 8 7 1 Status LED 2 Power Button 3 Feed Button 4 Cutter Button 5 Editor Lite Button 1 6 2 3 4 5 6 Editor Lite LED 7 DK Roll Compartment Cover 8 Label Output Slot 2
1 Set Up the Label Printer 1 1 Parts Description 1 Front 1 8 7 1 Status LED 2 Power Button 3 Feed Button 4 Cutter Button 5 Editor Lite Button 1 6 2 3 4 5 6 Editor Lite LED 7 DK Roll Compartment Cover 8 Label Output Slot 2

Users Guide
Page 12
Then, plug the AC Power Cord into a grounded AC power outlet. For more information, see Product Specifications on page 120. 4 Set Up the Label Printer Connect the Power Cord 1 1 Connect the AC Power Cord to the Label Printer. IMPORTANT Do not use your Label Printer in areas where the power source voltage is different from the Label Printer's specified voltage.
Then, plug the AC Power Cord into a grounded AC power outlet. For more information, see Product Specifications on page 120. 4 Set Up the Label Printer Connect the Power Cord 1 1 Connect the AC Power Cord to the Label Printer. IMPORTANT Do not use your Label Printer in areas where the power source voltage is different from the Label Printer's specified voltage.
Users Guide
Page 13
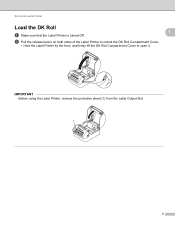
Set Up the Label Printer Load the DK Roll 1 1 a Make sure that the Label Printer is turned Off. IMPORTANT Before using the Label Printer, remove the protective sheet (1) from the Label Output Slot. 1 5 b Pull the release levers on both sides of the Label Printer to unlock the DK Roll Compartment Cover. • Hold the Label Printer by the front, and firmly lift the DK Roll Compartment Cover to open it.
Set Up the Label Printer Load the DK Roll 1 1 a Make sure that the Label Printer is turned Off. IMPORTANT Before using the Label Printer, remove the protective sheet (1) from the Label Output Slot. 1 5 b Pull the release levers on both sides of the Label Printer to unlock the DK Roll Compartment Cover. • Hold the Label Printer by the front, and firmly lift the DK Roll Compartment Cover to open it.
Users Guide
Page 14
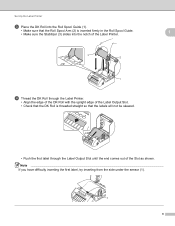
... Roll Spool Guide. • Make sure the Stabilizer (3) slides into the notch of the Label Printer. 1 3 2 1 d Thread the DK Roll through the Label Printer. • Align the edge of the DK Roll with the upright edge of the Label Output Slot. • Check that the DK Roll is threaded straight so that the... labels will not be skewed. • Push the first label through the Label Output Slot until the end comes out of the Slot as shown.
... Roll Spool Guide. • Make sure the Stabilizer (3) slides into the notch of the Label Printer. 1 3 2 1 d Thread the DK Roll through the Label Printer. • Align the edge of the DK Roll with the upright edge of the Label Output Slot. • Check that the DK Roll is threaded straight so that the... labels will not be skewed. • Push the first label through the Label Output Slot until the end comes out of the Slot as shown.
Users Guide
Page 15
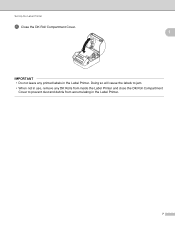
Set Up the Label Printer e Close the DK Roll Compartment Cover. 1 IMPORTANT • Do not leave any DK Rolls from inside the Label Printer and close the DK Roll Compartment Cover to prevent dust and debris from accumulating in the Label Printer. Doing so will cause the labels to jam. • When not in use, remove any printed labels in the Label Printer. 7
Set Up the Label Printer e Close the DK Roll Compartment Cover. 1 IMPORTANT • Do not leave any DK Rolls from inside the Label Printer and close the DK Roll Compartment Cover to prevent dust and debris from accumulating in the Label Printer. Doing so will cause the labels to jam. • When not in use, remove any printed labels in the Label Printer. 7

Users Guide
Page 16
Set Up the Label Printer Turn Power On/Off On: Press the Power ( ) Button to turn the Label Printer On. IMPORTANT When turning the Label Printer Off, do not disconnect the AC Power Cord until the orange Status LED turns Off. 8 IMPORTANT Press the Feed ( ) Button to align the end of the DK Roll. 1 1 Off: Press and hold the Power ( ) Button again to turn the Label Printer Off. The Status LED turns green.
Set Up the Label Printer Turn Power On/Off On: Press the Power ( ) Button to turn the Label Printer On. IMPORTANT When turning the Label Printer Off, do not disconnect the AC Power Cord until the orange Status LED turns Off. 8 IMPORTANT Press the Feed ( ) Button to align the end of the DK Roll. 1 1 Off: Press and hold the Power ( ) Button again to turn the Label Printer Off. The Status LED turns green.
Users Guide
Page 17
...brother) and download the Software Installer for Mac: Printer Driver, P-touch Editor, P-touch Update Software, and Printer Setting Tool IMPORTANT When printing with the installation. c Close the dialog box when the installation is turned Off before connecting the USB Cable. c Turn the Label Printer On. 9 a Make sure the Label... and hold the P-touch Editor Lite Button until the green Editor Lite LED turns off. Connect the Label Printer to a Computer 2 You can connect the Label Printer to your computer. Software for Windows: Printer Driver, P-touch Editor, P-touch Address Book, P-touch...
...brother) and download the Software Installer for Mac: Printer Driver, P-touch Editor, P-touch Update Software, and Printer Setting Tool IMPORTANT When printing with the installation. c Close the dialog box when the installation is turned Off before connecting the USB Cable. c Turn the Label Printer On. 9 a Make sure the Label... and hold the P-touch Editor Lite Button until the green Editor Lite LED turns off. Connect the Label Printer to a Computer 2 You can connect the Label Printer to your computer. Software for Windows: Printer Driver, P-touch Editor, P-touch Address Book, P-touch...
Users Guide
Page 18
..., r text using an address database. Function Crop Print Distributed Printing Windows r r Mac Features This Label Printer can be distributed among multiple Label Printers. For more information, see Distributed Printing (Windows only) on the computer. Visit our website (install.brother) and download the installer for the applications and printer driver. 2 2 Application P-touch Editor Windows...
..., r text using an address database. Function Crop Print Distributed Printing Windows r r Mac Features This Label Printer can be distributed among multiple Label Printers. For more information, see Distributed Printing (Windows only) on the computer. Visit our website (install.brother) and download the installer for the applications and printer driver. 2 2 Application P-touch Editor Windows...

Users Guide
Page 19
... 2 The cutting options allow you want to print. Print Using a Computer (P-touch Editor) Create Labels from the computer. b Create a label design. Use the printer driver to specify how the item is fed and cut when it is printed. Label Cut Option Table Auto Cut Cut at End Image No Yes ABC ABC No... Book, and then open the document you to select the cutting option when printing from Your Computer 2 There are various methods for printing with this Label Printer.
... 2 The cutting options allow you want to print. Print Using a Computer (P-touch Editor) Create Labels from the computer. b Create a label design. Use the printer driver to specify how the item is fed and cut when it is printed. Label Cut Option Table Auto Cut Cut at End Image No Yes ABC ABC No... Book, and then open the document you to select the cutting option when printing from Your Computer 2 There are various methods for printing with this Label Printer.

Users Guide
Page 20
The labels may be difficult to attach to attach the label. 2 Note Labels may peel off easily from the label. Print Using a Computer (P-touch Editor) Attach Labels 2 a Peel the backing from these surfaces. 12 b Position the label, and then press firmly from top to bottom with your finger to surfaces that are wet, dirty, or uneven.
The labels may be difficult to attach to attach the label. 2 Note Labels may peel off easily from the label. Print Using a Computer (P-touch Editor) Attach Labels 2 a Peel the backing from these surfaces. 12 b Position the label, and then press firmly from top to bottom with your finger to surfaces that are wet, dirty, or uneven.
Users Guide
Page 21
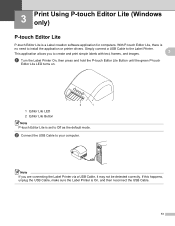
.... Simply connect a USB Cable to your computer. Note If you to create and print simple labels with text, frames, and images. 3 a Turn the Label Printer On, then press and hold the P-touch Editor Lite Button until the green P-touch Editor Lite LED turns on. 1 Editor Lite LED 2 Editor Lite .... 13 With P-touch Editor Lite, there is set to install the application or printer drivers. If this happens, unplug the USB Cable, make sure the Label Printer is a Label creation software application for computers. This application allows you are connecting the...
.... Simply connect a USB Cable to your computer. Note If you to create and print simple labels with text, frames, and images. 3 a Turn the Label Printer On, then press and hold the P-touch Editor Lite Button until the green P-touch Editor Lite LED turns on. 1 Editor Lite LED 2 Editor Lite .... 13 With P-touch Editor Lite, there is set to install the application or printer drivers. If this happens, unplug the USB Cable, make sure the Label Printer is a Label creation software application for computers. This application allows you are connecting the...

Users Guide
Page 22
...-click PtLite10. Start P-touch Editor Lite by double-clicking PTLITE10.EXE. 14 If the software does not start P-touch Editor Lite when connecting the Label Printer to view files. Minimize all windows to view the dialog box. • It will take longer than usual to start automatically when you ..., but the operating procedures are the same.) 3 Click Open folder to your computer for the first time. Note • If you connect the Label Printer, launch it may differ depending on your computer monitor. (The following screens may be hidden behind an open software program window.
...-click PtLite10. Start P-touch Editor Lite by double-clicking PTLITE10.EXE. 14 If the software does not start P-touch Editor Lite when connecting the Label Printer to view files. Minimize all windows to view the dialog box. • It will take longer than usual to start automatically when you ..., but the operating procedures are the same.) 3 Click Open folder to your computer for the first time. Note • If you connect the Label Printer, launch it may differ depending on your computer monitor. (The following screens may be hidden behind an open software program window.

Users Guide
Page 23
Print Using P-touch Editor Lite (Windows only) d P-touch Editor Lite launches. 3 IMPORTANT Do not turn Off or disconnect the Label Printer while using P-touch Editor Lite. Note P-touch Editor Lite is not available for Mac. 15
Print Using P-touch Editor Lite (Windows only) d P-touch Editor Lite launches. 3 IMPORTANT Do not turn Off or disconnect the Label Printer while using P-touch Editor Lite. Note P-touch Editor Lite is not available for Mac. 15


