

Users Manual - English
Page 5
Connecting the printer to the AC adapter. 3. Connect the AC power cord to an AC power outlet NOTE: AC power cord and AC Adapter are optional. Figure 2. Plug the AC power cord into a nearby AC power outlet (100~240 VAC, 50-60 Hz). Page 1 Setting Up the Printer Connecting to an AC Outlet (Optional) Connect the printer to a nearby AC power outlet to run it on AC power or to the printer as shown in Figure 2. 2. Please purchase appropriate adapter. Connect the AC adapter to charge the battery (See "Charging the Battery", page 37). 1. Chapter 1 -
Connecting the printer to the AC adapter. 3. Connect the AC power cord to an AC power outlet NOTE: AC power cord and AC Adapter are optional. Figure 2. Plug the AC power cord into a nearby AC power outlet (100~240 VAC, 50-60 Hz). Page 1 Setting Up the Printer Connecting to an AC Outlet (Optional) Connect the printer to a nearby AC power outlet to run it on AC power or to the printer as shown in Figure 2. 2. Please purchase appropriate adapter. Connect the AC adapter to charge the battery (See "Charging the Battery", page 37). 1. Chapter 1 -
Users Manual - English
Page 18
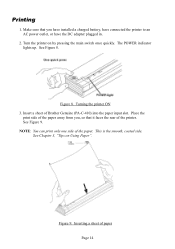
Turning the printer ON 3. Insert a sheet of the paper. NOTE: You can print only one side of Brother Genuine (PA-C-410) into the paper input slot. Turn the printer on Using Paper". Figure 8. See Figure 9. Figure 9. See Figure 8. Inserting a sheet of the printer. ... the main switch once quickly. Place the print side of the paper away from you have installed a charged battery, have connected the printer to an AC power outlet, or have the DC adapter plugged in. 2. Printing 1. Make sure that you , so that it faces the rear of paper Page 14
Turning the printer ON 3. Insert a sheet of the paper. NOTE: You can print only one side of Brother Genuine (PA-C-410) into the paper input slot. Turn the printer on Using Paper". Figure 8. See Figure 9. Figure 9. See Figure 8. Inserting a sheet of the printer. ... the main switch once quickly. Place the print side of the paper away from you have installed a charged battery, have connected the printer to an AC power outlet, or have the DC adapter plugged in. 2. Printing 1. Make sure that you , so that it faces the rear of paper Page 14
Users Manual - English
Page 38
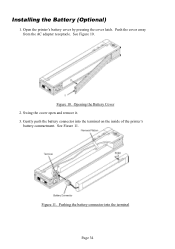
See Figure 10. Gently push the battery connector into the terminal Page 34 See Figure 11. Figure 11. Open the printer's battery cover by pressing the cover latch. Pushing the battery connector into the terminal on the inside of the printer's battery compartment. Installing the Battery (Optional) 1. Figure 10. Swing the cover open and remove it. 3. Opening the Battery Cover 2. Push the cover away from the AC adapter receptacle.
See Figure 10. Gently push the battery connector into the terminal Page 34 See Figure 11. Figure 11. Open the printer's battery cover by pressing the cover latch. Pushing the battery connector into the terminal on the inside of the printer's battery compartment. Installing the Battery (Optional) 1. Figure 10. Swing the cover open and remove it. 3. Opening the Battery Cover 2. Push the cover away from the AC adapter receptacle.

Users Manual - English
Page 39
..., press it inside the battery compartment 5. Figure 12. Otherwise, the battery cover will not close properly. If necessary, gently push the cover latch towards the AC adapter receptacle until it . Page 35 Then you may accidentally insert the battery on to the inside of the battery compartment opposite the... AC adapter receptacle. While holding onto the ribbon, tilt the battery and place it securely into position. Make sure the side of the battery with Ni-MH ...
..., press it inside the battery compartment 5. Figure 12. Otherwise, the battery cover will not close properly. If necessary, gently push the cover latch towards the AC adapter receptacle until it . Page 35 Then you may accidentally insert the battery on to the inside of the battery compartment opposite the... AC adapter receptacle. While holding onto the ribbon, tilt the battery and place it securely into position. Make sure the side of the battery with Ni-MH ...
Users Manual - English
Page 40
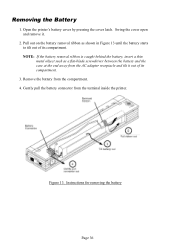
... 36 Pull out on the battery removal ribbon as a flat-blade screwdriver between the battery and the case at the end away from the AC adapter receptacle and tilt it . 2. NOTE: If the battery removal ribbon is caught behind the battery, insert a thin metal object such as shown in Figure 13...
... 36 Pull out on the battery removal ribbon as a flat-blade screwdriver between the battery and the case at the end away from the AC adapter receptacle and tilt it . 2. NOTE: If the battery removal ribbon is caught behind the battery, insert a thin metal object such as shown in Figure 13...
Users Manual - English
Page 41
... it is approximately 120 minutes. Make sure the printer is connected to an AC power outlet with the AC adapter and power cord or a DC power cord. 2. A new battery at 100% charge will constantly draw approximately 20 mA to blink. Brother recommends that when the printer is connected to an external source of the...
... it is approximately 120 minutes. Make sure the printer is connected to an AC power outlet with the AC adapter and power cord or a DC power cord. 2. A new battery at 100% charge will constantly draw approximately 20 mA to blink. Brother recommends that when the printer is connected to an external source of the...

Users Manual - English
Page 54
... no power. Page 50 Make sure the AC power outlet is connected properly. No Battery Found When Charging If this indication occurs immediately when attempting to charge the battery, the printer did not detect a battery when you are using the AC adapter, make sure power is connected and that... there are using a DC adapter, make sure it is "live". See page 34, "Installing the Battery (Optional)". If you tried to an...
... no power. Page 50 Make sure the AC power outlet is connected properly. No Battery Found When Charging If this indication occurs immediately when attempting to charge the battery, the printer did not detect a battery when you are using the AC adapter, make sure power is connected and that... there are using a DC adapter, make sure it is "live". See page 34, "Installing the Battery (Optional)". If you tried to an...
Users Manual - English
Page 62
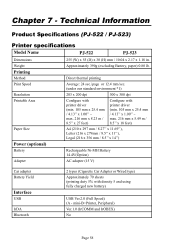
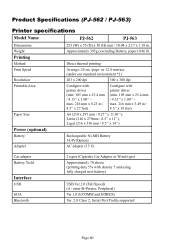
...''), Letter (216 x 279mm / 8.5'' x 11''), Legal (216 x 356 mm / 8.5'' x 14'') Power (optional) Battery Rechargeable Ni-MH Battery 14.4V(Option) Adapter AC adapter (15 V) Car adapter Battery Yield Interface USB IrDA Bluetooth 2 types (Cigarette Car Adapter or Wired type) Approximately 70 sheets (printing duty 5% with density 5 and using fully charged new battery) USB Ver.2.0 (Full Speed...
...''), Letter (216 x 279mm / 8.5'' x 11''), Legal (216 x 356 mm / 8.5'' x 14'') Power (optional) Battery Rechargeable Ni-MH Battery 14.4V(Option) Adapter AC adapter (15 V) Car adapter Battery Yield Interface USB IrDA Bluetooth 2 types (Cigarette Car Adapter or Wired type) Approximately 70 sheets (printing duty 5% with density 5 and using fully charged new battery) USB Ver.2.0 (Full Speed...
Users Manual - English
Page 64
...''), Letter (216 x 279mm / 8.5'' x 11''), Legal (216 x 356 mm / 8.5'' x 14'') Power (optional) Battery Rechargeable Ni-MH Battery 14.4V(Option) Adapter AC adapter (15 V) Car adapter Battery Yield Interface USB IrDA Bluetooth 2 types (Cigarette Car Adapter or Wired type) Approximately 70 sheets (printing duty 5% with density 5 and using fully charged new battery) USB Ver.2.0 (Full Speed...
...''), Letter (216 x 279mm / 8.5'' x 11''), Legal (216 x 356 mm / 8.5'' x 14'') Power (optional) Battery Rechargeable Ni-MH Battery 14.4V(Option) Adapter AC adapter (15 V) Car adapter Battery Yield Interface USB IrDA Bluetooth 2 types (Cigarette Car Adapter or Wired type) Approximately 70 sheets (printing duty 5% with density 5 and using fully charged new battery) USB Ver.2.0 (Full Speed...

Users Manual - English
Page 65
... condensation) -15 - 50 °C / 5 - 122 °F 30 - 85 % (No condensation) 1) These figures are depending on A4 size paper and continuous printing. USB interface and AC adapter power.
... condensation) -15 - 50 °C / 5 - 122 °F 30 - 85 % (No condensation) 1) These figures are depending on A4 size paper and continuous printing. USB interface and AC adapter power.
Quick Reference Card - English
Page 1
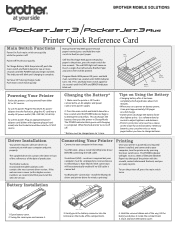
... Ribbon ONOFF CHRAERFRGEESH DATA POWER CHRAERFRGEESH ERROR DATA ONOFF ERROR POWER CHRAERFRGEESH DATA ERROR Terminal Bulge INTERFACE 2 AC ADAPT . ! 1 1. Hold the removal ribbon out of Genuine Brother Paper into the 12 VDC source. The indicator will blink until the POWER indicator begins to print.... into the PocketJet and then into the top of Genuine Brother Paper and a test sheet will come on battery power, it . The POWER indicator will be printed. Swing the cover open and remove it can be charged prior to charge batteries. INTERFACE AC ADAPT . ! Gently...
... Ribbon ONOFF CHRAERFRGEESH DATA POWER CHRAERFRGEESH ERROR DATA ONOFF ERROR POWER CHRAERFRGEESH DATA ERROR Terminal Bulge INTERFACE 2 AC ADAPT . ! 1 1. Hold the removal ribbon out of Genuine Brother Paper into the 12 VDC source. The indicator will blink until the POWER indicator begins to print.... into the PocketJet and then into the top of Genuine Brother Paper and a test sheet will come on battery power, it . The POWER indicator will be printed. Swing the cover open and remove it can be charged prior to charge batteries. INTERFACE AC ADAPT . ! Gently...


