
Users Manual - English and Spanish
Page 2
...Brother P-touch Electronic Labeling System Model Number : PT-18R complies with the instructions, may not cause harmful interference, and (2) this document are related to Part 15 of the FCC Rules. Federal Communications Commission (FCC) Declaration of Conformity (For USA Only) Responsible Party : Brother International...8226; The enclosed interface cable should be determined by turning the equipment off and on, the user is a trademark of International Business Machines, Inc. • Microsoft and Windows are registered trademarks of Microsoft Corporation, USA. • The names of...
...Brother P-touch Electronic Labeling System Model Number : PT-18R complies with the instructions, may not cause harmful interference, and (2) this document are related to Part 15 of the FCC Rules. Federal Communications Commission (FCC) Declaration of Conformity (For USA Only) Responsible Party : Brother International...8226; The enclosed interface cable should be determined by turning the equipment off and on, the user is a trademark of International Business Machines, Inc. • Microsoft and Windows are registered trademarks of Microsoft Corporation, USA. • The names of...
Users Manual - English and Spanish
Page 3
.... You are not limited to label cassettes, cutters, stamps, power adapters, cases and batteries. • Except as "this Product"). • If you purchased a product from Brother and/or alteration/removal of the serial number). Supply Brother or the Brother Authorized Service Center with a photocopy...8226; Consumable and Accessories Items accompanying the Machine have a onestage warranty: 90 Days from other than defects in materials or workmanship. Brother® 90 Days/One Year Limited Warranty and Replacement Service (For USA Only) Who is covered: • This limited warranty ("...
.... You are not limited to label cassettes, cutters, stamps, power adapters, cases and batteries. • Except as "this Product"). • If you purchased a product from Brother and/or alteration/removal of the serial number). Supply Brother or the Brother Authorized Service Center with a photocopy...8226; Consumable and Accessories Items accompanying the Machine have a onestage warranty: 90 Days from other than defects in materials or workmanship. Brother® 90 Days/One Year Limited Warranty and Replacement Service (For USA Only) Who is covered: • This limited warranty ("...

Users Manual - English and Spanish
Page 7
.... • The battery charger also serves as a convenient storage stand, so the P-touch is an easy to the Software Installation Guide for purchasing the P-touch PT-18R. In addition to easy label creation via pre-formatted label layouts, the P-touch editing software features advanced label formatting, block formats, bar codes and auto-numbering functions. • Carry your...
.... • The battery charger also serves as a convenient storage stand, so the P-touch is an easy to the Software Installation Guide for purchasing the P-touch PT-18R. In addition to easy label creation via pre-formatted label layouts, the P-touch editing software features advanced label formatting, block formats, bar codes and auto-numbering functions. • Carry your...

Users Manual - English and Spanish
Page 8
... the battery is not charged, connect the AC adapter directly to create simple labels with your label before printing prevents wasting tape on incomplete labels. Enter the label text from the keyboard. Print the label you will become familiar with the P-touch 1 Prepare the P-touch. P. 43 You can check the layout of editing functions. Set a tape cassette...
... the battery is not charged, connect the AC adapter directly to create simple labels with your label before printing prevents wasting tape on incomplete labels. Enter the label text from the keyboard. Print the label you will become familiar with the P-touch 1 Prepare the P-touch. P. 43 You can check the layout of editing functions. Set a tape cassette...
Users Manual - English and Spanish
Page 9
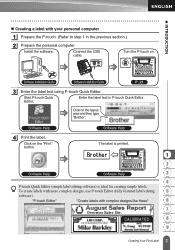
... the layout area and then type "Brother". Start P-touch Quick Editor. "P-touch Editor" "Create labels with more complex designs, use P-touch Editor (fully featured label editing 5 software). Click on the "Print" button. Turn the P-touch on. INTRODUCTION Creating a label with your personal computer 1 Prepare the P-touch. (Refer to step 1 in P-touch Quick Editor. The label is printed. 1 2 Software Help Software Help...
... the layout area and then type "Brother". Start P-touch Quick Editor. "P-touch Editor" "Create labels with more complex designs, use P-touch Editor (fully featured label editing 5 software). Click on the "Print" button. Turn the P-touch on. INTRODUCTION Creating a label with your personal computer 1 Prepare the P-touch. (Refer to step 1 in P-touch Quick Editor. The label is printed. 1 2 Software Help Software Help...

Users Manual - English and Spanish
Page 12
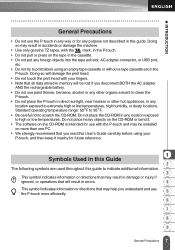
... Precautions This may result in memory will be lost due to failure or repair of the tape may otherwise be transferred to the surface, or the surface beneath the label may change. It may fall down and cause an injury. • Do not place heavy objects on the environmental conditions and the... battery charger. Be sure to disconnect the AC adapter and battery charger from the power outlet and the P-touch when not using the P-touch for any extended period of time. • If battery fluid comes into contact with skin or clothes, wash the affected areas thoroughly with clean water....
... Precautions This may result in memory will be lost due to failure or repair of the tape may otherwise be transferred to the surface, or the surface beneath the label may change. It may fall down and cause an injury. • Do not place heavy objects on the environmental conditions and the... battery charger. Be sure to disconnect the AC adapter and battery charger from the power outlet and the P-touch when not using the P-touch for any extended period of time. • If battery fluid comes into contact with skin or clothes, wash the affected areas thoroughly with clean water....
Users Manual - English and Spanish
Page 13
...operations that all data stored in memory will result in errors. directions that may result in the P-touch. Standard operating temperature range: 50°F to 95°F. • Be careful not to print labels using an empty tape cassette or without a tape cassette set in damage or injury if 4 :... This symbol indicates information or the P-touch more than one PC. • We strongly recommend that may help you read...
...operations that all data stored in memory will result in errors. directions that may result in the P-touch. Standard operating temperature range: 50°F to 95°F. • Be careful not to print labels using an empty tape cassette or without a tape cassette set in damage or injury if 4 :... This symbol indicates information or the P-touch more than one PC. • We strongly recommend that may help you read...
Users Manual - English and Spanish
Page 14
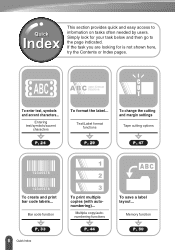
... 33 8 Quick Index 1 2 3 To print multiple copies (with autonumbering)... Multiple copy/autonumbering functions P. 44 ABC To save a label layout... Simply look for is not shown here, try the Contents or Index pages. Memory function P. 50 If the task you are...then go to inforQmautiiocnkonIntadseksxoften needed by users. Entering text/symbols/accent characters To format the label... INTRODUCTION Quick Index This section provides quick and easy access to the page indicated. Text/Label format functions To change the cutting and margin settings Tape cutting options P. 24 P. 29...
... 33 8 Quick Index 1 2 3 To print multiple copies (with autonumbering)... Multiple copy/autonumbering functions P. 44 ABC To save a label layout... Simply look for is not shown here, try the Contents or Index pages. Memory function P. 50 If the task you are...then go to inforQmautiiocnkonIntadseksxoften needed by users. Entering text/symbols/accent characters To format the label... INTRODUCTION Quick Index This section provides quick and easy access to the page indicated. Text/Label format functions To change the cutting and margin settings Tape cutting options P. 24 P. 29...
Users Manual - English and Spanish
Page 15
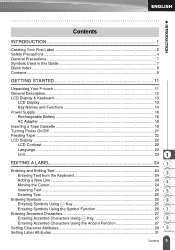
INTRODUCTION Contents INTRODUCTION 1 Creating Your First Label 2 Safety Precautions ...4 General Precautions...7 Symbols Used in this Guide 7 Quick Index ...8 Contents ...9 GETTING STARTED 11 Unpacking Your P-touch 11 General Description...12 LCD Display & Keyboard 13 LCD Display ...13 Key Names and Functions 14 Power Supply ...16 Rechargeable Battery 16 AC Adapter ...19 ...
INTRODUCTION Contents INTRODUCTION 1 Creating Your First Label 2 Safety Precautions ...4 General Precautions...7 Symbols Used in this Guide 7 Quick Index ...8 Contents ...9 GETTING STARTED 11 Unpacking Your P-touch 11 General Description...12 LCD Display & Keyboard 13 LCD Display ...13 Key Names and Functions 14 Power Supply ...16 Rechargeable Battery 16 AC Adapter ...19 ...

Users Manual - English and Spanish
Page 16
... a Single Copy 43 Printing Multiple Copies 44 Auto-numbering Labels 45 Mirror Printing ...46 Tape Cutting Options 47 Attaching Labels...49 USING THE FILE MEMORY 50 Storing a Label into Memory 50 Opening a Stored Label File 51 Deleting a Stored Label File 52 MAINTAINING YOUR P-touch 53 Resetting the P-touch 53 Maintenance...53 Cleaning the Main Unit 53 Cleaning...
... a Single Copy 43 Printing Multiple Copies 44 Auto-numbering Labels 45 Mirror Printing ...46 Tape Cutting Options 47 Attaching Labels...49 USING THE FILE MEMORY 50 Storing a Label into Memory 50 Opening a Stored Label File 51 Deleting a Stored Label File 52 MAINTAINING YOUR P-touch 53 Resetting the P-touch 53 Maintenance...53 Cleaning the Main Unit 53 Cleaning...

Users Manual - English and Spanish
Page 19
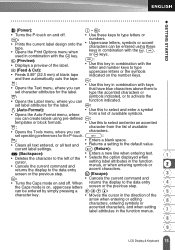
... are entered to the left of the cursor, and the character to the left of each line, this mark indicates the line number within the label layout. 2. Return mark Indicates the end of a line of the cursor. Style guidance Indicates the current font (5), character size (6), character style (7) and frame (8) settings. 1 9. Caps...
... are entered to the left of the cursor, and the character to the left of each line, this mark indicates the line number within the label layout. 2. Return mark Indicates the end of a line of the cursor. Style guidance Indicates the current font (5), character size (6), character style (7) and frame (8) settings. 1 9. Caps...
Users Manual - English and Spanish
Page 21
... pre-defined : templates or block formats. • Use this key in the function menus. 7 8 9 15 LCD Display & Keyboard set label attributes for the P-touch. : : • Clears all text entered, or all text and current label settings. • Enters a blank space. • Returns a setting to the default value. (Return): (Backspace): • Deletes the character...
... pre-defined : templates or block formats. • Use this key in the function menus. 7 8 9 15 LCD Display & Keyboard set label attributes for the P-touch. : : • Clears all text entered, or all text and current label settings. • Enters a blank space. • Returns a setting to the default value. (Return): (Backspace): • Deletes the character...
Users Manual - English and Spanish
Page 26
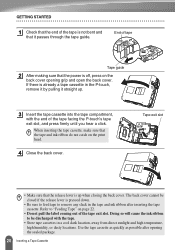
.... 20 Inserting a Tape Cassette The back cover cannot be discharged with the end of the tape facing the P-touch's tape exit slot, and press firmly until you hear a click. Doing so will cause the ink ribbon to..." on the print head. 4 Close the back cover. If there is already a tape cassette in the P-touch, remove it by pulling it passes through the tape guide. Refer to be closed if the release lever is... that the tape and ink ribbon do not catch on page 22. • Do not pull the label coming out of the tape exit slot. Use the tape cassette as quickly as possible after inserting the ...
.... 20 Inserting a Tape Cassette The back cover cannot be discharged with the end of the tape facing the P-touch's tape exit slot, and press firmly until you hear a click. Doing so will cause the ink ribbon to..." on the print head. 4 Close the back cover. If there is already a tape cassette in the P-touch, remove it by pulling it passes through the tape guide. Refer to be closed if the release lever is... that the tape and ink ribbon do not catch on page 22. • Do not pull the label coming out of the tape exit slot. Use the tape cassette as quickly as possible after inserting the ...

Users Manual - English and Spanish
Page 28
...; Be sure to feed tape to remove any slack in the tape and ink ribbon after inserting the tape cassette. • Do not pull the label coming out of five levels (+2, +1, 0, -1, -2) to make the screen easier to read. Doing so will cause the tape to be discharged with the tape. •...
...; Be sure to feed tape to remove any slack in the tape and ink ribbon after inserting the tape cassette. • Do not pull the label coming out of five levels (+2, +1, 0, -1, -2) to make the screen easier to read. Doing so will cause the tape to be discharged with the tape. •...
Users Manual - English and Spanish
Page 30
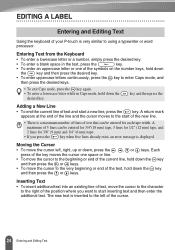
... then press the Adding a New Line • To end the current line of text and start inserting text and then enter the additional text. EDITING A LABEL Entering and Editing Text Using the keyboard of your P-touch is inserted to the left , right, up or down, press the , or keys.
... then press the Adding a New Line • To end the current line of text and start inserting text and then enter the additional text. EDITING A LABEL Entering and Editing Text Using the keyboard of your P-touch is inserted to the left , right, up or down, press the , or keys.

Users Manual - English and Spanish
Page 31
... Symbols 3 Including the symbols available on the keyboard can be entered using the key. 8 • To enter one character at once. 1 Press the key. EDITING A LABEL Deleting Text Deleting one of the cursor is deleted each time the key is deleted. Deleting all text at once • Use the key to... current format settings, or select "Text & Format" to the text entry screen. 3 Press the key. If you want to the right of 103 symbols (including international and extended ASCII characters) available with the Symbol 4 function. All text is pressed.
... Symbols 3 Including the symbols available on the keyboard can be entered using the key. 8 • To enter one character at once. 1 Press the key. EDITING A LABEL Deleting Text Deleting one of the cursor is deleted each time the key is deleted. Deleting all text at once • Use the key to... current format settings, or select "Text & Format" to the text entry screen. 3 Press the key. If you want to the right of 103 symbols (including international and extended ASCII characters) available with the Symbol 4 function. All text is pressed.

Users Manual - English and Spanish
Page 32
... for a complete list of 103 symbols. 1 Press the key. Group (A) Punctuation (B) Business (C) Mathematics (D) Bracket (E) Arrow (F) Unit (G) International (H) Number (I) Pictograph (J) Electrical (K) Others Symbol List Symbols The use this mark conform with the relevant directives. 26 Entering Symbols The selected symbol... is displayed. EDITING A LABEL Entering Symbols Using the Symbol Function The Symbol function offers a total of all groups and symbols available. A list of...
... for a complete list of 103 symbols. 1 Press the key. Group (A) Punctuation (B) Business (C) Mathematics (D) Bracket (E) Arrow (F) Unit (G) International (H) Number (I) Pictograph (J) Electrical (K) Others Symbol List Symbols The use this mark conform with the relevant directives. 26 Entering Symbols The selected symbol... is displayed. EDITING A LABEL Entering Symbols Using the Symbol Function The Symbol function offers a total of all groups and symbols available. A list of...

Users Manual - English and Spanish
Page 33
... screen is selected, or select it using the key. • To enter one of all accented characters available. 7 8 9 27 Entering Accented Characters EDITING A LABEL Entering Accented Characters The P-touch can be used with the Accent function. 2 Type the letter for a complete list of these accented characters, hold down the key and then...
... screen is selected, or select it using the key. • To enter one of all accented characters available. 7 8 9 27 Entering Accented Characters EDITING A LABEL Entering Accented Characters The P-touch can be used with the Accent function. 2 Type the letter for a complete list of these accented characters, hold down the key and then...

Users Manual - English and Spanish
Page 34
EDITING A LABEL Character a A c C d D e E g G i I l L n Accented Character List Accented Characters Character N o O r R s S t T u U y Y z Z Accented Characters 28 Entering Accented Characters
EDITING A LABEL Character a A c C d D e E g G i I l L n Accented Character List Accented Characters Character N o O r R s S t T u U y Y z Z Accented Characters 28 Entering Accented Characters

Users Manual - English and Spanish
Page 35
... (e.g. Setting Options Attribute Value Result 1 HEL 2 (Helsinki) 3 BRU (Brussels) 4 Font FLO 5 (Florida) BEL 6 (Belgium) 7 8 9 29 Setting Character Attributes EDITING A LABEL Setting Character Attributes Using the key, you do not press the key. • Press the key to return to the previous step. • Press the ... 2 Select an attribute using the or keys. 3 Press the key to the Setting Options table for a list of lines on the label. New settings are NOT applied if you can select a font and apply size, width and style attributes. 1 Press the key.
... (e.g. Setting Options Attribute Value Result 1 HEL 2 (Helsinki) 3 BRU (Brussels) 4 Font FLO 5 (Florida) BEL 6 (Belgium) 7 8 9 29 Setting Character Attributes EDITING A LABEL Setting Character Attributes Using the key, you do not press the key. • Press the key to return to the previous step. • Press the ... 2 Select an attribute using the or keys. 3 Press the key to the Setting Options table for a list of lines on the label. New settings are NOT applied if you can select a font and apply size, width and style attributes. 1 Press the key.


