
Users Manual - English and Spanish
Page 2
... dealer or an experienced radio/TV technician for purchasing the P-touch 580C! could void the user's authority to provide reasonable protection against harmful interference in a residential installation. Your labels and stamps can print labels with different widths and exciting colors. You no guarantee that require... from that you to ensure compliance with the limits for Class B digital device, pursuant to correct the interference by Brother Industries, Ltd. This product is no longer have to worry about urgent tasks that interference will allow you keep it a very ...
... dealer or an experienced radio/TV technician for purchasing the P-touch 580C! could void the user's authority to provide reasonable protection against harmful interference in a residential installation. Your labels and stamps can print labels with different widths and exciting colors. You no guarantee that require... from that you to ensure compliance with the limits for Class B digital device, pursuant to correct the interference by Brother Industries, Ltd. This product is no longer have to worry about urgent tasks that interference will allow you keep it a very ...

Users Manual - English and Spanish
Page 3
... 15 CLEANING THE PRINT HEAD AND ROLLERS 16 LEARNING THE ROPES INTRODUCTION...18 DOOR SIGN EXAMPLE 19 EQUIPMENT LABEL EXAMPLE 24 ADDRESS LABEL EXAMPLE 34 STOREGE SHELF LABEL EXAMPLE 38 FOR YOUR INFORMATION INTRODUCTION...46 FINDING YOUR WAY 47 POWER BUTTON...48 CURSORS ...49 SHIFT, ALT & CAPS ...50 CODE KEY...51 SYMBOLS...52...
... 15 CLEANING THE PRINT HEAD AND ROLLERS 16 LEARNING THE ROPES INTRODUCTION...18 DOOR SIGN EXAMPLE 19 EQUIPMENT LABEL EXAMPLE 24 ADDRESS LABEL EXAMPLE 34 STOREGE SHELF LABEL EXAMPLE 38 FOR YOUR INFORMATION INTRODUCTION...46 FINDING YOUR WAY 47 POWER BUTTON...48 CURSORS ...49 SHIFT, ALT & CAPS ...50 CODE KEY...51 SYMBOLS...52...

Users Manual - English and Spanish
Page 4
BACKSPACE ...63 LINE OUT...64 CLEAR ...65 ZOOM MODE...66 LABEL LENGTH ...67 CONTRAST ...68 AUTO FORMATS...69 LOCAL FORMATTING 75 GLOBAL FORMATTING 77 FONT ...79 SIZE/WIDTH ...81 STYLE/ITALIC...83 UNDERLINING/FRAMING 86 MULTI-...
BACKSPACE ...63 LINE OUT...64 CLEAR ...65 ZOOM MODE...66 LABEL LENGTH ...67 CONTRAST ...68 AUTO FORMATS...69 LOCAL FORMATTING 75 GLOBAL FORMATTING 77 FONT ...79 SIZE/WIDTH ...81 STYLE/ITALIC...83 UNDERLINING/FRAMING 86 MULTI-...
Users Manual - English and Spanish
Page 5
...START This section provides basic information concerning the machine itself, tape cassettes, and power supplies. Although this machine is your P-Touch 580C. 1 LEARNING THE ROPES This tutorial section leads you through the exercises in Learning the Popes. If this machine to help ... You Start section for more details on some techniques, we suggest you work through easyto-follow practice sessions designed to make simple labels. FOR YOUR INFORMATION This handy reference section contains detailed explanations of the machine. Good luck! Please read this machine, or if...
...START This section provides basic information concerning the machine itself, tape cassettes, and power supplies. Although this machine is your P-Touch 580C. 1 LEARNING THE ROPES This tutorial section leads you through the exercises in Learning the Popes. If this machine to help ... You Start section for more details on some techniques, we suggest you work through easyto-follow practice sessions designed to make simple labels. FOR YOUR INFORMATION This handy reference section contains detailed explanations of the machine. Good luck! Please read this machine, or if...
Users Manual - English and Spanish
Page 15
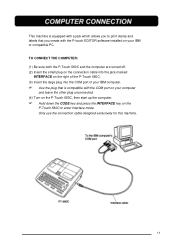
... computer. + Use the plug that is equipped with a jack which allows you create with the COM port on the P-Touch 580C to print stamp and labels that you to enter Interface mode. Only use the connection cable designed exclusively for this machine. 11 This machine is compatible with ...the P-touch EDITOR software installed on your computer and leave the other plug unconnected. (4) Turn on the P-Touch 580C, then start up the ...
... computer. + Use the plug that is equipped with a jack which allows you create with the COM port on the P-Touch 580C to print stamp and labels that you to enter Interface mode. Only use the connection cable designed exclusively for this machine. 11 This machine is compatible with ...the P-touch EDITOR software installed on your computer and leave the other plug unconnected. (4) Turn on the P-Touch 580C, then start up the ...

Users Manual - English and Spanish
Page 16
... sure that the entire back of the cassette contacts the bottom of the compartment. + When inserting the tape cassette, make distinctive color-coded and stylized labels. If you are available for this machine has been designed to allow you to cut off the excess tape. 12 However, since TZ tape cassettes...
... sure that the entire back of the cassette contacts the bottom of the compartment. + When inserting the tape cassette, make distinctive color-coded and stylized labels. If you are available for this machine has been designed to allow you to cut off the excess tape. 12 However, since TZ tape cassettes...

Users Manual - English and Spanish
Page 17
.... (6) Close the compartment cover, then turn on the machine if necessary. (7) Press the FEED key once to wind the toothed wheel in the direction of label tape. If you are using an old tape cassette, be sure that the tape is sent through the cassette and the end of the tape... under the tape guides. (5) Insert both the ink and tape cassettes firmly into the tape cassette. (4) Take the adhesive tape off the end of the label tape and pull out about 1/2" (12 mm) of the arrow on the tape cutter lever. 13 TO INSERT MULTI-COLOR INK AND TAPE CASSETTES: (1) Press...
.... (6) Close the compartment cover, then turn on the machine if necessary. (7) Press the FEED key once to wind the toothed wheel in the direction of label tape. If you are using an old tape cassette, be sure that the tape is sent through the cassette and the end of the tape... under the tape guides. (5) Insert both the ink and tape cassettes firmly into the tape cassette. (4) Take the adhesive tape off the end of the label tape and pull out about 1/2" (12 mm) of the arrow on the tape cutter lever. 13 TO INSERT MULTI-COLOR INK AND TAPE CASSETTES: (1) Press...

Users Manual - English and Spanish
Page 19
After creating a message, position the label on character transfers. Caution: Hold the tape very firmly and do not move it while rubbing the tape. 15 Then, by simply rubbing the instant ... towards you, pull the stick away from you can transfer the tape's contents directly onto the paper. The enclosed stick enables you to remove the label backing from the tape easily. (1) Hold the tape in the stick. (3) After turning the stick three quarters of paper. INSERT LETTERING TAPE (RUB-ON TRANSFERS...
After creating a message, position the label on character transfers. Caution: Hold the tape very firmly and do not move it while rubbing the tape. 15 Then, by simply rubbing the instant ... towards you, pull the stick away from you can transfer the tape's contents directly onto the paper. The enclosed stick enables you to remove the label backing from the tape easily. (1) Hold the tape in the stick. (3) After turning the stick three quarters of paper. INSERT LETTERING TAPE (RUB-ON TRANSFERS...

Users Manual - English and Spanish
Page 20
... to gently wipe the print head with your finger. (4) Try printing again. This is covered with a tape recorder, the machine's head may appear through the label message.
... to gently wipe the print head with your finger. (4) Try printing again. This is covered with a tape recorder, the machine's head may appear through the label message.
Users Manual - English and Spanish
Page 22
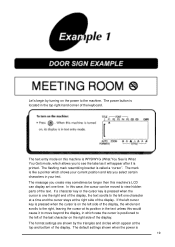
... become acquainted with the P-Touch 580C! 18 Since they do not require much time, they can be done in the For Your Information section. And now, let's see how easy it is a fourline address label. The second, an equipment instruction label, takes advantage of creating a simple one...this training section, simply follow the instructions, checking that you work through there exercises to use this machine. Finally, the storage shelf label shows you are a first time user, we suggest that your results match the diagrams provided. The Learning the Ropes examples consist of...
... become acquainted with the P-Touch 580C! 18 Since they do not require much time, they can be done in the For Your Information section. And now, let's see how easy it is a fourline address label. The second, an equipment instruction label, takes advantage of creating a simple one...this training section, simply follow the instructions, checking that you work through there exercises to use this machine. Finally, the storage shelf label shows you are a first time user, we suggest that your results match the diagrams provided. The Learning the Ropes examples consist of...
Users Manual - English and Spanish
Page 23
... characters in the top right-hand corner of the keyboard. The power button is located in your current position and lets you to see the label as it will appear after it to move beyond the display, in which case the cursor is positioned to the left of the last character...
... characters in the top right-hand corner of the keyboard. The power button is located in your current position and lets you to see the label as it will appear after it to move beyond the display, in which case the cursor is positioned to the left of the last character...

Users Manual - English and Spanish
Page 24
... format mode, you can create your own formats and can even define local formats, which allows you to enter text and symbols into preset label templates. To do so, we must first input a capital "M". The 4 key moves the cursor forward through inputted text without adding blank spaces.... 20 Detailed explanations for labels. Now, let's begin entering the text for portions of For Your Information. As on for the first time have been preprogrammed into common formats ...
... format mode, you can create your own formats and can even define local formats, which allows you to enter text and symbols into preset label templates. To do so, we must first input a capital "M". The 4 key moves the cursor forward through inputted text without adding blank spaces.... 20 Detailed explanations for labels. Now, let's begin entering the text for portions of For Your Information. As on for the first time have been preprogrammed into common formats ...

Users Manual - English and Spanish
Page 25
Now, let's revise this label using the BACKSPACE key to delete the lowercase letters in our message and use the Caps mode, which allows us to enter a string of text editing methods, see pages 63 to enter uppercase characters which are mode appropriate for a door sign. 21 For detailed explanations of capital letters without holding down the SHIFT key, to 65. Once you have created a message, you can easily edit it by correcting mistakes or simply adjusting the text or style.
Now, let's revise this label using the BACKSPACE key to delete the lowercase letters in our message and use the Caps mode, which allows us to enter a string of text editing methods, see pages 63 to enter uppercase characters which are mode appropriate for a door sign. 21 For detailed explanations of capital letters without holding down the SHIFT key, to 65. Once you have created a message, you can easily edit it by correcting mistakes or simply adjusting the text or style.

Users Manual - English and Spanish
Page 28
Let's assume we want to 55 of text containing both uppercase and lowercase letters, then edit it into a three-line label. Although the entered characters may not seen to align properly in the LCD display, they will line up correctly on 3/4" (18-mm)- First, we will .... If you have any questions about basic inputting, please review the previous example (Door Sign) or see pages 50 to make a multi-line equipment instruction label. In this example can be printed on the printed label. + The label this practice session, we will make an instruction...
Let's assume we want to 55 of text containing both uppercase and lowercase letters, then edit it into a three-line label. Although the entered characters may not seen to align properly in the LCD display, they will line up correctly on 3/4" (18-mm)- First, we will .... If you have any questions about basic inputting, please review the previous example (Door Sign) or see pages 50 to make a multi-line equipment instruction label. In this example can be printed on the printed label. + The label this practice session, we will make an instruction...
Users Manual - English and Spanish
Page 30
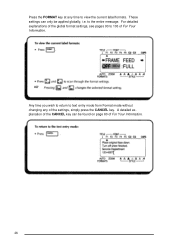
Press the FORMAT key at any of the settings, simply press the CANCEL key. A detailed explanation of the CANCEL key can only be found on page 60 of For Your Information. 26 These settings can be applied globally, i.e. Any time you wish to return to text entry mode from Format mode without changing any time to view the current label formats. to 103 of the global format settings, see pages 93 to the entire message. For detailed explanations of For Your Information.
Press the FORMAT key at any of the settings, simply press the CANCEL key. A detailed explanation of the CANCEL key can only be found on page 60 of For Your Information. 26 These settings can be applied globally, i.e. Any time you wish to return to text entry mode from Format mode without changing any time to view the current label formats. to 103 of the global format settings, see pages 93 to the entire message. For detailed explanations of For Your Information.
Users Manual - English and Spanish
Page 32
... and edited. If it were printed now, the standard default settings would be autosized and printed using font F1 (Helsinki) and a normal style. For this label, though, let's assume we must change the settings. Another way of text: font F2 (Brussels), framed and horizontally centered. In addition, the characters would not...
... and edited. If it were printed now, the standard default settings would be autosized and printed using font F1 (Helsinki) and a normal style. For this label, though, let's assume we must change the settings. Another way of text: font F2 (Brussels), framed and horizontally centered. In addition, the characters would not...

Users Manual - English and Spanish
Page 33
Since we wish to put a frame around the entire label and center the text, we will use the FORMAT key to enter these global format settings. 29
Since we wish to put a frame around the entire label and center the text, we will use the FORMAT key to enter these global format settings. 29

Users Manual - English and Spanish
Page 36
The TAUSE setting in Special print mode can be used to set whether or not the Machine will pause while printing copies of labels so the tape can be cut. 32 Therefore, we want to attach the same label. A detailed explanation of the same text. Finally, let's assume that we have three photocopier machines onto which we need to print three copies of the repeat printing function can be found in the Printing & Special printing section on pages 109 to 110.
The TAUSE setting in Special print mode can be used to set whether or not the Machine will pause while printing copies of labels so the tape can be cut. 32 Therefore, we want to attach the same label. A detailed explanation of the same text. Finally, let's assume that we have three photocopier machines onto which we need to print three copies of the repeat printing function can be found in the Printing & Special printing section on pages 109 to 110.

Users Manual - English and Spanish
Page 37
If the cut pause setting and been turned on, the machine would pause between the three copies so the tape could simply press the RETURN key. Since this would be printed continuously. If the cut . Three framed and horizontally-centered labels with characters using font F2 (Brussels) would use quite a lot of the label, we can now press the CANCEL key to escape from Special print mode and return to print three copies of tape for an example, we could be cut pause setting is turned off, the three copies would be printed. If we now wished to our text. 33
If the cut pause setting and been turned on, the machine would pause between the three copies so the tape could simply press the RETURN key. Since this would be printed continuously. If the cut . Three framed and horizontally-centered labels with characters using font F2 (Brussels) would use quite a lot of the label, we can now press the CANCEL key to escape from Special print mode and return to print three copies of tape for an example, we could be cut pause setting is turned off, the three copies would be printed. If we now wished to our text. 33

Users Manual - English and Spanish
Page 38
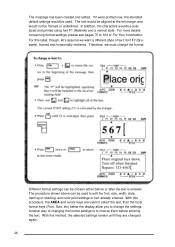
wide tape. The local formatting will be printed on the printed label. In this example can be used to align properly in this quick practice session, we will make a multi-line address label with local formatting. + The label in the LCD display, they will line up correctly on 3/4" (18-mm)- Although the entered characters may not seem to emphasize a certain portion of the message. 34 or 1" (24-mm)-
wide tape. The local formatting will be printed on the printed label. In this example can be used to align properly in this quick practice session, we will make a multi-line address label with local formatting. + The label in the LCD display, they will line up correctly on 3/4" (18-mm)- Although the entered characters may not seem to emphasize a certain portion of the message. 34 or 1" (24-mm)-


