
Users Manual - English and Spanish
Page 2
... generates, uses, and can contain characters of the P-Touch 580C makes it in order to ensure compliance with the instructions, may want to refer to this equipment does cause harmful interference to operate the equipment. If this manual occasionally, we suggest that interference will allow you keep it a very versatile machine. The enclosed interface cable should be determined by Brother Industries...
... generates, uses, and can contain characters of the P-Touch 580C makes it in order to ensure compliance with the instructions, may want to refer to this equipment does cause harmful interference to operate the equipment. If this manual occasionally, we suggest that interference will allow you keep it a very versatile machine. The enclosed interface cable should be determined by Brother Industries...

Users Manual - English and Spanish
Page 14
... you use the AC adaptor when printing large fonts and bar codes on the right side of time. TO ATTACH THE AC ADAPTOR: (1) Insert the small plug on the adaptor into the nearest standard electrical outlet. + Only use your machine for this machine anywhere a standard electrical outlet is disconnected, all messages in the working area and the memory will be lost. Remove the batteries and...
... you use the AC adaptor when printing large fonts and bar codes on the right side of time. TO ATTACH THE AC ADAPTOR: (1) Insert the small plug on the adaptor into the nearest standard electrical outlet. + Only use your machine for this machine anywhere a standard electrical outlet is disconnected, all messages in the working area and the memory will be lost. Remove the batteries and...
Users Manual - English and Spanish
Page 15
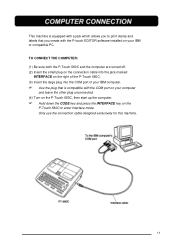
... the P-Touch 580C and the computer are turned off. (2) Insert the small plug on the connection cable into the jack marked INTERFACE on the right of the P-Touch 580C. (3) Insert the large plug into the COM port of your IBM computer. + Use the plug that you to enter Interface mode. This machine is equipped with a jack which allows you create with the P-touch EDITOR software installed on the P-Touch 580C to print stamp and labels that is...
... the P-Touch 580C and the computer are turned off. (2) Insert the small plug on the connection cable into the jack marked INTERFACE on the right of the P-Touch 580C. (3) Insert the large plug into the COM port of your IBM computer. + Use the plug that you to enter Interface mode. This machine is equipped with a jack which allows you create with the P-touch EDITOR software installed on the P-Touch 580C to print stamp and labels that is...
Users Manual - English and Spanish
Page 22
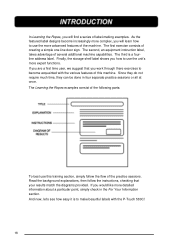
... easy it is a fourline address label. The third is to make beautiful labels with the various features of this training section, simply follow the instructions, checking that you work through there exercises to become increasingly more complex, you will find a series of the practice sessions. The second, an equipment instruction label, takes advantage of creating a simple one-line door sign. In Learning...
... easy it is a fourline address label. The third is to make beautiful labels with the various features of this training section, simply follow the instructions, checking that you work through there exercises to become increasingly more complex, you will find a series of the practice sessions. The second, an equipment instruction label, takes advantage of creating a simple one-line door sign. In Learning...
Users Manual - English and Spanish
Page 32
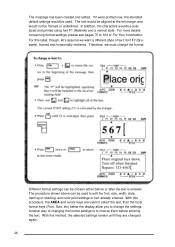
... the text. With this label, though, let's assume we must change the settings. Another way of changing the format settings is entered. If it were printed now, the standard default settings would be framed or underlined. The text would be aligned at the left margin and would be autosized and printed using font F1 (Helsinki) and a normal style. The message has been created and edited. In addition, the characters...
... the text. With this label, though, let's assume we must change the settings. Another way of changing the format settings is entered. If it were printed now, the standard default settings would be framed or underlined. The text would be aligned at the left margin and would be autosized and printed using font F1 (Helsinki) and a normal style. The message has been created and edited. In addition, the characters...

Users Manual - English and Spanish
Page 51
... 66 67 68 69 75 77 PAGE Text Formats: Font 79 Size/Width 81 Style/Italic 83 Underlining/Framing 86 Multi-Color Printing 87 Label Formats: Framing 93 Tape Feed 94 Vertical Printing 95 Mirror Printing 96 Horizontal Alignment 97 Vertical Alignment 98 Length 99 Display Units 100 Colored Frames/Shading 101 Colored Characters 103 MEMORY Storing/Recalling/Deleting 105 PRINTING Normal, Multiple & Split Printing 109 Making Stamps 111 BAR CODING 113 47
... 66 67 68 69 75 77 PAGE Text Formats: Font 79 Size/Width 81 Style/Italic 83 Underlining/Framing 86 Multi-Color Printing 87 Label Formats: Framing 93 Tape Feed 94 Vertical Printing 95 Mirror Printing 96 Horizontal Alignment 97 Vertical Alignment 98 Length 99 Display Units 100 Colored Frames/Shading 101 Colored Characters 103 MEMORY Storing/Recalling/Deleting 105 PRINTING Normal, Multiple & Split Printing 109 Making Stamps 111 BAR CODING 113 47
Users Manual - English and Spanish
Page 52
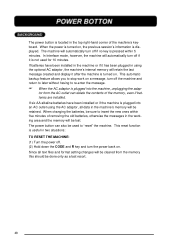
... machine's memory will automatically turn the power back on. This reset function is displayed. When the power is turned on, the previous session's information is useful in using the AC adaptor, all text files and format setting changes will be cleared from the AC outlet can also be done only as a last resort. 48 The power button can delete the contents of the memory, even if batteries are installed...
... machine's memory will automatically turn the power back on. This reset function is displayed. When the power is turned on, the previous session's information is useful in using the AC adaptor, all text files and format setting changes will be cleared from the AC outlet can also be done only as a last resort. 48 The power button can delete the contents of the memory, even if batteries are installed...

Users Manual - English and Spanish
Page 54
... symbols written in the capital letter of a name. pressing the SHIFT key is very useful for inputting a single capital letter, for a character written in red types in red on the upper part of the desired character written in Caps mode. The indicator will only produce uppercase letters. TITLE fonts will go off. TO ENTER A CHARACTER WRITTEN IN RED: Hold down the SHIFT key and...
... symbols written in the capital letter of a name. pressing the SHIFT key is very useful for inputting a single capital letter, for a character written in red types in red on the upper part of the desired character written in Caps mode. The indicator will only produce uppercase letters. TITLE fonts will go off. TO ENTER A CHARACTER WRITTEN IN RED: Hold down the SHIFT key and...

Users Manual - English and Spanish
Page 81
... left and bottom text alignment, automatic label length adjustment, one-color character printing and frame printing using the first color). 77 ALI LENGTH UNIT C. Hold down the CODE key and press the SPACE key to change all settings are as you can see how the label will appear after it is displayed. (4) Repeat steps (2) and (3) until the first setting you enter your entire text file and the LCD display returns to text entry mode...
... left and bottom text alignment, automatic label length adjustment, one-color character printing and frame printing using the first color). 77 ALI LENGTH UNIT C. Hold down the CODE key and press the SPACE key to change all settings are as you can see how the label will appear after it is displayed. (4) Repeat steps (2) and (3) until the first setting you enter your entire text file and the LCD display returns to text entry mode...

Users Manual - English and Spanish
Page 91
... tape compartment cover and insert the first ink cassette into a multi-color printing tape cassette, then insert them firmly into the compartment before closing the compartment cover. The default color is COLOR1. + When a message is useful when part of your desired setting is shown by the indicators above the LCD display. (3) Enter the text to which the characters will be printed. + Before printing the label, be sure to use...
... tape compartment cover and insert the first ink cassette into a multi-color printing tape cassette, then insert them firmly into the compartment before closing the compartment cover. The default color is COLOR1. + When a message is useful when part of your desired setting is shown by the indicators above the LCD display. (3) Enter the text to which the characters will be printed. + Before printing the label, be sure to use...

Users Manual - English and Spanish
Page 92
... rewound, the message "INSERT COLOR3" will be displayed. + Before printing, be sure that there is enough tape in the tape cassette, otherwise the label may not be printed correctly. (3) Open the compartment cover and check that is rewinding. The message "WORKING" briefly flashes, then "COPIES COLOR2" appears while the characters assigned the second ink color are printed. When printing finishes, the message "REMOVE INK RIBBON" will be displayed. (4) Open the...
... rewound, the message "INSERT COLOR3" will be displayed. + Before printing, be sure that there is enough tape in the tape cassette, otherwise the label may not be printed correctly. (3) Open the compartment cover and check that is rewinding. The message "WORKING" briefly flashes, then "COPIES COLOR2" appears while the characters assigned the second ink color are printed. When printing finishes, the message "REMOVE INK RIBBON" will be displayed. (4) Open the...

Users Manual - English and Spanish
Page 98
... default setting (FULL) can only be applied to the entire label. This machine can be set to just part of your label. The tape feed settings are: FULL (1" (24 mm)) NONE (1/6" (4 mm)) NARROW (1/3" (8 mm)) MEDIUM (1/2" (12 mm)) + Since reducing the tape feed may decrease bar code readability, full tape feed is installed, this setting will be ignored and the message will be printed with full margins. If instant (rubon) lettering tape is...
... default setting (FULL) can only be applied to the entire label. This machine can be set to just part of your label. The tape feed settings are: FULL (1" (24 mm)) NONE (1/6" (4 mm)) NARROW (1/3" (8 mm)) MEDIUM (1/2" (12 mm)) + Since reducing the tape feed may decrease bar code readability, full tape feed is installed, this setting will be ignored and the message will be printed with full margins. If instant (rubon) lettering tape is...

Users Manual - English and Spanish
Page 105
... text. Also, check that there is enough tape in the tape cassette, otherwise the label may not be sure that the setting for the C.FRAME function has been chosen. If a frame or shading has not been added to the label, this function are the same set- COLOR1 COLOR2 COLOR3 + Before printing the label using this setting is displayed. + The default setting (COLOR1) can only be selected by pressing the SPACE...
... text. Also, check that there is enough tape in the tape cassette, otherwise the label may not be sure that the setting for the C.FRAME function has been chosen. If a frame or shading has not been added to the label, this function are the same set- COLOR1 COLOR2 COLOR3 + Before printing the label using this setting is displayed. + The default setting (COLOR1) can only be selected by pressing the SPACE...

Users Manual - English and Spanish
Page 107
... until the color you wish to use is displayed. + The default setting (OFF) can be applied to the entire label. It cannot be selected by pressing the SPACE key. (4) Press the RETURN key. 103 If only the normal and hold character styles are the same set- When printing multi-colored labels with the C.FRAME function. The C.CHAR setting can only be sure that...
... until the color you wish to use is displayed. + The default setting (OFF) can be applied to the entire label. It cannot be selected by pressing the SPACE key. (4) Press the RETURN key. 103 If only the normal and hold character styles are the same set- When printing multi-colored labels with the C.FRAME function. The C.CHAR setting can only be sure that...

Users Manual - English and Spanish
Page 113
... the label that will be printed, set whether the machine will pause between copies so that the tape can be cut. + When this parameter is being printed, a message will appear to instruct you wish to change is highlighted. (3) Press the 5 and 6 keys until the first setting you on which tape of install. The SPECIAL PRINT key allows you print your text on the installed tape. Press the FEED key...
... the label that will be printed, set whether the machine will pause between copies so that the tape can be cut. + When this parameter is being printed, a message will appear to instruct you wish to change is highlighted. (3) Press the 5 and 6 keys until the first setting you on which tape of install. The SPECIAL PRINT key allows you print your text on the installed tape. Press the FEED key...

Users Manual - English and Spanish
Page 123
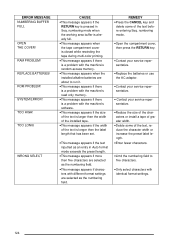
... enter a character, a diacritical mark, return, new block or space when the working area buffer is already full. •This message appears if a text format (font, size width, style, underling and framing, or color) key is pressed when the working area buffer is already full. •This message appears if the RETURN key is pressed in Symbol or Bar code mode when the working area...
... enter a character, a diacritical mark, return, new block or space when the working area buffer is already full. •This message appears if a text format (font, size width, style, underling and framing, or color) key is pressed when the working area buffer is already full. •This message appears if the RETURN key is pressed in Symbol or Bar code mode when the working area...

Users Manual - English and Spanish
Page 125
... bar code data. ERROR! ERROR MESSAGE CUT NOW EJECT CUT TAPE & PRESS RETURN ERROR! UL/FRM FIXED SIZE! This message appears if you try printing in Interface mode without installing the correct tape cassette. •A maximum of digits set in Bar code mode, but it . •Enter a letter between A and B has not been entered at the beginning and end of the bar code. •Input the correct number of digits or change it not removed...
... bar code data. ERROR! ERROR MESSAGE CUT NOW EJECT CUT TAPE & PRESS RETURN ERROR! UL/FRM FIXED SIZE! This message appears if you try printing in Interface mode without installing the correct tape cassette. •A maximum of digits set in Bar code mode, but it . •Enter a letter between A and B has not been entered at the beginning and end of the bar code. •Input the correct number of digits or change it not removed...

Users Manual - English and Spanish
Page 127
... the power is turned on or while trying to print. •This message appears if a file is recalled and joined to the current message, causing the text to exceed the one meter limit. •This message appears if the RETURN key is pressed in Format mode, causing the text to print a label or feed the tape when a tape cassette is greater then the maximum number of lines in...
... the power is turned on or while trying to print. •This message appears if a file is recalled and joined to the current message, causing the text to exceed the one meter limit. •This message appears if the RETURN key is pressed in Format mode, causing the text to print a label or feed the tape when a tape cassette is greater then the maximum number of lines in...
Users Manual - English and Spanish
Page 128
... Auto format mode exceeds the preset length. •This message appears if more then five characters are selected as the numbering field. TOO HIGH! REPLACE BATTERIES! numbering mode. •Open the compartment cover, then press the RETURN key. •Contact your service repersentative. •Replace the batteries or use the AC adaptor. •Contact your service repersentative. • Contact your service repersentative. •Reduce the size of the characters or install a tape...
... Auto format mode exceeds the preset length. •This message appears if more then five characters are selected as the numbering field. TOO HIGH! REPLACE BATTERIES! numbering mode. •Open the compartment cover, then press the RETURN key. •Contact your service repersentative. •Replace the batteries or use the AC adaptor. •Contact your service repersentative. • Contact your service repersentative. •Reduce the size of the characters or install a tape...

Users Manual - English and Spanish
Page 132
... 114 Batteries 8, 9, 48 Blank display 125 Blocks 57 Bold character style 83 Bottom alignment 98 Boxing 86, 93 C CANCEL key 56, 60 Canceling Deleting stored text 108 Operations 60 Recalling stored text 106 Storing text 105 CAPS key 21, 50 Cassette 8, 12 Center alignment Horizontal 97 Vertical 98 Character sizes 81 Character styles 83 Character widths 81 Check digit 113 128 Cleaning Machine's surface 8 Print head and rollers 16 CLEAR key...
... 114 Batteries 8, 9, 48 Blank display 125 Blocks 57 Bold character style 83 Bottom alignment 98 Boxing 86, 93 C CANCEL key 56, 60 Canceling Deleting stored text 108 Operations 60 Recalling stored text 106 Storing text 105 CAPS key 21, 50 Cassette 8, 12 Center alignment Horizontal 97 Vertical 98 Character sizes 81 Character styles 83 Character widths 81 Check digit 113 128 Cleaning Machine's surface 8 Print head and rollers 16 CLEAR key...


