Users Manual - English
Page 3
...modified in any way (including but not limited to floor models or refurbished product), prior to your purchase you are not limited to label cassettes, cutters, stamps, power adapters, cases and batteries. • Except as "this Product"). • If you purchased a product from..."Original Purchaser") of the accompanying product, consumables and accessories (collectively referred to in this warranty as otherwise provided herein, Brother warrants that the Machine and the accompanying Consumable and Accessory Items will ask you to do if you think your Product is eligible for warranty ...
...modified in any way (including but not limited to floor models or refurbished product), prior to your purchase you are not limited to label cassettes, cutters, stamps, power adapters, cases and batteries. • Except as "this Product"). • If you purchased a product from..."Original Purchaser") of the accompanying product, consumables and accessories (collectively referred to in this warranty as otherwise provided herein, Brother warrants that the Machine and the accompanying Consumable and Accessory Items will ask you to do if you think your Product is eligible for warranty ...
Users Manual - English
Page 8
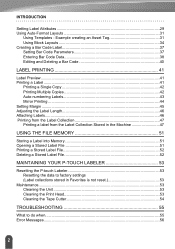
... Setting Margin ...45 Adjusting the Label Length 46 Attaching Labels...46 Printing from the Label Collection 47 Printing a label from the Label Collection Stored in the Machine 47 USING THE FILE MEMORY 51 Storing a Label into Memory 51 Opening a Stored Label File 51 Printing a Stored Label File 52 Deleting a Stored Label File 52 MAINTAINING YOUR P-TOUCH LABELER 53 Resetting the P-touch...
... Setting Margin ...45 Adjusting the Label Length 46 Attaching Labels...46 Printing from the Label Collection 47 Printing a label from the Label Collection Stored in the Machine 47 USING THE FILE MEMORY 51 Storing a Label into Memory 51 Opening a Stored Label File 51 Printing a Stored Label File 52 Deleting a Stored Label File 52 MAINTAINING YOUR P-TOUCH LABELER 53 Resetting the P-touch...

Users Manual - English
Page 10
... the P-touch labeler P. 10 2 CREATING A LABEL • Entering and Editing text. P. 22 • Entering Accented Characters. P. 24 • Using Auto-Format Layouts. P. 47 Before printing, you can be created easily by selecting and then printing designs already built into the machine. 4 How to use the P-touch labeler „ Create a label with the P-touch labeler 1 GETTING STARTED...
... the P-touch labeler P. 10 2 CREATING A LABEL • Entering and Editing text. P. 22 • Entering Accented Characters. P. 24 • Using Auto-Format Layouts. P. 47 Before printing, you can be created easily by selecting and then printing designs already built into the machine. 4 How to use the P-touch labeler „ Create a label with the P-touch labeler 1 GETTING STARTED...
Users Manual - English
Page 14
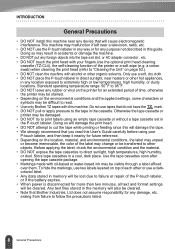
...device that will cause electromagnetic interference.This machine may malfunction if left near heaters or other objects. Only use tapes that Brother Industries, Ltd does not assume responsibility for any rubber or vinyl on the location, material, and environmental conditions, the label may unpeel or become irremovable, the ... soon after opening the tape cassette package. • Markings made with alcohol or other or use two labels layered on page 53.). • DO NOT clean the machine with oil-based or water-based ink may change or be transferred to other hot appliances, in any ...
...device that will cause electromagnetic interference.This machine may malfunction if left near heaters or other objects. Only use tapes that Brother Industries, Ltd does not assume responsibility for any rubber or vinyl on the location, material, and environmental conditions, the label may unpeel or become irremovable, the ... soon after opening the tape cassette package. • Markings made with alcohol or other or use two labels layered on page 53.). • DO NOT clean the machine with oil-based or water-based ink may change or be transferred to other hot appliances, in any ...
Users Manual - English
Page 20
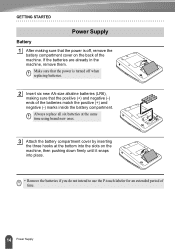
... in the machine, remove them. GETTING STARTED Power Supply Battery 1 After making sure that the power is off, remove the battery compartment cover on the machine, then pushing down firmly until it snaps into place. • Remove the batteries if you do not intend to use the P-touch labeler for an ...extended period of the machine. Make sure that the power is turned off when replacing batteries. 2 Insert six new AA-size alkaline batteries (LR6), making sure ...
... in the machine, remove them. GETTING STARTED Power Supply Battery 1 After making sure that the power is off, remove the battery compartment cover on the machine, then pushing down firmly until it snaps into place. • Remove the batteries if you do not intend to use the P-touch labeler for an ...extended period of the machine. Make sure that the power is turned off when replacing batteries. 2 Insert six new AA-size alkaline batteries (LR6), making sure ...

Users Manual - English
Page 21
... outlet. z GETTING STARTED AC Adapter (Optional on the PT-2030.) Connect the AC adapter directly to the P-touch labeler. 1 Insert the plug on the AC adapter cord into the connector marked DC IN 9-9.5V on the P-touch labeler. 2 Insert the AC adapter plug into the machine. Brother shall not assume any responsibility for any responsibility for...
... outlet. z GETTING STARTED AC Adapter (Optional on the PT-2030.) Connect the AC adapter directly to the P-touch labeler. 1 Insert the plug on the AC adapter cord into the connector marked DC IN 9-9.5V on the P-touch labeler. 2 Insert the AC adapter plug into the machine. Brother shall not assume any responsibility for any responsibility for...
Users Manual - English
Page 22
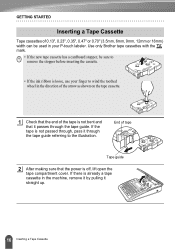
... Tape guide 2 After making sure that it passes through the tape guide referring to wind the toothed wheel in your P-touch labeler. If there is already a tape cassette in the machine, remove it by pulling it through the tape guide. GETTING STARTED Inserting a Tape Cassette Tape cassettes of 0.13", 0.23", 0....sure to remove the stopper before inserting the cassette. • If the ink ribbon is loose, use your finger to the illustration. Use only Brother tape cassettes with the mark. • If the new tape cassette has a cardboard stopper, be used in the direction of the arrow as ...
... Tape guide 2 After making sure that it passes through the tape guide referring to wind the toothed wheel in your P-touch labeler. If there is already a tape cassette in the machine, remove it by pulling it through the tape guide. GETTING STARTED Inserting a Tape Cassette Tape cassettes of 0.13", 0.23", 0....sure to remove the stopper before inserting the cassette. • If the ink ribbon is loose, use your finger to the illustration. Use only Brother tape cassettes with the mark. • If the new tape cassette has a cardboard stopper, be used in the direction of the arrow as ...
Users Manual - English
Page 23
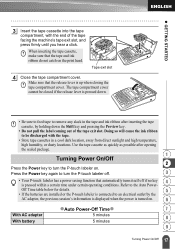
... ink ribbon to an electrical outlet by holding down the Shift key and pressing the Preview key. • Do not pull the label coming out of the tape facing the machine's tape exit slot, and press firmly until you hear a click. Make sure that the release lever is turned on. 6 zAuto Power...
... ink ribbon to an electrical outlet by holding down the Shift key and pressing the Preview key. • Do not pull the label coming out of the tape facing the machine's tape exit slot, and press firmly until you hear a click. Make sure that the release lever is turned on. 6 zAuto Power...
Users Manual - English
Page 47
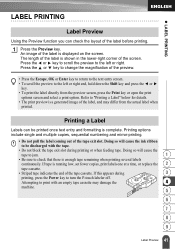
...and press the or key. • To print the label directly from the actual label when printed. If tape is a generated image of the label, and may damage the 4 machine. 5 6 7 8 9 41 Label Preview LABEL PRINTING z LABEL PRINTING Label Preview Using the Preview function you can be discharged with ...include single and multiple copies, sequential numbering and mirror-printing. • Do not pull the label coming out of the screen. The length of the label is complete. Printing a Label Labels can check the layout of the tape cassette. Doing so will cause the tape to jam...
...and press the or key. • To print the label directly from the actual label when printed. If tape is a generated image of the label, and may damage the 4 machine. 5 6 7 8 9 41 Label Preview LABEL PRINTING z LABEL PRINTING Label Preview Using the Preview function you can be discharged with ...include single and multiple copies, sequential numbering and mirror-printing. • Do not pull the label coming out of the screen. The length of the label is complete. Printing a Label Labels can check the layout of the tape cassette. Doing so will cause the tape to jam...
Users Manual - English
Page 53
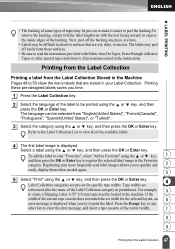
...message, and insert a tape cassette of the correct width. 7 8 9 47 Printing from the Label Collection Stored in the Machine Pages 48 to 50 show the many labels that are stored in your Label Collection. Press the Escape key or any other special tapes and observe all of the available...dirty, or uneven. The language can be selected from these pre-designed labels saves you try to register the selected label image in the machine. To add the label to your most frequently used label images allows you to create a Shipping Label, 0.70" (18 mm) tape must be loaded in the Favorites ...
...message, and insert a tape cassette of the correct width. 7 8 9 47 Printing from the Label Collection Stored in the Machine Pages 48 to 50 show the many labels that are stored in your Label Collection. Press the Escape key or any other special tapes and observe all of the available...dirty, or uneven. The language can be selected from these pre-designed labels saves you try to register the selected label image in the machine. To add the label to your most frequently used label images allows you to create a Shipping Label, 0.70" (18 mm) tape must be loaded in the Favorites ...
Users Manual - English
Page 58
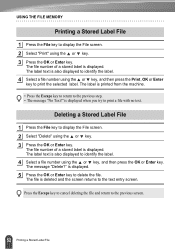
...step. • The message "No Text!" The label text is printed from the machine. • Press the Escape key to return to print the selected label. The label text is displayed. USING THE FILE MEMORY Printing a Stored Label File 1 Press the File key to identify the label. 4 Select a file number using the or key,... to display the File screen. 2 Select "Delete" using the or key. 3 Press the OK or Enter key. The file number of a stored label is displayed. 5 Press the OK or Enter key to delete the file. Press the Escape key to cancel deleting the file and return to print...
...step. • The message "No Text!" The label text is printed from the machine. • Press the Escape key to return to print the selected label. The label text is displayed. USING THE FILE MEMORY Printing a Stored Label File 1 Press the File key to identify the label. 4 Select a file number using the or key,... to display the File screen. 2 Select "Delete" using the or key. 3 Press the OK or Enter key. The file number of a stored label is displayed. 5 Press the OK or Enter key to delete the file. Press the Escape key to cancel deleting the file and return to print...
Users Manual - English
Page 59
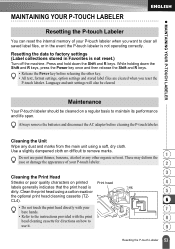
...cleaning cassette for directions on how to factory settings (Label collections stored in the event the P-touch labeler is dirty. z MAINTAINING YOUR P-TOUCH LABELER MAINTAINING YOUR P-TOUCH LABELER Resetting the P-touch Labeler You can reset the internal memory of your P-touch labeler. 2 3 Cleaning the Print Head Streaks or ... Wipe any other key. • All text, format settings, option settings and stored label files are cleared when you want to clear all saved label files, or in Favorites is not reset.) Turn off the machine. Clean the print head using a soft, dry cloth.
...cleaning cassette for directions on how to factory settings (Label collections stored in the event the P-touch labeler is dirty. z MAINTAINING YOUR P-TOUCH LABELER MAINTAINING YOUR P-TOUCH LABELER Resetting the P-touch Labeler You can reset the internal memory of your P-touch labeler. 2 3 Cleaning the Print Head Streaks or ... Wipe any other key. • All text, format settings, option settings and stored label files are cleared when you want to clear all saved label files, or in Favorites is not reset.) Turn off the machine. Clean the print head using a soft, dry cloth.
Users Manual - English
Page 64
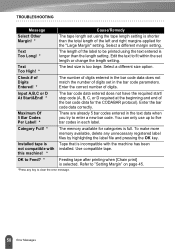
... by highlighting the label file and pressing the OK key. Refer to clear the error message. 58 Error Messages Select a different margin setting. Edit the text to enter a new bar code. this machine! * OK to be printed using the tape length setting is shorter than the length setting. ...Check # of Digits Entered! * The number of digits entered in the bar code parameters. Maximum Of 5 Bar Codes Per Label! * There are already 5 bar codes ...
... by highlighting the label file and pressing the OK key. Refer to clear the error message. 58 Error Messages Select a different margin setting. Edit the text to enter a new bar code. this machine! * OK to be printed using the tape length setting is shorter than the length setting. ...Check # of Digits Entered! * The number of digits entered in the bar code parameters. Maximum Of 5 Bar Codes Per Label! * There are already 5 bar codes ...


