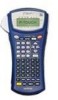

Users Manual - English
Page 2
...two conditions: (1) this P-touch make it an extremely practical machine in the plant or in accordance with the limits for purchasing this P-touch! Although this manual nearby for a Class B digital device, pursuant to use, we suggest that the product Product Name Model Number : Brother Label Printer P-touch : PT-1400... complies with the limits for future reference. Federal Communications Commission (FCC) Declaration of Conformity (For USA Only) Responsible Party : Brother International Corporation 100 Somerset Corporate...
...two conditions: (1) this P-touch make it an extremely practical machine in the plant or in accordance with the limits for purchasing this P-touch! Although this manual nearby for a Class B digital device, pursuant to use, we suggest that the product Product Name Model Number : Brother Label Printer P-touch : PT-1400... complies with the limits for future reference. Federal Communications Commission (FCC) Declaration of Conformity (For USA Only) Responsible Party : Brother International Corporation 100 Somerset Corporate...

Users Manual - English
Page 3
...4 Cleaning 7 Cleaning the print head, rollers and tape cutter 7 Optional AC Adapter 8 Connecting the AC adapter 8 Turning the P-touch On/Off 8 2. Label Type Modes 9 Selecting a Label Type Mode 9 Normal and Vertical Modes 9 Rotate Mode and Rotate & Repeat Mode 10 Flag Mode 11 Port & Panel Modes 12...default setting 14 Confirming a choice 14 Cancelling a choice 14 Inputting Label Data 15 Entering and editing text 15 Entering an accented character 17 Entering a bar code 18 Entering a symbol 20 i CONTENTS Brother® 90 Days/One Year Limited Warranty and Replacement Service (...
...4 Cleaning 7 Cleaning the print head, rollers and tape cutter 7 Optional AC Adapter 8 Connecting the AC adapter 8 Turning the P-touch On/Off 8 2. Label Type Modes 9 Selecting a Label Type Mode 9 Normal and Vertical Modes 9 Rotate Mode and Rotate & Repeat Mode 10 Flag Mode 11 Port & Panel Modes 12...default setting 14 Confirming a choice 14 Cancelling a choice 14 Inputting Label Data 15 Entering and editing text 15 Entering an accented character 17 Entering a bar code 18 Entering a symbol 20 i CONTENTS Brother® 90 Days/One Year Limited Warranty and Replacement Service (...

Users Manual - English
Page 4
... style 27 Using the pre-formatted Auto Format templates 29 Printing Labels 30 Previewing the label layout 30 Feeding tape 30 Printing a label 30 Using special printing functions 31 Storing and Recalling Files 35 Storing label text 35 Recalling text that has been stored 36 Deleting text ...Adjustments 37 Selecting how tape is fed and cut 37 Adjusting the display contrast 37 Setting the Auto Reduction function 38 Calibrating the label length 38 Specifying if the PERSONAL symbol category is continually updated ......39 Changing the units of measure 39 Changing the language 39 ...
... style 27 Using the pre-formatted Auto Format templates 29 Printing Labels 30 Previewing the label layout 30 Feeding tape 30 Printing a label 30 Using special printing functions 31 Storing and Recalling Files 35 Storing label text 35 Recalling text that has been stored 36 Deleting text ...Adjustments 37 Selecting how tape is fed and cut 37 Adjusting the display contrast 37 Setting the Auto Reduction function 38 Calibrating the label length 38 Specifying if the PERSONAL symbol category is continually updated ......39 Changing the units of measure 39 Changing the language 39 ...

Users Manual - English
Page 5
...You are also responsible for the cost of the Warranty Period(s): • Machines have a two-stage warranty: 90 days from the original purchase date and an additional warranty up at ...the original purchase date. What is not covered by hand if you desire). Supply Brother or the Brother Authorized Service Center with this Product (including but not limited to damage resulting from ...limited to floor models or refurbished product), prior to your purchase you are not limited to label cassettes, cutters, stamps, power adapters, cases and batteries. • Except as to whether...
...You are also responsible for the cost of the Warranty Period(s): • Machines have a two-stage warranty: 90 days from the original purchase date and an additional warranty up at ...the original purchase date. What is not covered by hand if you desire). Supply Brother or the Brother Authorized Service Center with this Product (including but not limited to damage resulting from ...limited to floor models or refurbished product), prior to your purchase you are not limited to label cassettes, cutters, stamps, power adapters, cases and batteries. • Except as to whether...
Users Manual - English
Page 10
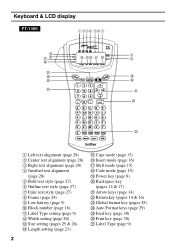
... display PT-1400 1 234 56 7 E GF H Q P O N D CB A 0 8 9 I J K L M 1 Left text alignment (page 28) 2 Center text alignment (page 28) 3 Right text alignment (page 28) 4 Justified text alignment (page 28) 5 Bold text style (page 27) 6 Outline text style (page 27) 7 Italic text style (page 27) 8 Frame (page 24) 9 Low battery (page 5) 0 Block number (page 16) A Label... (page 14) L Return key (pages 14 & 16) M Global format key (pages 25) N Auto Format keys (page 29) O Feed key (page 30) P Print key (page 30) Q Label Type (page 9) 2
... display PT-1400 1 234 56 7 E GF H Q P O N D CB A 0 8 9 I J K L M 1 Left text alignment (page 28) 2 Center text alignment (page 28) 3 Right text alignment (page 28) 4 Justified text alignment (page 28) 5 Bold text style (page 27) 6 Outline text style (page 27) 7 Italic text style (page 27) 8 Frame (page 24) 9 Low battery (page 5) 0 Block number (page 16) A Label... (page 14) L Return key (pages 14 & 16) M Global format key (pages 25) N Auto Format keys (page 29) O Feed key (page 30) P Print key (page 30) Q Label Type (page 9) 2

Users Manual - English
Page 12
...using a battery charger designed specifically for this compact and portable machine can be used instead of types, colors and sizes, enabling you to make distinctive color-coded and stylized labels. Instead, recharge the batteries by leaving them . ☞ Do not use any of the following,...has been designed to allow you to change the batteries and tape cassettes quickly and easily. With batteries installed, this machine in the P-touch with them in a wide variety of six alkaline batteries. ☞ The rechargeable batteries cannot be used anywhere. Installing batteries and a tape...
...using a battery charger designed specifically for this compact and portable machine can be used instead of types, colors and sizes, enabling you to make distinctive color-coded and stylized labels. Instead, recharge the batteries by leaving them . ☞ Do not use any of the following,...has been designed to allow you to change the batteries and tape cassettes quickly and easily. With batteries installed, this machine in the P-touch with them in a wide variety of six alkaline batteries. ☞ The rechargeable batteries cannot be used anywhere. Installing batteries and a tape...

Users Manual - English
Page 14
...be at least 3/16" (5 mm). ☞ The label may peel off cylindrical objects if the object is bent after the label is able to cut Extra Strength Adhesive Tape. Flexible ID Tape ☞ For applications that this P-touch is equipped with is affixed. Extra Strength Adhesive Tape ...☞ For textured, rough, or slippery surface, we recommend using Flexible ID Tape. ☞ Labels made with Flexible ID Tape are not designed for use as electrical...
...be at least 3/16" (5 mm). ☞ The label may peel off cylindrical objects if the object is bent after the label is able to cut Extra Strength Adhesive Tape. Flexible ID Tape ☞ For applications that this P-touch is equipped with is affixed. Extra Strength Adhesive Tape ...☞ For textured, rough, or slippery surface, we recommend using Flexible ID Tape. ☞ Labels made with Flexible ID Tape are not designed for use as electrical...
Users Manual - English
Page 15
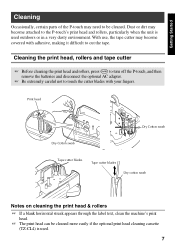
... swab Tape cutter blades Tape cutter blades Dry cotton swab Notes on cleaning the print head & rollers ☞ If a blank horizontal streak appears through the label text, clean the machine's print head. ☞ The print head can be cleaned. With use, the tape cutter may become attached to the... P-touch's print head and rollers, particularly when the unit is used outdoors or in a very dusty environment. Dust or dirt may need to cut the tape. ...
... swab Tape cutter blades Tape cutter blades Dry cotton swab Notes on cleaning the print head & rollers ☞ If a blank horizontal streak appears through the label text, clean the machine's print head. ☞ The print head can be cleaned. With use, the tape cutter may become attached to the... P-touch's print head and rollers, particularly when the unit is used outdoors or in a very dusty environment. Dust or dirt may need to cut the tape. ...
Users Manual - English
Page 16
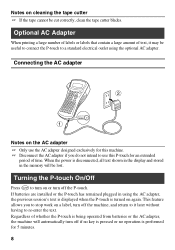
Optional AC Adapter When printing a large number of labels or labels that contain a large amount of time. Turning the P-touch On/Off Press o to re-enter the text. Regardless of whether the P-touch is being operated from batteries or the AC adapter, the machine will be lost. This feature allows you do not intend... to use this machine. ☞ Disconnect the AC adapter if you to stop work on a label, turn off the machine, and return to it later without having to turn on or turn off the P-touch. When the power is turned on again. If batteries are installed or the...
Optional AC Adapter When printing a large number of labels or labels that contain a large amount of time. Turning the P-touch On/Off Press o to re-enter the text. Regardless of whether the P-touch is being operated from batteries or the AC adapter, the machine will be lost. This feature allows you do not intend... to use this machine. ☞ Disconnect the AC adapter if you to stop work on a label, turn off the machine, and return to it later without having to turn on or turn off the P-touch. When the power is turned on again. If batteries are installed or the...

Users Manual - English
Page 17
... Mode Pressing a allows you to select one of the two regular modes for designing and printing your own custom labels, or any of the six special modes available for printing labels preformatted for identifying patch panels, cables, connectors and other components. 1 Press a. 2 Press u or d (or continue ... the desired setting). 6 Press n to apply the selected settings. 7 Type the text for each label in a separate text block. 8 Print the labels. • To print a single copy of each label, press p. • To print multiple copies or several copies while increasing certain characters, or to ...
... Mode Pressing a allows you to select one of the two regular modes for designing and printing your own custom labels, or any of the six special modes available for printing labels preformatted for identifying patch panels, cables, connectors and other components. 1 Press a. 2 Press u or d (or continue ... the desired setting). 6 Press n to apply the selected settings. 7 Type the text for each label in a separate text block. 8 Print the labels. • To print a single copy of each label, press p. • To print multiple copies or several copies while increasing certain characters, or to ...

Users Manual - English
Page 18
... mm) ● FRAME: OFF, 1 , 2 , 3 , 4 Default: OFF ☞ A single block of text can easily be read from any angle. With both of these Label Type modes can be entered, formatted, printed and cut as shown below. When wrapping Flexible ID Tape around cables and wires to cables and wires..., we recommend using these modes, the text is printed repeatedly along the label. After selecting the Label Type mode NORMAL or VERTICAL, the label text can be wrapped around cylindrical objects, the diameter of the object should be used. Rotate Rotate & ...
... mm) ● FRAME: OFF, 1 , 2 , 3 , 4 Default: OFF ☞ A single block of text can easily be read from any angle. With both of these Label Type modes can be entered, formatted, printed and cut as shown below. When wrapping Flexible ID Tape around cables and wires to cables and wires..., we recommend using these modes, the text is printed repeatedly along the label. After selecting the Label Type mode NORMAL or VERTICAL, the label text can be wrapped around cylindrical objects, the diameter of the object should be used. Rotate Rotate & ...
Users Manual - English
Page 19
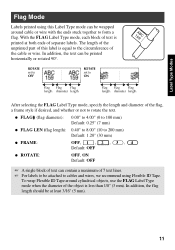
... wire. ROTATE set to OFF ROTATE set to ON Flag Flag Flag length diameter length Flag Flag Flag length diameter length After selecting the FLAG Label Type mode, specify the length and diameter of the flag, a frame style if desired, and whether or not to rotate the text. ● FLAG ... less than 1/8" (3 mm). To wrap Flexible ID Tape around cable or wire with the ends stuck together to form a flag. Label Type Modes Flag Mode Labels printed using this label is equal to cables and wires, we recommend using Flexible ID Tape. In addition, the flag length should be printed horizontally or...
... wire. ROTATE set to OFF ROTATE set to ON Flag Flag Flag length diameter length Flag Flag Flag length diameter length After selecting the FLAG Label Type mode, specify the length and diameter of the flag, a frame style if desired, and whether or not to rotate the text. ● FLAG ... less than 1/8" (3 mm). To wrap Flexible ID Tape around cable or wire with the ends stuck together to form a flag. Label Type Modes Flag Mode Labels printed using this label is equal to cables and wires, we recommend using Flexible ID Tape. In addition, the flag length should be printed horizontally or...

Users Manual - English
Page 20
...Block length Block length Block length Block length After selecting the PORT or PANEL Label Type mode, specify the length of each block of equally spaced switches, fuses or connectors on a separate label, making this label useful for identifying different components or ports that are printed in the order ...that they were typed in or in the opposite order. Port & Panel Modes Labels printed using these labels useful for a row of the text is printed on a patch panel. Port FRONT REVERSE Panel (PRINT set to FRONT) Panel (...
...Block length Block length Block length Block length After selecting the PORT or PANEL Label Type mode, specify the length of each block of equally spaced switches, fuses or connectors on a separate label, making this label useful for identifying different components or ports that are printed in the order ...that they were typed in or in the opposite order. Port & Panel Modes Labels printed using these labels useful for a row of the text is printed on a patch panel. Port FRONT REVERSE Panel (PRINT set to FRONT) Panel (...

Users Manual - English
Page 21
...mm) ● FRAME: * For the PORT Label Type mode: OFF, 1 , 2 , 3 , 4 Default: OFF * For the PANEL Label Type mode: OFF, 1 , 2 , 3 , 4 , 5 , 6 , 7 , 8 , 9 Default: OFF ● PRINT (print order): FRONT, REVERSE Default: FRONT ☞ For these types of labels, we recommend using Extra Strength Adhesive Tape. &#...is only available with the PANEL Label Type mode. ☞ By using the Numbering function with the PANEL Label Type mode, a single label containing multiple blocks of ascending characters can easily be created, for example, to label patch panels as shown above....
...mm) ● FRAME: * For the PORT Label Type mode: OFF, 1 , 2 , 3 , 4 Default: OFF * For the PANEL Label Type mode: OFF, 1 , 2 , 3 , 4 , 5 , 6 , 7 , 8 , 9 Default: OFF ● PRINT (print order): FRONT, REVERSE Default: FRONT ☞ For these types of labels, we recommend using Extra Strength Adhesive Tape. &#...is only available with the PANEL Label Type mode. ☞ By using the Numbering function with the PANEL Label Type mode, a single label containing multiple blocks of ascending characters can easily be created, for example, to label patch panels as shown above....

Users Manual - English
Page 23
... end of the entered text, press g, then d. ☞ To move the cursor several characters or lines at once, hold down l, r, u or d. 15 Basic Functions Inputting Label Data Entering and editing text Entering characters ● To type a lowercase letter, a number, a comma or a period, simply press the key for that character. ● To...
... end of the entered text, press g, then d. ☞ To move the cursor several characters or lines at once, hold down l, r, u or d. 15 Basic Functions Inputting Label Data Entering and editing text Entering characters ● To type a lowercase letter, a number, a comma or a period, simply press the key for that character. ● To...

Users Manual - English
Page 24
... exit Insert mode. 16 " " appears at the cursor's current position, make sure that the Insert indicator is displayed. R R2:456 R1:ABC_ ---- -- 1 NORMAL 2 ☞ A single label can only contain a maximum of fifty text blocks. ☞ The number of the block that can be printed at one time is indicated at the... can be printed as follows. Adding a new line of text ● To end the current line of text and start a new one time, some outputted labels may be blank.
... exit Insert mode. 16 " " appears at the cursor's current position, make sure that the Insert indicator is displayed. R R2:456 R1:ABC_ ---- -- 1 NORMAL 2 ☞ A single label can only contain a maximum of fifty text blocks. ☞ The number of the block that can be printed at one time is indicated at the... can be printed as follows. Adding a new line of text ● To end the current line of text and start a new one time, some outputted labels may be blank.

Users Manual - English
Page 26
.... Setting bar code parameters 1 Press g, then c. 2 Press l or r until all parameters are set as part of labels. ☞ Since this machine is only available with certain ink colors on white tape. ☞ To type in an uppercase accented character, press h (or press g, then h to enter ...before pressing the letter key. ☞ An accented character can also be able to read the labels. ☞ Bar code readers may not be selected by typing in black on certain label tape colors. Parameter PROTOCOL WIDTH (bar width) UNDER# (numbers printed below bar code) CHECK DIGIT Settings...
.... Setting bar code parameters 1 Press g, then c. 2 Press l or r until all parameters are set as part of labels. ☞ Since this machine is only available with certain ink colors on white tape. ☞ To type in an uppercase accented character, press h (or press g, then h to enter ...before pressing the letter key. ☞ An accented character can also be able to read the labels. ☞ Bar code readers may not be selected by typing in black on certain label tape colors. Parameter PROTOCOL WIDTH (bar width) UNDER# (numbers printed below bar code) CHECK DIGIT Settings...

Users Manual - English
Page 31
...unless the Symbol Save function is set to OFF. (Refer to Specifying if the PERSONAL symbol category is continually updated on page 39.) Formatting the Label Specifying a label length The length of the label can be specified as follows. 1 Press g, then A. 2 Press l or r until LENGTH is displayed. 3 Press u or d until the desired... label length is displayed (or use the number keys to type in the desired setting). 4 Press n. 0.30" to 39.00" (6 to 999 mm) Specifying a margin ...
...unless the Symbol Save function is set to OFF. (Refer to Specifying if the PERSONAL symbol category is continually updated on page 39.) Formatting the Label Specifying a label length The length of the label can be specified as follows. 1 Press g, then A. 2 Press l or r until LENGTH is displayed. 3 Press u or d until the desired... label length is displayed (or use the number keys to type in the desired setting). 4 Press n. 0.30" to 39.00" (6 to 999 mm) Specifying a margin ...
Users Manual - English
Page 33
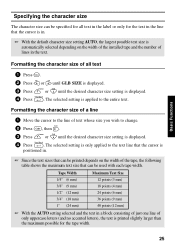
... size of a line 1 Move the cursor to the line of all text in . ☞ Since the text sizes that the cursor is positioned in the label or only for the tape width. 25 The selected setting is only applied to the text line that can be used with each tape width...
... size of a line 1 Move the cursor to the line of all text in . ☞ Since the text sizes that the cursor is positioned in the label or only for the tape width. 25 The selected setting is only applied to the text line that can be used with each tape width...

Users Manual - English
Page 37
...; 1.60" (24 mm × 41 mm) 1 TEXT? 2 BAR CODE? 5 ASSET4 1" × 2.20" (24 mm × 55 mm) 1 TEXT1? 3 TEXT3? 5 TEXT5? 2 TEXT2? 4 TEXT4? 6 ID LABEL 1" × 2.75" (24 mm × 69 mm) 1 TEXT1? 3 TEXT3? 2 TEXT2? 7 SIGN 1" × 4.00" 1 SYMBOL? 2 TEXT1? (24 mm × 101 mm) 3 TEXT2? 8 BADGE 3/4" ...× 25 mm) 1 TEXT1? 2 TEXT2? 1 Press g, then the number key where the template that you to quickly and easily create labels for the selected template is displayed. 29 The first field for a variety of applications-from identifying the contents of its fields, and then the...
...; 1.60" (24 mm × 41 mm) 1 TEXT? 2 BAR CODE? 5 ASSET4 1" × 2.20" (24 mm × 55 mm) 1 TEXT1? 3 TEXT3? 5 TEXT5? 2 TEXT2? 4 TEXT4? 6 ID LABEL 1" × 2.75" (24 mm × 69 mm) 1 TEXT1? 3 TEXT3? 2 TEXT2? 7 SIGN 1" × 4.00" 1 SYMBOL? 2 TEXT1? (24 mm × 101 mm) 3 TEXT2? 8 BADGE 3/4" ...× 25 mm) 1 TEXT1? 2 TEXT2? 1 Press g, then the number key where the template that you to quickly and easily create labels for the selected template is displayed. 29 The first field for a variety of applications-from identifying the contents of its fields, and then the...


