
Users Manual - English
Page 13
... Patterns The sample file for this tutorial can be found at the following formats can be imported. • Windows bitmap (.bmp) • Exif (.tif, .jpg) • Portable Network Graphics (.png) • GIF (.gif) 11 Select the file girl2-face.bmp in the folder Documents (My Documents)\PE-DESIGN PLUS\Tutorial 1 b Memo: Image file formats Images...
... Patterns The sample file for this tutorial can be found at the following formats can be imported. • Windows bitmap (.bmp) • Exif (.tif, .jpg) • Portable Network Graphics (.png) • GIF (.gif) 11 Select the file girl2-face.bmp in the folder Documents (My Documents)\PE-DESIGN PLUS\Tutorial 1 b Memo: Image file formats Images...

Users Manual - English
Page 23
... is installed in a method different than that used with Photo Stitch 1. Step 2 Importing photo data into PE-DESIGN PLUS Applying an image mask and adjusting its size and position Changing the sewing angle Step 1 Starting the Photo Stitch 2 wizard Click , ...We will create an embroidery pattern with Photo Stitch 2 in the Documents (My Documents) folder. 2. Double-click the Documents (My Documents)\ PE-DESIGN PLUS\Tutorial folder to open it. Creating Embroidery Patterns 21 Step 1 Step 2 Step 3 Step 4 Starting the Photo Stitch 2 wizard Importing photo data into PEDESIGN PLUS 1.
... is installed in a method different than that used with Photo Stitch 1. Step 2 Importing photo data into PE-DESIGN PLUS Applying an image mask and adjusting its size and position Changing the sewing angle Step 1 Starting the Photo Stitch 2 wizard Click , ...We will create an embroidery pattern with Photo Stitch 2 in the Documents (My Documents) folder. 2. Double-click the Documents (My Documents)\ PE-DESIGN PLUS\Tutorial folder to open it. Creating Embroidery Patterns 21 Step 1 Step 2 Step 3 Step 4 Starting the Photo Stitch 2 wizard Importing photo data into PEDESIGN PLUS 1.
Users Manual - English
Page 26
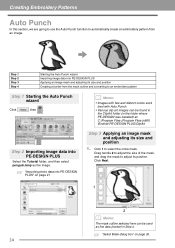
... (border) in the folder where PE-DESIGN was installed) at: C:\Program Files (Program Files (x86)) \Brother\PE-DESIGN PLUS\ClipArt Step 2 Importing image data into PE-DESIGN PLUS Select the Tutorial folder, and then select penguin.bmp as the image. c "Importing photo data into PE-DESIGN PLUS Applying an image mask and adjusting ...Punch wizard Click , then . Step 1 Step 2 Step 3 Step 4 Starting the Auto Punch wizard Importing image data into PE-DESIGN PLUS" on page 30. 24 c "Select Mask dialog box" on page 21 Step 3 Applying an image mask and adjusting its size and position...
... (border) in the folder where PE-DESIGN was installed) at: C:\Program Files (Program Files (x86)) \Brother\PE-DESIGN PLUS\ClipArt Step 2 Importing image data into PE-DESIGN PLUS Select the Tutorial folder, and then select penguin.bmp as the image. c "Importing photo data into PE-DESIGN PLUS Applying an image mask and adjusting ...Punch wizard Click , then . Step 1 Step 2 Step 3 Step 4 Starting the Auto Punch wizard Importing image data into PE-DESIGN PLUS" on page 30. 24 c "Select Mask dialog box" on page 21 Step 3 Applying an image mask and adjusting its size and position...

Users Manual - English
Page 29
... Output Size dialog box" on page 30 3. For this example, we will simply continue to the next step. c "Importing photo data into PE-DESIGN PLUS" on page 21 From this dialog box, the size and position of the image can be adjusted. Click Next. 1. c "Select Mask dialog... data into PE-DESIGN PLUS Select the Tutorial folder, and then select tulip.bmp as the image. Click , then , then . b Memo: Various clip art images can be found in the ClipArt folder (in the folder where PE-DESIGN was installed) at: C:\Program Files (Program Files (x86)) \Brother\PE-DESIGN PLUS\ClipArt From ...
... Output Size dialog box" on page 30 3. For this example, we will simply continue to the next step. c "Importing photo data into PE-DESIGN PLUS" on page 21 From this dialog box, the size and position of the image can be adjusted. Click Next. 1. c "Select Mask dialog... data into PE-DESIGN PLUS Select the Tutorial folder, and then select tulip.bmp as the image. Click , then , then . b Memo: Various clip art images can be found in the ClipArt folder (in the folder where PE-DESIGN was installed) at: C:\Program Files (Program Files (x86)) \Brother\PE-DESIGN PLUS\ClipArt From ...

Users Manual - English
Page 34
...characters in the character table (1) in the Text Attributes tab. From the keyboard, type in "ABCD". Click , then . Documents (My Documents)\PE-DESIGN PLUS\Tutorial Step 1 Step 2 Step 3 Entering Text Transforming text Specifying character spacing Step 1 Entering Text 1. While it in the Transform style with the ...a Note: If the entered character is hidden, click Show List to an embroidery pattern, the character appears as in the Design Page. If this tutorial can also be found at the following location. This is particularly useful if you have to hide the character table. Click...
...characters in the character table (1) in the Text Attributes tab. From the keyboard, type in "ABCD". Click , then . Documents (My Documents)\PE-DESIGN PLUS\Tutorial Step 1 Step 2 Step 3 Entering Text Transforming text Specifying character spacing Step 1 Entering Text 1. While it in the Transform style with the ...a Note: If the entered character is hidden, click Show List to an embroidery pattern, the character appears as in the Design Page. If this tutorial can also be found at the following location. This is particularly useful if you have to hide the character table. Click...


