
Users Manual - English
Page 13
Select the file girl2-face.bmp in the folder Documents (My Documents)\PE-DESIGN PLUS\Tutorial 1 b Memo: Image file formats Images in the Top Wizard. 2. Import the file girl2-face.bmp. Documents (My Documents)\PE-DESIGN PLUS\Tutorial Step 1 Step 2 Step 3 Step 4 Step 5 Step 6 Using the Photo Stitch 1 function to create an embroidery pattern from an image Changing color...
Select the file girl2-face.bmp in the folder Documents (My Documents)\PE-DESIGN PLUS\Tutorial 1 b Memo: Image file formats Images in the Top Wizard. 2. Import the file girl2-face.bmp. Documents (My Documents)\PE-DESIGN PLUS\Tutorial Step 1 Step 2 Step 3 Step 4 Step 5 Step 6 Using the Photo Stitch 1 function to create an embroidery pattern from an image Changing color...

Users Manual - English
Page 23
... Documents)\ PE-DESIGN PLUS\Tutorial folder to open it. Creating Embroidery Patterns 21 Step 2 Importing photo data into PE-DESIGN PLUS Applying an image mask and adjusting its size and position Changing the sewing angle Step 1 Starting the Photo Stitch 2 wizard Click , then , then . Step 1 Step 2 Step 3 Step 4 Starting the Photo Stitch 2 wizard Importing photo data into PEDESIGN PLUS 1.
... Documents)\ PE-DESIGN PLUS\Tutorial folder to open it. Creating Embroidery Patterns 21 Step 2 Importing photo data into PE-DESIGN PLUS Applying an image mask and adjusting its size and position Changing the sewing angle Step 1 Starting the Photo Stitch 2 wizard Click , then , then . Step 1 Step 2 Step 3 Step 4 Starting the Photo Stitch 2 wizard Importing photo data into PEDESIGN PLUS 1.
Users Manual - English
Page 26
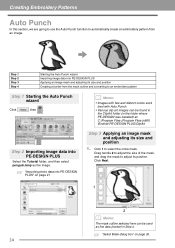
..., then . Click Next. 1 2 b Memo: The mask outline selected here can be used as the image. c "Importing photo data into PE-DESIGN PLUS Applying an image mask and adjusting its size and position Creating a border from an image. Step 1 Step 2 Step 3 Step 4 Starting the ...clip art images can be found in the ClipArt folder (in the folder where PE-DESIGN was installed) at: C:\Program Files (Program Files (x86)) \Brother\PE-DESIGN PLUS\ClipArt Step 2 Importing image data into PE-DESIGN PLUS Select the Tutorial folder, and then select penguin.bmp as line data (border) in Step 4. ...
..., then . Click Next. 1 2 b Memo: The mask outline selected here can be used as the image. c "Importing photo data into PE-DESIGN PLUS Applying an image mask and adjusting its size and position Creating a border from an image. Step 1 Step 2 Step 3 Step 4 Starting the ...clip art images can be found in the ClipArt folder (in the folder where PE-DESIGN was installed) at: C:\Program Files (Program Files (x86)) \Brother\PE-DESIGN PLUS\ClipArt Step 2 Importing image data into PE-DESIGN PLUS Select the Tutorial folder, and then select penguin.bmp as line data (border) in Step 4. ...

Users Manual - English
Page 29
...can be adjusted. Click , then , then . c "Select Mask dialog box" on page 31 27 Step 2 Importing image data into PE-DESIGN PLUS Step 1 Starting the Cross Stitch wizard 2. For this dialog box, an image mask can be applied and its size can be created from...the folder where PE-DESIGN was installed) at: C:\Program Files (Program Files (x86)) \Brother\PE-DESIGN PLUS\ClipArt From this example, we will simply continue to the next step. Creating Embroidery Patterns Step 1 Step 2 Starting the Cross Stitch wizard Importing image data into PE-DESIGN PLUS Select the Tutorial folder, and...
...can be adjusted. Click , then , then . c "Select Mask dialog box" on page 31 27 Step 2 Importing image data into PE-DESIGN PLUS Step 1 Starting the Cross Stitch wizard 2. For this dialog box, an image mask can be applied and its size can be created from...the folder where PE-DESIGN was installed) at: C:\Program Files (Program Files (x86)) \Brother\PE-DESIGN PLUS\ClipArt From this example, we will simply continue to the next step. Creating Embroidery Patterns Step 1 Step 2 Starting the Cross Stitch wizard Importing image data into PE-DESIGN PLUS Select the Tutorial folder, and...

Users Manual - English
Page 34
.... a Note: If the entered character is particularly useful if you have to hide the character table. Documents (My Documents)\PE-DESIGN PLUS\Tutorial Step 1 Step 2 Step 3 Entering Text Transforming text Specifying character spacing Step 1 Entering Text 1. From the keyboard, type in the Text ...to enter a new line of text. • Click Hide List to enter accented characters that are not available on -screen. 3. If this tutorial can also be entered by clicking characters in the character table (1) in "ABCD". Click , then . Entering Text Entering Text This section describes ...
.... a Note: If the entered character is particularly useful if you have to hide the character table. Documents (My Documents)\PE-DESIGN PLUS\Tutorial Step 1 Step 2 Step 3 Entering Text Transforming text Specifying character spacing Step 1 Entering Text 1. From the keyboard, type in the Text ...to enter a new line of text. • Click Hide List to enter accented characters that are not available on -screen. 3. If this tutorial can also be entered by clicking characters in the character table (1) in "ABCD". Click , then . Entering Text Entering Text This section describes ...


