
Users Manual - English
Page 3
... in Windows® 7. It can be installed. The Operation Manual is used on transfer This software may differ slightly. 1 Otherwise, with PE-DESIGN PLUS, click , then Operation Manual. Read the following Product Agreement, which has been provided for this product. Before opening the CD-ROM package ...software is also installed during software installation. This product cannot be returned after it must be downloaded from Softfoundry International Pte. With PES-Writer, click Help, then Operation Manual. If this software only if you for your computer, it has been opened.
... in Windows® 7. It can be installed. The Operation Manual is used on transfer This software may differ slightly. 1 Otherwise, with PE-DESIGN PLUS, click , then Operation Manual. Read the following Product Agreement, which has been provided for this product. Before opening the CD-ROM package ...software is also installed during software installation. This product cannot be returned after it must be downloaded from Softfoundry International Pte. With PES-Writer, click Help, then Operation Manual. If this software only if you for your computer, it has been opened.

Users Manual - English
Page 5
... to Lines and Regions 45 Opening/Importing Embroidery Designs..... 48 Transferring Embroidery Designs to Machines 52 Printing 54 Specifying the Design Page Size and Color 56 Changing Application Settings 57 Supplement 61 Understanding Windows 61 PE-DESIGN PLUS Window 61 Menus 65 Tips and Techniques 67 ...Sewing Direction 67 Sewing Order 67 Sewing Wide Areas 67 Reference 68 Sewing Attributes 68 Font List 70 PES-Writer 72 Writing Multiple Embroidery Files to ...
... to Lines and Regions 45 Opening/Importing Embroidery Designs..... 48 Transferring Embroidery Designs to Machines 52 Printing 54 Specifying the Design Page Size and Color 56 Changing Application Settings 57 Supplement 61 Understanding Windows 61 PE-DESIGN PLUS Window 61 Menus 65 Tips and Techniques 67 ...Sewing Direction 67 Sewing Order 67 Sewing Wide Areas 67 Reference 68 Sewing Attributes 68 Font List 70 PES-Writer 72 Writing Multiple Embroidery Files to ...

Users Manual - English
Page 10
... selected, the software is checked at startup to check for Updates. If the message shown below appears, the latest version of the Program Click in PE-DESIGN PLUS, then Check for the latest version if a firewall is the latest version. 8 b Memo: If the Always check for restarting the computer appears, it is not... are required. The software is checked to restart the computer. Checking for the Latest Version of the software is the latest version. Make sure that PE-DESIGN PLUS starts up correctly.
... selected, the software is checked at startup to check for Updates. If the message shown below appears, the latest version of the Program Click in PE-DESIGN PLUS, then Check for the latest version if a firewall is the latest version. 8 b Memo: If the Always check for restarting the computer appears, it is not... are required. The software is checked to restart the computer. Checking for the Latest Version of the software is the latest version. Make sure that PE-DESIGN PLUS starts up correctly.

Users Manual - English
Page 12
..., and then click Open. (5) Always show Wizard at Startup Select this button to start up the wizard each time PE-DESIGN PLUS is started up. 10 Creating Embroidery Patterns Getting Started Starting Up Application Starting up , the following wizard appears. (1).... (2) Open PES Click this button to open embroidery data (.pes). c "Opening a PE-DESIGN PLUS file" on page 11 (4) Most Recently Used Files Click the name of a file from an image. About the Top Wizard When PE-DESIGN PLUS starts up PE-DESIGN PLUS Click , then All Programs, then PE-DESIGN PLUS, and then click PE-DESIGN PLUS.
..., and then click Open. (5) Always show Wizard at Startup Select this button to start up the wizard each time PE-DESIGN PLUS is started up. 10 Creating Embroidery Patterns Getting Started Starting Up Application Starting up , the following wizard appears. (1).... (2) Open PES Click this button to open embroidery data (.pes). c "Opening a PE-DESIGN PLUS file" on page 11 (4) Most Recently Used Files Click the name of a file from an image. About the Top Wizard When PE-DESIGN PLUS starts up PE-DESIGN PLUS Click , then All Programs, then PE-DESIGN PLUS, and then click PE-DESIGN PLUS.

Users Manual - English
Page 13
Documents (My Documents)\PE-DESIGN PLUS\Tutorial Step 1 Step 2 Step 3 Step 4 Step 5 Step 6 ... the text Importing and rotating an embroidery pattern Transferring embroidery patterns to embroidery machines • Transferring the design to an original card • Transferring data to embroidery machines via a USB media Step 1 Using...location. Import the file girl2-face.bmp. Select the file girl2-face.bmp in the folder Documents (My Documents)\PE-DESIGN PLUS\Tutorial 1 b Memo: Image file formats Images in the Top Wizard. 2. Creating Embroidery Patterns Creating Embroidery Patterns ...
Documents (My Documents)\PE-DESIGN PLUS\Tutorial Step 1 Step 2 Step 3 Step 4 Step 5 Step 6 ... the text Importing and rotating an embroidery pattern Transferring embroidery patterns to embroidery machines • Transferring the design to an original card • Transferring data to embroidery machines via a USB media Step 1 Using...location. Import the file girl2-face.bmp. Select the file girl2-face.bmp in the folder Documents (My Documents)\PE-DESIGN PLUS\Tutorial 1 b Memo: Image file formats Images in the Top Wizard. 2. Creating Embroidery Patterns Creating Embroidery Patterns ...

Users Manual - English
Page 20
... name appears in the file name. 2 b Memo: If no file name has been specified or if the file cannot be exported as a file of the PE-DESIGN PLUS window. Click 1, then 2. 1 3. Creating Embroidery Patterns Saving Overwriting Click 1, then 2. 1 2. Select the drive and the folder, and then type in the title bar of a different...
... name appears in the file name. 2 b Memo: If no file name has been specified or if the file cannot be exported as a file of the PE-DESIGN PLUS window. Click 1, then 2. 1 3. Creating Embroidery Patterns Saving Overwriting Click 1, then 2. 1 2. Select the drive and the folder, and then type in the title bar of a different...

Users Manual - English
Page 23
...the sewing angle Step 1 Starting the Photo Stitch 2 wizard Click , then , then . b Memo: When this application is installed, the PE-DESIGN PLUS folder is installed in a method different than that used with Photo Stitch 1. Image To Stitch Photo Stitch 2 We will create an embroidery ...(My Documents) folder. 2. Double-click the Documents (My Documents)\ PE-DESIGN PLUS\Tutorial folder to open it. Select the file girl2-face.bmp, and then click Open, or double-click the file's icon. Step 1 Step 2 Step 3 Step 4 Starting the Photo Stitch 2 wizard Importing photo data into PEDESIGN PLUS 1.
...the sewing angle Step 1 Starting the Photo Stitch 2 wizard Click , then , then . b Memo: When this application is installed, the PE-DESIGN PLUS folder is installed in a method different than that used with Photo Stitch 1. Image To Stitch Photo Stitch 2 We will create an embroidery ...(My Documents) folder. 2. Double-click the Documents (My Documents)\ PE-DESIGN PLUS\Tutorial folder to open it. Select the file girl2-face.bmp, and then click Open, or double-click the file's icon. Step 1 Step 2 Step 3 Step 4 Starting the Photo Stitch 2 wizard Importing photo data into PEDESIGN PLUS 1.
Users Manual - English
Page 26
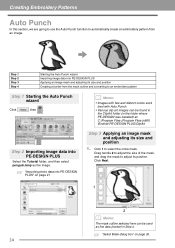
...Step 1 Starting the Auto Punch wizard Click , then . Step 1 Step 2 Step 3 Step 4 Starting the Auto Punch wizard Importing image data into PE-DESIGN PLUS Applying an image mask and adjusting its size and position Creating a border from an image. b Memo: • Images with few and distinct colors work.... Click Next. 1 2 b Memo: The mask outline selected here can be used as line data (border) in the folder where PE-DESIGN was installed) at: C:\Program Files (Program Files (x86)) \Brother\PE-DESIGN PLUS\ClipArt Step 2 Importing image data into PE-DESIGN PLUS" on page 30. 24
...Step 1 Starting the Auto Punch wizard Click , then . Step 1 Step 2 Step 3 Step 4 Starting the Auto Punch wizard Importing image data into PE-DESIGN PLUS Applying an image mask and adjusting its size and position Creating a border from an image. b Memo: • Images with few and distinct colors work.... Click Next. 1 2 b Memo: The mask outline selected here can be used as line data (border) in the folder where PE-DESIGN was installed) at: C:\Program Files (Program Files (x86)) \Brother\PE-DESIGN PLUS\ClipArt Step 2 Importing image data into PE-DESIGN PLUS" on page 30. 24

Users Manual - English
Page 29
... dialog box" on page 30 3. b Memo: Various clip art images can be found in the ClipArt folder (in the folder where PE-DESIGN was installed) at: C:\Program Files (Program Files (x86)) \Brother\PE-DESIGN PLUS\ClipArt From this example, we will simply continue to the next step. For this dialog box, an image mask can be...
... dialog box" on page 30 3. b Memo: Various clip art images can be found in the ClipArt folder (in the folder where PE-DESIGN was installed) at: C:\Program Files (Program Files (x86)) \Brother\PE-DESIGN PLUS\ClipArt From this example, we will simply continue to the next step. For this dialog box, an image mask can be...

Users Manual - English
Page 34
... to hide the character table. Click in "ABCD". Click , then . From the keyboard, type in the Design page. A vertical dashed line will appear on the Design Page for typing directly on your keyboard. 2. Documents (My Documents)\PE-DESIGN PLUS\Tutorial Step 1 Step 2 Step 3 Entering Text Transforming text Specifying character spacing Step 1 Entering Text 1. If.... 3. b Memo: • Text can be converted to an embroidery pattern, the character appears as in the Transform style with a fan shape. While it in the Design Page.
... to hide the character table. Click in "ABCD". Click , then . From the keyboard, type in the Design page. A vertical dashed line will appear on the Design Page for typing directly on your keyboard. 2. Documents (My Documents)\PE-DESIGN PLUS\Tutorial Step 1 Step 2 Step 3 Entering Text Transforming text Specifying character spacing Step 1 Entering Text 1. If.... 3. b Memo: • Text can be converted to an embroidery pattern, the character appears as in the Transform style with a fan shape. While it in the Design Page.

Users Manual - English
Page 42
...to Actual Size : Fit selected objects to window : Fit Design Page to window b Memo: • Zooming is displayed can easily be changed by dragging the Zoom slider in or out, right-click to reverse the zooming operation. 40 c "PE-DESIGN PLUS Window" on page 61 • While zooming in the... status bar or clicking the Zoom ratio. Arranging Embroidery Designs Checking Embroidery Patterns Zooming Using the Pan tool Click , then , then 1. The part...
...to Actual Size : Fit selected objects to window : Fit Design Page to window b Memo: • Zooming is displayed can easily be changed by dragging the Zoom slider in or out, right-click to reverse the zooming operation. 40 c "PE-DESIGN PLUS Window" on page 61 • While zooming in the... status bar or clicking the Zoom ratio. Arranging Embroidery Designs Checking Embroidery Patterns Zooming Using the Pan tool Click , then , then 1. The part...

Users Manual - English
Page 50
... following ways. • Drag the embroidery design from file Windows Explorer into the PE-DESIGN PLUS window. • Double-click the embroidery design file in Windows Explorer. 48 c "Specifying the Design Page Size and Color" on page 56 Opening a PE-DESIGN PLUS file 1. Click 1, then 2. 1 2 2. Arranging Embroidery Designs Opening/Importing Embroidery Designs Creating a new embroidery design Click 1, then 2. 1 2 b Memo: • To view...
... following ways. • Drag the embroidery design from file Windows Explorer into the PE-DESIGN PLUS window. • Double-click the embroidery design file in Windows Explorer. 48 c "Specifying the Design Page Size and Color" on page 56 Opening a PE-DESIGN PLUS file 1. Click 1, then 2. 1 2 2. Arranging Embroidery Designs Opening/Importing Embroidery Designs Creating a new embroidery design Click 1, then 2. 1 2 b Memo: • To view...

Users Manual - English
Page 51
...the Category selector, select a category to be imported, and then click Import, or double click the file icon. appears before the embroidery design is to be imported at the same time. • With the buttons at the same time. Click to the currently selected folder.... on the new Design Page. Click then , then , . Arranging Embroidery Designs b Memo: Multiple files can be opened with this software, the message "This file will be imported into a new Design Page." a Note: If a .pes file created with PE-DESIGN NEXT or earlier is opened in PE-DESIGN PLUS. Arranging Embroidery...
...the Category selector, select a category to be imported, and then click Import, or double click the file icon. appears before the embroidery design is to be imported at the same time. • With the buttons at the same time. Click to the currently selected folder.... on the new Design Page. Click then , then , . Arranging Embroidery Designs b Memo: Multiple files can be opened with this software, the message "This file will be imported into a new Design Page." a Note: If a .pes file created with PE-DESIGN NEXT or earlier is opened in PE-DESIGN PLUS. Arranging Embroidery...

Users Manual - English
Page 62
... on the embroidery machine, depending on the embroidery machine being used on the machine. If the number of consecutive jumps in embroidery design of the DST format With the DST format, you can display the thread information specified with more consecutive jump codes than or equal...1. However, the names that are displayed are displayed on a different computer. Simply copy chart2.btc from C:\Program Files (Program Files (x86))\Brother\PE-DESIGN PLUS\Color on page 63 Select DST Settings (1), specify the number of jumps in the DST file is trimmed. Arranging Embroidery...
... on the embroidery machine, depending on the embroidery machine being used on the machine. If the number of consecutive jumps in embroidery design of the DST format With the DST format, you can display the thread information specified with more consecutive jump codes than or equal...1. However, the names that are displayed are displayed on a different computer. Simply copy chart2.btc from C:\Program Files (Program Files (x86))\Brother\PE-DESIGN PLUS\Color on page 63 Select DST Settings (1), specify the number of jumps in the DST file is trimmed. Arranging Embroidery...

Users Manual - English
Page 63
...ratio. c "Customizing Quick Access Toolbar/ Shortcut keys" on page 63 4 Option button Click this button to specify settings for the Design Page and user thread chart. 5 Help button Click this toolbar is always displayed, regardless of the selected command. 12 Zoom This displays... commands makes them easily accessible. Drag the slider to the name below each group when selecting the desired command. Supplement Understanding Windows PE-DESIGN PLUS Window 3 45 1 2 Supplement 6 7 10 11 9 8 12 1 Application button Click to display a menu containing commands for specifying thread...
...ratio. c "Customizing Quick Access Toolbar/ Shortcut keys" on page 63 4 Option button Click this button to specify settings for the Design Page and user thread chart. 5 Help button Click this toolbar is always displayed, regardless of the selected command. 12 Zoom This displays... commands makes them easily accessible. Drag the slider to the name below each group when selecting the desired command. Supplement Understanding Windows PE-DESIGN PLUS Window 3 45 1 2 Supplement 6 7 10 11 9 8 12 1 Application button Click to display a menu containing commands for specifying thread...

Users Manual - English
Page 74
...the files you hear it snap into the USB Card Writer Module. Click 1, and then select the folder where the desired pattern files (.pes or .pen) are copyright-protected embroidery data and can only be used with the compatible embroidery machine. • Some features may not be... Writer Module. 2. PES-Writer Writing Multiple Embroidery Files to an original card at the same time. b Memo: About .pen files • .pen files, like .pes files, can save multiple .pes or .pen files to an Original Card Starting up PES-Writer Click , then All Programs, then PE-DESIGN PLUS, and then click...
...the files you hear it snap into the USB Card Writer Module. Click 1, and then select the folder where the desired pattern files (.pes or .pen) are copyright-protected embroidery data and can only be used with the compatible embroidery machine. • Some features may not be... Writer Module. 2. PES-Writer Writing Multiple Embroidery Files to an original card at the same time. b Memo: About .pen files • .pen files, like .pes files, can save multiple .pes or .pen files to an Original Card Starting up PES-Writer Click , then All Programs, then PE-DESIGN PLUS, and then click...

Users Manual - English
Page 77
... USB Card Writer Module, the computer with the USB Card Writer Module connected to its USB port must be established, contact your authorized dealer or Brother Customer Service. being used, it must connect to the Internet. appeared. or "The server could not be connected to. If the solutions suggested do not... installed correctly. The USB Card Writer Module Not enough power is not installed correctly. Troubleshooting If a problem occurs, click Customer Support on the menu of PE-DESIGN PLUS to visit the following solutions.
... USB Card Writer Module, the computer with the USB Card Writer Module connected to its USB port must be established, contact your authorized dealer or Brother Customer Service. being used, it must connect to the Internet. appeared. or "The server could not be connected to. If the solutions suggested do not... installed correctly. The USB Card Writer Module Not enough power is not installed correctly. Troubleshooting If a problem occurs, click Customer Support on the menu of PE-DESIGN PLUS to visit the following solutions.

Users Manual - English
Page 78
... 42 Color 47 Color Option 20, 23 Color pane 61 combining pattern colors 43 Computer 5 Cross Stitch function 27, 28 D Design Page Settings 56, 57 Design Page size 56, 57 Design Property 51 Docking 63 DST format 60 E Edit User Thread Chart 58 editing sewing order 44 thread color charts 58 thread...20 Max. Number of Colors 20, 26, 28 measurement units 57 Memory 5 Monitor 5 N New 48 NOT DEFINED 47 number of jumps 60 O Online Registration 9 opening .pes file 48 new Design Page 48 PE-DESIGN PLUS file 48 Operating system 5 Option button 61 Options 65 Density 23 Max.
... 42 Color 47 Color Option 20, 23 Color pane 61 combining pattern colors 43 Computer 5 Cross Stitch function 27, 28 D Design Page Settings 56, 57 Design Page size 56, 57 Design Property 51 Docking 63 DST format 60 E Edit User Thread Chart 58 editing sewing order 44 thread color charts 58 thread...20 Max. Number of Colors 20, 26, 28 measurement units 57 Memory 5 Monitor 5 N New 48 NOT DEFINED 47 number of jumps 60 O Online Registration 9 opening .pes file 48 new Design Page 48 PE-DESIGN PLUS file 48 Operating system 5 Option button 61 Options 65 Density 23 Max.


