

Users Manual - English
Page 5
... 13 Embroidery Step by Step 14 Attaching the Embroidery Unit 15 Embroidery unit precautions ...15 Attaching the embroidery unit ...15 Removing the embroidery unit ...16 Turning the Machine On/Off 18 Power supply precautions ...18 Turning on the machine ...19 Turning off the machine ...19...the machine settings ...21 Checking machine operating procedures ...23 Winding/Installing the Bobbin 24 Bobbin precautions ...24 Winding the bobbin ...24 Installing the bobbin ...28 Upper Threading ...30 About the spool of thread ...30 Threading the upper thread ...30 Threading the needle ...32 Threading ...
... 13 Embroidery Step by Step 14 Attaching the Embroidery Unit 15 Embroidery unit precautions ...15 Attaching the embroidery unit ...15 Removing the embroidery unit ...16 Turning the Machine On/Off 18 Power supply precautions ...18 Turning on the machine ...19 Turning off the machine ...19...the machine settings ...21 Checking machine operating procedures ...23 Winding/Installing the Bobbin 24 Bobbin precautions ...24 Winding the bobbin ...24 Installing the bobbin ...28 Upper Threading ...30 About the spool of thread ...30 Threading the upper thread ...30 Threading the needle ...32 Threading ...

Users Manual - English
Page 6
... Stopping while embroidering ...66 Bobbin Case Adjustment 68 Correct tension...68 Bobbin thread is loose...68 Bobbin thread is tight ...68 APPENDIX 69 Care and Maintenance ...70 Cleaning the machine surface ...70 Cleaning the race ...70 Attaching the Embroidery Foot 72 Attaching the embroidery Foot "Q" ...72 Troubleshooting ...74 Error messages ...78 Adjusting the LCD ...81...
... Stopping while embroidering ...66 Bobbin Case Adjustment 68 Correct tension...68 Bobbin thread is loose...68 Bobbin thread is tight ...68 APPENDIX 69 Care and Maintenance ...70 Cleaning the machine surface ...70 Cleaning the race ...70 Attaching the Embroidery Foot 72 Attaching the embroidery Foot "Q" ...72 Troubleshooting ...74 Error messages ...78 Adjusting the LCD ...81...

Users Manual - English
Page 7
... INSTRUCTIONS", and then study this manual for future reference. c Automatic thread cutting The thread can quickly and easily be cut automatically after you for purchasing this embroidery machine. b Quick-set bobbin You can embroider built-in embroidery patterns, characters, framed decorations, and designs from optional embroidery cards (page 39). 5 Introduction Thank you have finished reading this...
... INSTRUCTIONS", and then study this manual for future reference. c Automatic thread cutting The thread can quickly and easily be cut automatically after you for purchasing this embroidery machine. b Quick-set bobbin You can embroider built-in embroidery patterns, characters, framed decorations, and designs from optional embroidery cards (page 39). 5 Introduction Thank you have finished reading this...
Users Manual - English
Page 9
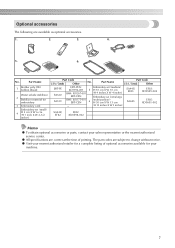
... z To obtain optional accessories or parts, contact your machine. 7 The part codes are available as optional accessories. 1. 2. 3. 4. 5. 6. Part Name 1 Brother poly #90 bobbin thread Water solude stabilizer 2 Stabilizer material for a complete listing of printing. Part Name Part Code U.S.A. / Canada Other EBT-PE SA520 SA519 EBT-PEN: Embroidery set (medium) XC5996-001 5 H 10 cm X W 10...
... z To obtain optional accessories or parts, contact your machine. 7 The part codes are available as optional accessories. 1. 2. 3. 4. 5. 6. Part Name 1 Brother poly #90 bobbin thread Water solude stabilizer 2 Stabilizer material for a complete listing of printing. Part Name Part Code U.S.A. / Canada Other EBT-PE SA520 SA519 EBT-PEN: Embroidery set (medium) XC5996-001 5 H 10 cm X W 10...

Users Manual - English
Page 10
.... f Bobbin winder Use the bobbin winder when winding the bobbin. n Thread take-up lever. k Embroidery unit Attach the embroidery unit to thread the needle. d Bobbin winding thread guide Pass the thread around the thread guide plate when threading the upper thread. Before using the machine can be displayed (page 11). 8 h Embroidery unit connector slot Plug in the connector for using the...
.... f Bobbin winder Use the bobbin winder when winding the bobbin. n Thread take-up lever. k Embroidery unit Attach the embroidery unit to thread the needle. d Bobbin winding thread guide Pass the thread around the thread guide plate when threading the upper thread. Before using the machine can be displayed (page 11). 8 h Embroidery unit connector slot Plug in the connector for using the...

Users Manual - English
Page 11
... Remove the needle plate cover to be exchanged. Needle and embroidery foot section Right-side/rear view a Thread guide disk Pass the thread through the thread guide disk when using the needle threader to turn the machine on the power supply cord into the bobbin case. f Embroidery foot "Q" This presser foot is lowered, it enters the...
... Remove the needle plate cover to be exchanged. Needle and embroidery foot section Right-side/rear view a Thread guide disk Pass the thread through the thread guide disk when using the needle threader to turn the machine on the power supply cord into the bobbin case. f Embroidery foot "Q" This presser foot is lowered, it enters the...
Users Manual - English
Page 13
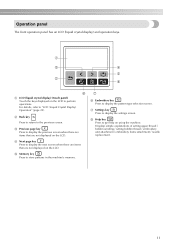
... there are items that are not displayed on the LCD to store patterns in the machine's memory. g f Embroidery key Press to display the settings screen. Displays simple explanations of setting upper thread / bobbin winding / setting bobbin thread / embroidery unit attachment / embroidery frame attachment / needle replacement. 11 g Settings key Press to display the pattern type selection screen...
... there are items that are not displayed on the LCD to store patterns in the machine's memory. g f Embroidery key Press to display the settings screen. Displays simple explanations of setting upper thread / bobbin winding / setting bobbin thread / embroidery unit attachment / embroidery frame attachment / needle replacement. 11 g Settings key Press to display the pattern type selection screen...

Users Manual - English
Page 15
... 14 Attaching the Embroidery Unit 15 Embroidery unit precautions 15 Attaching the embroidery unit 15 Removing the embroidery unit 16 Turning the Machine On/Off 18 Power supply precautions 18 Turning on the machine 19 Turning off the machine 19 LCD (Liquid Crystal Display) Operation 20 Viewing the LCD 20 Changing the machine settings 21 Checking machine operating procedures...
... 14 Attaching the Embroidery Unit 15 Embroidery unit precautions 15 Attaching the embroidery unit 15 Removing the embroidery unit 16 Turning the Machine On/Off 18 Power supply precautions 18 Turning on the machine 19 Turning off the machine 19 LCD (Liquid Crystal Display) Operation 20 Viewing the LCD 20 Changing the machine settings 21 Checking machine operating procedures...

Users Manual - English
Page 16
...embroidery are as follows. 1 Attaching the embroidery unit Attach the embroidery unit. (If the embroidery unit is not attached, the machine does not operate.) For details, refer to "Attaching the embroidery unit" (page 15). ↓ 2 Checking the needle Use a needle matched to "Attaching the Embroidery... the needle" (page 36). ↓ 3 Setting up the embroidery thread according to "Selecting Embroidery Patterns" (page 49). ↓ 7 Checking the layout Check and adjust the size and position of the embroidery pattern. For details on adjusting the layout, refer to "Adjusting ...
...embroidery are as follows. 1 Attaching the embroidery unit Attach the embroidery unit. (If the embroidery unit is not attached, the machine does not operate.) For details, refer to "Attaching the embroidery unit" (page 15). ↓ 2 Checking the needle Use a needle matched to "Attaching the Embroidery... the needle" (page 36). ↓ 3 Setting up the embroidery thread according to "Selecting Embroidery Patterns" (page 49). ↓ 7 Checking the layout Check and adjust the size and position of the embroidery pattern. For details on adjusting the layout, refer to "Adjusting ...
Users Manual - English
Page 23
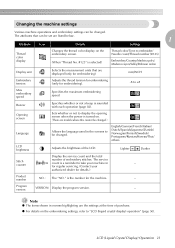
...: Display the program version. - Changing the machine settings Various machine operations and embroidery settings can be set are listed below. 1 Attribute Icon Details Settings Thread color display Changes the thread color display on the embroidery screen. (When "Thread No. #123" is selected) Thread color/Time to embroider/ Needle count/Thread number (#123) Embroidery/Country/Madeira poly/ Madeira rayon/Sulky/Robison...
...: Display the program version. - Changing the machine settings Various machine operations and embroidery settings can be set are listed below. 1 Attribute Icon Details Settings Thread color display Changes the thread color display on the embroidery screen. (When "Thread No. #123" is selected) Thread color/Time to embroider/ Needle count/Thread number (#123) Embroidery/Country/Madeira poly/ Madeira rayon/Sulky/Robison...
Users Manual - English
Page 25
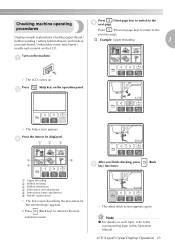
... LCD. Press the item to the d next page. Displays simple explanations of setting upper thread / bobbin winding / setting bobbin thread / embroidery † Example: Upper threading 1 unit attachment / embroidery frame attachment / needle replacement on . LCD (Liquid Crystal Display) Operation 23 Turn on the machine. X The help screen appears. procedures Press (Previous page key) to return to the...
... LCD. Press the item to the d next page. Displays simple explanations of setting upper thread / bobbin winding / setting bobbin thread / embroidery † Example: Upper threading 1 unit attachment / embroidery frame attachment / needle replacement on . LCD (Liquid Crystal Display) Operation 23 Turn on the machine. X The help screen appears. procedures Press (Previous page key) to return to the...
Users Manual - English
Page 34
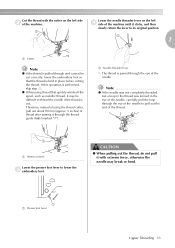
... and open the shutter before removing the upper thread, be used with sewing machine needles 75/11 through the thread guide disk from the front. 1 a Thread guide disk Pass the thread behind the needle bar thread guide by holding the thread in the order shown below. 1 a Shutter Note z If the embroidery foot has been lowered and the shutter...
... and open the shutter before removing the upper thread, be used with sewing machine needles 75/11 through the thread guide disk from the front. 1 a Thread guide disk Pass the thread behind the needle bar thread guide by holding the thread in the order shown below. 1 a Shutter Note z If the embroidery foot has been lowered and the shutter...
Users Manual - English
Page 35
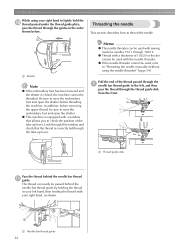
... the needle to pull out the end of the machine. Cut the thread with extreme force, otherwise the needle may be difficult to thread the needle if the thread is cut correctly, lower the embroidery foot so that quickly winds off the spool, such as metallic thread, it clicks, and then slowly return the lever to...
... the needle to pull out the end of the machine. Cut the thread with extreme force, otherwise the needle may be difficult to thread the needle if the thread is cut correctly, lower the embroidery foot so that quickly winds off the spool, such as metallic thread, it clicks, and then slowly return the lever to...
Users Manual - English
Page 36
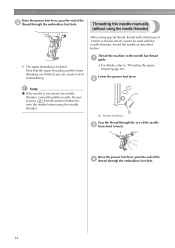
... be used with a thickness of the d thread through the embroidery foot hole. Now that the upper threading and the lower threading are finished, you are ready to "Threading the upper thread" (page 30). When using special thread, thread with the needle threader, thread the needle as described below. Thread the machine to the needle bar thread a guide. • For details, refer to...
... be used with a thickness of the d thread through the embroidery foot hole. Now that the upper threading and the lower threading are finished, you are ready to "Threading the upper thread" (page 30). When using special thread, thread with the needle threader, thread the needle as described below. Thread the machine to the needle bar thread a guide. • For details, refer to...
Users Manual - English
Page 41
... .... 53 Selecting a frame pattern 54 Using an embroidery card (sold separately 55 Embroidering 56 Embroidering attractive finishes .....56 Embroidering a pattern 57 Appliquéing 59 Editing and Saving Patterns 61 Adjusting the layout 61 Storing patterns 63 Adjusting the thread tension...........64 Resewing 65 Thread runs out partway through a design 65 Stopping while...
... .... 53 Selecting a frame pattern 54 Using an embroidery card (sold separately 55 Embroidering 56 Embroidering attractive finishes .....56 Embroidering a pattern 57 Appliquéing 59 Editing and Saving Patterns 61 Adjusting the layout 61 Storing patterns 63 Adjusting the thread tension...........64 Resewing 65 Thread runs out partway through a design 65 Stopping while...

Users Manual - English
Page 42
... sure there is necessary for embroidering. ■ Stabilizer material Attach a stabilizer material for embroidery. Note z For good quality embroidery designs be sure to "Optional accessories" (page 7). ■ Embroidery thread For the upper thread, use stabilizer for embroidery machines. Note z Always use the embroidery thread or country thread. CAUTION ● Do not embroider fabrics that matches the size of fabric a little...
... sure there is necessary for embroidering. ■ Stabilizer material Attach a stabilizer material for embroidery. Note z For good quality embroidery designs be sure to "Optional accessories" (page 7). ■ Embroidery thread For the upper thread, use stabilizer for embroidery machines. Note z Always use the embroidery thread or country thread. CAUTION ● Do not embroider fabrics that matches the size of fabric a little...
Users Manual - English
Page 49
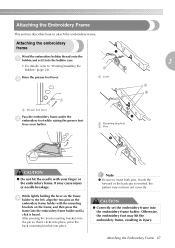
... bobbin case. • For details, refer to the left, align the two pins on the embroidery frame holder with your finger or the embroidery frame. It may hit the embroidery frame, resulting in injury. While lightly holding the lever on the frame d holder to "Winding/...Installing the Bobbin" (page 24). Attaching the Embroidery Frame 47 Attaching the embroidery frame Wind the embroidery bobbin thread onto the a bobbin and set the embroidery frame...
... bobbin case. • For details, refer to the left, align the two pins on the embroidery frame holder with your finger or the embroidery frame. It may hit the embroidery frame, resulting in injury. While lightly holding the lever on the frame d holder to "Winding/...Installing the Bobbin" (page 24). Attaching the Embroidery Frame 47 Attaching the embroidery frame Wind the embroidery bobbin thread onto the a bobbin and set the embroidery frame...

Users Manual - English
Page 58
... strike the object and cause a poor finish to "Optional accessories" (page 7). Thread Upper thread Bobbin thread Use embroidery thread, or country embroidery thread intended for use with this machine. The frame may tangle. If you continue embroidering without enough thread in the range of motion of threads below. Other embroidery threads may not turn out correctly. Embroidering attractive finishes There are two...
... strike the object and cause a poor finish to "Optional accessories" (page 7). Thread Upper thread Bobbin thread Use embroidery thread, or country embroidery thread intended for use with this machine. The frame may tangle. If you continue embroidering without enough thread in the range of motion of threads below. Other embroidery threads may not turn out correctly. Embroidering attractive finishes There are two...
Users Manual - English
Page 59
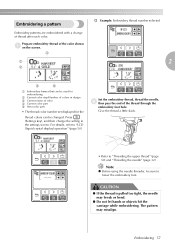
...changed. Embroidering 57 Press (Settings key), and then change of the thread through the embroidery foot hole. Set the embroidery thread, thread the needle, b then pass the end of thread after each color. CAUTION ● If the thread is pulled too tight, the needle may misalign. The pattern may ... or bend. ● Do not let hands or objects hit the carriage while embroidering. Prepare embroidery thread of color d Current color part e Next color part • The thread color number set displayed for embroidering b Current color step/Number of colors in the settings screen...
...changed. Embroidering 57 Press (Settings key), and then change of the thread through the embroidery foot hole. Set the embroidery thread, thread the needle, b then pass the end of thread after each color. CAUTION ● If the thread is pulled too tight, the needle may misalign. The pattern may ... or bend. ● Do not let hands or objects hit the carriage while embroidering. Prepare embroidery thread of color d Current color part e Next color part • The thread color number set displayed for embroidering b Current color step/Number of colors in the settings screen...
Users Manual - English
Page 60
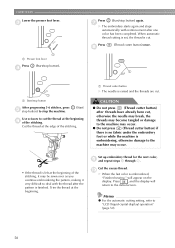
... the machine may be sewn over as you continue embroidering the pattern, making it very difficult to the initial screen. Memo z For the automatic cutting setting, refer to cut . c 1 a Presser foot lever Press d (Start/stop button) again. a Thread cutter button X The needle is embroidered, "Finished sewing." Cut the excess thread. Set up embroidery thread for...
... the machine may be sewn over as you continue embroidering the pattern, making it very difficult to the initial screen. Memo z For the automatic cutting setting, refer to cut . c 1 a Presser foot lever Press d (Start/stop button) again. a Thread cutter button X The needle is embroidered, "Finished sewing." Cut the excess thread. Set up embroidery thread for...


