Users Manual - English
Page 7
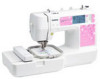
...accessories ...9 Names of Machine Parts and Their Functions 10 Front view ...10 Needle and embroidery foot section ...11 Right-side/rear view ...11 Operation buttons ...12 Operation panel ...13...embroidery frame ...44 Attaching the Embroidery Frame 47 Attaching the embroidery frame ...47 Removing the embroidery frame ...48 EMBROIDERY 49 Selecting Embroidery Patterns 50 Copyright information ...50 Embroidery pattern types ...50 Setting for embroidering ...51 Selecting alphanumeric characters ...53 Selecting an embroidery pattern ...54 Selecting a frame pattern ...55 Using an embroidery card...
...accessories ...9 Names of Machine Parts and Their Functions 10 Front view ...10 Needle and embroidery foot section ...11 Right-side/rear view ...11 Operation buttons ...12 Operation panel ...13...embroidery frame ...44 Attaching the Embroidery Frame 47 Attaching the embroidery frame ...47 Removing the embroidery frame ...48 EMBROIDERY 49 Selecting Embroidery Patterns 50 Copyright information ...50 Embroidery pattern types ...50 Setting for embroidering ...51 Selecting alphanumeric characters ...53 Selecting an embroidery pattern ...54 Selecting a frame pattern ...55 Using an embroidery card...
Users Manual - English
Page 9
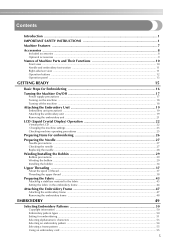
...become available by one press of a lever (page 38). d Bright light The convenient LED lamp makes it easy to embroider. h Embroidery You can start embroidering without pulling up (page 12). A red or orange light indicates an error or that the machine is ready to... (page 58). g Lighting Start/Stop button When the green light is on the website or saved in embroidery patterns, alphanumeric characters, framed decorations, and designs from optional embroidery cards (page 49). 7 c USB port Various embroidery patterns on , the machine is warming up the bobbin thread (page 34).
...become available by one press of a lever (page 38). d Bright light The convenient LED lamp makes it easy to embroider. h Embroidery You can start embroidering without pulling up (page 12). A red or orange light indicates an error or that the machine is ready to... (page 58). g Lighting Start/Stop button When the green light is on the website or saved in embroidery patterns, alphanumeric characters, framed decorations, and designs from optional embroidery cards (page 49). 7 c USB port Various embroidery patterns on , the machine is warming up the bobbin thread (page 34).
Users Manual - English
Page 11
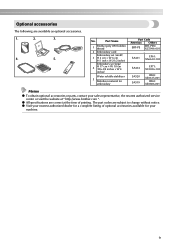
... part codes are available as optional accessories. 1. 2. 3. 4. 5. Optional accessories The following are subject to change without notice. Part Name 1 Brother poly #90 bobbin thread 2 Embroidery card Embroidery set (small) 3 H 2 cm × W 6 cm (H 1 inch × W 2-1/2 inches) Embroidery set (large) 4 H 17 cm × W 10 cm (H 6-3/4 inches × W 4 inches) Water soluble stabilizer 5 Stabilizer material for your sales representative...
... part codes are available as optional accessories. 1. 2. 3. 4. 5. Optional accessories The following are subject to change without notice. Part Name 1 Brother poly #90 bobbin thread 2 Embroidery card Embroidery set (small) 3 H 2 cm × W 6 cm (H 1 inch × W 2-1/2 inches) Embroidery set (large) 4 H 17 cm × W 10 cm (H 6-3/4 inches × W 4 inches) Water soluble stabilizer 5 Stabilizer material for your sales representative...

Users Manual - English
Page 13
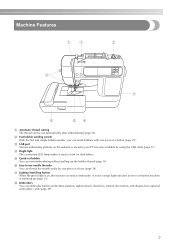
...Do not cover the air vent while the machine is being used for embroidering. Memo z Refer to pages 10 through the needle bar thread guide. f Embroidery foot "Q" (page 76) This presser foot is lowered, it enters the hole in the needle plate. f Main power switch (page 18) Use the... this port and the other to raise and lower the needle. a Handle Carry the machine by its handle when transporting the machine. c Embroidery card slot (page 55) Insert the embroidery card. b Needle bar thread guide (page 40) Pass the upper thread through 13 while you (counterclockwise) to the computer.
...Do not cover the air vent while the machine is being used for embroidering. Memo z Refer to pages 10 through the needle bar thread guide. f Embroidery foot "Q" (page 76) This presser foot is lowered, it enters the hole in the needle plate. f Main power switch (page 18) Use the... this port and the other to raise and lower the needle. a Handle Carry the machine by its handle when transporting the machine. c Embroidery card slot (page 55) Insert the embroidery card. b Needle bar thread guide (page 40) Pass the upper thread through 13 while you (counterclockwise) to the computer.

Users Manual - English
Page 52
...For details, refer to "Using an embroidery card" (page 55). b Alphanumeric character patterns There are completed by changing the upper thread according to "Selecting an embroidery pattern"(page 54). e Patterns saved in the machine and embroidery cards are total 70 patterns. Copyright information The... patterns saved in the machine's memory Press when retrieving patterns from an embroidery card. Embroidery pattern types An embroidery pattern can be combined with 12 stitch types. c Frame patterns 10 shapes, such as squares and...
...For details, refer to "Using an embroidery card" (page 55). b Alphanumeric character patterns There are completed by changing the upper thread according to "Selecting an embroidery pattern"(page 54). e Patterns saved in the machine and embroidery cards are total 70 patterns. Copyright information The... patterns saved in the machine's memory Press when retrieving patterns from an embroidery card. Embroidery pattern types An embroidery pattern can be combined with 12 stitch types. c Frame patterns 10 shapes, such as squares and...
Users Manual - English
Page 57
... your machine. Press . Select the frame shape. Note z Always turn off the machine. z Use only embroidery cards manufactured for frame pattern shapes and Using an embroidery card stitches. z Embroidery cards purchased in the Quick reference guide for this machine. Turn off the machine to operate incorrectly. Selecting...using (Previous page key) and (Next page key), and select from the 12 stitches. z Do not put anything other than an embroidery card in the machine. 2 There are not in use, keep them in the right direction. b Switch the screen using (Previous page...
... your machine. Press . Select the frame shape. Note z Always turn off the machine. z Use only embroidery cards manufactured for frame pattern shapes and Using an embroidery card stitches. z Embroidery cards purchased in the Quick reference guide for this machine. Turn off the machine to operate incorrectly. Selecting...using (Previous page key) and (Next page key), and select from the 12 stitches. z Do not put anything other than an embroidery card in the machine. 2 There are not in use, keep them in the right direction. b Switch the screen using (Previous page...

Users Manual - English
Page 58
EMBROIDERY Insert the embroidery card in the embroidery b card slot on the right side of the arrow. Select a pattern. Face the arrow on the embroidery card toward you, and insert it in "Selecting an embroidery pattern" (page 54). 56 c Press d on the machine. X This selection screen for the patterns saved in the card is the same as in the direction of the machine. Turn on the screen. e The operation is displayed.
EMBROIDERY Insert the embroidery card in the embroidery b card slot on the right side of the arrow. Select a pattern. Face the arrow on the embroidery card toward you, and insert it in "Selecting an embroidery pattern" (page 54). 56 c Press d on the machine. X This selection screen for the patterns saved in the card is the same as in the direction of the machine. Turn on the screen. e The operation is displayed.
Users Manual - English
Page 84
...displayed. APPENDIX Error messages When erroneous operations are performed messages and advice on operation will be displayed on the LCD was pressed when no card was inserted. 7 The start /stop button was raised. 8 The memory is full and the pattern cannot be wrong or the ...2 The start /stop button or thread cutter button was pressed while the embroidery foot was pressed at a screen other than the embroidery screen. Upper thread has run out. 3 CAUTION Be sure to the "Removable Disk" in embroidery edit mode. 5 While embroidering, data is written to rethread the machine....
...displayed. APPENDIX Error messages When erroneous operations are performed messages and advice on operation will be displayed on the LCD was pressed when no card was inserted. 7 The start /stop button was raised. 8 The memory is full and the pattern cannot be wrong or the ...2 The start /stop button or thread cutter button was pressed while the embroidery foot was pressed at a screen other than the embroidery screen. Upper thread has run out. 3 CAUTION Be sure to the "Removable Disk" in embroidery edit mode. 5 While embroidering, data is written to rethread the machine....
Users Manual - English
Page 86
...and the 20 needle is winding the bobbin. 84 The start/stop button, the embroidery key, or the memory key is pressed, but the embroidery unit is not attached. 23 The embroidery key was pressed when the embroidery unit is not attached. 24 The bobbin winder is bent and hitting the needle ...not compatible with your machine has been inserted. • Certain licensed designs cannot be read by this machine. 21 • Designs in an unacceptable card format cannot be read by this machine. • Design data saved in a hoop size not compatible with your machine has been selected. 22 ...
...and the 20 needle is winding the bobbin. 84 The start/stop button, the embroidery key, or the memory key is pressed, but the embroidery unit is not attached. 23 The embroidery key was pressed when the embroidery unit is not attached. 24 The bobbin winder is bent and hitting the needle ...not compatible with your machine has been inserted. • Certain licensed designs cannot be read by this machine. 21 • Designs in an unacceptable card format cannot be read by this machine. • Design data saved in a hoop size not compatible with your machine has been selected. 22 ...
Users Manual - English
Page 89
... needle replacement 28 embroidering pattern 57 needle set 8 embroidery card 55 embroidery card slot 11, 56 needle threader lever 10 needle threading 37 embroidery character selection 53 needles 27 embroidery data 69 next page key 13 embroidery foot installation 76 embroidery frame 44 O embroidery frame installation 47 embroidery frame removal 48 embroidery key 13 operation beep 85 operation buttons 10, 12...
... needle replacement 28 embroidering pattern 57 needle set 8 embroidery card 55 embroidery card slot 11, 56 needle threader lever 10 needle threading 37 embroidery character selection 53 needles 27 embroidery data 69 next page key 13 embroidery foot installation 76 embroidery frame 44 O embroidery frame installation 47 embroidery frame removal 48 embroidery key 13 operation beep 85 operation buttons 10, 12...


