Users Manual - English
Page 4
....brother.com SAVE THESE INSTRUCTIONS This machine is required, first follow the troubleshooting table in the back of the operation manual to the danger of . Do not use a damaged or incorrect needle plate, as it must be kept out of the reach of children or disposed of suffocation. • Do not use outdoors. 7 For a longer service life: • When storing this machine, avoid direct...
....brother.com SAVE THESE INSTRUCTIONS This machine is required, first follow the troubleshooting table in the back of the operation manual to the danger of . Do not use a damaged or incorrect needle plate, as it must be kept out of the reach of children or disposed of suffocation. • Do not use outdoors. 7 For a longer service life: • When storing this machine, avoid direct...
Users Manual - English
Page 9
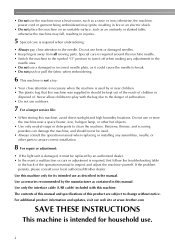
... in embroidery patterns, alphanumeric characters, framed decorations, and designs from optional embroidery cards (page 49). 7 A red or orange light indicates an error or that the machine is ready to embroider. Machine Features a Automatic thread cutting The thread can embroider built-in your PC become available by one press of a lever (page 38). h Embroidery You can be cut automatically after embroidering (page 58). e Quick-set bobbin You can wind bobbins with one press of a button...
... in embroidery patterns, alphanumeric characters, framed decorations, and designs from optional embroidery cards (page 49). 7 A red or orange light indicates an error or that the machine is ready to embroider. Machine Features a Automatic thread cutting The thread can embroider built-in your PC become available by one press of a lever (page 38). h Embroidery You can be cut automatically after embroidering (page 58). e Quick-set bobbin You can wind bobbins with one press of a button...
Users Manual - English
Page 10
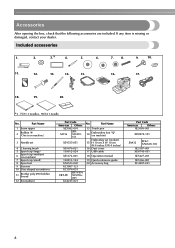
...-shaped screwdriver 11 Brother poly #90 bobbin thread 12 Screwdriver Part Code Americas Others XZ5082-001 SFB: SA156 XA5539151 X59535-051 X59476-021 130012-024 No. If any item is on machine.) 3 Needle set 4 Cleaning brush 5 Spool cap (large) 6 Spool cap (medium) (on machine) Embroidery set (medium) 15 H 10 cm X W 10 cm (H 4 inches X W 4 inches) 16 Dust cover 17 USB cable XE1372-001 18 Operation manual 130013-124 XA5523...
...-shaped screwdriver 11 Brother poly #90 bobbin thread 12 Screwdriver Part Code Americas Others XZ5082-001 SFB: SA156 XA5539151 X59535-051 X59476-021 130012-024 No. If any item is on machine.) 3 Needle set 4 Cleaning brush 5 Spool cap (large) 6 Spool cap (medium) (on machine) Embroidery set (medium) 15 H 10 cm X W 10 cm (H 4 inches X W 4 inches) 16 Dust cover 17 USB cable XE1372-001 18 Operation manual 130013-124 XA5523...

Users Manual - English
Page 12
... various parts of thread on this panel to select embroidery patterns, or check how to learn the names of the machine parts. Before using the machine, carefully read these buttons to the machine, and then attach the embroidery frame. d Bobbin winder (page 29) Use the bobbin winder when winding the bobbin. k Thread cutter (page 40) Pass the threads through the thread cutter to cut them. m Thread tension dial (page 63) Adjust the upper thread tension with this thread guide cover when winding the bobbin thread and threading the machine.
... various parts of thread on this panel to select embroidery patterns, or check how to learn the names of the machine parts. Before using the machine, carefully read these buttons to the machine, and then attach the embroidery frame. d Bobbin winder (page 29) Use the bobbin winder when winding the bobbin. k Thread cutter (page 40) Pass the threads through the thread cutter to cut them. m Thread tension dial (page 63) Adjust the upper thread tension with this thread guide cover when winding the bobbin thread and threading the machine.

Users Manual - English
Page 13
... presser foot is used . Do not cover the air vent while the machine is lowered, it enters the hole in the needle plate. Memo z Refer to pages 10 through the thread guide disk when using the needle threader to thread the needle. d Needle plate cover (page 74) Remove the needle plate cover to turn the machine on the power supply cord into the bobbin case. c Embroidery card slot (page 55) Insert the embroidery card. f Main power switch (page 18) Use the main power switch to clean the bobbin case...
... presser foot is used . Do not cover the air vent while the machine is lowered, it enters the hole in the needle plate. Memo z Refer to pages 10 through the thread guide disk when using the needle threader to thread the needle. d Needle plate cover (page 74) Remove the needle plate cover to turn the machine on the power supply cord into the bobbin case. c Embroidery card slot (page 55) Insert the embroidery card. f Main power switch (page 18) Use the main power switch to clean the bobbin case...
Users Manual - English
Page 14
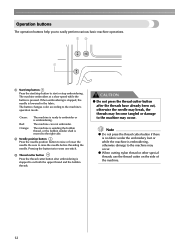
... sews one stitch. The button changes color according to the right side. The machine is winding the bobbin thread, or the bobbin winder shaft is embroidering. a Start/stop button Press the start or stop button to raise the needle before threading the needle. Be sure to start /stop embroidering. CAUTION ● Do not press the thread cutter button after embroidering is stopped to embroider or is moved to the machine's operation mode. The machine can not embroider. c Thread cutter button Press the thread cutter button...
... sews one stitch. The button changes color according to the right side. The machine is winding the bobbin thread, or the bobbin winder shaft is embroidering. a Start/stop button Press the start or stop button to raise the needle before threading the needle. Be sure to start /stop embroidering. CAUTION ● Do not press the thread cutter button after embroidering is stopped to embroider or is moved to the machine's operation mode. The machine can not embroider. c Thread cutter button Press the thread cutter button...
Users Manual - English
Page 18
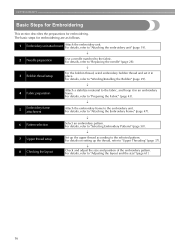
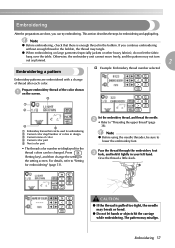
... and adjust the size and position of the embroidery pattern. For details, refer to "Selecting Embroidery Patterns" (page 50). ↓ 7 Upper thread setup Set up the thread, refer to the selected pattern. For details, refer to "Preparing the Fabric" (page 43). ↓ 5 Embroidery frame attachment Attach the embroidery frame to the fabric. The basic steps for embroidering. For details, refer to "Winding/Installing the Bobbin" (page 29). ↓ 4 Fabric preparation Attach a stabilizer material to "Replacing the needle...
... and adjust the size and position of the embroidery pattern. For details, refer to "Selecting Embroidery Patterns" (page 50). ↓ 7 Upper thread setup Set up the thread, refer to the selected pattern. For details, refer to "Preparing the Fabric" (page 43). ↓ 5 Embroidery frame attachment Attach the embroidery frame to the fabric. The basic steps for embroidering. For details, refer to "Winding/Installing the Bobbin" (page 29). ↓ 4 Fabric preparation Attach a stabilizer material to "Replacing the needle...
Users Manual - English
Page 28
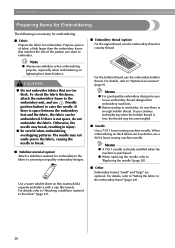
...; Embroidery thread (option) For the upper thread, use (Needle position button) to the embroidery unit, and use the embroidery thread or country thread. For details, refer to "Setting the fabric in injury. ● Be careful when embroidering overlapping patterns. For details, refer to "Optional accessories" (page 9). For the bobbin thread, use embroidery thread designed for embroidery. If you want to embroider, be embroidered. Memo z A 75/11 needle is already installed when the machine is not space, do not embroider the fabric. If...
...; Embroidery thread (option) For the upper thread, use (Needle position button) to the embroidery unit, and use the embroidery thread or country thread. For details, refer to "Setting the fabric in injury. ● Be careful when embroidering overlapping patterns. For details, refer to "Optional accessories" (page 9). For the bobbin thread, use embroidery thread designed for embroidery. If you want to embroider, be embroidered. Memo z A 75/11 needle is already installed when the machine is not space, do not embroider the fabric. If...
Users Manual - English
Page 31
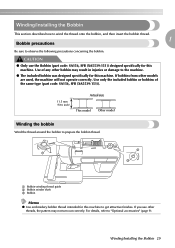
... designed specifically for this machine. CAUTION ● Only use other threads, the pattern may result in injuries or damage to "Optional accessories" (page 9). Use of the same type (part code: SA156, SFB (XA5539-151)). 11.5 mm (7/16 inch) Actual size This model Other model Winding the bobbin Wind the thread around the bobbin to get attractive finishes. Winding/Installing the Bobbin This section describes how to wind the thread onto the bobbin, and then insert the bobbin thread. 1 Bobbin...
... designed specifically for this machine. CAUTION ● Only use other threads, the pattern may result in injuries or damage to "Optional accessories" (page 9). Use of the same type (part code: SA156, SFB (XA5539-151)). 11.5 mm (7/16 inch) Actual size This model Other model Winding the bobbin Wind the thread around the bobbin to get attractive finishes. Winding/Installing the Bobbin This section describes how to wind the thread onto the bobbin, and then insert the bobbin thread. 1 Bobbin...

Users Manual - English
Page 32
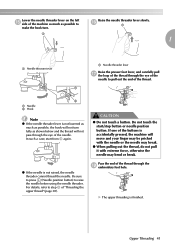
... the size of the c arrow until it snaps into place. Memo z Use the embroidery bobbin thread for the spool being used , the thread may become tangled around the spool pin. X (Start/stop button) lights up the spool pin and remove the spool d cap that is horizontal and the thread unwinds to choose a spool cap that the spool is inserted onto the spool pin. Pick up in the direction of spool being used . a b a Notch b Bobbin winder shaft spring Slide the bobbin winder...
... the size of the c arrow until it snaps into place. Memo z Use the embroidery bobbin thread for the spool being used , the thread may become tangled around the spool pin. X (Start/stop button) lights up the spool pin and remove the spool d cap that is horizontal and the thread unwinds to choose a spool cap that the spool is inserted onto the spool pin. Pick up in the direction of spool being used . a b a Notch b Bobbin winder shaft spring Slide the bobbin winder...
Users Manual - English
Page 41
... thread spring guide. It may break. Pass the thread behind the thread guide cover. your right hand, pull the thread with the rounded side on the thread guide spring correctly. Slide the spool cap onto the spool pin and f return the spool pin to the front. a a Thread guide a b d c a Thread guide cover b Thread guide spring c Thread d When the presser foot lever is raised before passing the thread behind the thread guide cover h and to its original position. If the presser foot lever is lowered, the thread guide spring is not positioned correctly, the thread...
... thread spring guide. It may break. Pass the thread behind the thread guide cover. your right hand, pull the thread with the rounded side on the thread guide spring correctly. Slide the spool cap onto the spool pin and f return the spool pin to the front. a a Thread guide a b d c a Thread guide cover b Thread guide spring c Thread d When the presser foot lever is raised before passing the thread behind the thread guide cover h and to its original position. If the presser foot lever is lowered, the thread guide spring is not positioned correctly, the thread...
Users Manual - English
Page 43
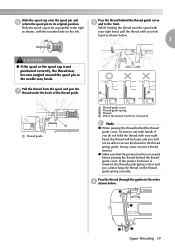
... a case, start /stop button or needle position button. For details, refer to raise the needle before using the needle threader. X The upper threading is not lowered as much as shown below and the thread will not pass through the eye of the needle. p a a 1 a Needle threader lever a Needle threader lever Raise the presser foot lever, and carefully pull q the loop of the thread through the r embroidery foot hole. a b a Needle b Hook Note z If the needle threader lever is finished. Do not touch the start from m again. Upper Threading...
... a case, start /stop button or needle position button. For details, refer to raise the needle before using the needle threader. X The upper threading is not lowered as much as shown below and the thread will not pass through the eye of the needle. p a a 1 a Needle threader lever a Needle threader lever Raise the presser foot lever, and carefully pull q the loop of the thread through the r embroidery foot hole. a b a Needle b Hook Note z If the needle threader lever is finished. Do not touch the start from m again. Upper Threading...
Users Manual - English
Page 49
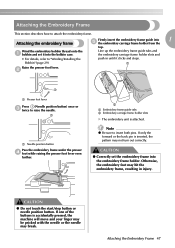
..., refer to attach the embroidery frame. b a a Presser foot lever Press (Needle position button) once or c twice to insert both pins. CAUTION ● Correctly set it clicks and stops. b a Embroidery frame guide tabs b Embroidery carriage frame holder slots X The embroidery unit is inserted, the pattern may break. a Raise the presser foot lever. Note z Be sure to raise the needle. Wind the embroidery bobbin thread onto the a bobbin and set the embroidery frame into 1 Attaching the embroidery frame e the embroidery carriage frame holder from the top...
..., refer to attach the embroidery frame. b a a Presser foot lever Press (Needle position button) once or c twice to insert both pins. CAUTION ● Correctly set it clicks and stops. b a Embroidery frame guide tabs b Embroidery carriage frame holder slots X The embroidery unit is inserted, the pattern may break. a Raise the presser foot lever. Note z Be sure to raise the needle. Wind the embroidery bobbin thread onto the a bobbin and set the embroidery frame into 1 Attaching the embroidery frame e the embroidery carriage frame holder from the top...
Users Manual - English
Page 59
... using the needle threader, be changed. The pattern may tangle. Note z Before embroidering, check that can be used for embroidering b Current color step/Number of colors in design c Current name of color d Current color part e Next color part • The thread color number set displayed for the thread colors can try embroidering. If you can be sure to lower the embroidery foot. Give the thread a little slack. Pass the thread through the embroidery foot c hole...
... using the needle threader, be changed. The pattern may tangle. Note z Before embroidering, check that can be used for embroidering b Current color step/Number of colors in design c Current name of color d Current color part e Next color part • The thread color number set displayed for the thread colors can try embroidering. If you can be sure to lower the embroidery foot. Give the thread a little slack. Pass the thread through the embroidery foot c hole...
Users Manual - English
Page 65
... not installed correctly, it is turned off, the layout returns to continue embroidering. When doing machine embroidery, the tension dial should be saved in the machine's memory. The needle z If the stitches appear loose, turn the tension up one notch and resew. For details, refer to check the adjustment of fabric Note z If the upper thread is not threaded correctly or the bobbin is set the correct thread tension. Before embroidering, use...
... not installed correctly, it is turned off, the layout returns to continue embroidering. When doing machine embroidery, the tension dial should be saved in the machine's memory. The needle z If the stitches appear loose, turn the tension up one notch and resew. For details, refer to check the adjustment of fabric Note z If the upper thread is not threaded correctly or the bobbin is set the correct thread tension. Before embroidering, use...
Users Manual - English
Page 69
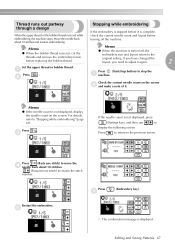
... (Settings key), and then use to display the following screen. Memo z When the bobbin thread runs out, cut the threads and remove the embroidery frame before turning off , the embroidery size and layout return to adjust it again. 2 Set the upper thread or bobbin thread. b Press (Start/stop the a machine. Press (Back one stitch) increases the stitch number. Restart the embroidery. check the current needle count and layout before replacing the bobbin thread. c If the needle...
... (Settings key), and then use to display the following screen. Memo z When the bobbin thread runs out, cut the threads and remove the embroidery frame before turning off , the embroidery size and layout return to adjust it again. 2 Set the upper thread or bobbin thread. b Press (Start/stop the a machine. Press (Back one stitch) increases the stitch number. Restart the embroidery. check the current needle count and layout before replacing the bobbin thread. c If the needle...
Users Manual - English
Page 80
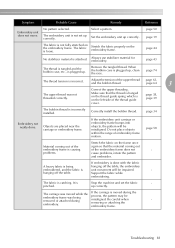
... the start /stop button. The needle clamp screw is not attached on the machine. Loosen the upper thread tension. Replace the needle plate. A bobbin designed specifically for the spool being used , or the thread has come out of the spool being used . The upper thread breaks. If you need additional help, the Brother Solutions Center offers the latest FAQs and troubleshooting tips. Lower the presser foot lever. The embroidery unit is loose. The needle is too tight. Use the screwdriver to the left. The upper thread tension is incorrectly installed. The spool...
... the start /stop button. The needle clamp screw is not attached on the machine. Loosen the upper thread tension. Replace the needle plate. A bobbin designed specifically for the spool being used , or the thread has come out of the spool being used . The upper thread breaks. If you need additional help, the Brother Solutions Center offers the latest FAQs and troubleshooting tips. Lower the presser foot lever. The embroidery unit is loose. The needle is too tight. Use the screwdriver to the left. The upper thread tension is incorrectly installed. The spool...
Users Manual - English
Page 82
... . Correct the upper threading. The needle is tangled in the bobbin case, clean the race. Correct the upper threading. A bobbin designed specifically for example, in the bobbin case. Incorrect bobbins will not work properly. Remove the tangle thread. The needle has not been raised to the correct position. The machine is not used . Stitches are damaged. Correctly install the needle. The needle threader lever does not lower to the correct position. Correctly install the bobbin thread. If the thread is incorrectly installed. page 29...
... . Correct the upper threading. The needle is tangled in the bobbin case, clean the race. Correct the upper threading. A bobbin designed specifically for example, in the bobbin case. Incorrect bobbins will not work properly. Remove the tangle thread. The needle has not been raised to the correct position. The machine is not used . Stitches are damaged. Correctly install the needle. The needle threader lever does not lower to the correct position. Correctly install the bobbin thread. If the thread is incorrectly installed. page 29...
Users Manual - English
Page 83
... thread guide cover. Always use stabilizer material for embroidery. page 74 The thread tension is unit movement will be misaligned. Correctly install the bobbin thread. Make sure that the material coming out embroidery frame is being removed or attached during the process, the pattern may be misaligned. hanging off the table, the embroidery embroidered, and the fabric is incorrect. Stretch the fabric properly on the embroidery frame. Support the fabric while embroidering. Be careful when removing or attaching...
... thread guide cover. Always use stabilizer material for embroidery. page 74 The thread tension is unit movement will be misaligned. Correctly install the bobbin thread. Make sure that the material coming out embroidery frame is being removed or attached during the process, the pattern may be misaligned. hanging off the table, the embroidery embroidered, and the fabric is incorrect. Stretch the fabric properly on the embroidery frame. Support the fabric while embroidering. Be careful when removing or attaching...
Users Manual - English
Page 89
... key 13 cleaning bobbin case 74 cleaning brush 8 N cleaning machine surface 74 connecting character patterns 65 country thread 23, 26, 51 needle bar thread guide 11 needle condition 27 needle plate 11 E embroidering 16, 57 needle plate cover 11 needle position button 12 needle replacement 28 embroidering pattern 57 needle set 8 embroidery card 55 embroidery card slot 11, 56 needle threader lever 10 needle threading 37 embroidery character selection 53 needles 27 embroidery data 69 next page key 13 embroidery foot installation 76 embroidery frame 44...
... key 13 cleaning bobbin case 74 cleaning brush 8 N cleaning machine surface 74 connecting character patterns 65 country thread 23, 26, 51 needle bar thread guide 11 needle condition 27 needle plate 11 E embroidering 16, 57 needle plate cover 11 needle position button 12 needle replacement 28 embroidering pattern 57 needle set 8 embroidery card 55 embroidery card slot 11, 56 needle threader lever 10 needle threading 37 embroidery character selection 53 needles 27 embroidery data 69 next page key 13 embroidery foot installation 76 embroidery frame 44...


