
Instruction Manual
Page 2
... the "PE-DESIGN Software Key". • Do not drop or hit the "PE-DESIGN Software Key". For repairs or adjustments • In the event that you to ensure safe and correct operation, please read before using this device and to create a wide variety of embroidery designs and supports a wider range of the software. SAVE THESE INSTRUCTIONS This product is the retail price of sewing attribute settings (thread density, sewing pitch, etc...
... the "PE-DESIGN Software Key". • Do not drop or hit the "PE-DESIGN Software Key". For repairs or adjustments • In the event that you to ensure safe and correct operation, please read before using this device and to create a wide variety of embroidery designs and supports a wider range of the software. SAVE THESE INSTRUCTIONS This product is the retail price of sewing attribute settings (thread density, sewing pitch, etc...
Instruction Manual
Page 3
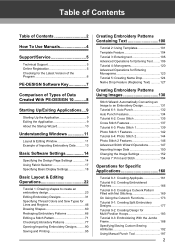
Table of Contents Table of Contents 2 How To Use Manuals 4 Support/Service 5 Technical Support 5 Online Registration 5 Checking for the Latest Version of the Program 6 PE-DESIGN Software Key 7 Comparison of Types of Data Created With PE-DESIGN 10...........8 Starting Up/Exiting Applications....9 Starting Up the Application 9 Exiting the Application 9 About the Startup Wizard 10 Understanding Windows 11 Layout & Editing Window 11 Example of Importing Embroidery Data .......... 13 Basic Software Settings 14 Specifying...
Table of Contents Table of Contents 2 How To Use Manuals 4 Support/Service 5 Technical Support 5 Online Registration 5 Checking for the Latest Version of the Program 6 PE-DESIGN Software Key 7 Comparison of Types of Data Created With PE-DESIGN 10...........8 Starting Up/Exiting Applications....9 Starting Up the Application 9 Exiting the Application 9 About the Startup Wizard 10 Understanding Windows 11 Layout & Editing Window 11 Example of Importing Embroidery Data .......... 13 Basic Software Settings 14 Specifying...
Instruction Manual
Page 5
... operations. The procedures in this software is used on how to the embroidery machine. Read the appropriate chapter when necessary. Menus/Tools and Reference: Provides lists of the [Start] screen to show the [All Apps] view, and then Click [Instruction Manual] under the title [PE-DESIGN 10] in addition to the procedure for updating the software. It can be installed. Each descriptive title allows you need...
... operations. The procedures in this software is used on how to the embroidery machine. Read the appropriate chapter when necessary. Menus/Tools and Reference: Provides lists of the [Start] screen to show the [All Apps] view, and then Click [Instruction Manual] under the title [PE-DESIGN 10] in addition to the procedure for updating the software. It can be installed. Each descriptive title allows you need...
Instruction Manual
Page 6
... updates. Have the make and model of the Web browser. This information will help expedite your computer and Windows® Operating System. (Refer to find the Technical Support in some areas. 5 The online registration page on our Web site. Click in the address bar of your questions more quickly. Make sure PE-DESIGN 10 is current with any updates. Support/Service Technical Support Contact Technical Support...
... updates. Have the make and model of the Web browser. This information will help expedite your computer and Windows® Operating System. (Refer to find the Technical Support in some areas. 5 The online registration page on our Web site. Click in the address bar of your questions more quickly. Make sure PE-DESIGN 10 is current with any updates. Support/Service Technical Support Contact Technical Support...
Instruction Manual
Page 16
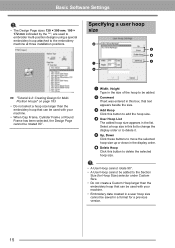
... the display order. e Up, Down Click these buttons to be added. d User Hoop List The added hoop size appears in the size of the hoop to move the selected hoop size up or down in this box, that can be used to embroider multi-position designs using a special embroidery hoop attached to delete it. a Width, Height Type in the list. Basic Software Settings a • The Design Page sizes 130 × 300 mm, 100 ×...
... the display order. e Up, Down Click these buttons to be added. d User Hoop List The added hoop size appears in the size of the hoop to move the selected hoop size up or down in this box, that can be used to embroider multi-position designs using a special embroidery hoop attached to delete it. a Width, Height Type in the list. Basic Software Settings a • The Design Page sizes 130 × 300 mm, 100 ×...
Instruction Manual
Page 118
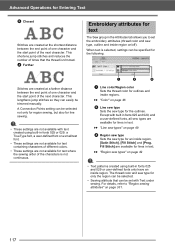
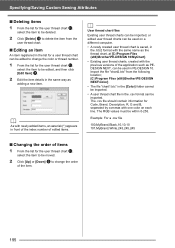
... of times that can be set the embroidery attributes (thread color and sew type, outline and inside region. [Satin Stitch], [Fill Stitch] and [Prog. Fill Stitch] are created at a farther distance between the end point of one character and the start point of the next character. For details, refer to set with text created using built-in fonts 025 and 029, and a user-defined...
... of times that can be set the embroidery attributes (thread color and sew type, outline and inside region. [Satin Stitch], [Fill Stitch] and [Prog. Fill Stitch] are created at a farther distance between the end point of one character and the start point of the next character. For details, refer to set with text created using built-in fonts 025 and 029, and a user-defined...

Instruction Manual
Page 144
... thread colors are listed, in order, starting from the chart selected in the [Thread Chart] selector. To use added thread colors and automatically select other thread colors, select the [Auto Select] check box, and then update. • The thread colors in the list of colors used to adjust the brightness. b Creating beautiful photo embroidery • [Brother Chart (Photo Stitch)] in the [Thread Chart] selector is lowered, the sewing pitch (stitch length...
... thread colors are listed, in order, starting from the chart selected in the [Thread Chart] selector. To use added thread colors and automatically select other thread colors, select the [Auto Select] check box, and then update. • The thread colors in the list of colors used to adjust the brightness. b Creating beautiful photo embroidery • [Brother Chart (Photo Stitch)] in the [Thread Chart] selector is lowered, the sewing pitch (stitch length...

Instruction Manual
Page 149
... To Stitch function is available only with a different one. Drag the handle to adjust the image to the desired position. a b c d a Adjust the position and size of the list. a A mask shape edited with or created by clicking [Auto Generate] will be selected the next time a pattern is created using a Stitch Wizard. The [Open an image file] dialog box appears. d Embroidery pattern size 148 The [Auto Generate] button...
... To Stitch function is available only with a different one. Drag the handle to adjust the image to the desired position. a b c d a Adjust the position and size of the list. a A mask shape edited with or created by clicking [Auto Generate] will be selected the next time a pattern is created using a Stitch Wizard. The [Open an image file] dialog box appears. d Embroidery pattern size 148 The [Auto Generate] button...
Instruction Manual
Page 178
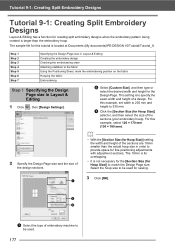
... embroidering order Attaching stabilizer to match the Design Page size. c Click the [Section Size (for this tutorial is located at Documents (My documents)\PE-DESIGN 10\Tutorial\Tutorial_9. The 10mm is for overlapping. • It is not necessary for the [Section Size (for Hoop Size)] to the fabric Using the Positioning Sheet, mark the embroidering position on the fabric Hooping the fabric Embroidering Step 1 Specifying the Design Page size in Layout & Editing 1 Click , then [Design Settings...
... embroidering order Attaching stabilizer to match the Design Page size. c Click the [Section Size (for this tutorial is located at Documents (My documents)\PE-DESIGN 10\Tutorial\Tutorial_9. The 10mm is for overlapping. • It is not necessary for the [Section Size (for Hoop Size)] to the fabric Using the Positioning Sheet, mark the embroidering position on the fabric Hooping the fabric Embroidering Step 1 Specifying the Design Page size in Layout & Editing 1 Click , then [Design Settings...

Instruction Manual
Page 180
... adhesive, spray the adhesive onto a hooped piece of stabilizer that are many types of stabilizer for your embroidery. Step 5 Using the Positioning Sheet, mark the embroidering position on the fabric, and mark points A, B, C and D. When printing the positioning sheet from the PDF file, be sure to print it at actual size. In some cases, you may need to use two pieces of a marking pen...
... adhesive, spray the adhesive onto a hooped piece of stabilizer that are many types of stabilizer for your embroidery. Step 5 Using the Positioning Sheet, mark the embroidering position on the fabric, and mark points A, B, C and D. When printing the positioning sheet from the PDF file, be sure to print it at actual size. In some cases, you may need to use two pieces of a marking pen...
Instruction Manual
Page 186
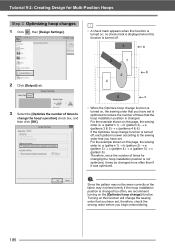
... change the sewing order that you begin embroidering. 185 a Since the pattern may not feed evenly if the hoop installation position is changed too often, we recommend turning on this function is turned off , each pattern is sewn according to reduce the number of times for Multi-Position Hoops Step 3 Optimizing hoop changes 1 Click , then [Design Settings]. For the example shown on the [Optimize hoop change] function. Tutorial 9-2: Creating Design for changing the hoop installation position...
... change the sewing order that you begin embroidering. 185 a Since the pattern may not feed evenly if the hoop installation position is changed too often, we recommend turning on this function is turned off , each pattern is sewn according to reduce the number of times for Multi-Position Hoops Step 3 Optimizing hoop changes 1 Click , then [Design Settings]. For the example shown on the [Optimize hoop change] function. Tutorial 9-2: Creating Design for changing the hoop installation position...

Instruction Manual
Page 193
... used sewing attributes Frequently used sewing attributes can be saved in a user thread chart. 1 Click [Option], then [Options]. 192 Single right click on C:\Program Files (x86)\Brother\PE-DESIGN 10\Settings. b Sewing attributes appropriate for that are already available. a b Operations for Specific Applications 4 Type in a name for the group of thread colors that fabric. 2 Click [Load]. The settings in a list. Simply copy [sastu.txt] from [C:\Program Files (x86)\Brother\PE-DESIGN 10\Settings...
... used sewing attributes Frequently used sewing attributes can be saved in a user thread chart. 1 Click [Option], then [Options]. 192 Single right click on C:\Program Files (x86)\Brother\PE-DESIGN 10\Settings. b Sewing attributes appropriate for that are already available. a b Operations for Specific Applications 4 Type in a name for the group of thread colors that fabric. 2 Click [Load]. The settings in a list. Simply copy [sastu.txt] from [C:\Program Files (x86)\Brother\PE-DESIGN 10\Settings...
Instruction Manual
Page 196
... (x86)\Brother\PE-DESIGN 10\MyChart]. • Existing user thread charts, created with newly added items, an asterisk (*) appears in front of the index number of the application such as adding a new item. The RGB values must be edited, and then click [Edit Item] g. 2 Edit the item details in the same way as PEDESIGN NEXT, can be used on...
... (x86)\Brother\PE-DESIGN 10\MyChart]. • Existing user thread charts, created with newly added items, an asterisk (*) appears in front of the index number of the application such as adding a new item. The RGB values must be edited, and then click [Edit Item] g. 2 Edit the item details in the same way as PEDESIGN NEXT, can be used on...

Instruction Manual
Page 206
... b, continue the operation by using the machine's operation panel. Color change Change the thread spool on the machine. Check thread Check the bobbin thread or the upper thread on the embroidery machine to the transferred design area. The received data can be sent to the [Link] dialog, repeat step 4 for each design. The [Link] dialog will be specified. While the data is sewing. b The transferred data cannot be embroidered. If...
... b, continue the operation by using the machine's operation panel. Color change Change the thread spool on the machine. Check thread Check the bobbin thread or the upper thread on the embroidery machine to the transferred design area. The received data can be sent to the [Link] dialog, repeat step 4 for each design. The [Link] dialog will be specified. While the data is sewing. b The transferred data cannot be embroidered. If...

Instruction Manual
Page 235
... [Pattern]. a An additional color (used for the region sewing and [Manual] has been selected as the sewing direction. b Move the sliders to adjust the density of thread colors, click the desired color. Design Center 3 Select the desired color and sew type ([Concentric Circle Stitch] or [Radial Stitch]). 234 Sew Setting Stage 4 From the [Thread Chart] selector, select a thread color chart or a user thread chart. 2 Specify the desired settings in Design Center...
... [Pattern]. a An additional color (used for the region sewing and [Manual] has been selected as the sewing direction. b Move the sliders to adjust the density of thread colors, click the desired color. Design Center 3 Select the desired color and sew type ([Concentric Circle Stitch] or [Radial Stitch]). 234 Sew Setting Stage 4 From the [Thread Chart] selector, select a thread color chart or a user thread chart. 2 Specify the desired settings in Design Center...
Instruction Manual
Page 256
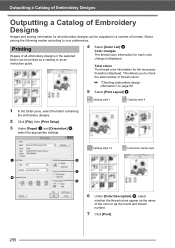
... the embroidery designs. 2 Click [File], then [Print Setup]. 3 Under [Paper] a and [Orientation] b, select the appropriate settings. Color changes The thread color information for the necessary threads is displayed. This allows you to your preferences. Catalog style 12 Instruction Guide style a d b c e 6 Under [Color Description] e, select whether the thread colors appear as the name of all embroidery designs can be outputted in a number of thread colors...
... the embroidery designs. 2 Click [File], then [Print Setup]. 3 Under [Paper] a and [Orientation] b, select the appropriate settings. Color changes The thread color information for the necessary threads is displayed. This allows you to your preferences. Catalog style 12 Instruction Guide style a d b c e 6 Under [Color Description] e, select whether the thread colors appear as the name of all embroidery designs can be outputted in a number of thread colors...

Instruction Manual
Page 296
... enlarging/reducing the stitch pattern. However, the needle drop point pattern is enlarged/reduced. a This software allows you to use the same needle and the same machine embroidery thread. However, the final result also depends on your sewing data before sewing on the same type of fabric as your final material and to create a wide variety of embroidery patterns and supports wider ranges for the setting of the area...
... enlarging/reducing the stitch pattern. However, the needle drop point pattern is enlarged/reduced. a This software allows you to use the same needle and the same machine embroidery thread. However, the final result also depends on your sewing data before sewing on the same type of fabric as your final material and to create a wide variety of embroidery patterns and supports wider ranges for the setting of the area...

Instruction Manual
Page 351
... 44 Online Registration 5 Open paths 64 Opening .pem files 222 .pes file 90 Background images 271 Clipboard images 151, 222 Embroidery patterns 94, 245 Images 150, 222 Layout & Editing file 90 New Design Page 90 New figure handle images 222 New line images 222 New stitch pattern 266 Stitch patterns 260 TWAIN images 151 Optimizing Hoop changes 185, 188 Option Design Property 186 Edit User Thread Chart 192 Option button 11...
... 44 Online Registration 5 Open paths 64 Opening .pem files 222 .pes file 90 Background images 271 Clipboard images 151, 222 Embroidery patterns 94, 245 Images 150, 222 Layout & Editing file 90 New Design Page 90 New figure handle images 222 New line images 222 New stitch pattern 266 Stitch patterns 260 TWAIN images 151 Optimizing Hoop changes 185, 188 Option Design Property 186 Edit User Thread Chart 192 Option button 11...

Startup : Reference Guide
Page 4
...-3(B)/NMB-3(B) Important Changes or modifications not expressly approved by turning the equipment off and on a circuit different from that the products Product Name: Brother PE-DESIGN Software Key Model Numbers: PE-DESIGN 10 / PE-DESIGN 10U complies with the instructions, may cause undesired operation. could void the user's authority to comply with the limits for help. Reorient or relocate the receiving antenna. - This equipment generates, uses, and...
...-3(B)/NMB-3(B) Important Changes or modifications not expressly approved by turning the equipment off and on a circuit different from that the products Product Name: Brother PE-DESIGN Software Key Model Numbers: PE-DESIGN 10 / PE-DESIGN 10U complies with the instructions, may cause undesired operation. could void the user's authority to comply with the limits for help. Reorient or relocate the receiving antenna. - This equipment generates, uses, and...
Startup : Reference Guide
Page 5
... unit and to use . For safe operation • Do not save any files on the "PE-DESIGN Software Key". • Do not drop or hit the "PE-DESIGN Software Key". Important Using this unit for unauthorized copying of sewing attribute settings (thread density, sewing pitch, etc.). For additional product information and updates, visit our web site at: http://www.brother.com/ or http://support.brother.com/ Please read...
... unit and to use . For safe operation • Do not save any files on the "PE-DESIGN Software Key". • Do not drop or hit the "PE-DESIGN Software Key". Important Using this unit for unauthorized copying of sewing attribute settings (thread density, sewing pitch, etc.). For additional product information and updates, visit our web site at: http://www.brother.com/ or http://support.brother.com/ Please read...


