Users Manual - English
Page 2
...not operate where aerosol (spray) products are leaving the machine unattended. Keep ventilation openings of lint, dust, and loose cloth. • Do not use extension cords. WARNING - Return the machine to the needle. Special care is required around the machine needle. • Switch the machine to the...electrical or mechanical adjustment. 4 Always keep your machine if the power is cut. 3 Never operate this manual, or if you are being used or where oxygen is being administered. 5 Special care is spilled on the cord. • Plug the machine directly into any adjustments mentioned ...
...not operate where aerosol (spray) products are leaving the machine unattended. Keep ventilation openings of lint, dust, and loose cloth. • Do not use extension cords. WARNING - Return the machine to the needle. Special care is required around the machine needle. • Switch the machine to the...electrical or mechanical adjustment. 4 Always keep your machine if the power is cut. 3 Never operate this manual, or if you are being used or where oxygen is being administered. 5 Special care is spilled on the cord. • Plug the machine directly into any adjustments mentioned ...

Users Manual - English
Page 3
If the problem persists, please consult your local authorized Brother dealer. Use this machine only for household use. 1 Benzene, thinner, and scouring powders can damage the case and machine, and should never be used by or near a space heater, iron, halogen lamp, or other parts to assure correct ...needle, or other hot objects. • Use only neutral soaps or detergents to clean the case. For additional product information and updates, visit our web site at www.brother.com SAVE THESE INSTRUCTIONS This machine is intended for its intended use outdoors. 7 For a longer service life:...
If the problem persists, please consult your local authorized Brother dealer. Use this machine only for household use. 1 Benzene, thinner, and scouring powders can damage the case and machine, and should never be used by or near a space heater, iron, halogen lamp, or other parts to assure correct ...needle, or other hot objects. • Use only neutral soaps or detergents to clean the case. For additional product information and updates, visit our web site at www.brother.com SAVE THESE INSTRUCTIONS This machine is intended for its intended use outdoors. 7 For a longer service life:...

Users Manual - English
Page 4
...the correct lead. FOR USERS IN THE UK, EIRE, MALTA AND CYPRUS ONLY IMPORTANT • In the event of replacing the plug fuse, use a fuse approved by persons (including children) with reduced physical, sensory or mental capabilities, or lack of the appliance by a person responsible for... the plug supplied with the appliance. 2 Children should be supervised to ensure that they have been given supervision or instruction concerning use of experience and knowledge, unless they do not play with this equipment, you should contact your authorized dealer to BS 1362, i.e. FOR ...
...the correct lead. FOR USERS IN THE UK, EIRE, MALTA AND CYPRUS ONLY IMPORTANT • In the event of replacing the plug fuse, use a fuse approved by persons (including children) with reduced physical, sensory or mental capabilities, or lack of the appliance by a person responsible for... the plug supplied with the appliance. 2 Children should be supervised to ensure that they have been given supervision or instruction concerning use of experience and knowledge, unless they do not play with this equipment, you should contact your authorized dealer to BS 1362, i.e. FOR ...

Users Manual - English
Page 5
... bobbin ...28 Upper Threading ...30 About the spool of thread ...30 Threading the upper thread ...30 Threading the needle ...32 Threading the needle manually (without using the needle threader 34 Replacing the Needle ...35 Needle precautions ...35 Checking the needle ...35 Replacing the needle...36 EMBROIDERY 39 Embroidering Neatly ...40 What...
... bobbin ...28 Upper Threading ...30 About the spool of thread ...30 Threading the upper thread ...30 Threading the needle ...32 Threading the needle manually (without using the needle threader 34 Replacing the Needle ...35 Needle precautions ...35 Checking the needle ...35 Replacing the needle...36 EMBROIDERY 39 Embroidering Neatly ...40 What...

Users Manual - English
Page 6
Using an embroidery card (sold separately) ...55 Embroidering ...56 Embroidering attractive finishes...56 Embroidering a pattern ...57 Appliquéing ...59 Editing and Saving Patterns 61 Adjusting ...
Using an embroidery card (sold separately) ...55 Embroidering ...56 Embroidering attractive finishes...56 Embroidering a pattern ...57 Appliquéing ...59 Editing and Saving Patterns 61 Adjusting ...

Users Manual - English
Page 7
Before using the machine, carefully read the "IMPORTANT SAFETY INSTRUCTIONS", and then study this manual for purchasing this manual, store it where it can be wound with ...
Before using the machine, carefully read the "IMPORTANT SAFETY INSTRUCTIONS", and then study this manual for purchasing this manual, store it where it can be wound with ...

Users Manual - English
Page 10
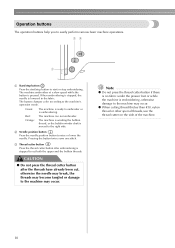
... needle threader lever to the machine, and then attach the embroidery frame. Before using the machine can be selected and edited, and operations for using the machine, carefully read these buttons to operate the machine. b Thread guide cover Like with the thread guide plate, pass ...and lower the presser foot lever to raise and lower the presser foot j Operation buttons Use these descriptions to check the position of the machine and their functions are described below. f Bobbin winder Use the bobbin winder when winding the bobbin. g Operation panel From the operation panel, patterns...
... needle threader lever to the machine, and then attach the embroidery frame. Before using the machine can be selected and edited, and operations for using the machine, carefully read these buttons to operate the machine. b Thread guide cover Like with the thread guide plate, pass ...and lower the presser foot lever to raise and lower the presser foot j Operation buttons Use these descriptions to check the position of the machine and their functions are described below. f Bobbin winder Use the bobbin winder when winding the bobbin. g Operation panel From the operation panel, patterns...

Users Manual - English
Page 11
... needle threader to turn the machine on the power supply cord into the bobbin case. c Needle plate When the needle is used . f Main power switch Use the main power switch to thread the needle. Memo z Refer to pages 8 through the needle bar thread guide. c Embroidery card slot Insert the ...embroidery card. d Air vent The air vent allows the air surrounding the motor to use your machine. 9 Do not cover the air vent while the machine is being used for embroidering. b Needle bar thread guide Pass the upper thread through 11 while you (counterclockwise) to clean...
... needle threader to turn the machine on the power supply cord into the bobbin case. c Needle plate When the needle is used . f Main power switch Use the main power switch to thread the needle. Memo z Refer to pages 8 through the needle bar thread guide. c Embroidery card slot Insert the ...embroidery card. d Air vent The air vent allows the air surrounding the motor to use your machine. 9 Do not cover the air vent while the machine is being used for embroidering. b Needle bar thread guide Pass the upper thread through 11 while you (counterclockwise) to clean...
Users Manual - English
Page 12
... needle position button to start /stop button to raise or lower the needle. z When cutting thread thicker than #30, nylon thread or other special threads, use the thread cutter on the side of the machine. 10 Green: The machine is ready to the machine may occur. Pressing the button twice sews...
... needle position button to start /stop button to raise or lower the needle. z When cutting thread thicker than #30, nylon thread or other special threads, use the thread cutter on the side of the machine. 10 Green: The machine is ready to the machine may occur. Pressing the button twice sews...
Users Manual - English
Page 13
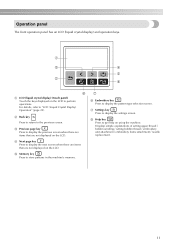
...) Touch the keys displayed on the LCD. d Next page key Press to display the next screen when there are items that are not displayed on using the machine. g f Embroidery key Press to perform operations. Displays simple explanations of setting upper thread / bobbin winding / setting bobbin thread / embroidery unit attachment / embroidery frame...
...) Touch the keys displayed on the LCD. d Next page key Press to display the next screen when there are items that are not displayed on using the machine. g f Embroidery key Press to perform operations. Displays simple explanations of setting upper thread / bobbin winding / setting bobbin thread / embroidery unit attachment / embroidery frame...

Users Manual - English
Page 15
... bobbin 28 Upper Threading ...30 About the spool of thread 30 Threading the upper thread 30 Threading the needle 32 Threading the needle manually (without using the needle threader 34 Replacing the Needle 35 Needle precautions 35 Checking the needle 35 Replacing the needle 36
... bobbin 28 Upper Threading ...30 About the spool of thread 30 Threading the upper thread 30 Threading the needle 32 Threading the needle manually (without using the needle threader 34 Replacing the Needle 35 Needle precautions 35 Checking the needle 35 Replacing the needle 36

Users Manual - English
Page 16
... the embroidery unit is not attached, the machine does not operate.) For details, refer to "Attaching the embroidery unit" (page 15). ↓ 2 Checking the needle Use a needle matched to "Attaching the Embroidery Frame" (page 47). ↓ 6 Selecting a pattern Select an embroidery pattern. For details, refer to "Winding/Installing the Bobbin" (page...
... the embroidery unit is not attached, the machine does not operate.) For details, refer to "Attaching the embroidery unit" (page 15). ↓ 2 Checking the needle Use a needle matched to "Attaching the Embroidery Frame" (page 47). ↓ 6 Selecting a pattern Select an embroidery pattern. For details, refer to "Winding/Installing the Bobbin" (page...
Users Manual - English
Page 20
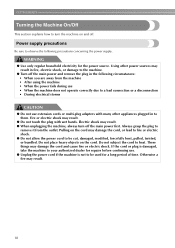
...regular household electricity for a long period of time. Always grasp the plug to remove it from the machine • After using the machine • When the power fails during use • When the machine does not operate correctly due to a bad connection or a disconnection • During electrical storms ...Be sure to observe the following circumstances: • When you are away from the outlet. Do not subject the cord to heat. Using other appliances plugged in the following precautions concerning the power supply. Do not place heavy objects on the cord may result in fire, ...
...regular household electricity for a long period of time. Always grasp the plug to remove it from the machine • After using the machine • When the power fails during use • When the machine does not operate correctly due to a bad connection or a disconnection • During electrical storms ...Be sure to observe the following circumstances: • When you are away from the outlet. Do not subject the cord to heat. Using other appliances plugged in the following precautions concerning the power supply. Do not place heavy objects on the cord may result in fire, ...
Users Manual - English
Page 21
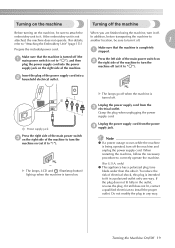
..., the machine does not operate. (For details, In addition, before transporting the machine to another location, be sure to attach the When you are finished using the machine, turn it off. If it . If the embroidery unit is turned off the machine and unplug the power supply cord. Turning the Machine...
..., the machine does not operate. (For details, In addition, before transporting the machine to another location, be sure to attach the When you are finished using the machine, turn it off. If it . If the embroidery unit is turned off the machine and unplug the power supply cord. Turning the Machine...
Users Manual - English
Page 22
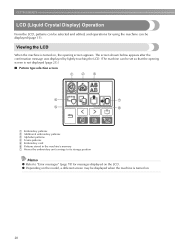
... e Embroidery card f Patterns stored in the machine's memory g Moves the embroidery unit carriage to its storage position Memo z Refer to "Error messages" (page 78) for using the machine can be displayed (page 11). GETTING READY LCD (Liquid Crystal Display) Operation From the LCD, patterns can be selected and edited, and operations...
... e Embroidery card f Patterns stored in the machine's memory g Moves the embroidery unit carriage to its storage position Memo z Refer to "Error messages" (page 78) for using the machine can be displayed (page 11). GETTING READY LCD (Liquid Crystal Display) Operation From the LCD, patterns can be selected and edited, and operations...
Users Manual - English
Page 23
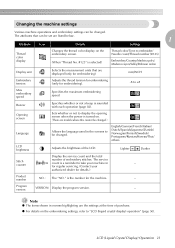
... the maximum embroidering speed. Buzzer Specifies whether or not a beep is turned on. (There are models where this cannot be changed.) Language Allows the language used in the screens to be changed . Opening screen Sets whether or not to display the opening screen when the power is sounded with each operation...
... the maximum embroidering speed. Buzzer Specifies whether or not a beep is turned on. (There are models where this cannot be changed.) Language Allows the language used in the screens to be changed . Opening screen Sets whether or not to display the opening screen when the power is sounded with each operation...
Users Manual - English
Page 24
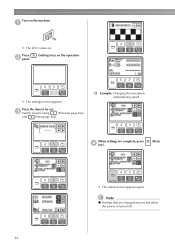
a X The LCD comes on the operation X The settings screen appears. c Switch screens using (Previous page key) and (Next page key). † Example: Changing the maximum embroidering speed When settings are not lost when the power is turned off. 22 Note z Settings that are changed are complete, press d key). (Back X The initial screen appears again. Press the item to be set. Press b panel. (Settings key) on . GETTING READY Turn on the machine.
a X The LCD comes on the operation X The settings screen appears. c Switch screens using (Previous page key) and (Next page key). † Example: Changing the maximum embroidering speed When settings are not lost when the power is turned off. 22 Note z Settings that are changed are complete, press d key). (Back X The initial screen appears again. Press the item to be set. Press b panel. (Settings key) on . GETTING READY Turn on the machine.
Users Manual - English
Page 26
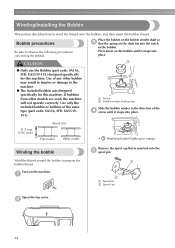
...Bobbin precautions Be sure to prepare the bobbin thread. If bobbins from other bobbin may result in the direction of any other models are used, the machine will not operate correctly. Winding the bobbin Wind the thread around the bobbin to observe the following precautions concerning the bobbin. ... bobbin on the bobbin winder shaft so c that is inserted onto the e spool pin. 1 2 a Spool pin b Spool cap Open the top cover. Use of the d arrow until it snaps into the notch in orange. b 24 Press down on the machine. GETTING READY Winding/Installing the Bobbin This section...
...Bobbin precautions Be sure to prepare the bobbin thread. If bobbins from other bobbin may result in the direction of any other models are used, the machine will not operate correctly. Winding the bobbin Wind the thread around the bobbin to observe the following precautions concerning the bobbin. ... bobbin on the bobbin winder shaft so c that is inserted onto the e spool pin. 1 2 a Spool pin b Spool cap Open the top cover. Use of the d arrow until it snaps into the notch in orange. b 24 Press down on the machine. GETTING READY Winding/Installing the Bobbin This section...
Users Manual - English
Page 27
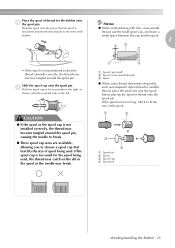
... it to the right, as transparent nylon thread or metallic thread, place the spool net over the spool before placing the spool of spool being used . If the spool net is not installed correctly, the thread may catch on the left. Place the spool of the spool. 1 2 3 4 a Spool net b Spool c Spool... d Spool pin Winding/Installing the Bobbin 25 g Slide the spool cap as far as possible to fit the size of thread for the spool being used , the thread may become tangled around the spool pin, causing the needle to break. ● Three spool cap sizes are available, allowing you to the...
... it to the right, as transparent nylon thread or metallic thread, place the spool net over the spool before placing the spool of spool being used . If the spool net is not installed correctly, the thread may catch on the left. Place the spool of the spool. 1 2 3 4 a Spool net b Spool c Spool... d Spool pin Winding/Installing the Bobbin 25 g Slide the spool cap as far as possible to fit the size of thread for the spool being used , the thread may become tangled around the spool pin, causing the needle to break. ● Three spool cap sizes are available, allowing you to the...
Users Manual - English
Page 29
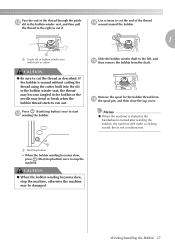
... slit in bobbin winder seat (with built-in cutter) CAUTION ● Be sure to cut it. If the bobbin is wound without cutting the thread using the cutter built into the slit in the bobbin winder seat, the thread may become tangled in the bobbin winder seat, and then pull the... as described. Remove the spool for the bobbin thread from the shaft. Winding/Installing the Bobbin 27 Slide the bobbin winder shaft to run out. Use scissors to cut the end of the thread through the guide l slit in the bobbin or the needle may be damaged. this is turned after...
... slit in bobbin winder seat (with built-in cutter) CAUTION ● Be sure to cut it. If the bobbin is wound without cutting the thread using the cutter built into the slit in the bobbin winder seat, the thread may become tangled in the bobbin winder seat, and then pull the... as described. Remove the spool for the bobbin thread from the shaft. Winding/Installing the Bobbin 27 Slide the bobbin winder shaft to run out. Use scissors to cut the end of the thread through the guide l slit in the bobbin or the needle may be damaged. this is turned after...


