
Accessory Catalog
Page 4
... accessories to add a professional finish to your sewing projects. SA161 All Brother home-use sewing machines www.brother.com Its position can be adjusted exactly on the presser foot. 4. Adjustable Zipper & Piping Foot Brother General Sewing Accessories 06 Adjustable Zipper & Piping Foot Attaches zippers and pipings... that the needle fits on the opening on the edge of zipper/piping, avoiding the non-flat parts of zipper/piping, and presses the fabric with a screwdriver. 5. Brother General Sewing Accessories 05 Sew as you like. Check the needle does not hit the presser foot,...
... accessories to add a professional finish to your sewing projects. SA161 All Brother home-use sewing machines www.brother.com Its position can be adjusted exactly on the presser foot. 4. Adjustable Zipper & Piping Foot Brother General Sewing Accessories 06 Adjustable Zipper & Piping Foot Attaches zippers and pipings... that the needle fits on the opening on the edge of zipper/piping, avoiding the non-flat parts of zipper/piping, and presses the fabric with a screwdriver. 5. Brother General Sewing Accessories 05 Sew as you like. Check the needle does not hit the presser foot,...

Accessory Catalog
Page 6
... Non Stick Foot Overlock Foot Picot Foot Brother General Sewing Accessories 10 SA126 ABCDEFJKMN SA127 GHILOP Skirt Innov-is Project Book (See page 50 for details.) Narrow Hemmer Foot Designed to protect edges from the back and front and roll it into the curled part of the foot. 6. Raise the needle... and the presser foot. 4. Non Stick Foot Designed for details.) www.brother.com Lower the presser foot so that the foot guide is Project Book (See page 53...
... Non Stick Foot Overlock Foot Picot Foot Brother General Sewing Accessories 10 SA126 ABCDEFJKMN SA127 GHILOP Skirt Innov-is Project Book (See page 50 for details.) Narrow Hemmer Foot Designed to protect edges from the back and front and roll it into the curled part of the foot. 6. Raise the needle... and the presser foot. 4. Non Stick Foot Designed for details.) www.brother.com Lower the presser foot so that the foot guide is Project Book (See page 53...

Users Manual - English
Page 2
... loose cloth. • Do not use bent or damaged needles. • Keep fingers away from the build up of the machine free from all moving parts. Plug the machine directly into the electrical outlet. • Never drop or insert any air openings blocked. Do not use extension cords. Special care is...
... loose cloth. • Do not use bent or damaged needles. • Keep fingers away from the build up of the machine free from all moving parts. Plug the machine directly into the electrical outlet. • Never drop or insert any air openings blocked. Do not use extension cords. Special care is...

Users Manual - English
Page 3
...adjustment is not suitable for its intended use as described in the manual. For additional product information and updates, visit our web site at www.brother.com FOR USERS IN THE UK, EIRE, MALTA AND CYPRUS ONLY IMPORTANT • In the event of this product are subject to change ...used by ASTA to obtain the correct lead. Save these instructions. Never use a fuse approved by or near a space heater, iron, halogen lamp, or other parts to assure correct installation. 8 For repair or adjustment: • If the Light unit is damaged, it must be required if used . • Always ...
...adjustment is not suitable for its intended use as described in the manual. For additional product information and updates, visit our web site at www.brother.com FOR USERS IN THE UK, EIRE, MALTA AND CYPRUS ONLY IMPORTANT • In the event of this product are subject to change ...used by ASTA to obtain the correct lead. Save these instructions. Never use a fuse approved by or near a space heater, iron, halogen lamp, or other parts to assure correct installation. 8 For repair or adjustment: • If the Light unit is damaged, it must be required if used . • Always ...
Users Manual - English
Page 4
Contents Important Safety Instructions 1 Introduction ...5 Machine Features ...5 Accessories...6 Included accessories ...6 Optional accessories ...7 Names of Machine Parts and Their Functions 8 Front view ...8 Needle and embroidery foot section ...9 Right-side/rear view ...9 Operation buttons ...10 Operation panel ...11 GETTING READY 13 Embroidery Step ...
Contents Important Safety Instructions 1 Introduction ...5 Machine Features ...5 Accessories...6 Included accessories ...6 Optional accessories ...7 Names of Machine Parts and Their Functions 8 Front view ...8 Needle and embroidery foot section ...9 Right-side/rear view ...9 Operation buttons ...10 Operation panel ...11 GETTING READY 13 Embroidery Step ...
Users Manual - English
Page 7
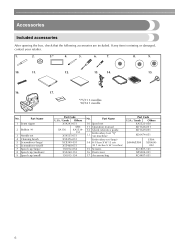
.... 1. 2. 3.* 4. 5. 6. 7. 8. 9. 10. 11. 12. 13. 14. 15. 16. 17. *75/11 3 needles 90/14 1 needle No. Part Name 10 Spool net 11 Operation manual 12 Quick reference guide 13 Embroidery foot "Q" (on machine) Embroidery set 4 Cleaning brush 5 Screwdriver (large) 6 Screwdriver (small) ...7 Spool cap (large) 8 Spool cap (medium) 9 Spool cap (small) Part Code U.S.A. / Canada Others X54243-051 SA156 SFB: XA5539- 151 X59535-051 X59476-051 XC8349-051 X55468-051 130012-054 X55260-153 130013-154 No....
.... 1. 2. 3.* 4. 5. 6. 7. 8. 9. 10. 11. 12. 13. 14. 15. 16. 17. *75/11 3 needles 90/14 1 needle No. Part Name 10 Spool net 11 Operation manual 12 Quick reference guide 13 Embroidery foot "Q" (on machine) Embroidery set 4 Cleaning brush 5 Screwdriver (large) 6 Screwdriver (small) ...7 Spool cap (large) 8 Spool cap (medium) 9 Spool cap (small) Part Code U.S.A. / Canada Others X54243-051 SA156 SFB: XA5539- 151 X59535-051 X59476-051 XC8349-051 X55468-051 130012-054 X55260-153 130013-154 No....

Users Manual - English
Page 8
... are correct at the time of optional accessories available for embroidery 3 Embroidery card Part Code U.S.A. / Canada Other No. No. Part Name Part Code U.S.A. / Canada Other EBT-PE SA520 SA519 EBT-PEN: Embroidery set (medium) XC5996-001 5 H 10 cm X W 10 ... 2-1/2 inches) SA442/ EF82 EF82: XD0598-002 Memo z To obtain optional accessories or parts, contact your machine. 7 z Visit your nearest authorized retailer for a complete listing of printing. Part Name 1 Brother poly #90 bobbin thread Water solude stabilizer 2 Stabilizer material for your sales representative or the...
... are correct at the time of optional accessories available for embroidery 3 Embroidery card Part Code U.S.A. / Canada Other No. No. Part Name Part Code U.S.A. / Canada Other EBT-PE SA520 SA519 EBT-PEN: Embroidery set (medium) XC5996-001 5 H 10 cm X W 10 ... 2-1/2 inches) SA442/ EF82 EF82: XD0598-002 Memo z To obtain optional accessories or parts, contact your machine. 7 z Visit your nearest authorized retailer for a complete listing of printing. Part Name 1 Brother poly #90 bobbin thread Water solude stabilizer 2 Stabilizer material for your sales representative or the...

Users Manual - English
Page 9
... thread guide cover when threading the upper thread. e Top cover Open the top cover to thread the needle. Names of Machine Parts and Their Functions The names of the various parts of thread on the spool pin. c Spool pin Place a spool of the machine and their functions are described below. n Thread take... around the thread guide plate when threading the upper thread. m Needle threader lever Use the needle threader lever to place the spool of the machine parts.
... thread guide cover when threading the upper thread. e Top cover Open the top cover to thread the needle. Names of Machine Parts and Their Functions The names of the various parts of thread on the spool pin. c Spool pin Place a spool of the machine and their functions are described below. n Thread take... around the thread guide plate when threading the upper thread. m Needle threader lever Use the needle threader lever to place the spool of the machine parts.

Users Manual - English
Page 25
...lights up in injuries or damage to observe the following precautions concerning the bobbin. Use only the included bobbin or bobbins of the same type (part code: SA156, SFB: XA5539151). 2 a Notch b Bobbin winder shaft spring Slide the bobbin winder in the bobbin. Turn on the shaft ...the notch in the direction of any other models are used, the machine will not operate correctly. CAUTION 1 ● Only use the Bobbin (part code: SA156, SFB: XA5539-151) designed specifically for this machine. Bobbin precautions Be sure to the machine. ● The included bobbin was ...
...lights up in injuries or damage to observe the following precautions concerning the bobbin. Use only the included bobbin or bobbins of the same type (part code: SA156, SFB: XA5539151). 2 a Notch b Bobbin winder shaft spring Slide the bobbin winder in the bobbin. Turn on the shaft ...the notch in the direction of any other models are used, the machine will not operate correctly. CAUTION 1 ● Only use the Bobbin (part code: SA156, SFB: XA5539-151) designed specifically for this machine. Bobbin precautions Be sure to the machine. ● The included bobbin was ...

Users Manual - English
Page 29
... the bobbin case is not correctly installed, the thread tension will be incorrect. • Be careful not to hold c the end of the same type (part code: SA156, SFB: XA5539-151). 11.5 mm (7/16 inch) Actual size This model Other model • Be sure to install the bobbin so that d the...
... the bobbin case is not correctly installed, the thread tension will be incorrect. • Be careful not to hold c the end of the same type (part code: SA156, SFB: XA5539-151). 11.5 mm (7/16 inch) Actual size This model Other model • Be sure to install the bobbin so that d the...

Users Manual - English
Page 37
... from falling into the machine. c 2 a Screwdriver b Needle clamp screw • Do not apply a strong force when loosening or tightening the needle clamp screw, otherwise certain parts of the machine may occur if (Start/stop button) is accidentally pressed and the machine starts embroidering. Hold the needle with fabric or paper to...
... from falling into the machine. c 2 a Screwdriver b Needle clamp screw • Do not apply a strong force when loosening or tightening the needle clamp screw, otherwise certain parts of the machine may occur if (Start/stop button) is accidentally pressed and the machine starts embroidering. Hold the needle with fabric or paper to...

Users Manual - English
Page 58
... after each color. Press (Settings key), and then change of the thread through the embroidery foot hole. Prepare embroidery thread of color d Current color part e Next color part • The thread color number set displayed for embroidering b Current color step/Number of colors in the settings screen. c a 2 b d e a Embroidery frames that can be...
... after each color. Press (Settings key), and then change of the thread through the embroidery foot hole. Prepare embroidery thread of color d Current color part e Next color part • The thread color number set displayed for embroidering b Current color step/Number of colors in the settings screen. c a 2 b d e a Embroidery frames that can be...

Users Manual - English
Page 63
... pattern 1 degree to the right Returns the pattern to check the pattern position. EMBROIDERY Memo z If you make a note of the values in the lower part of screen when you change the size and position, you can embroider with the pattern position. • Press (Back key) to return to the previous...
... pattern 1 degree to the right Returns the pattern to check the pattern position. EMBROIDERY Memo z If you make a note of the values in the lower part of screen when you change the size and position, you can embroider with the pattern position. • Press (Back key) to return to the previous...

Users Manual - English
Page 72
... or a vacuum cleaner to the bobbin case. ● Never use a bobbin case that is correctly installed, otherwise the needle may suffer. For a new bobbin case (part code: XC8167- Note z If lint or dust collects on the bobbin thread sensor, the sensor may not operate correctly. 251), contact your nearest authorized service...
... or a vacuum cleaner to the bobbin case. ● Never use a bobbin case that is correctly installed, otherwise the needle may suffer. For a new bobbin case (part code: XC8167- Note z If lint or dust collects on the bobbin thread sensor, the sensor may not operate correctly. 251), contact your nearest authorized service...
Quick Setup Guide USB - English
Page 2
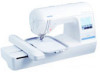
... of Conformity (For USA Only) Responsible Party: Brother International Corporation 100 Somerset Corporate Boulevard Bridgewater, NJ 08807-0911 USA TEL : (908) 704-1700 declares that the product Product Name: Model Number: Brother Sewing Machine PE-700II This device complies with the limits for a Class B digital device, pursuant to Part 15 of the FCC Rules. However, there...
... of Conformity (For USA Only) Responsible Party: Brother International Corporation 100 Somerset Corporate Boulevard Bridgewater, NJ 08807-0911 USA TEL : (908) 704-1700 declares that the product Product Name: Model Number: Brother Sewing Machine PE-700II This device complies with the limits for a Class B digital device, pursuant to Part 15 of the FCC Rules. However, there...

