
Accessory Catalog
Page 6
... the presser foot. 2. Select a desired stitch and sew. Lower the needle into the curled part of the foot. 6. Brother General Sewing Accessories 09 Narrow Hemmer Foot Non Stick Foot Overlock Foot Picot Foot Brother General Sewing Accessories 10 SA126 ABCDEFJKMN SA127 GHILOP Skirt Innov-is Project Book (See page 50 for details... of the fabric. 4. Position the edge of the foot. 8. Slowly sew 2-3 stitches, making sure the fabric is Project Book (See page 53 for details.) www.brother.com Raise the needle and the presser foot. 5. Increase upper thread...
... the presser foot. 2. Select a desired stitch and sew. Lower the needle into the curled part of the foot. 6. Brother General Sewing Accessories 09 Narrow Hemmer Foot Non Stick Foot Overlock Foot Picot Foot Brother General Sewing Accessories 10 SA126 ABCDEFJKMN SA127 GHILOP Skirt Innov-is Project Book (See page 50 for details... of the fabric. 4. Position the edge of the foot. 8. Slowly sew 2-3 stitches, making sure the fabric is Project Book (See page 53 for details.) www.brother.com Raise the needle and the presser foot. 5. Increase upper thread...

Accessory Catalog
Page 12
...up the center of the presser foot on the fabric you to make fringes). Zigzag-sew with a single zigzag stitch. Adjust the upper thread tension. 2. Stitch in place using . 3. Creating tailor tacks: 1. Select a straight stitch, left needle position. 2. For appliqué: 1.... Also used for clothing as well as knits. 1. SA150 ABCDEFJKMN www.brother.com Making loops or fringes: 1. Mark a guideline to follow on thin to medium weight fabrics. Select a straight stitch, left needle position. 2....
...up the center of the presser foot on the fabric you to make fringes). Zigzag-sew with a single zigzag stitch. Adjust the upper thread tension. 2. Stitch in place using . 3. Creating tailor tacks: 1. Select a straight stitch, left needle position. 2. For appliqué: 1.... Also used for clothing as well as knits. 1. SA150 ABCDEFJKMN www.brother.com Making loops or fringes: 1. Mark a guideline to follow on thin to medium weight fabrics. Select a straight stitch, left needle position. 2....

Accessory Catalog
Page 34
...perfect for each design. Dependable thread delivery through machine tensions. Out metallic thread maintains its color, heat resistance and strength. Bobbin Threads Stabilizers and Water Water Soluble Stabilizers Brother Embroidery Accessories 66 Bobbin Threads Brother Bobbin Threads are included in a fun assortment of ... Lightweight Adhesive-back Water Soluble Spun 11" x 6 yds AB C A (White): SA-EBT B (Black): SAEBT999 C (White only): EBT-PE Christmas Tree Ornament Innov-is Project Book (See page 33 for the Quattro™ 6000D, Duetta™ 4500D/Innov-is 4000D, 2500D, 1500D, 1200...
...perfect for each design. Dependable thread delivery through machine tensions. Out metallic thread maintains its color, heat resistance and strength. Bobbin Threads Stabilizers and Water Water Soluble Stabilizers Brother Embroidery Accessories 66 Bobbin Threads Brother Bobbin Threads are included in a fun assortment of ... Lightweight Adhesive-back Water Soluble Spun 11" x 6 yds AB C A (White): SA-EBT B (Black): SAEBT999 C (White only): EBT-PE Christmas Tree Ornament Innov-is Project Book (See page 33 for the Quattro™ 6000D, Duetta™ 4500D/Innov-is 4000D, 2500D, 1500D, 1200...

Accessory Catalog
Page 38
... 3. Set the machine setting: 3/4 thread overlock, stitch length to 1.5 mm from 5 mm, and adjust the tension. 3. Align the edge of the fabric to the guide on your machine. 2. Brother Serger/ Overlock Feet 73 Pearls and Sequins Foot SA211, XB0537-001 XB0537-001 is for 1034D, and SA211 is.... 4. Sew and then open the fabrics. Note: When the fabrics gather, tighten the thread tension. Retract the knife on the front of fabric together. SA210 Party Bag SA212 Piping Foot Taping Foot Brother Serger/ Overlock Feet 74 Piping Foot Sews piping tapes with two pieces of the foot. 5.
... 3. Set the machine setting: 3/4 thread overlock, stitch length to 1.5 mm from 5 mm, and adjust the tension. 3. Align the edge of the fabric to the guide on your machine. 2. Brother Serger/ Overlock Feet 73 Pearls and Sequins Foot SA211, XB0537-001 XB0537-001 is for 1034D, and SA211 is.... 4. Sew and then open the fabrics. Note: When the fabrics gather, tighten the thread tension. Retract the knife on the front of fabric together. SA210 Party Bag SA212 Piping Foot Taping Foot Brother Serger/ Overlock Feet 74 Piping Foot Sews piping tapes with two pieces of the foot. 5.

Users Manual - English
Page 5
... attractive finishes...56 Embroidering a pattern...57 Appliquéing ...59 Editing and Saving Patterns 61 Adjusting the layout ...61 Storing patterns ...63 Adjusting the thread tension...64 Resewing ...65 Thread runs out partway through a design...65 Stopping while embroidering ...66 APPENDIX 69 Care and Maintenance ...70 Cleaning the machine surface ...70...
... attractive finishes...56 Embroidering a pattern...57 Appliquéing ...59 Editing and Saving Patterns 61 Adjusting the layout ...61 Storing patterns ...63 Adjusting the thread tension...64 Resewing ...65 Thread runs out partway through a design...65 Stopping while embroidering ...66 APPENDIX 69 Care and Maintenance ...70 Cleaning the machine surface ...70...

Users Manual - English
Page 22
mm/INCH Embroidery tension Adjusts the thread tension for embroidering (only for embroidering). -8 to take your machine in for embroidering). The service count is a reminder to +8 Max embroidery speed Specifies the maximum embroidering ...
mm/INCH Embroidery tension Adjusts the thread tension for embroidering (only for embroidering). -8 to take your machine in for embroidering). The service count is a reminder to +8 Max embroidery speed Specifies the maximum embroidering ...
Users Manual - English
Page 29
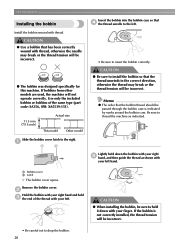
...bobbin Insert the bobbin into the bobbin case so that the thread unwinds in the correct direction, otherwise the thread may break or the thread tension will be sure to hold it down the bobbin with your right e hand, and then guide the thread as indicated. Install the bobbin ...Memo z The order that has been correctly wound with thread, otherwise the needle may break or the thread tension will be passed through the bobbin case is not correctly installed, the thread tension will not operate correctly. Be sure to thread the machine as shown with your finger. CAUTION ● Be...
...bobbin Insert the bobbin into the bobbin case so that the thread unwinds in the correct direction, otherwise the thread may break or the thread tension will be sure to hold it down the bobbin with your right e hand, and then guide the thread as indicated. Install the bobbin ...Memo z The order that has been correctly wound with thread, otherwise the needle may break or the thread tension will be passed through the bobbin case is not correctly installed, the thread tension will not operate correctly. Be sure to thread the machine as shown with your finger. CAUTION ● Be...

Users Manual - English
Page 30
Memo z You can start embroidering without pulling up the bobbin thread. Winding/Installing the Bobbin 29 Pass the thread through the tension-adjusting spring of the bobbin cover, and then lightly press down on the right side. 2 1 X The lower threading is correctly inserted through the slot as .... Note z Make sure that the thread is finished. g Insert the tab in "Upper Threading" (page 30). If it is not inserted correctly, reinsert the thread. 1 a Tension-adjusting spring Reattach the bobbin cover. Continue with the procedure in the lower-left corner of the bobbin case.
Memo z You can start embroidering without pulling up the bobbin thread. Winding/Installing the Bobbin 29 Pass the thread through the tension-adjusting spring of the bobbin cover, and then lightly press down on the right side. 2 1 X The lower threading is correctly inserted through the slot as .... Note z Make sure that the thread is finished. g Insert the tab in "Upper Threading" (page 30). If it is not inserted correctly, reinsert the thread. 1 a Tension-adjusting spring Reattach the bobbin cover. Continue with the procedure in the lower-left corner of the bobbin case.

Users Manual - English
Page 40
... attractive finishes .....56 Embroidering a pattern 57 Appliquéing 59 Editing and Saving Patterns 61 Adjusting the layout 61 Storing patterns 63 Adjusting the thread tension...........64 Resewing 65 Thread runs out partway through a design 65 Stopping while embroidering .........66 Embroidering Neatly 40 What to prepare 40 Preparing the Fabric 42...
... attractive finishes .....56 Embroidering a pattern 57 Appliquéing 59 Editing and Saving Patterns 61 Adjusting the layout 61 Storing patterns 63 Adjusting the thread tension...........64 Resewing 65 Thread runs out partway through a design 65 Stopping while embroidering .........66 Embroidering Neatly 40 What to prepare 40 Preparing the Fabric 42...

Users Manual - English
Page 51
... display or other settings. (Settings key). The selected pattern is displayed), the previous patterns/subsequent patterns are displayed can be selected. [mm/inch] EMBROIDERY TENSION The thread tension for embroidering can be selected. [650SPM/350SPM] NAME OF COLOR: Typical color name TIME: Time required for embroidery will be adjusted. [-8 to the type...
... display or other settings. (Settings key). The selected pattern is displayed), the previous patterns/subsequent patterns are displayed can be selected. [mm/inch] EMBROIDERY TENSION The thread tension for embroidering can be selected. [650SPM/350SPM] NAME OF COLOR: Typical color name TIME: Time required for embroidery will be adjusted. [-8 to the type...

Users Manual - English
Page 52
... stitches) at a time and changes the position for starting the embroidery. Press this key to change the thread settings. Selecting Embroidery Patterns 51 Press or tension. to adjust the thread Press or to select or cancel programmed thread cutting. This is used . The position of each character, the upper thread is...
... stitches) at a time and changes the position for starting the embroidery. Press this key to change the thread settings. Selecting Embroidery Patterns 51 Press or tension. to adjust the thread Press or to select or cancel programmed thread cutting. This is used . The position of each character, the upper thread is...

Users Manual - English
Page 65
... side b Wrong side 64 c To delete the stored pattern, press . In this instance, decrease the upper thread tension. To adjust the thread tension, press (Settings key). Press . b Switch screens using (Previous page key) and (Next page key). Note z Characters saved from the total number of pages X ...appears. Before embroidering, use a scrap of the same fabric to recall. EMBROIDERY Select the pattern you wish to check the adjustment of the thread tension, etc. X The stored pattern is shown in order to undo the thread and the fabric may be visible on back of the fabric.
... side b Wrong side 64 c To delete the stored pattern, press . In this instance, decrease the upper thread tension. To adjust the thread tension, press (Settings key). Press . b Switch screens using (Previous page key) and (Next page key). Note z Characters saved from the total number of pages X ...appears. Before embroidering, use a scrap of the same fabric to recall. EMBROIDERY Select the pattern you wish to check the adjustment of the thread tension, etc. X The stored pattern is shown in order to undo the thread and the fabric may be visible on back of the fabric.
Users Manual - English
Page 75
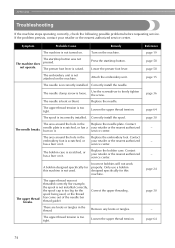
... needle is not turned on it. needle plate is not attached on it . Correct the upper threading. Loosen the upper thread tension. If the problem persists, contact your retailer or the nearest authorized service center. The machine does not operate. The start /stop... authorized service center. The upper thread was not pressed. Turn on it . The needle is incorrectly installed. Loosen the upper thread tension. Contact The needle breaks. page 64 74 A bobbin designed specifically for the spool being used . The spool is bent or blunt...
... needle is not turned on it. needle plate is not attached on it . Correct the upper threading. Loosen the upper thread tension. If the problem persists, contact your retailer or the nearest authorized service center. The machine does not operate. The start /stop... authorized service center. The upper thread was not pressed. Turn on it . The needle is incorrectly installed. Loosen the upper thread tension. Contact The needle breaks. page 64 74 A bobbin designed specifically for the spool being used . The spool is bent or blunt...
Users Manual - English
Page 76
...Bobbin thread does not wind neatly on it . Remove the tangled thread and clean the race. - page 30 The thread tension is incorrectly installed. Adjust the tension of the upper thread. Remove the tangled thread. Contact needle plate is scratched, or has a your retailer or the nearest ...not rotate smoothly, or has a burr on it . Only use a bobbin designed specifically for this machine is not used . The thread tension is tangled or breaks. page 28 The lower thread is incorrect. Symptom Probable Cause Remedy Reference The thread is tangled, for example, in ...
...Bobbin thread does not wind neatly on it . Remove the tangled thread and clean the race. - page 30 The thread tension is incorrectly installed. Adjust the tension of the upper thread. Remove the tangled thread. Contact needle plate is scratched, or has a your retailer or the nearest ...not rotate smoothly, or has a burr on it . Only use a bobbin designed specifically for this machine is not used . The thread tension is tangled or breaks. page 28 The lower thread is incorrect. Symptom Probable Cause Remedy Reference The thread is tangled, for example, in ...

Users Manual - English
Page 77
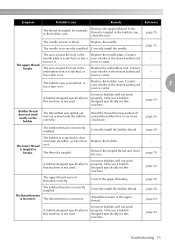
Correct the upper threading. Stitches are damaged. The upper thread was not threaded correctly. Incorrect bobbins will disappear. The thread tension is not set up the embroidery unit correctly. Contact your retailer or the nearest authorized service center. The embroidery unit is ... bobbin case is made while embroidering. Correct the upper threading. The thread does not pass through the eye of the LCD. Adjust the tension of the LCD is not sewn correctly. Dust has collected on the bobbin Remove any dust from the bobbin thread sensor. A bobbin designed...
Correct the upper threading. Stitches are damaged. The upper thread was not threaded correctly. Incorrect bobbins will disappear. The thread tension is not set up the embroidery unit correctly. Contact your retailer or the nearest authorized service center. The embroidery unit is ... bobbin case is made while embroidering. Correct the upper threading. The thread does not pass through the eye of the LCD. Adjust the tension of the LCD is not sewn correctly. Dust has collected on the bobbin Remove any dust from the bobbin thread sensor. A bobbin designed...

Users Manual - English
Page 78
... embroidery frame. page 42 The thread is tangled and the bobbin case, etc., is plugged up , clean the race. Adjust the tension of the embroidery frame does not - Troubleshooting 77 Always use stabilizer material for embroidery with stretch fabrics, thin fabrics, fabrics with the ...incorrect. Stretch the fabric properly on the embroidery frame. Objects are placed near the carriage or embroidery frame. page 70 The thread tension is moved during the embroidery frame was being removed or attached during process, the pattern may be misaligned. When embroidering on the...
... embroidery frame. page 42 The thread is tangled and the bobbin case, etc., is plugged up , clean the race. Adjust the tension of the embroidery frame does not - Troubleshooting 77 Always use stabilizer material for embroidery with stretch fabrics, thin fabrics, fabrics with the ...incorrect. Stretch the fabric properly on the embroidery frame. Objects are placed near the carriage or embroidery frame. page 70 The thread tension is moved during the embroidery frame was being removed or attached during process, the pattern may be misaligned. When embroidering on the...

Users Manual - English
Page 79
... (Start/stop button or thread cutter button was pressed while the embroidery foot was selected. The start /stop button) without rethreading the machine, the thread tension may be displayed on the LCD. on the LCD was pressed when no card was pressed at a screen other than the embroidery screen. Upper thread...
... (Start/stop button or thread cutter button was pressed while the embroidery foot was selected. The start /stop button) without rethreading the machine, the thread tension may be displayed on the LCD. on the LCD was pressed when no card was pressed at a screen other than the embroidery screen. Upper thread...

Users Manual - English
Page 85
APPENDIX R race 70 recalling a pattern 63 release button 17 resewing 65 S safety instructions 1 scissors 6 screwdriver 6 seam ripper 6 , settings key 11 22 spool cap 6 , spool net 6 25 spool of thread 30 spool pin 8 , stabilizer material 7 42 start/stop button 10 storing pattern 63 T thread cutter 8 thread cutter button 10 thread guide cover 8 thread guide disk 9 thread guide plate 8 thread take-up lever check window 8 thread tension adjustment 64 top cover 8 touch panel 11 troubleshooting 74 turning machine on/off 19 U upper threading 30 84
APPENDIX R race 70 recalling a pattern 63 release button 17 resewing 65 S safety instructions 1 scissors 6 screwdriver 6 seam ripper 6 , settings key 11 22 spool cap 6 , spool net 6 25 spool of thread 30 spool pin 8 , stabilizer material 7 42 start/stop button 10 storing pattern 63 T thread cutter 8 thread cutter button 10 thread guide cover 8 thread guide disk 9 thread guide plate 8 thread take-up lever check window 8 thread tension adjustment 64 top cover 8 touch panel 11 troubleshooting 74 turning machine on/off 19 U upper threading 30 84


