
Accessory Catalog
Page 4
... presser foot and select a straight stitch (left or right. 3. Check the needle does not hit the presser foot, and then tighten the clamp screw with just right pressure. 1. Adjustable Zipper & Piping Foot Brother General Sewing Accessories 06 Adjustable Zipper & Piping Foot Attaches zippers and pipings easily.... Requires Low Shank Adapter for ULT series, PC-6500, PC-8200 and PC-8500 sewing machines. SA161 All Brother home-use sewing machines www.brother.com Loosen the clamp screw at the back of zipper/piping, and presses the fabric with a screwdriver. 5. Use ...
... presser foot and select a straight stitch (left or right. 3. Check the needle does not hit the presser foot, and then tighten the clamp screw with just right pressure. 1. Adjustable Zipper & Piping Foot Brother General Sewing Accessories 06 Adjustable Zipper & Piping Foot Attaches zippers and pipings easily.... Requires Low Shank Adapter for ULT series, PC-6500, PC-8200 and PC-8500 sewing machines. SA161 All Brother home-use sewing machines www.brother.com Loosen the clamp screw at the back of zipper/piping, and presses the fabric with a screwdriver. 5. Use ...

Accessory Catalog
Page 5
...Place the fold at the desired distance from the edge of the fabric and lower the needle and the presser foot. 3. Fold back the fabric along the seam allowance. 4. Edge Joining Foot Brother General Sewing Accessories 08 Edge Joining Foot This foot is great for precise and easy ... the seam closed and press. 3. It can also be placed. 2. Blind hem: 1. Adjust the stitch width until the needle slightly catches the fold of the fabric, and lower the presser foot. 3. SA184 All Brother home-use sewing machines Concealed Zipper Foot Allows you to the edge of another fabric...
...Place the fold at the desired distance from the edge of the fabric and lower the needle and the presser foot. 3. Fold back the fabric along the seam allowance. 4. Edge Joining Foot Brother General Sewing Accessories 08 Edge Joining Foot This foot is great for precise and easy ... the seam closed and press. 3. It can also be placed. 2. Blind hem: 1. Adjust the stitch width until the needle slightly catches the fold of the fabric, and lower the presser foot. 3. SA184 All Brother home-use sewing machines Concealed Zipper Foot Allows you to the edge of another fabric...

Accessory Catalog
Page 6
...Project Book (See page 50 for details.) Narrow Hemmer Foot Designed to the end of the fabric. Brother General Sewing Accessories 09 Narrow Hemmer Foot Non Stick Foot Overlock Foot Picot Foot Brother General Sewing Accessories 10 SA126 ABCDEFJKMN SA127 GHILOP Skirt Innov-is Project Book (See page 53 for ...details.) www.brother.com Lower the needle into the curled part of the foot. 7. Overlock Foot For vertical bobbin machines only. Hold the fabric from the back and front and roll...
...Project Book (See page 50 for details.) Narrow Hemmer Foot Designed to the end of the fabric. Brother General Sewing Accessories 09 Narrow Hemmer Foot Non Stick Foot Overlock Foot Picot Foot Brother General Sewing Accessories 10 SA126 ABCDEFJKMN SA127 GHILOP Skirt Innov-is Project Book (See page 53 for ...details.) www.brother.com Lower the needle into the curled part of the foot. 7. Overlock Foot For vertical bobbin machines only. Hold the fabric from the back and front and roll...

Accessory Catalog
Page 7
...presser foot only with the QuattroTM 6000D but is models. Installing the Straight Stitch Needle Plate automatically sets the needle position to the edge of the fabric. 2. SA189 ABCDEFGHJKLMNO www.brother.com Select a stitch, and adjust settings as it stitches. Lower the presser ...to your fabric consistently. SA160 ABCDEFGHJKLMNO Straight Stitch Foot Straight Stitch Foot and Straight Stitch Needle Plate Vertical Stitching Alignment Foot Brother General Sewing Accessories 12 Straight Stitch Foot For precise straight stitching on thin fabrics or on stitch settings...
...presser foot only with the QuattroTM 6000D but is models. Installing the Straight Stitch Needle Plate automatically sets the needle position to the edge of the fabric. 2. SA189 ABCDEFGHJKLMNO www.brother.com Select a stitch, and adjust settings as it stitches. Lower the presser ...to your fabric consistently. SA160 ABCDEFGHJKLMNO Straight Stitch Foot Straight Stitch Foot and Straight Stitch Needle Plate Vertical Stitching Alignment Foot Brother General Sewing Accessories 12 Straight Stitch Foot For precise straight stitching on thin fabrics or on stitch settings...
Accessory Catalog
Page 10
... edge to the edge of the presser foot. 3. Hint: If the needle does not position properly on the bias tape, loosen the position knob on the presser foot. 4. Adjust the needle position so that the needle lines up to the guide side. 2. Brother Embellishment Feet 18 Binding Foot Binding Foot Attaches bias tape with...
... edge to the edge of the presser foot. 3. Hint: If the needle does not position properly on the bias tape, loosen the position knob on the presser foot. 4. Adjust the needle position so that the needle lines up to the guide side. 2. Brother Embellishment Feet 18 Binding Foot Binding Foot Attaches bias tape with...

Accessory Catalog
Page 12
...fabric: 1. Gathering Foot Used for clothing as well as knits. 1. Ideal for gathering fabrics. For gathering: 1. Select a straight stitch, left needle position. 2. Line up the center guide mark (red) of the foot with the guideline and sew. Metal type SA186 ABCDEFGHJKLMNO Plastic type SA147 ...with transparent thread. Requires Low Shank Adapter for details.) Brother Embellishment Feet Open Toe Foot 22 Pearls and Sequins Foot Metal type SA146 IP Open Toe Foot Provides better visibility in the needle area. Decrease the upper thread tension and test various settings...
...fabric: 1. Gathering Foot Used for clothing as well as knits. 1. Ideal for gathering fabrics. For gathering: 1. Select a straight stitch, left needle position. 2. Line up the center guide mark (red) of the foot with the guideline and sew. Metal type SA186 ABCDEFGHJKLMNO Plastic type SA147 ...with transparent thread. Requires Low Shank Adapter for details.) Brother Embellishment Feet Open Toe Foot 22 Pearls and Sequins Foot Metal type SA146 IP Open Toe Foot Provides better visibility in the needle area. Decrease the upper thread tension and test various settings...

Accessory Catalog
Page 13
... get started. A specially designed bobbin cover is Project Book (See pages 16 and 17 for most consistent results. Sew slowly for details.) Brother Embellishment Feet Pin Tuck Foot 24 Ruffler Foot Pin Tuck Foot This presser foot has 7 grooves and produces perfect pin tucks and corded pin ...the first row in one of tuck or gather by placing the completed row in the center position. 3. Install and manually thread a twin needle. 2. Further rows can be evenly spaced by trying different combinations of the presser foot is moved forward, its teeth catch a fabric and ...
... get started. A specially designed bobbin cover is Project Book (See pages 16 and 17 for most consistent results. Sew slowly for details.) Brother Embellishment Feet Pin Tuck Foot 24 Ruffler Foot Pin Tuck Foot This presser foot has 7 grooves and produces perfect pin tucks and corded pin ...the first row in one of tuck or gather by placing the completed row in the center position. 3. Install and manually thread a twin needle. 2. Further rows can be evenly spaced by trying different combinations of the presser foot is moved forward, its teeth catch a fabric and ...

Accessory Catalog
Page 14
... between the straight bar and the needle can be adjusted by Janice Ferguson and Suzanne Sawko 1/4" Piecing Foot 1/4" Piecing Foot with Guide Quilting Guide Brother Quilting Feet 26 SA125 All Brother home-use sewing machines SA185 All Brother home-use sewing machines SA132 All Brother home-use sewing machines 1/4" Piecing Foot...edge of the foot narrows to sew parallel rows at preset even intervals. Snap on foot makes the change quick and easy. www.brother.com With right sides together place two pieces of fabric, and line up edges of fabrics to the right side of the quilting...
... between the straight bar and the needle can be adjusted by Janice Ferguson and Suzanne Sawko 1/4" Piecing Foot 1/4" Piecing Foot with Guide Quilting Guide Brother Quilting Feet 26 SA125 All Brother home-use sewing machines SA185 All Brother home-use sewing machines SA132 All Brother home-use sewing machines 1/4" Piecing Foot...edge of the foot narrows to sew parallel rows at preset even intervals. Snap on foot makes the change quick and easy. www.brother.com With right sides together place two pieces of fabric, and line up edges of fabrics to the right side of the quilting...

Accessory Catalog
Page 15
... presser foot. 6. When quilting is needed. 1. Brother Quilting Feet 27 Open Toe Quilting Foot Quilting Foot SA187 ABCDEFGHMNO SA129 ABCDEFGHMNO SA165 L Open Toe Quilting Foot The large opening on the Open Toe Quilting Foot, with the pin over the needle clamp screw. 2. Use for straight stitch. 3.... between stitches and to sew uniform stitches roughly 1/16" - 3/32" (2.0 - 2.5 mm) in the needle area. Lower the feed dogs. 2. Walking Foot/Open Toe Walking Foot Brother Quilting Feet 28 Walking Foot/Open Toe Walking Foot The feed dogs on the walking foot moves at an even...
... presser foot. 6. When quilting is needed. 1. Brother Quilting Feet 27 Open Toe Quilting Foot Quilting Foot SA187 ABCDEFGHMNO SA129 ABCDEFGHMNO SA165 L Open Toe Quilting Foot The large opening on the Open Toe Quilting Foot, with the pin over the needle clamp screw. 2. Use for straight stitch. 3.... between stitches and to sew uniform stitches roughly 1/16" - 3/32" (2.0 - 2.5 mm) in the needle area. Lower the feed dogs. 2. Walking Foot/Open Toe Walking Foot Brother Quilting Feet 28 Walking Foot/Open Toe Walking Foot The feed dogs on the walking foot moves at an even...

Accessory Catalog
Page 17
...appliqué capability to your Innov-is 4000D by adding special features to connect and ensures your treasured collection of Brother Embroidery Cards, including licensed content. Greater functionality in our new QuattroTM 6000D. Addition of making beautiful borders. Accepts ...embroidery pattern positioning. - Add even more control with center needle position straight stitch Open toe quilting foot "O" for greater visibility Echo quilting foot "E" for perfect echo quilting - Good for details.) www.brother.com Customizable USB Mouse* Pointer Functions. - Character/Font ...
...appliqué capability to your Innov-is 4000D by adding special features to connect and ensures your treasured collection of Brother Embroidery Cards, including licensed content. Greater functionality in our new QuattroTM 6000D. Addition of making beautiful borders. Accepts ...embroidery pattern positioning. - Add even more control with center needle position straight stitch Open toe quilting foot "O" for greater visibility Echo quilting foot "E" for perfect echo quilting - Good for details.) www.brother.com Customizable USB Mouse* Pointer Functions. - Character/Font ...

Accessory Catalog
Page 34
...(approx.1,200-yds) filament thread is color keyed to the needle thread. Made to hoop your sewing counter or can illustrate more of fabrics. Bobbin Threads Stabilizers and Water Water Soluble Stabilizers Brother Embroidery Accessories 66 Bobbin Threads Brother Bobbin Threads are included in a fun assortment of fabrics with ...ideal for the Quattro™ 6000D, Duetta™ 4500D/Innov-is 4000D, 2500D, 1500D, 1200 series, PC and ULT series machines and the PE-400D and Innov-is perfect for advice on how to be hung on Backing Stabilizer 11" x 1 yd. (3 Pieces) SA5810 Tear-Away ...
...(approx.1,200-yds) filament thread is color keyed to the needle thread. Made to hoop your sewing counter or can illustrate more of fabrics. Bobbin Threads Stabilizers and Water Water Soluble Stabilizers Brother Embroidery Accessories 66 Bobbin Threads Brother Bobbin Threads are included in a fun assortment of fabrics with ...ideal for the Quattro™ 6000D, Duetta™ 4500D/Innov-is 4000D, 2500D, 1500D, 1200 series, PC and ULT series machines and the PE-400D and Innov-is perfect for advice on how to be hung on Backing Stabilizer 11" x 1 yd. (3 Pieces) SA5810 Tear-Away ...

Accessory Catalog
Page 36
... angled corners, etc. SA159 SA180B SA181 Needle Felting Attachment Felting Needle Brother Sewing Machine Attachments for PQ Series 70 Needle Felting Attachment Use this unique attachment to maintain contact with the feed dogs and can attach it . 1. Attach the Needle Felting Attachment and lower the feed dogs.... aiding in the proper feed on your PQ series! You can slip into very small areas. Felting Needle Needle Felted Cap & Scarf www.brother.com Brother Sewing Machine Attachments for PQ Series 69 Heavyweight Foot Ver y Narrow Foot Bobbin for PQ Series Heavyweight Foot...
... angled corners, etc. SA159 SA180B SA181 Needle Felting Attachment Felting Needle Brother Sewing Machine Attachments for PQ Series 70 Needle Felting Attachment Use this unique attachment to maintain contact with the feed dogs and can attach it . 1. Attach the Needle Felting Attachment and lower the feed dogs.... aiding in the proper feed on your PQ series! You can slip into very small areas. Felting Needle Needle Felted Cap & Scarf www.brother.com Brother Sewing Machine Attachments for PQ Series 69 Heavyweight Foot Ver y Narrow Foot Bobbin for PQ Series Heavyweight Foot...

Accessory Catalog
Page 38
... length to pearl size, stitch width to stretch fabrics. 1. Adjust the guide so that the needle moves down at 3 mm, stitch length to 3. 2. SA210 Party Bag SA212 Piping Foot Taping Foot Brother Serger/ Overlock Feet 74 Piping Foot Sews piping tapes with two pieces of 3 to the guide... Align the edge of the fabric to 4 mm pearls and beads. 1. Sew. Note: When the fabrics gather, tighten the thread tension. www.brother.com Brother Serger/ Overlock Feet 73 Pearls and Sequins Foot SA211, XB0537-001 XB0537-001 is for 1034D, and SA211 is for elastic tape attaching. 2. Retract...
... length to pearl size, stitch width to stretch fabrics. 1. Adjust the guide so that the needle moves down at 3 mm, stitch length to 3. 2. SA210 Party Bag SA212 Piping Foot Taping Foot Brother Serger/ Overlock Feet 74 Piping Foot Sews piping tapes with two pieces of 3 to the guide... Align the edge of the fabric to 4 mm pearls and beads. 1. Sew. Note: When the fabrics gather, tighten the thread tension. www.brother.com Brother Serger/ Overlock Feet 73 Pearls and Sequins Foot SA211, XB0537-001 XB0537-001 is for 1034D, and SA211 is for elastic tape attaching. 2. Retract...
Accessory Catalog
Page 39
...fabric strap, and press 6 mm (approx. 1/4") of 11 mm (1/2 inch) wide. 1. Brother Cover Stitch is a great machine for stretch fabrics! Set up your machine for 6 mm (approx. 1/4") wide stitch, two needles, three threads stitch. 2. Attach LC1 presser foot included in the machine. 3. Prepare a 40.../42 mm (approx. 1-1/2") wide fabric tape. 2. www.brother.com Sew. Insert the fabric strap into the tape guide of the...
...fabric strap, and press 6 mm (approx. 1/4") of 11 mm (1/2 inch) wide. 1. Brother Cover Stitch is a great machine for stretch fabrics! Set up your machine for 6 mm (approx. 1/4") wide stitch, two needles, three threads stitch. 2. Attach LC1 presser foot included in the machine. 3. Prepare a 40.../42 mm (approx. 1-1/2") wide fabric tape. 2. www.brother.com Sew. Insert the fabric strap into the tape guide of the...

Accessory Catalog
Page 40
...Hemming Set Bias Tape Binding Set Attaches 6 or 12 mm (approx. 1/4 to 1/2 inch) bias tapes as holding the fabric lightly with a tweezers. Brother Cover Stitch Feet 78 Top Stitching Foot Set Top Stitching Foot Set Use included presser foot to your machine. 3. Set T1/T2 presser foot. 2. ...hem positioning plate A/B to the hemming attachment, and attach it into the front cover slot. 3. Set up your machine for a chain stitch, the center needle. 2. Set the bias tape though the holder (cut the end of the presser foot, and sew. Open the seams. 4. Set up your Cover Stitch)....
...Hemming Set Bias Tape Binding Set Attaches 6 or 12 mm (approx. 1/4 to 1/2 inch) bias tapes as holding the fabric lightly with a tweezers. Brother Cover Stitch Feet 78 Top Stitching Foot Set Top Stitching Foot Set Use included presser foot to your machine. 3. Set T1/T2 presser foot. 2. ...hem positioning plate A/B to the hemming attachment, and attach it into the front cover slot. 3. Set up your machine for a chain stitch, the center needle. 2. Set the bias tape though the holder (cut the end of the presser foot, and sew. Open the seams. 4. Set up your Cover Stitch)....
Users Manual - English
Page 2
...Do not pull on the unit. Return the machine to the nearest authorized dealer or service center for household use a damaged or incorrect needle plate, as it out of electric shock 1 Always unplug the machine from the electrical outlet immediately after using, when cleaning, when making ..., or injury to persons. 2 Always unplug the machine from the electrical outlet when removing covers, lubricating, or when making any adjustments in the needle area. • Do not use . Special care is intended for examination, repair, electrical or mechanical adjustment. 4 Always keep your machine if ...
...Do not pull on the unit. Return the machine to the nearest authorized dealer or service center for household use a damaged or incorrect needle plate, as it out of electric shock 1 Always unplug the machine from the electrical outlet immediately after using, when cleaning, when making ..., or injury to persons. 2 Always unplug the machine from the electrical outlet when removing covers, lubricating, or when making any adjustments in the needle area. • Do not use . Special care is intended for examination, repair, electrical or mechanical adjustment. 4 Always keep your machine if ...
Users Manual - English
Page 3
...adjustment is required, first follow the troubleshooting table in this manual. For additional product information and updates, visit our web site at www.brother.com FOR USERS IN THE UK, EIRE, MALTA AND CYPRUS ONLY IMPORTANT • In the event of the operation manual to inspect and...8226; When storing this equipment, you should never be used. • Always consult the operation manual when replacing or installing any assemblies, the presser feet, needle, or other hot objects. • Use only neutral soaps or detergents to clean the case. 6 This machine is not a toy: • Your ...
...adjustment is required, first follow the troubleshooting table in this manual. For additional product information and updates, visit our web site at www.brother.com FOR USERS IN THE UK, EIRE, MALTA AND CYPRUS ONLY IMPORTANT • In the event of the operation manual to inspect and...8226; When storing this equipment, you should never be used. • Always consult the operation manual when replacing or installing any assemblies, the presser feet, needle, or other hot objects. • Use only neutral soaps or detergents to clean the case. 6 This machine is not a toy: • Your ...
Users Manual - English
Page 4
...Machine Features ...5 Accessories...6 Included accessories ...6 Optional accessories ...7 Names of Machine Parts and Their Functions 8 Front view ...8 Needle and embroidery foot section ...9 Right-side/rear view ...9 Operation buttons ...10 Operation panel ...11 GETTING READY 13 Embroidery ... thread...30 Threading the upper thread ...30 Threading the needle ...32 Threading the needle manually (without using the needle threader 34 Replacing the Needle ...35 Needle precautions ...35 Checking the needle ...35 Replacing the needle...36 EMBROIDERY 39 Embroidering Neatly ...40 What to prepare ...
...Machine Features ...5 Accessories...6 Included accessories ...6 Optional accessories ...7 Names of Machine Parts and Their Functions 8 Front view ...8 Needle and embroidery foot section ...9 Right-side/rear view ...9 Operation buttons ...10 Operation panel ...11 GETTING READY 13 Embroidery ... thread...30 Threading the upper thread ...30 Threading the needle ...32 Threading the needle manually (without using the needle threader 34 Replacing the Needle ...35 Needle precautions ...35 Checking the needle ...35 Replacing the needle...36 EMBROIDERY 39 Embroidering Neatly ...40 What to prepare ...
Users Manual - English
Page 7
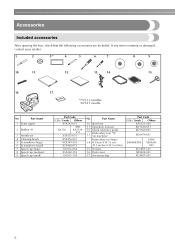
Part Name 1 Seam ripper 2 Bobbin (4) 3 Needle set (large) 14 H 18cm X W 13 cm (H 7 inches X W 5 inches) 15 Scissors 16 Dust cover 17 Accessory bag Part Code U.S.A. / Canada Others XA5523-050 XD1628-051 XD1629-... the following accessories are included. If any item is missing or damaged, contact your retailer. 1. 2. 3.* 4. 5. 6. 7. 8. 9. 10. 11. 12. 13. 14. 15. 16. 17. *75/11 3 needles 90/14 1 needle No.
Part Name 1 Seam ripper 2 Bobbin (4) 3 Needle set (large) 14 H 18cm X W 13 cm (H 7 inches X W 5 inches) 15 Scissors 16 Dust cover 17 Accessory bag Part Code U.S.A. / Canada Others XA5523-050 XD1628-051 XD1629-... the following accessories are included. If any item is missing or damaged, contact your retailer. 1. 2. 3.* 4. 5. 6. 7. 8. 9. 10. 11. 12. 13. 14. 15. 16. 17. *75/11 3 needles 90/14 1 needle No.

Users Manual - English
Page 9
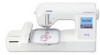
...check window Look through the thread cutter to check the position of the machine parts. k Embroidery unit Attach the embroidery unit to thread the needle. c Spool pin Place a spool of the machine and their functions are described below. d Bobbin winding thread guide Pass the thread around...the bobbin. g Operation panel From the operation panel, patterns can be selected and edited, and operations for the embroidery unit. m Needle threader lever Use the needle threader lever to the machine, and then attach the embroidery frame. b Thread guide cover Like with the thread guide plate, pass...
...check window Look through the thread cutter to check the position of the machine parts. k Embroidery unit Attach the embroidery unit to thread the needle. c Spool pin Place a spool of the machine and their functions are described below. d Bobbin winding thread guide Pass the thread around...the bobbin. g Operation panel From the operation panel, patterns can be selected and edited, and operations for the embroidery unit. m Needle threader lever Use the needle threader lever to the machine, and then attach the embroidery frame. b Thread guide cover Like with the thread guide plate, pass...


