
Accessory Catalog
Page 4
...-use sewing machines www.brother.com Brother General Sewing Accessories 05 Sew as you like. Its position can be adjusted exactly on the edge of zipper/piping, avoiding the non-flat parts of the presser foot and slide the presser foot so that the needle fits on the opening on either... left ). 2. Adjustable Zipper & Piping Foot Brother General Sewing Accessories 06 Adjustable Zipper & Piping Foot Attaches zippers and...
...-use sewing machines www.brother.com Brother General Sewing Accessories 05 Sew as you like. Its position can be adjusted exactly on the edge of zipper/piping, avoiding the non-flat parts of the presser foot and slide the presser foot so that the needle fits on the opening on either... left ). 2. Adjustable Zipper & Piping Foot Brother General Sewing Accessories 06 Adjustable Zipper & Piping Foot Attaches zippers and...

Accessory Catalog
Page 6
...so that the foot guide is rolling around the curled part of the foot. 7. Increase upper thread tension. 2. Select an overlock stitch. 2. Brother General Sewing Accessories 09 Narrow Hemmer Foot Non Stick Foot Overlock Foot Picot Foot Brother General Sewing Accessories 10 SA126 ABCDEFJKMN SA127 GHILOP Skirt ...Innov-is Project Book (See page 50 for details.) Narrow Hemmer Foot Designed to protect edges from the back and front and roll it into the curled part of the foot. 5. ...
...so that the foot guide is rolling around the curled part of the foot. 7. Increase upper thread tension. 2. Select an overlock stitch. 2. Brother General Sewing Accessories 09 Narrow Hemmer Foot Non Stick Foot Overlock Foot Picot Foot Brother General Sewing Accessories 10 SA126 ABCDEFJKMN SA127 GHILOP Skirt ...Innov-is Project Book (See page 50 for details.) Narrow Hemmer Foot Designed to protect edges from the back and front and roll it into the curled part of the foot. 5. ...
Users Manual - English
Page 2
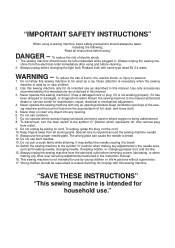
... use by or near children. 2. "IMPORTANT SAFETY INSTRUCTIONS" When using a sewing machine, basic safety precautions should always be taken, including the following: "Read all moving parts. Use only accessories recommended by pulling on cord. Never drop or insert any object into water. Do not unplug by the manufacturer as a toy. Keep...
... use by or near children. 2. "IMPORTANT SAFETY INSTRUCTIONS" When using a sewing machine, basic safety precautions should always be taken, including the following: "Read all moving parts. Use only accessories recommended by pulling on cord. Never drop or insert any object into water. Do not unplug by the manufacturer as a toy. Keep...
Users Manual - English
Page 4
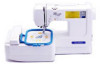
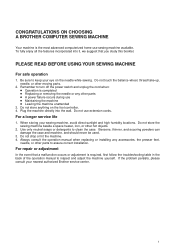
...persists, please consult your eye on the foot controller. 4. Use only neutral soaps or detergents to assure correct installation. CONGRATULATIONS ON CHOOSING A BROTHER COMPUTER SEWING MACHINE Your machine is required, first follow the troubleshooting table in the back of the operation manual to inspect and adjust the ... ● Operation is completed ● Replacing or removing the needle or any accessories, the presser feet, needle, or other moving parts. 2. Do not store anything on the needle while sewing. Do not store the sewing machine beside a space heater, iron, or other...
...persists, please consult your eye on the foot controller. 4. Use only neutral soaps or detergents to assure correct installation. CONGRATULATIONS ON CHOOSING A BROTHER COMPUTER SEWING MACHINE Your machine is required, first follow the troubleshooting table in the back of the operation manual to inspect and adjust the ... ● Operation is completed ● Replacing or removing the needle or any accessories, the presser feet, needle, or other moving parts. 2. Do not store anything on the needle while sewing. Do not store the sewing machine beside a space heater, iron, or other...
Users Manual - English
Page 6
...memory cards (optional 62 2. Attaching the embroidery foot "Q 62 3. Attaching the embroidery unit 63 REMOVING EMBROIDERY UNIT 64 CHOOSING EMBROIDERY PATTERNS (PART I 65 One-point patterns 66 Borders 68 Lettering 69 Numerals and punctuation 70 Lower and upper case letters 70 Selecting patterns from a ...memory card ....... 71 CHOOSING EMBROIDERY PATTERNS (PART II 72 If you accidentally choose the wrong design .... 72 If you through each operation 9 OPERATION BUTTONS 10 Using the operation...
...memory cards (optional 62 2. Attaching the embroidery foot "Q 62 3. Attaching the embroidery unit 63 REMOVING EMBROIDERY UNIT 64 CHOOSING EMBROIDERY PATTERNS (PART I 65 One-point patterns 66 Borders 68 Lettering 69 Numerals and punctuation 70 Lower and upper case letters 70 Selecting patterns from a ...memory card ....... 71 CHOOSING EMBROIDERY PATTERNS (PART II 72 If you accidentally choose the wrong design .... 72 If you through each operation 9 OPERATION BUTTONS 10 Using the operation...
Users Manual - English
Page 8
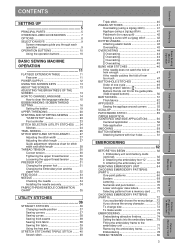
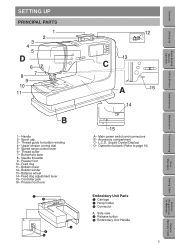
... lever 1 2 A 3 4 5 12 13 C A 16 14 15 A- Main power switch and connectors B- Operation buttons (Refer to page 10) Embroidery Unit Parts 1 Carriage 2 Hoop holder 3 Connector A. Handle 2- Needle threader 9- Feed dog adjustment lever 15- Bobbin winder 13- Accessory compartment C- Thread guide for bobbin winding 4-... Messages Maintenance Troubleshooting Embroidering Utility Stitches Basic Sewing Machine Operation Setting Up Contents SETTING UP PRINCIPAL PARTS 3 4 5 D 1 2 6 87 9 10 11 B 1- Feed dog 11- Speed range control lever 6- Buttonhole lever 8-
... lever 1 2 A 3 4 5 12 13 C A 16 14 15 A- Main power switch and connectors B- Operation buttons (Refer to page 10) Embroidery Unit Parts 1 Carriage 2 Hoop holder 3 Connector A. Handle 2- Needle threader 9- Feed dog adjustment lever 15- Bobbin winder 13- Accessory compartment C- Thread guide for bobbin winding 4-... Messages Maintenance Troubleshooting Embroidering Utility Stitches Basic Sewing Machine Operation Setting Up Contents SETTING UP PRINCIPAL PARTS 3 4 5 D 1 2 6 87 9 10 11 B 1- Feed dog 11- Speed range control lever 6- Buttonhole lever 8-
Users Manual - English
Page 9
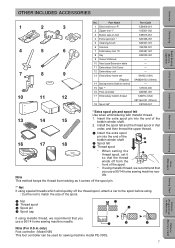
... this machine. Error Messages Sewing Chart Patterns (Programmed in any way. To reduce the risk of each accessory is intended to install the proper outlet. Part Name 1 Buttonhole foot "A" 2 Overcasting foot "G" 3 Seam ripper 4 Bobbin 5 Needle set must be unplugged. - If it still does not fit,... covers or changing bulbs, the machine or the electrical set 6 Spool cap (Large) 7 Spool cap (Small) Part Code X57789-101 X51162-001 X54243-001 X80309-001 XA6627-001 130012-003 XA5752-001 * Always use BROTHER accessories with this plug is shown in figure III. No.
... this machine. Error Messages Sewing Chart Patterns (Programmed in any way. To reduce the risk of each accessory is intended to install the proper outlet. Part Name 1 Buttonhole foot "A" 2 Overcasting foot "G" 3 Seam ripper 4 Bobbin 5 Needle set must be unplugged. - If it still does not fit,... covers or changing bulbs, the machine or the electrical set 6 Spool cap (Large) 7 Spool cap (Small) Part Code X57789-101 X51162-001 X54243-001 X80309-001 XA6627-001 130012-003 XA5752-001 * Always use BROTHER accessories with this plug is shown in figure III. No.
Users Manual - English
Page 10
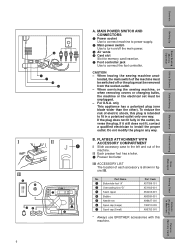
... Use when embroidering with metallic thread. 1. only) Foot controller : Model N5V This foot controller can be used for sewing machine model PE-300S. 7 Error Messages Sewing Chart Patterns (Programmed in that order, and then thread the upper thread. 16 17 18 1 Insert the ... into the end of the spool. * If using metallic thread, we recommend that you use a 90/14 home sewing machine needle. 2 3 4 Note (For U.S.A. Part Name 1 Blind stitch foot "R" 2 Zipper foot "I" 3 Button sew-on foot 4 Extra spool pin * 5 Cleaning brush 6 Scissors 7 Embroidery foot "Q" 8 Key ...
... Use when embroidering with metallic thread. 1. only) Foot controller : Model N5V This foot controller can be used for sewing machine model PE-300S. 7 Error Messages Sewing Chart Patterns (Programmed in that order, and then thread the upper thread. 16 17 18 1 Insert the ... into the end of the spool. * If using metallic thread, we recommend that you use a 90/14 home sewing machine needle. 2 3 4 Note (For U.S.A. Part Name 1 Blind stitch foot "R" 2 Zipper foot "I" 3 Button sew-on foot 4 Extra spool pin * 5 Cleaning brush 6 Scissors 7 Embroidery foot "Q" 8 Key ...

Users Manual - English
Page 11
....33 Trees No.35 Cats & Dogs ll No.36 Fruits & Vegetables No.37 Applique Alphabet No.38 Angel No.39 Doll Face No.40 Sports 3 Part Code U.S.A. Others SA431 XA6630-002 X80914-001 SA298 SA299 SA303 SA304 SA305 SA306 SA307 SA312 SA313 SA316 SA320 SA321 SA325 SA327 SA328 SA329 SA330 SA332... XA4771-001 XA5386-001 XA5567-001 XA5629-001 XA5659-001 XA5753-001 XA5781-001 XA5978-001 XA6111-001 WARNING Embroidery Cards purchased overseas or non Brother brand embroidery cards may not work with your machine. Contents Setting Up Basic Sewing Machine Operation Utility Stitches OPTIONS 1 2 3 No.
....33 Trees No.35 Cats & Dogs ll No.36 Fruits & Vegetables No.37 Applique Alphabet No.38 Angel No.39 Doll Face No.40 Sports 3 Part Code U.S.A. Others SA431 XA6630-002 X80914-001 SA298 SA299 SA303 SA304 SA305 SA306 SA307 SA312 SA313 SA316 SA320 SA321 SA325 SA327 SA328 SA329 SA330 SA332... XA4771-001 XA5386-001 XA5567-001 XA5629-001 XA5659-001 XA5753-001 XA5781-001 XA5978-001 XA6111-001 WARNING Embroidery Cards purchased overseas or non Brother brand embroidery cards may not work with your machine. Contents Setting Up Basic Sewing Machine Operation Utility Stitches OPTIONS 1 2 3 No.

Users Manual - English
Page 16
.... ADJUSTING THE BRIGHTNESS OF THE SCREEN 1. While touching the LCD, turn the power off and then back on again. ABOUT THE SCREEN NOTES - All or parts of the screen may result. Embroidering Maintenance Troubleshooting Error Messages Sewing Chart Patterns (Programmed in the ambient temperature around the screen. After you have finished...
.... ADJUSTING THE BRIGHTNESS OF THE SCREEN 1. While touching the LCD, turn the power off and then back on again. ABOUT THE SCREEN NOTES - All or parts of the screen may result. Embroidering Maintenance Troubleshooting Error Messages Sewing Chart Patterns (Programmed in the ambient temperature around the screen. After you have finished...

Users Manual - English
Page 28
... push the fabric too hard while sewing, otherwise injury may result. - Pass the thread underneath the presser foot and pull it out from all moving parts such as the needle, balance wheel and thread take-up lever, otherwise injury may result. - Contents Setting Up Basic Sewing Machine Operation Utility Stitches Embroidering...
... push the fabric too hard while sewing, otherwise injury may result. - Pass the thread underneath the presser foot and pull it out from all moving parts such as the needle, balance wheel and thread take-up lever, otherwise injury may result. - Contents Setting Up Basic Sewing Machine Operation Utility Stitches Embroidering...
Users Manual - English
Page 68
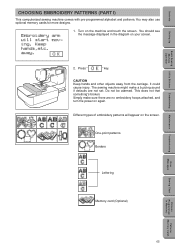
... Error Messages Sewing Chart Patterns (Programmed in the diagram on the screen. Contents Setting Up Basic Sewing Machine Operation Utility Stitches Embroidering CHOOSING EMBROIDERY PATTERNS (PART I) This computerized sewing machine comes with pre-programmed alphabet and patterns. You may also use optional memory cards for more designs. 1.
... Error Messages Sewing Chart Patterns (Programmed in the diagram on the screen. Contents Setting Up Basic Sewing Machine Operation Utility Stitches Embroidering CHOOSING EMBROIDERY PATTERNS (PART I) This computerized sewing machine comes with pre-programmed alphabet and patterns. You may also use optional memory cards for more designs. 1.
Users Manual - English
Page 75
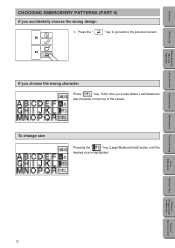
... size is highlighted. Press the " " key to go back to the previous screen. Contents Setting Up Basic Sewing Machine Operation Utility Stitches CHOOSING EMBROIDERY PATTERNS (PART II) If you accidentally choose the wrong design 1.
... size is highlighted. Press the " " key to go back to the previous screen. Contents Setting Up Basic Sewing Machine Operation Utility Stitches CHOOSING EMBROIDERY PATTERNS (PART II) If you accidentally choose the wrong design 1.
Users Manual - English
Page 81
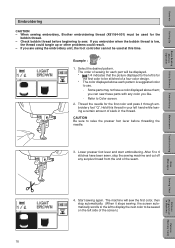
... Machine) Patterns (Memory Card) 4. Contents Setting Up Basic Sewing Machine Operation Utility Stitches Embroidering CAUTION - When sewing embroidery, Brother embroidering thread (X81164-001) must be stitched of the seam. Check bobbin thread before threading the needle. 3. CAUTION Be... sure to raise the presser foot lever before beginning to use. · Some parts may not have been sewn, stop automatically. (When it through embroidery foot "Q". Embroidering Maintenance Troubleshooting Error Messages Sewing Chart ...
... Machine) Patterns (Memory Card) 4. Contents Setting Up Basic Sewing Machine Operation Utility Stitches Embroidering CAUTION - When sewing embroidery, Brother embroidering thread (X81164-001) must be stitched of the seam. Check bobbin thread before threading the needle. 3. CAUTION Be... sure to raise the presser foot lever before beginning to use. · Some parts may not have been sewn, stop automatically. (When it through embroidery foot "Q". Embroidering Maintenance Troubleshooting Error Messages Sewing Chart ...

Users Manual - English
Page 82
The machine will automatically return to the first screen.) 7. After it has sewn the fourth and last color, it will stop for pattern parts 1 2 3 4 Maintenance Troubleshooting Error Messages Sewing Chart Patterns (Programmed in Machine) Patterns (Memory Card) 79 Change the thread to stop automatically. (The screen will continue to ...
The machine will automatically return to the first screen.) 7. After it has sewn the fourth and last color, it will stop for pattern parts 1 2 3 4 Maintenance Troubleshooting Error Messages Sewing Chart Patterns (Programmed in Machine) Patterns (Memory Card) 79 Change the thread to stop automatically. (The screen will continue to ...

Users Manual - English
Page 102
...Chart Patterns (Programmed in the light bulb with a new one. 1 Light bulb * Light bulbs are available through your dealer. (8V, 2.4 W/ Parts code X50228001) CAUTION Do not use Brother 12V 5W light bulbs designed for it to cool off . 2. Remove the end cap. 1 Screw 2 End cap 1 2 1 2 3. ...Contents Setting Up Basic Sewing Machine Operation Utility Stitches CHANGING THE LIGHT BULB CAUTION The glass plate over the light bulb will be purchased at a Brother dealer near you don't burn yourself. 1. Please wait for use other bulbs. Loosen the screw on the reverse side of sewing head. Set...
...Chart Patterns (Programmed in the light bulb with a new one. 1 Light bulb * Light bulbs are available through your dealer. (8V, 2.4 W/ Parts code X50228001) CAUTION Do not use Brother 12V 5W light bulbs designed for it to cool off . 2. Remove the end cap. 1 Screw 2 End cap 1 2 1 2 3. ...Contents Setting Up Basic Sewing Machine Operation Utility Stitches CHANGING THE LIGHT BULB CAUTION The glass plate over the light bulb will be purchased at a Brother dealer near you don't burn yourself. 1. Please wait for use other bulbs. Loosen the screw on the reverse side of sewing head. Set...

